VOOZH about

URL: https://www.tecmint.com/centos-7-installation/

⇱ Installation of “CentOS 7.0″ with Screenshots


Skip to content

This tutorial will guide you on how to perform a minimal installation of latest version of CentOS 7.0, using the binary DVD ISO image, an installation that is best suitable for developing a future customizable server platform, with no Graphical User Interface, where you can install only the software that you need.

👁 CentOS 7 Installation
Installation of CentOS 7

If you want to find out more about what’s new in this release of CentOS 7.0 holds and download links, I suggest reading the previous article on release announcements:

  1. CentOS 7.0 Features and Download ISO Images

Requirements

  1. CentOS 7.0 DVD ISO

CentOS 7.0 Installation Process

1. After downloading the last version of CentOS using above links or using official CentOS download page. Burn it to a DVD or create a bootable USB stick using LiveUSB Creator called Unetbootin.

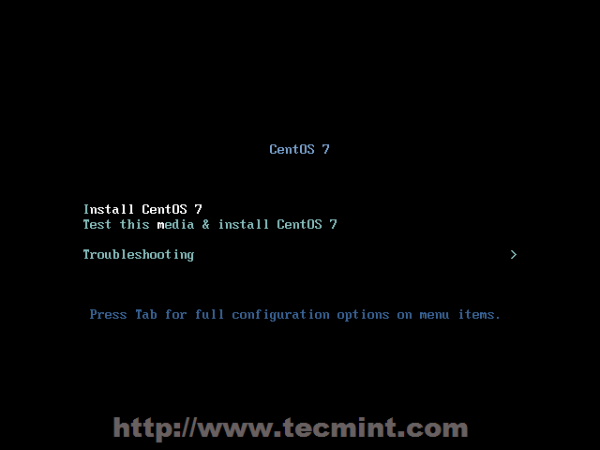
2. After you have created the installer bootable media, place your DVD/USB into your system appropriate drive, start the computer, select your bootable unit and the first CentOS 7 prompt should appear. At the prompt choose Install CentOS 7 and press [Enter] key.

👁 Install CentOS 7
CentOS 7 Boot Menu

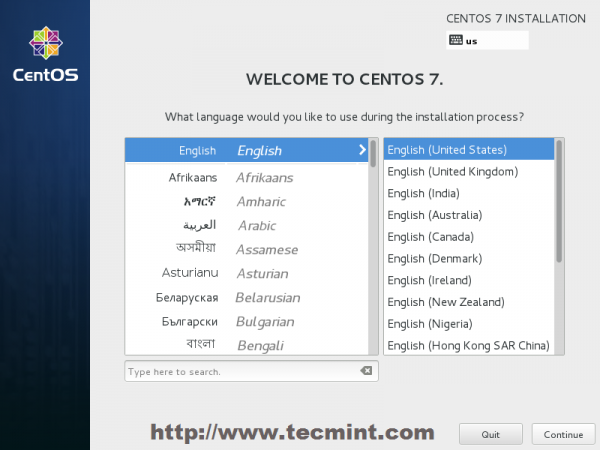
3. The system will start loading media installer and a Welcome screen should appear. Select your Installation Process Language, that will assist you through the entire installation procedure and click on Continue.

👁 CentOS 7 Booting
CentOS Installer Loading
👁 Select Installation Process Language
Select Installation Process Language

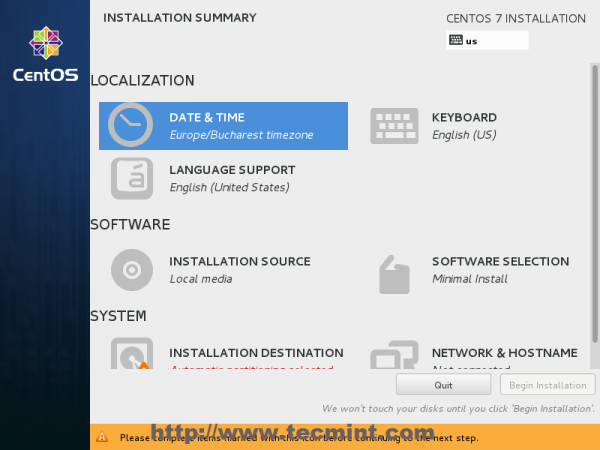
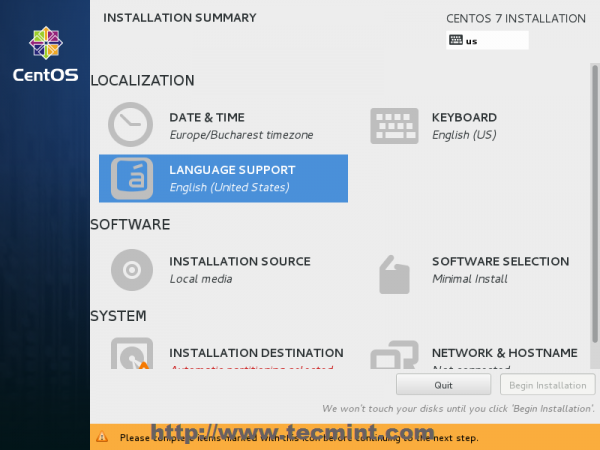
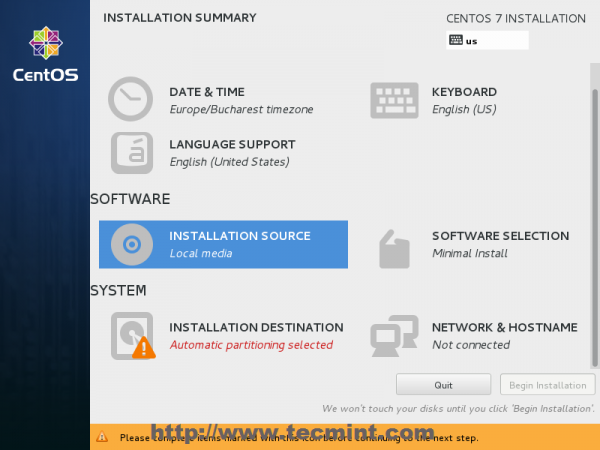
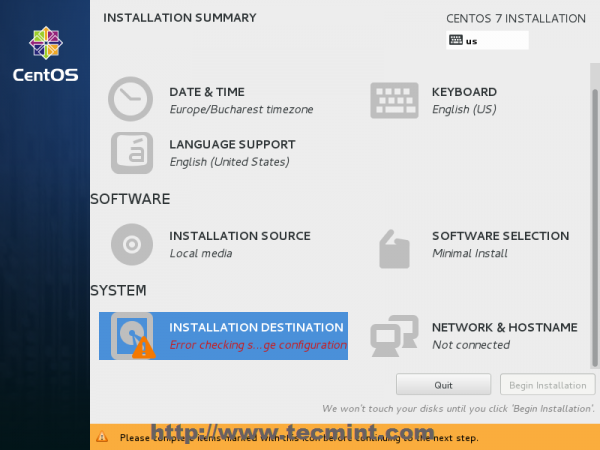
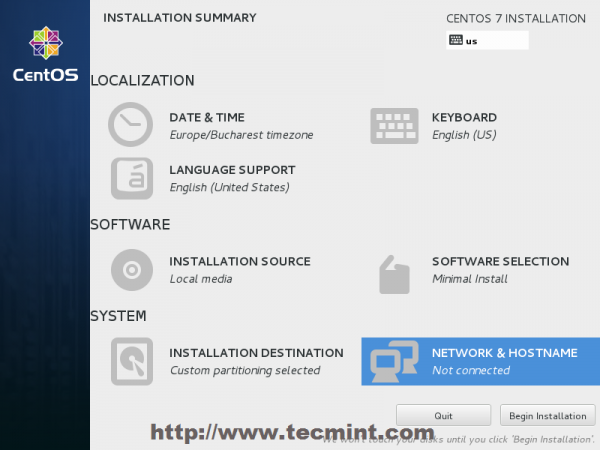
4. The next step, present screen prompt is Installation Summary. It contains a lot of options to fully customize your system. First thing you may want to setup is your time settings. Click on Date & Time and select your server physical location from the provided map and hit on upper Done button to apply configuration.

👁 Select Date & Time and Location
Select Date & Time and Location

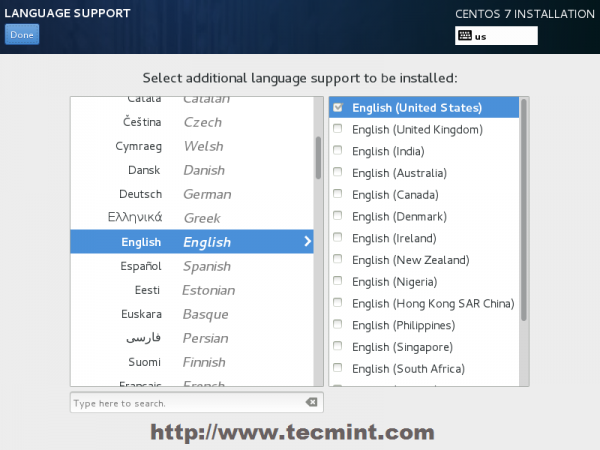
5. The next step is to choose your Language Support and Keyboard settings. Choose your main and extra language for your system and when you’re finished hit on Done button.

👁 Select Language and Keyboard
Select Language and Keyboard
👁 Select English Language
Select English Language

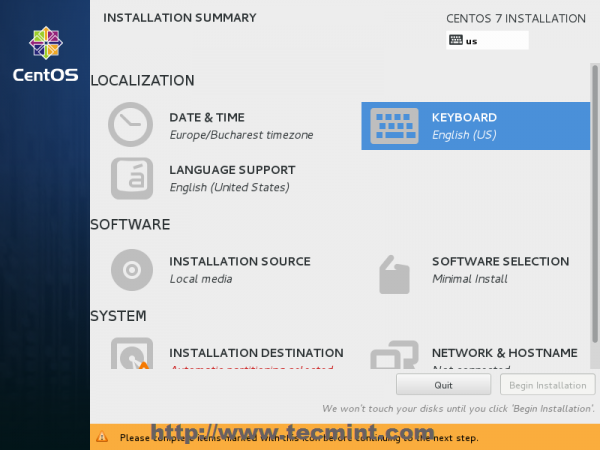
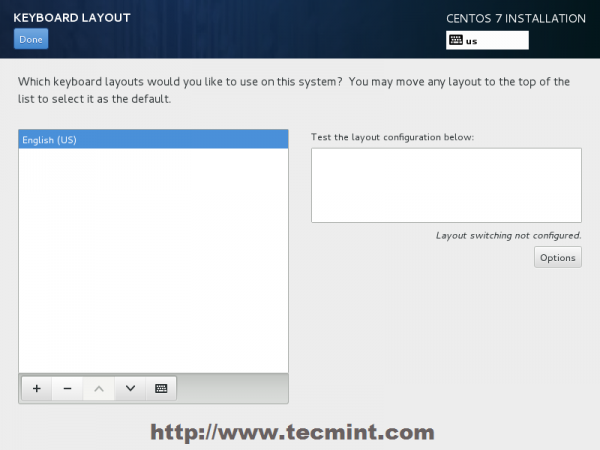
6. The same way choose your Keyboard Layout by hitting the plus button and test your keyboard configuration using the right input filed. After you finish setting up your keyboard, again hit on upper Done button to apply changes and go back to main screen on Installation Summary.

👁 Choose Keyboard Layout
Choose Keyboard Layout
👁 Choose English Keyboard
Choose English Keyboard

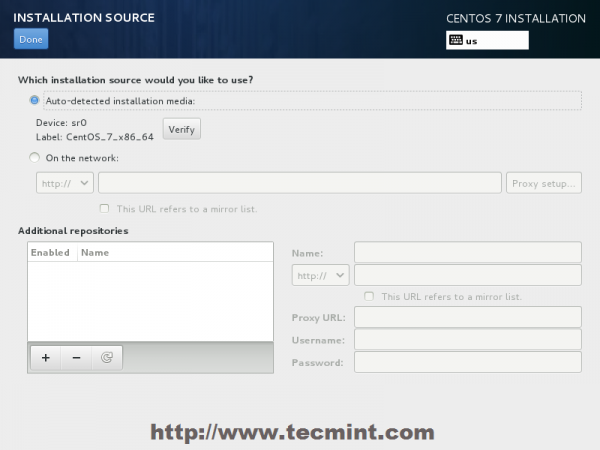
7. On the next step you can customize your installation by using other Installation Sources than your local DVD/USB media, such as a network locations using HTTP, HTTPS, FTP or NFS protocols and even add some additional repositories, but use this methods only if you know what you’re doing. So leave the default Auto-detected installation media and hit on Done to continue.

👁 Choose Installation Sources
Choose Installation Sources
👁 Auto Detect Installation Type
Auto Detect Installation Type

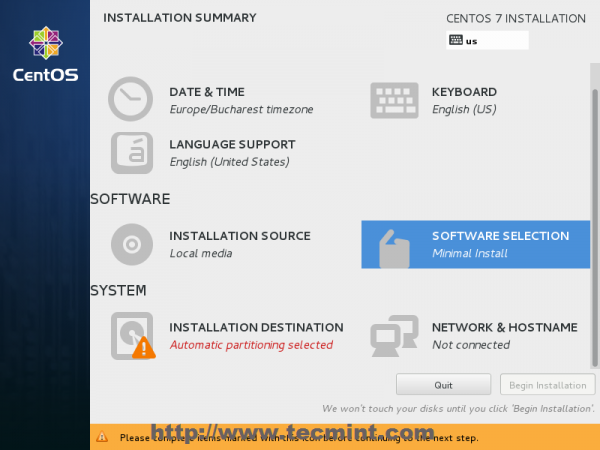
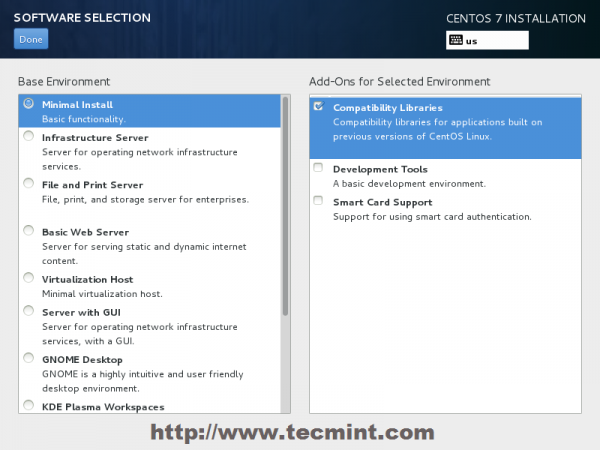
8. On the next step you can choose your system installation software. On this step CentOS offers a lot of Server and Desktop platform environments that you choose from, but, if you want a high degree of customization, especially if you are going to use CentOS 7 to run as a server platform, then I suggest you select Minimal Install with Compatibility Libraries as Add-ons, which will install a minimal basic system software and later you can add other packages as your needs require using yum groupinstall command.

👁 Software Selection
Software Selection
👁 Select CentOS 7 Minimal Install
Select CentOS 7 Minimal Install

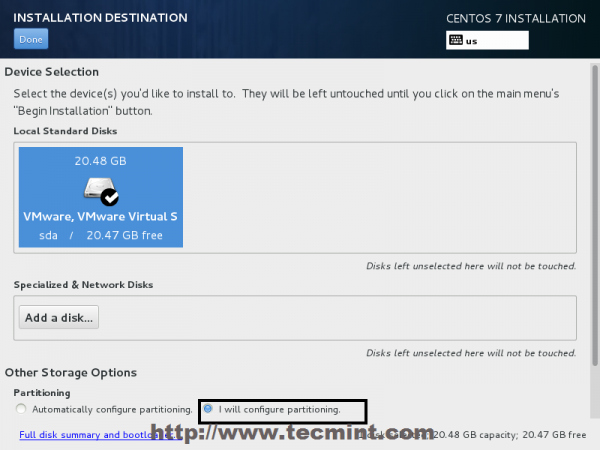
9. Now it’s time to partition your hard-drive. Click on Installation Destination menu, select your disk and choose I will configure partitioning.

👁 Choose Installation Destination
Choose Installation Destination
👁 Installation Device Selection
Installation Device Selection

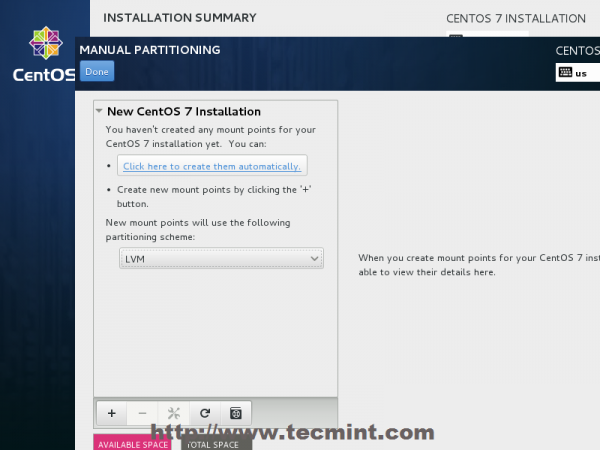
10. On the next screen, choose LVM (Logical Volume Manager) as partition layout and, then, click on Click here to create them automatically, option which will create three system partition using XFS filesystem, automatically redistributing your hard-disk space and gathering all LVS into one big Volume Group named centos.

  1. /boot – Non LVM
  2. /(root) – LVM
  3. Swap – LVM
👁 Select LVM Partition Type
Select LVM Partition Type
👁 Create Partitions
Create Partitions

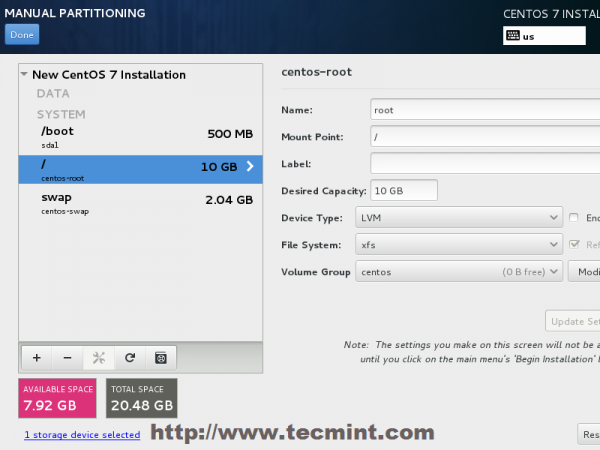
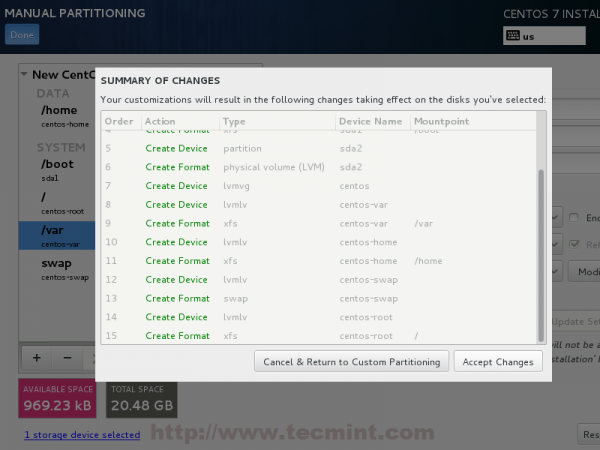
11. If you are not pleased with the default partition layout done automatically by the installer you can completely add, modify or resize your partition scheme and when you finish hit on Done button and Accept Changes on the Summary of Changes prompt.

👁 Summary of Partition Changes
Summary of Partition Changes

NOTE: For those users, who have hard-disks more than 2TB in size, the installer automatically will convert partition table to GPT, but if you wish to use GPT table on smaller disks than 2TB, then you should use the argument inst.gpt to the installer boot command line in order to change the default behaviour.

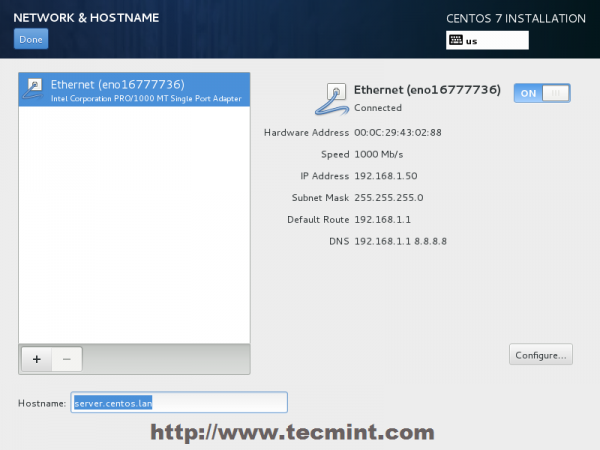
12. The next step is to set your system hostname and enable networking. Click on Network & Hostname label and type your system FQDN (Fully Qualified Domain Name) on Hostname filed, then enable your Network interface, switching the top Ethernet button to ON.

If you have a functional DHCP server on you network then it will automatically configure all your network setting for enabled NIC, which should appear under your active interface.

👁 Set System Hostname
Set System Hostname
👁 Enable Ethernet Interface
Enable Ethernet Interface

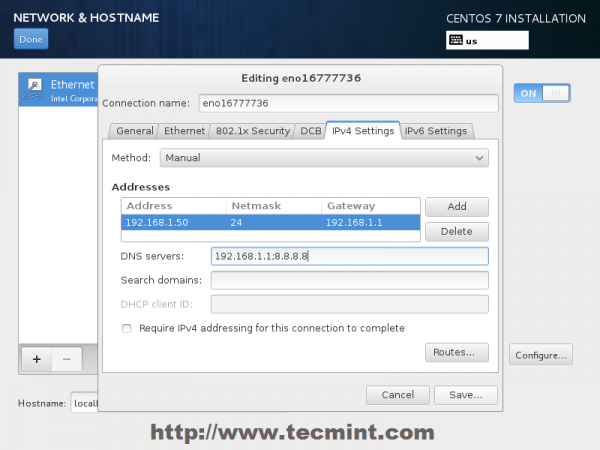
13. If your system will be destined as a server it’s better to set static network configuration on Ethernet NIC by clicking on Configure button and add all your static interface settings like in the screenshot below, and when you’re finished hit on Save button, disable and enable Ethernet card by switching the button to OFF and ON, and, then hit on Done to apply setting and go back to main menu.

👁 Enter Network Settings
Enter Network Settings

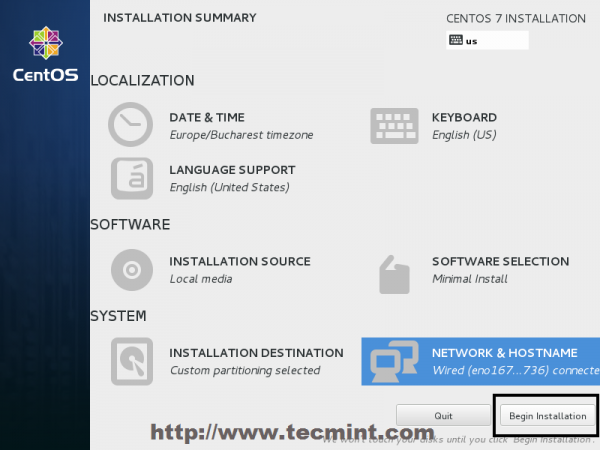
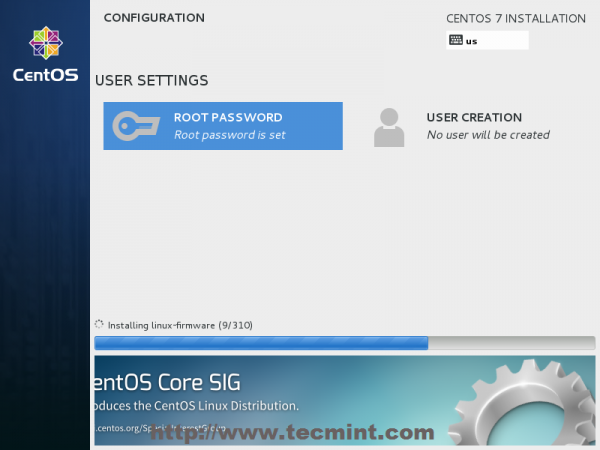
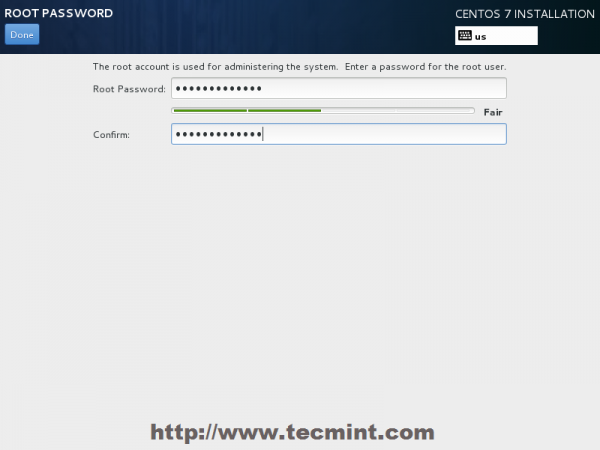
14. Now it’s time to start installation process by pressing on Begin Installation button and set up a strong password for root account.

👁 Click on Begin Installation
Click on Begin Installation
👁 CentOS 7 Root Password
Select Root Password
👁 Set Root Password in CentOS 7
Enter Root Password

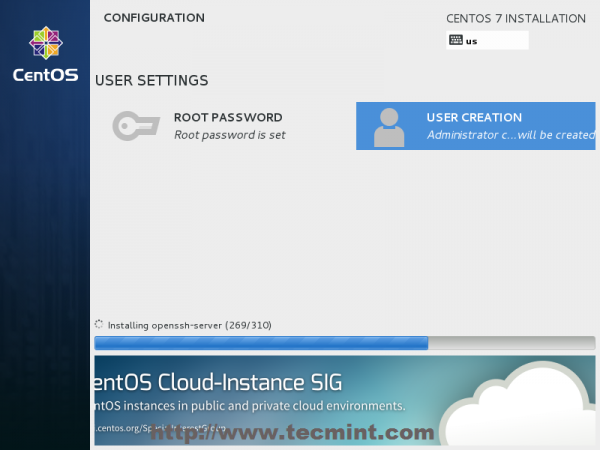
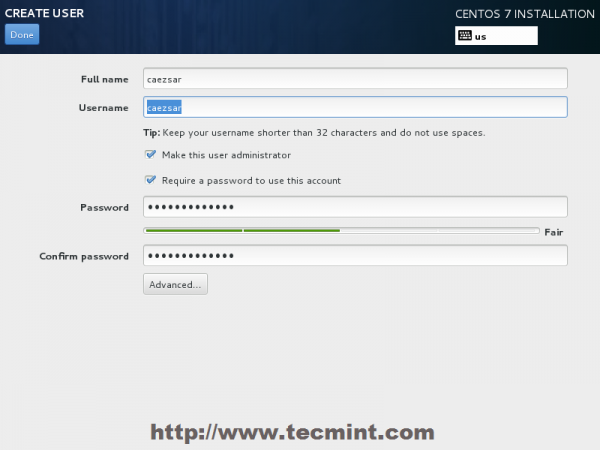
15. After you finish setting up a strong password for root account move to User Creation and create your first system user. You can designate this user to become a System Admin with root privileges using sudo command by checking the box Make this user administrator, then click on Done to go back on main menu and wait for the installation process to finish.

👁 CentOS 7 Installation Process
CentOS 7 Installation Process
👁 User Creation and Set Password
User Creation and Set Password

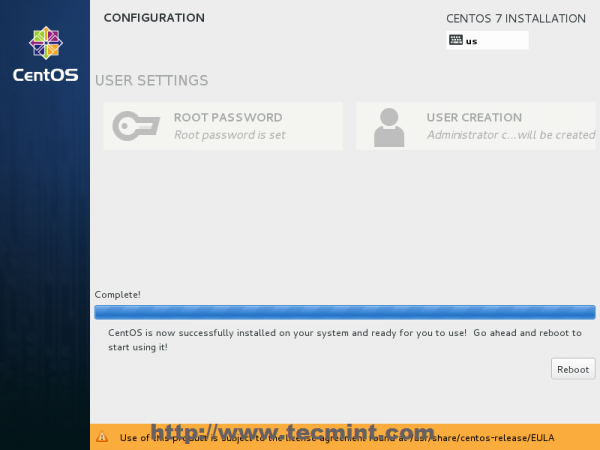
16. After the installation process finishes, the installer will show a successfully message on screen, demanding to reboot your system in order to use it.

👁 CentOS 7 Installation Complete
CentOS 7 Installation Complete

Congratulation! You have now installed last version of CentOS on your bare new machine. Remove any installation media and reboot your computer so you can login to your new minimal CentOS 7 environment and perform other system tasks, such as update you system and install other useful software needed to run day to day tasks.

If this article helped, share it with someone on your team.
TecMint Weekly Newsletter
Get the Learn Linux 7 Days Crash Course free when you join 34,000+ Linux professionals reading every Thursday.
Check your email for a magic link to get started.
Something went wrong. Please try again.
TecMint has been free for 14 years. Help keep it that way.
Google AI Overviews and tools like ChatGPT have cut into search traffic for independent tech sites like TecMint. Running this site costs over $2,000 every month for hosting, infrastructure, and paying authors to keep the content accurate and tested.

If this article helped you solve a problem, consider buying a coffee. It helps keep TecMint free, supports the authors, and keeps the project going.
☕ Buy Me a Coffee
Matei Cezar
I'am a computer addicted guy, a fan of open source and linux based system software, have about 4 years experience with Linux distributions desktop, servers and bash scripting.

Each tutorial at TecMint is created by a team of experienced Linux system administrators so that it meets our high-quality standards.

99 Comments

Leave a Reply
  1. I just see the message “press the enter key to begin the installation process“. I press Enter and nothing happens.

    I have downloaded Centos 7 from https://mirror.yandex.ru/centos/7.9.2009/isos/x86_64/.

    Reply
    • @Dmitry,

      CentOS 7 is old, why not go for Rocky or AlmaLiux 9?

      Reply
  2. /			20 GB 
    /usr			2GB
    /tmp		500 MB
    /var			384 MB
    /home		100 MB
    /boot		500 MB
    swap		4GB (RAM size: 4GB)
    

    Can i go through above partitions size for creating my own VM for learning linux.

    Please help to suggest.

    Reply
    • @Prafulla,

      Better create only one partition / with 30GB or 40GB.

      Reply
      • Ok, I will do it and if any issue then I will let you know.

        Reply
  3. Thank you I followed the all above steps and successfully able to install Centos 7 in my older laptop.

    Reply
  4. I created a Centos VM:

    Filesystem Size Used Avail Use% Mounted on
    /dev/mapper/centos-root 9.4G 3.4G 6.0G 37% /
    devtmpfs 895M 0 895M 0% /dev
    tmpfs 911M 0 911M 0% /dev/shm
    tmpfs 911M 11M 901M 2% /run
    tmpfs 911M 0 911M 0% /sys/fs/cgroup
    /dev/mapper/centos-home 953M 953M 652K 100% /home
    /dev/sda1 497M 163M 335M 33% /boot
    tmpfs 183M 60K 183M 1% /run/user/1000
    

    I would now like to create an FTP server. I am unable to download the iso since there is not enough space in /home. Do I increase the /home or is it possible to download to the /dev/mapper/centos-home?

    Reply
    • @Tar,

      Either free up some space on /home or download ISO in /dev/mapper/centos-root.

      Reply
  5. Thanks, but I want to install it on my PC to try it. I have 2 partitions NTFS I don’t want to delete it.

    Reply
  6. Thank you sir, this tutorial really helped me. First I tried to use unetbootin but failed, then I used RUFUS and it worked. I asked permission to rewrite this tutorial to my blog.

    Reply
    • @Ores,

      That’s great, yes Unetbootin sometimes failed, RUFUS always works. Sorry you can’t re-publish this article on your blog.

      Reply
  7. Install CentOS from UEFI, not Legacy, because Windows is surely installed via UEFI. In Windows cmd with admin privileges run: bcdedit

    Identify CentOS efi partition and run:

    bcdedit /set '{bootmgr}' path \EFI\refind\refind_x64.efi
    

    Adjust path with bcdedit output result.

    Reply
  8. After booting to the usb i get this:

    Minimal BASH-like line editing is supported. For the first word,
    TAB lists possible command completions. Anywhere else TAB lists
    possible device or file completions.
    
    Grub> _
    

    Im not using server grade tech.

    I built a custom pc into a 4u server with the following specs:

    -i7 8700
    -MSI Motherboard
    -Samsung 850 PRO (OS Drive)
    -Samsung 850 EVO (Storage)
    -32GB ddr4 ram
    

    Any idea what my issue is? I have tried installing so many times. I have turned on Legacy and turned off secure boot.
    ive tried a different USB and even a different cpu and mobo. ive installed centos 7 on a usb at least 10 times. ive tried minimal, dvd, and everything. NOTHING works. but i can load windows 10 on it no issue haha. Ideas?

    Reply
    • The CentOS bootable USB must be created using a UEFI supported utility: Rufus in this case does the job

      Reply
  9. I tried the above steps on a bare machine (new and without any OS), but forgot to manually partition my disk (step 10). I wanted to repeat the installation procedure from scratch and boot from my bootable USB again in order to do my own partitioning. However, when I reboot the system and I choose the booting option in BIOS to be from my USB, the system freezes and never proceeds further to save and exit! I have repeated this a few times and the same problem occurs. Any idea why this happens!?

    Reply
  10. I don’t get the expected screen when trying to install CENTOS 7 on a desktop. I created the bootable DVD, changed the boot sequence, installed the DVD, and the bios asked if I wanted to “Install CENTOS 7”, all of which I expected.

    After that I just get:

    "Started Device-Mapper Multipath Device Controller" 
    "Starting Open-iSCSI..." 
    "Started Open-iSCSI."
    "Starting dracut initqueue hook..."
    "Started Show Plymouth Boot Screen."
    "Reached target Paths."
    "Reached target Basic System."
    

    After that… the machine does nothing further. Please help!

    Reply
    • Give more details about machine resources, CPU, RAM, bios/efi , installation type (boos/legacy/efi/csm)

      Reply
  11. What is the command to get GUI after the successful local host login?

    Reply
  12. Thanks a lot admin, I have installed successfully, it’s a very helpful content for newbie

    Reply
  13. I want to setup and configure Zimbra Collaboration Suite in CentOS 7 but I’m confused what CentOS image I will choose if it’s DVD iso, Everything iso or Minimal iso. Please give me the right iso I will download. Thank you.

    Reply
    • @Ken,

      Go with CentOS 7 Minimal ISO images, which is enough to install Zimbra Collaboration Suite in CentOS 7.

      Reply
      • @Ravi thank you for the reply :)

        Reply
  14. @ravi Sir, its recommended to chose minimal or basic web server? i want to build a webserver (LAMP)for my website

    Reply
    • @Clark,

      Choose minimal with basic Web Server installation for CentOS..

      Reply
  15. I want to install Linux in my usb (pendrive), i want to use it live please suggest me how can i use that?

    Reply
    • @Shubham,

      Its simple, during installation drive selection, give your USB drive location..

      Reply
    • Use unbootin to create a bootable USB drive with a live ISO Linux distro (CentOS is not a live linux distro) or Rufus to create bootable live USB for UEFI compatible machines. Instaling directly to a portable USB instead of a fixed Hard Drive will mess things out (MBR stage one bootloader/ GPT) and can render your machine unable to boot.

      Reply
  16. Hi Cezar,

    I will give it a go on a windows 7 a machine. One question though will it create a dual-boot system after following all your steps?

    I have prepared a USB with UNITBOOTIN!

    Will update you on status! :)

    Reply
  17. How do I remove window 7 and install centos?

    Reply
    • Delete all partitions from HDD, repartition and install CentOS.

      Reply
  18. Are you trying to perform the installation directly on laptop or in a virtual machine inside the laptop? Does it throws you any errors whatsoever? what’s you machine resources in terms of RAM, CPU and HDD?

    Reply
  19. Thanks again. Which filesystem is recommended for each partition? The default is XFS but I think EXT 4 is much safer.

    Reply
    • @Armin,

      Yes, go with ext4 filesystem for better safer, faster and stable..

      Reply
  20. What is the recommended partition scheme for a 250GB hard disk to install Plesk? the partitioning section in your tutorial is very short. I don’t know which is the best practice to configure my VPS with 4GB of Ram and 250GB of hard disk space.

    Thank you.

    Reply
    • @Armin,

      This CentOS 7 installation is just an example to setup, you can use any size no matter whatever it be and create x number of partitions.. You can get the recommended size for Plesk from its official site..

      Reply
  21. Thanks for the tutorial. Is this configuration proper for installing Plesk to create a web hosting server?

    Reply
    • @Armin,

      Yes, but Plesk should be installed on newly fresh minimal CentOS 7 installation, I think you should go ahead and install Plesk on same..

      Reply
  22. Hi,
    Very nice tutorial but, I have a problem.
    At the time of partition it shows only 8312 kb left , whereas I have more than 100 GB free.
    Please help me

    Reply
    • @Paath,

      Thanks for finding this article very useful, could you share the screenshot of your partition table? so that we can help you out..

      Reply
  23. under the Network & Hostname i didn’t find any connected card..
    even then i manually input data into ipv4 settings.
    while installation i didn’t find any error but unfortunately after reboot i get only blank screen.
    kindly help me.
    Thanks
    Nadeem

    Reply
    • I had the same problem.
      The solution is to put the Swap partition outside of LVM
      Boot and Swap non LVM

      Reply
  24. The instillation source displays an error when I try to install from USB, everything else seems to work fine. I used the Fedora USB creator with the DVD1 ISO. Any help greatly appreciated.

    Reply
    • What kind of error it displays you? Is your machine UEFI based? In any case use Rufus to create a bootable USB stick UEFI compatible or if you want to do Legay Mode use Universal USB Installer tool from pendrivelinux.com website.

      Reply
  25. @sgr1 @harsh: Centos 7 requires minimum 1Gb RAM to run! The installation runs smoothly with aprox 2GB of RAM!

    Reply
  26. Hi
    Thanks for studying, Complete and usable
    regards

    Reply
  27. My installation keeps crashing after I complete all the setup and hit begin installation. It says “An unknown error has occured” send bug report or quit. I have tried several different CentOS 7 disks and get the same error. Also checked the disk for errors.
    Any suggestions? Can you learn anything from the error report?

    Using the Centos 7 x86_64-Minimal_1503-01 disk.

    Gigabyte GA-965GM-S2 (Intel G965 Chipset)
    Intel Core 2 Duo E6300 1.86GHz / 2MB Cache
    2GB RAM
    2X 160GB SATA HD RAID 1

    Reply
    • Try a different Linux distribution and see if the problem persists? Maybe there’s a hardware problem with your machine!

      Reply
      • Is there a hardware requirements list for CentOS 7?

        Reply
    • I have a problem like you
      of course i want to install CentOs 7 1511 DVD (.iso) on vm ware
      can anybody help me ?

      Reply
      • Go to vmware machine settings and perform the installation based on centOS dvd iso.

        Reply
  28. Hi, very nice tutorial, but I’ve got a problem. My CentOS 7 installation stucks after I hit “Install CenOS 7”. It doesn’t move out of stuck boot window. Please help me regarding this. Thank you !!

    Reply
    • Same here, tried with minimaliste and complete versions, both x64 on a laptop

      Reply
  29. hi! do you have centos 7 for beginners tutorial step by step up to advance thanks!

    Reply
  30. I ve recently installed centos 7 everything went fine I have a doubt how can I access from my other system using browser to this newly configured centos 7 server ip address help me I have more doubt on this category awaiting your reply

    Reply
  31. Dear sir
    Excellent one .Help me lot

    Reply
  32. Very good document, I justed finish installation the centOS 7 by following your doc. Thank you very much!

    Reply
  33. I have installed 64 bit CentOS 7 1503 in pentium i-3 system. CentOS -7 is installed. It is boot for centos 7 and its rescue mode only. In a separate partition there is also Winows 8 (64 bit) in my system. But multi operating system grub is not obtained. More over
    ‘grub-install’ command does not take CentOS 7 (64 bit). How the dual boot system canbe obtained (like windows 8 (64 bit) and CentOS 7).
    Has there any solution? Please inform me the technique for dual boot loader for 64 bit Windows 8 and CentOS 7.
    More over what is command (like ‘grub-install’ in CentOS 6) to install boot loader from rescue mode.

    ASOK MALLICK
    31/05/2015

    Reply
  34. I have noticed that you are using vmware, I have installed centos7 with vmware for many times. However, I just can not access the internet after installation.I am using win8.1 and vmware9.0. I have tried to shutdown firewall, using nat or host-only and bridge method,dhcp or static ip via editing ifcfg-ethxx file. No matter what I tried, it just didn’t work.can you help me?thx,sincerely

    Reply
    • It seems to be a problem with your host system win 8 or VMware. As long as you have internet connection on the host system, vmware should have internet also. check win net interfaces!

      Reply
  35. hi Matei,

    though I haven’t started it yet on the actual hands-on installation but I find your steps on centos very interesting …

    any way, in my entire computer life that I am used of Windows from as far as I can remember starting with Win 95 ..

    as of the moment, I want to venture into learning centos installation. however, I’m a little bit worried that lack of Linux-based experienced will be an obstacle.

    hoping then you can be my mentor specially on the aspects starting from downloading centos installer then to installing it in a new pc, as well, install some of the basic free online programs.

    hoping to hear from you soon using the email address I used on this comment.

    thanks,

    ~aRt

    Reply
  36. How do you turn CENTOS7 online? Seriously, there’s nothing in the FAQ and nothing in the help. Why would it install “offline” out of the box? It is such a stupid waste of time.

    Reply
    • You comment has no meaning to to? What you are referring to?

      Reply
  37. When you installed the system and partitioned the hard-drive, did you realocate the space correctly and leaved the windows NTFS partitions untouched? Also…windows 7 appears on you GRUB menu?Boot into CentOS 7 and verify the /boot/grub2/grub.cfg menuentries for a Windows record. Also…manually mount the windows partitions and try to reinstall the grub with grub2-mkconfig -o /boot/grub2/grub.cfg command.Please supply more info for an appropriate troubleshooting.

    Reply
  38. I installed centos successfully but I am not able to access Windows 7 again on laptop. How can I resolve this?

    Reply
    • LOL you probably lost windows 7 by formatting it… Instead of setting up two partitions you probably overwrote the one using windows 7.

      Reply
  39. Hi guys – am having a slight problem upgrading to centos 7. i have done the installation and configured my eth0 (first Network interface card) how ever, i just cant seem to get it right on the second NIC. Thanks for the help

    Reply
    • @Norman,
      It would be great if you could tell us briefly what exact problem you facing while configuring second NIC..

      Reply
  40. Hi, after I have installed Centos 7 I come to a black screen that states, centos linux 7 (core)
    kernel 3.10.0-123.e17.x86_64 on an x86_64

    Local Host login:

    I login, but I am still on the command line not in the system. Please advise me on how to get to the desktop instead of the command line.

    Thanks
    John

    Reply
    • @John,
      I think during software selection, you might have selected minimum packages for CentOS 7 installation,that’s the reason you landed up with terminal..no worries just follow the below article to install desktop on CentOS 7..

      https://www.tecmint.com/install-gui-in-rhel-centos-7/

      Reply
  41. sir , i install centos7 successfully bt after that when i install apache that time i get error like “cannt find a valid baseurl for repo: base/7/x86_64

    Reply
  42. Hey there,

    I have a problem. When I finished installing CentOS 7 as server, one of my NIC not shows up, there’s only 1 interface shown, when I entered IFCONFIG [eth0 & lo]. I have checked on /etc/sysconfig/network-scripts/, but not listed there. What am I supposed to do now?

    thx

    Reply
    • Have you got solution of your problem if yes then kindly tell me , I am suffering from same issue.

      Reply
    • I got solution for this issue through a blog.

      Some of the drivers has been removed from RHEL 7 ‘s Kernel. Install below rpm to solve this issue. it will be available in epel repo.

      kmod-forcedeth-0.64-1.el7.elrepo.x86_64.rpm for Nvidia NIC card.

      kmod-via-rhine-1.5.1-1.el7.elrepo.x86_64.rpm for D-link NIC card.

      I have D-Link NIC card.It worked for me.

      Reply
      • @Pandu,
        Thanks for your tip, hope it will be helpful to others, who are facing such similar issues…

        Reply
  43. @Kristof Bernaert: I’m pretty sure that the default firewalld service policy is blocking your incoming connections to port 80 for apache web server, but i knew that ssh port is open by default. So…if you have phisical access to the server add rules for ssh & apache using below commands and start ssh server:

    sudo systemctl start httpd
    firewall-cmd –ad-service=ssh –permanent
    firewall-cmd –ad-port=80/tcp –permanent
    firewall-cmd –reload

    Hope this resolves you problem.

    Reply
  44. No /home partition where will my ruleaza be?

    Reply
  45. how to make a manual partition in centos 7 .i am did process its not showing the screen

    Reply
  46. Hi, thanks for the run-through, but how can I do this installation using a kickstart file on the usb disk?
    i have tried setting it up in the following way but it doesn’t appear to work:
    Copied ISO to flash, made flash bootable with Universal USB installer and pointed the menu to my kickstart file. Installation starts but then it fails with the message:
    /dev/root does not exist.

    Reply
  47. Need info to get a GUI Login screen.
    I am using Centos 7 on Oracle VM Virtualbox.
    I am getting a CLI login… need to go to GUI… Guide me how to…???

    Reply
  48. Hi,

    In the “installation summary” the default choice for “Software selection” is “minimal install”.
    A “Minimal install” is a tiny core system only. In fact you need to click on “Software Selection” and chose a point including a GUI.

    Reply
  49. Hi, Iam begiiner and i’ve installed this centos7, but it can not going to GUI just like centos 6.5
    it’s just local host login and then just prompt just like dos prompt
    any idea?
    thanks all

    Reply
  50. Hello,
    I am a new linux user.Sorry,my English is not very well.
    I have successfully installed CentOS7 X64 in my notebook,but it can’t play media.
    I’ve tried installing mplayer with rpm,but it had no sounds.
    I’ve tried installing it with yum,but the system prompted lack of libary file.
    I enen have tried install ffmpeg with rpm,but I failed again.
    How should I do to solve this problem?

    Reply
  51. Why when I have installed the Centos 7 finished but I couldn’t see the Desktop?

    Reply
  52. super, just install successful my CentOS 7 according this post.

    Reply
  53. Could you do an automatic install CentOS 7 minimal with kickstart?

    Reply
  54. @sachin: Try add resolution=1366×768 ( use your resolution values) parameter to DVD boot by pressing TAB or Escape key on first prompt.

    Reply
  55. The installation screen is not coming in full size. Is it there some resolution problem.

    Reply
  56. hello all ! Does anyone know how to install rdesktop on centos 7 ??

    regards
    Tony

    Reply
      • Loaded plugins: fastestmirror, langpacks
        Loading mirror speeds from cached hostfile
        * base: centos.mirrors.hoobly.com
        * extras: mirror.oss.ou.edu
        * updates: mirrors.advancedhosters.com
        No package rdesktop available.

        Did you even try it on CentOS 7 before you gave the link and info?

        Reply
        • Dear Matt Davis,

          I think your internet conncetion through Proxy.

          Please set the proxy IP and reboot the system and try again.

          I hope this will help you.

          Thanks,
          Bhavesh

          Reply
  57. Thanks, nice work (y). i will try this distro soon.

    Reply

Got Something to Say? Join the Discussion... Cancel reply

Free Course
Get a free Linux course before you go.
Subscribe to TecMint Weekly and get the Learn Linux 7 Days Crash Course free. Read by 34,000+ Linux professionals every Thursday.
Check your email for a magic link to get started.