
Synthetic Image generation is the creation of artificially generated images that look as realistic as real images. These images can be created by Generation Adversarial Networks(GAN) which use a generator-discriminator architecture to train, generate and rate synthetic images that create a creation-feedback loop that runs multiple times until the generated synthetic image can fool the discriminator enough to be considered a real image. Another way to create synthetic images would be with Variational Autoencoders, and more recently, Vector Quantized Variational Autoencoders (VQ-VAE), which create a discrete latent representation and create more variety of images and is easier to train compared to GANs.
What if images can be generated by simply typing a short description of the image? That’s now possible with the advancement in GANs and Variational Autoencoders. In this article, we will look at several such architectures and models that can make this possible.
Impact of Synthetic Image Generation
Synthetic Image Generation can have varying impacts depending on how it’s used. It can be utilized in several machine learning business problems as well as help solve the scarcity of real data.
Pros of Synthetic Image Generation
- Synthetic Image generation can solve the business problem of scarcity or unavailability of image data by creating synthetic image data.
- Text to image generation can be used in conversational chatbots to generate contextual images based on user input.
- Synthetic images can be utilized to train ML models where the existing real image data does not have much variety. Synthetic images can be generated to add more variation to the existing image dataset before training the model.
- Text to image generation can be sued for search engines to create copyright-free images on the go as well as create synthetic images when there are limited search results.
Cons of Synthetic Image Generation
- Synthetic Image Generation can be used to create fake doctored images that can deceive the public.
- Synthetic Images, if not trained and generated with good accuracy and realism, can reduce the quality of the existing image dataset instead of improving it.
Text to Image Generation
Several types of architectures and models can be trained to generate synthetic images based on a string of text data. We will look at some of these in detail below.
DALL-E
DALL-E is a neural network created by OpenAI which is trained on image-text pairs with 12 billion parameters and can generate synthetic images from any text description. It is capable of various types of image generation aspects like animals and objects with their anthropomorphic versions, transforming and adding variety to images, and can also combine several aspects and details of images that are not related in a plausible manner.
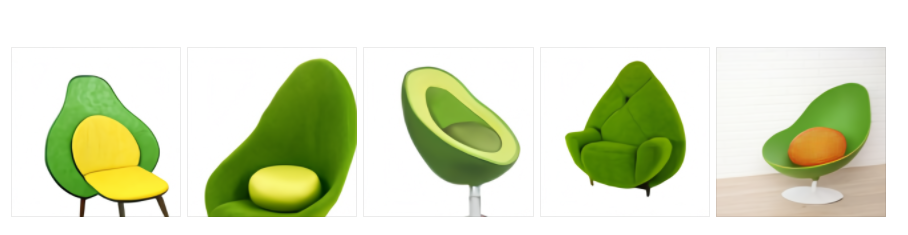
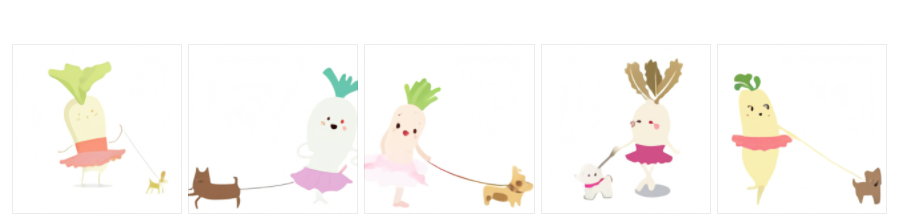
Some examples of images generated by DALL-E:
An armchair in the shape of an avocado
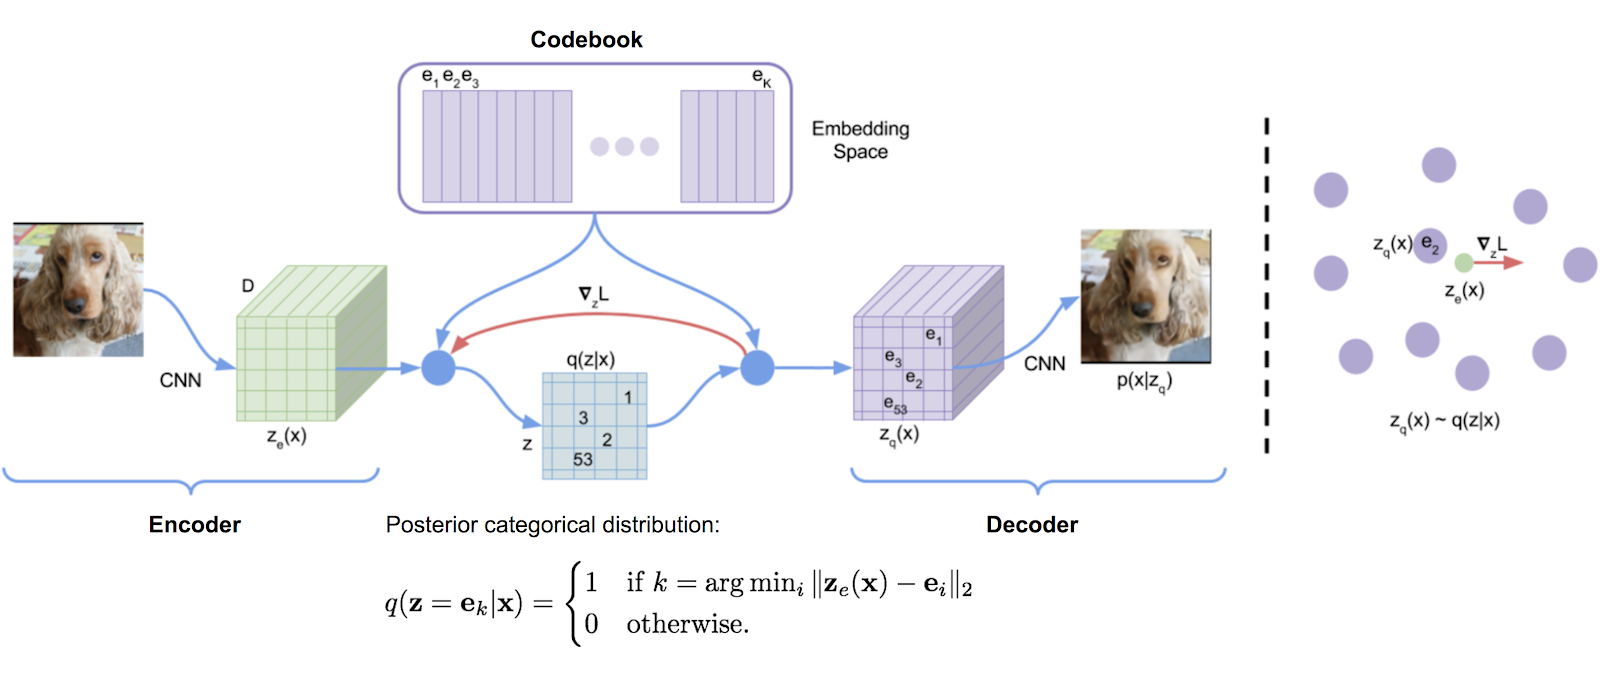
DALL-E architecture is based on Vector Quantized Variational Autoencoder (VQ-VAE) that uses vector quantization to obtain a discrete latent representation. It consists of an encoder-decoder architecture and compared to standard autoencoders, VQ-VAE adds a discrete codebook component to the network. The codebook is a list of vectors associated with a corresponding index used to quantize the bottleneck of the autoencoder. The encoder network output is then obtained and it is then matched with the codebook vectors present, and the nearest vector in Euclidean distance in the codebook is then sent to the decoder.
DALL-E Architecture
Since OpenAI has not released the full details of DALL-E, DALL-E mini can be tested to understand how the model works and also try out a visual interface where you can test input keywords and generate synthetic images.
Text to Image with CLIP
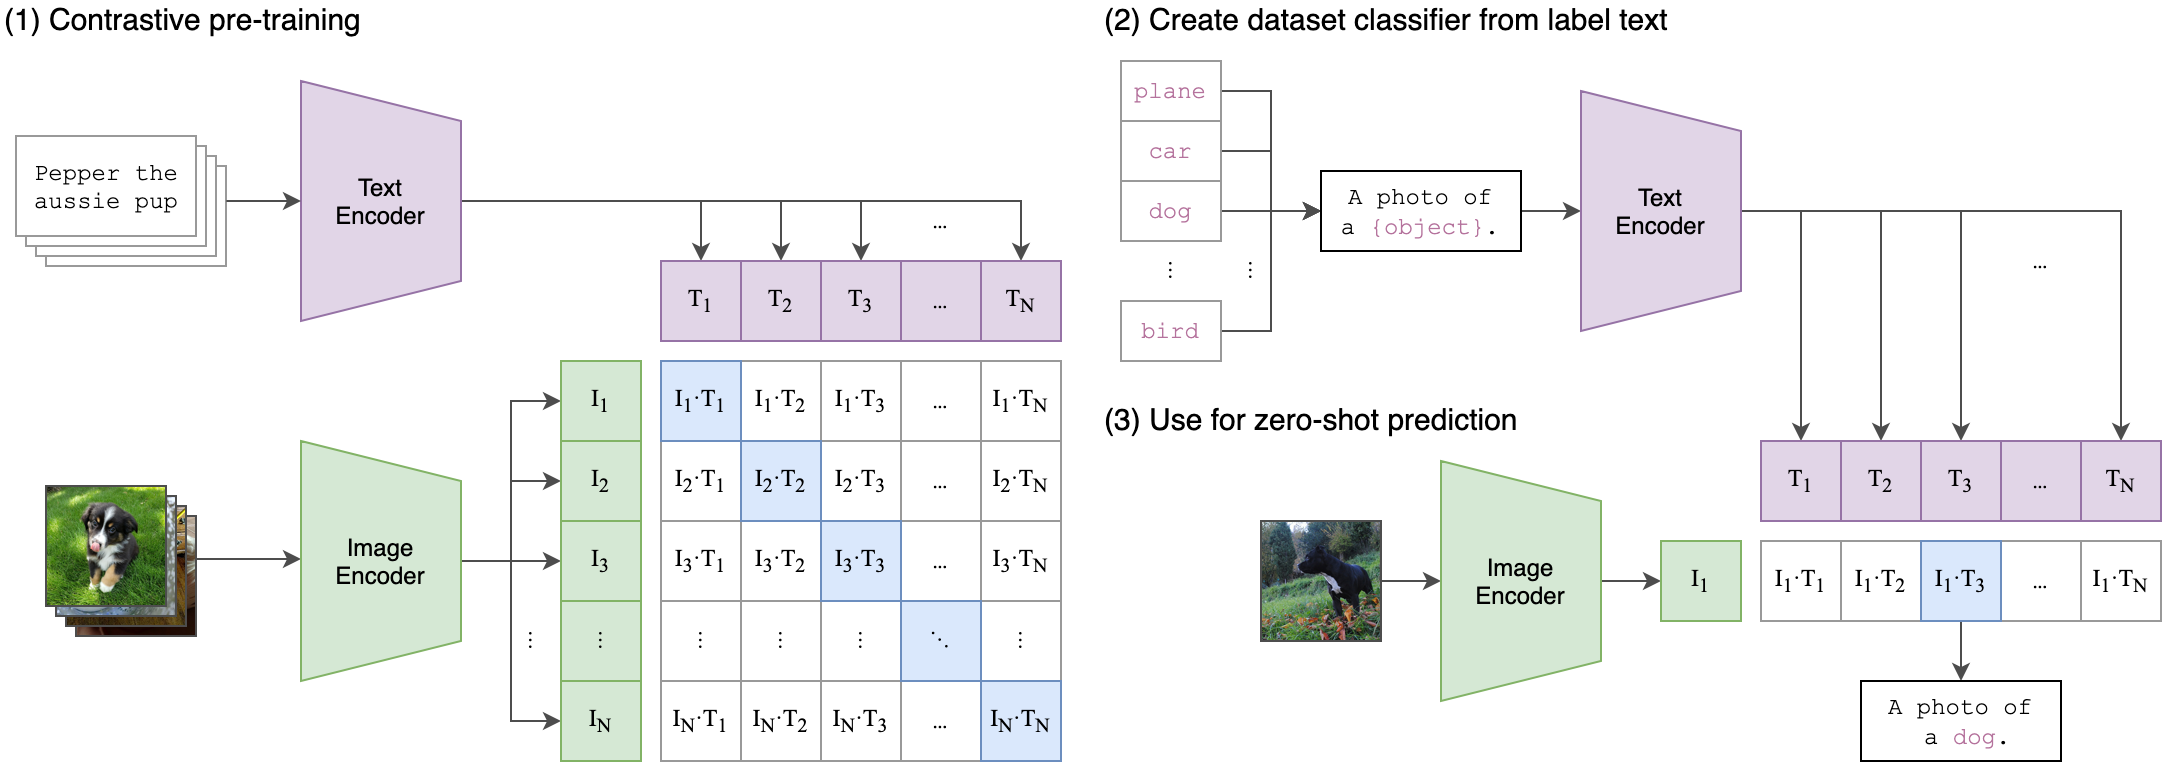
Contrastive Language-Image Pre-Training (CLIP) is a neural network trained on a variety of (image, text) pairs. The neural network can be trained in natural language to make predictions based on an image about the most relevant textual description. The model learns the relationship between a whole sentence and the image it describes; in a sense that when the model is trained, given an input sentence it will be able to generate the most accurate images related to the sentence.
CLIP Architecture is based on Zero-shot learning, where the model attempts to predict a class it saw zero times in the training data. So a model trained on exclusively cats and dogs can be then used to detect rabbits. A model like CLIP, because of how it uses the text information in the (image, text) pairs, tends to do well with zero-shot learning — even if the image it’s looking at is different from the training images, the CLIP model will likely be able to give a good guess for the caption for that image.
CLIP Architecture
Below we will see how to generate synthetic images with CLIP:
Install and Import Necessary Libraries
Install the necessary libraries in the Colab notebook and clone the CLIP repository. Import all the necessary modules and set the torch version suffix based on the CUDA version.
!pip install torch==1.7.1 torchvision==0.8.2 ftfy regex
!git clone https://github.com/openai/CLIP.git
%cd /content/CLIP/
Initialization
Set the text string input and the resolution of the image to be generated, and tokenize the user input.
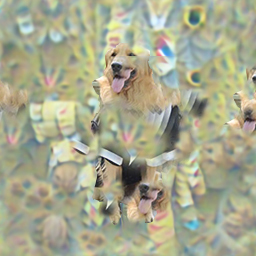
# text data based on which image will be generated
prompt = 'dog wearing a suit'
#image resolution
resolution = "256" #[128, 256, 512]
res = int(resolution)
im_shape = [res, res, 3]
sideX, sideY, channels = im_shape
#tokenize the user input text
tx = clip.tokenize(prompt)
Define some helper functions for image preprocessing, padding and writing the image to disk.
# Define some helper functions
def displ(img, pre_scaled=True):
 img = np.array(img)[:,:,:]
 img = np.transpose(img, (1, 2, 0))
 if not pre_scaled:
 #scale the image
 img = scale(img, 48*4, 32*4)
 imageio.imwrite('result.png', np.array(img))
 file_path = '/content/CLIP/frames/{}.png'.format(str(len(os.listdir('/content/CLIP/frames'))).zfill(5))
 imageio.imwrite(file_path, np.array(img))
 return display.Image('result.png')
def card_padded(im, to_pad=3):
 return np.pad(np.pad(np.pad(im, [[1,1], [1,1], [0,0]],constant_values=0), [[2,2], [2,2], [0,0]],constant_values=1),
 [[to_pad,to_pad], [to_pad,to_pad], [0,0]],constant_values=0)
Neural Network Model
Define the Sine Layer class along with the methods for initializing the weights and getting the tensor with the sine of the elements from the input.
class SineLayer(nn.Module):
 def __init__(self, in_features, out_features, bias=True,
 is_first=False, omega_0=30):
 super().__init__()
 self.omega_0 = omega_0
 self.is_first = is_first
 self.in_features = in_features
 self.linear = nn.Linear(in_features, out_features, bias=bias)
 self.init_weights()
#initialize weights
 def init_weights(self):
 with torch.no_grad():
 if self.is_first:
 self.linear.weight.uniform_(-1 / self.in_features,
 1 / self.in_features)
 else:
 self.linear.weight.uniform_(-np.sqrt(6 / self.in_features) / self.omega_0,
 np.sqrt(6 / self.in_features) / self.omega_0)
#tensor with the sine of the elements of input
 def forward(self, input):
 return torch.sin(self.omega_0 * self.linear(input))
 def forward_with_intermediate(self, input):
 # For visualization of activation distributions
 intermediate = self.omega_0 * self.linear(input)
 return torch.sin(intermediate), intermediate
Define the Siren class with the layers and methods for activation function.
class Siren(nn.Module):
 def __init__(self, in_features, hidden_features, hidden_layers, out_features, outermost_linear=True,
 first_omega_0=30, hidden_omega_0=30.):
 super().__init__()
 self.net = []
 self.net.append(SineLayer(in_features, hidden_features,
 is_first=True, omega_0=first_omega_0))
 for i in range(hidden_layers):
 self.net.append(SineLayer(hidden_features, hidden_features,
 is_first=False, omega_0=hidden_omega_0))
 if outermost_linear:
 final_linear = nn.Linear(hidden_features, out_features)
 with torch.no_grad():
 final_linear.weight.uniform_(-np.sqrt(6 / hidden_features) / hidden_omega_0,
 np.sqrt(6 / hidden_features) / hidden_omega_0)
 self.net.append(final_linear)
 else:
 self.net.append(SineLayer(hidden_features, out_features,
 is_first=False, omega_0=hidden_omega_0))
 self.net = nn.Sequential(*self.net)
 def forward(self, coords):
 coords = coords.clone().detach().requires_grad_(True)
 output = self.net(coords.cuda())
 return output.view(1, sideX, sideY, 3).permute(0, 3, 1, 2)#.sigmoid_()
 def forward_with_activations(self, coords, retain_grad=False):
 '''Returns not only model output, but also intermediate activations.
 Only used for visualizing activations later!'''
 activations = OrderedDict()
 activation_count = 0
 x = coords.clone().detach().requires_grad_(True)
 activations['input'] = x
 for i, layer in enumerate(self.net):
 if isinstance(layer, SineLayer):
 x, intermed = layer.forward_with_intermediate(x)
 if retain_grad:
 x.retain_grad()
 intermed.retain_grad()
 activations['_'.join((str(layer.__class__), "%d" % activation_count))] = intermed
 activation_count += 1
 else:
 x = layer(x)
 if retain_grad:
 x.retain_grad()
 activations['_'.join((str(layer.__class__), "%d" % activation_count))] = x
 activation_count += 1
 return activations
Define a function to generate a flattened grid of coordinates between -1 to 1.
def get_mgrid(sidelen, dim=2):
 '''Generates a flattened grid of (x,y,...) coordinates in a range of -1 to 1.
 sidelen: int
 dim: int'''
 tensors = tuple(dim * [torch.linspace(-1, 1, steps=sidelen)])
 mgrid = torch.stack(torch.meshgrid(*tensors), dim=-1)
 mgrid = mgrid.reshape(-1, dim)
 return mgrid
Optimizer and Loss Function
Initialize the model, set the optimizer, and define the loss function loop for generating the images with every subsequent image having a lower loss than the previous one.
model = Siren(in_features=2, out_features=3, hidden_features=256,
 hidden_layers=16, outermost_linear=False)
model.cuda()
LLL = []
eps = 0
optimizer = torch.optim.Adam(model.parameters(), .00001)
def checkin(loss):
 #print(loss)
 with torch.no_grad():
 al = nom(model(get_mgrid(sideX)).cpu()).numpy()
 for allls in al:
 displ(allls)
 clear_output()
 pic_num = str(len(os.listdir('/content/CLIP/frames')))
 print(f'Picture number {pic_num}n')
 if int(pic_num) == 1:
 print("The first image is less accurate.")
 display.display(display.Image('result.png'))
 print('Please wait a few seconds until the next picture')
Define the function for processing and encoding the image and text and getting the mean cosine similarity.
def ascend_txt():
 out = model(get_mgrid(sideX))
 cutn = 64
 p_s = []
 for ch in range(cutn):
 size = torch.randint(int(.5*sideX), int(.98*sideX), ())
 offsetx = torch.randint(0, sideX - size, ())
 offsety = torch.randint(0, sideX - size, ())
 apper = out[:, :, offsetx:offsetx + size, offsety:offsety + size]
 apper = torch.nn.functional.interpolate(apper, (224,224), mode='bilinear')
 p_s.append(nom(apper))
 into = torch.cat(p_s, 0)
 iii = perceptor.encode_image(into)
 t = perceptor.encode_text(tx.cuda())
 return -100*torch.cosine_similarity(t, iii, dim=-1).mean()
Model Training
Train the model for 10,000 epochs and visualize each step in the notebook.
def train(epoch, i):
 loss = ascend_txt()
 optimizer.zero_grad()
 loss.backward()
 optimizer.step()
 if itt % fr == 0:
 checkin(loss)
nom = torchvision.transforms.Normalize((0.48145466, 0.4578275, 0.40821073), (0.26862954, 0.26130258, 0.27577711))
itt = 0
for epochs in range(10000):
 for i in range(1000):
 train(eps, i)
 itt+=1
 eps+=1
Generated image
Once the training and generation are over, download the image from the notebook. The image below is a sample image generated with a much less number of epochs and hence is blurred to some extent.
That’s all! The synthetic image has been generated from just a text description and can be utilized in search engines, chatbots, and other use cases. With proper training and model tuning, the images will be less blurry and more accurate.
Some More Examples
StackGAN – Stacked Generative Adversarial Networks can be used for Text to Photo-realistic Image Synthesis.
AttnGAN – Attentional Generative Adversarial Networks can be used for text to synthetic image generation. It can synthesize fine-grained details at different sub-regions of the image by paying attention to the relevant
words in the natural language description.
SSA-GAN – Semantic Spatial Aware Generative Adversarial Networks can be used to generated synthetic images which are semantically consistent with the text descriptions.
Conclusion
Text-based synthetic image generation can be a highly useful feature in various applications and business use cases ranging from training ML models that don’t have sufficient image data, chatbots to create contextual images to search engines and stock photos. The advancements in neural networks have made it possible to easily achieve this and with further improvements down the line, synthetic images can soon replace a lot of scenarios where real images are unavailable and expensive.
Read more blogs here.
References
- Papers
- Images
Featured Image Introduction Image 1 Introduction Image 2 Introduction Image 3 DALL-E Images DALL-E Architecture CLIP Architecture
About the Author
Suvojit is a Senior Data Scientist at DunnHumby. He enjoys exploring new and innovative ideas and techniques in the field of AI and tries to solve real-world machine learning problems by thinking out of the box. He writes about the latest advancements in Artificial Intelligence and Natural Language processing. You can follow him on LinkedIn.
The media shown in this article is not owned by Analytics Vidhya and are used at the Author’s discretion