 |
VOOZH | about |
|
VOOZH | about |
Docker Build is one of the key features of Docker Engine, specifically designed to create container images. It plays an important role in the software development lifecycle by enabling developers to package applications and deploy them consistently across multiple environments. Docker Build isn't just for creating images; it is integral to both simple and complex workflows, making it a crucial tool for developers. By automating the image creation process, Docker Build ensures that applications are deployed smoothly and reliably, offering consistency across different platforms.
Here is the basic syntax of Docker build command:
docker build [OPTIONS] PATH | URLThe 'docker build' command includes a variety of options and flags that let you customize how images are built. Here are some of the most frequently used options, along with examples of how they work:
1. '-t, or --tag': This option lets you tag the image with a name and version (formatted as 'name:tag'). If you don’t provide a tag, Docker defaults to `:latest`.
docker build -t myapp:1.0 2. '-f, or --file': Use this option to specify a custom Dockerfile instead of the default './Dockerfile'.
docker build -f Dockerfile.dev -t myapp:dev .3. '--build-arg' : This option allows you to pass variables at build-time that can be used in the Dockerfile with the 'ARG' instruction. It’s useful for setting environment-specific configurations.
docker build --build-arg ENVIRONMENT=production -t myapp:prod .4. '--no-cache': If you want to skip using cached layers and force a fresh build, this option ensures each step in the Dockerfile is re-executed.
docker build --no-cache -t myapp:latest .5. '--rm': This option automatically removes any intermediate containers created during the build. It’s enabled by default, but you can turn it off if needed.
docker build --rm=false -t myapp:test .6. '--pull' : Forces Docker to pull the latest version of the base image before starting the build, ensuring your build uses the most current base image.
docker build --pull -t myapp:latest .7. '--target': When using a multistage Dockerfile, this option allows you to build up to a specific stage by providing the stage name. This is helpful when testing specific parts of a multistage build.
docker build --target builder -t myapp:builder .8. '--compress': Compresses the build context before sending it to the Docker daemon, which can help reduce data transfer times for larger projects.
docker build --compress -t myapp:compressed .9. '--label': Adds custom metadata to the image as key-value pairs. You might use this to include version details, author information, or other metadata.
docker build --label version="1.0" --label maintainer="user@example.com" -t myapp:labeled .10. '--network': Sets the network mode for the build, like 'bridge', 'host', or 'none', which can be useful when the build process needs network access.
docker build --network host -t myapp:hostnetwork .These options give you more control over the 'docker build' process, letting you build images with the exact configurations you need.
Docker building files also known as Dockerfiles are text files that contain instructions for building Docker images. These files consists of a set of commands and arguments that define the image's configuration. Dockerfiles allow developers to automate the process of building and deploying applications by specifying all the necessary components and dependencies in a single file.
docker build command to build the image, like docker build -t my-image ..docker run my-image.The Dockerfile uses DSL (Domain Specific Language) and contains instructions for generating a Docker image. Dockerfile will define the processes to quickly produce an image. While creating your application, you should create a Dockerfile in order since the Docker daemon runs all of the instructions from top to bottom. To learn more about the dockerfile refer to this link.
| Instruction | Description |
|---|---|
| FROM | Identifies the base image that will be used to create the new image. |
| COPY | Inserts data into the image from the host computer. |
| ADD | Like COPY, but with the capacity to extract tarballs and access files from URLs. |
| RUN | Continues out instructions within the image as it is currently being created. |
| WORKDIR | Defines the working directory for additional instructions inside the image. |
| CMD | Provides the default command that is going to be performed when the image-based container is started. |
| ENTRYPOINT | Comparable to CMD, but with an executable provided for when the container starts. |
| EXPOSE | Opens up a container's specified ports for external service communication. |
| ENV | Sets the image's internal setting variables. |
| VOLUME | Creates a volume or mount point for saving data between container runs. |
| USER | Provides the user or UID that will be used to operate the container. |
| LABEL | Adds key-value formatted metadata to the image. |
| ARG | Defines variables to be provided to the Dockerfile during the build process at build time. |
| ONBUILD | Provides a command to be run when the image is used as the foundation for another build. |
| HEALTHCHECK | Provides a command for analyzing a container's health. |
| MAINTAINER | Indicates the Dockerfile's author or maintainer. |
You may create the Docker file on Linux by running the following command. The command to generate the Docker file is as follows. Only an empty file will be created as a result; we will then need to write the Docker instructions.
touch DockerfileThe .dockerignore file is used to specify which files and directories Docker should ignore when building an image. It works similarly to .gitignore in Git.
.dockerignore in the root directory of your Docker project.* and ! to include or exclude specific files..log extension and the node_modules directory, your .dockerignore file might look like this:*.log
node_modules
To create a Docker image, start with the base image. It provides the base upon which the dependencies of your application are built. The FROM instructions is used to indicate the base image when constructing a Dockerfile. The parent image that your image will be based on is explained in this instruction. This dockerfile instructions must be included.
FROM ubuntuUsing the COPY instruction in your Dockerfile is what's needed to copy source code into a Docker image. The host machine's folders and files have been copied into the image via this instruction.
COPY . /appContainers and the outside world can communicate when a port in a Docker image is exposed. Running networked applications inside of containers needs this. The EXPOSE directive is used in Dockerfiles to expose ports. The above command tells Docker that the container will be waiting at runtime on the specified port. For more detail explanation refer this article.
EXPOSE 8080Here we have exposed the port 8080. You can replace 8080 with any port number that your application listens on. To learn more about the docker expose refer this link.
The CMD instruction in a Dockerfile specifies the default command to run when a container is started from the image. It is one of the essential instructions for defining the container's behavior.
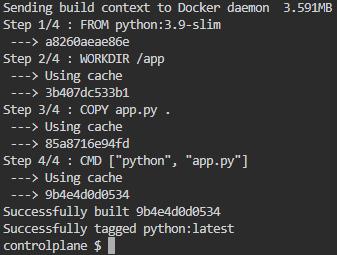
CMD ["executable", "param1", "param2"]"executable" is the executable or script to run inside the container."param1", "param2" are optional parameters passed to the executable.Building Docker images involves using the docker build command to create a new image from a Dockerfile. This process takes the instructions defined in the Dockerfile and executes them to construct the image.
docker build -t image_name .-t or --tag allows you to specify a name and optional tag for the image.image_name is the name you want to give to the image.. specifies the build context, which is the location of the Dockerfile and any files it reference# Use the official Python image as the base image
FROM python:3.9-slim
# Set the working directory inside the container
WORKDIR /app
# Copy the Python script into the container
COPY app.py .
# Define the command to run when the container starts
CMD ["python", "app.py"]
List the all images on the docker. Here the python images was build successfully and the image is available on the server refer the below image.
docker imagesTagging a Docker image involves assigning a specific name and optionally a tag to the image. This allows you to identify and reference the image more easily.
docker tag image_id repository_name:tagimage_id is the ID of the Docker image you want to tag.repository_name is the name you want to assign to the image.tag is an optional tag you can assign to the image. If not specified, Docker will use the latest tag by default.To run or test a Docker image, you use the docker run command. This command creates a new container from the specified image and starts it.
docker run image_nameyou can provide additional options to customize how the container is run, such as port mapping, volume mounting, environment variables, and more. Here's an example:
docker run -p 8080:80 my-image-p 8080:80 maps port 8080 on the host machine to port 80 inside the container.
Push a Docker image to a Docker repository, such as Docker Hub, you'll first need to log in to your Docker Hub account using the docker login command.
Log in to Docker Hub:
docker loginTag your local image with the repository name and optional tag:
docker tag local_image repository_name:tagPush the tagged image to the Docker repository:
docker push repository_name:tagIf you have a local image named my-image, and you want to push it to your Docker Hub repository under the name myusername/my-image with the tag latest, you would run:
docker tag my-image myusername/my-image:latest
docker push myusername/my-image:latest
Learn more about the docker commands you can refer this link.
Troubleshooting the docker build command can be a regular part of working with Docker. Here are some common issues and how you might fix them:
docker build. If the Dockerfile is somewhere else, use the -f option to point Docker to the right path.--no-cache option to skip cached layers and force a fresh build, which sometimes clears up unexpected issues.These features make Docker Build a versatile and powerful tool for developers, offering much more than simple image creation and significantly enhancing development workflows.