 |
VOOZH | about |
|
VOOZH | about |
Running multi-container applications can be simplified with Docker Compose. Instead of starting each container separately, Compose allows you to define your application’s services in a single YAML configuration file. Once the file is ready, one command is enough to create and start all the required containers.
Let's say we have a simple application having two components, a flask app and a Redis database. I will go by running the complete application with and without using the docker-compose tool, which would give your major use of this compose tool.
Step 1: Create a directory gfg_docker_compose that holds the our project
$ mkdir gfg_docker_composeStep 2: Move to that directory making as your working directory by running the following command.
$ cd gfg_docker_composeStep 3: Create the requirements.txt file
$ touch requirements.txtStep 4: Copy the below provided code in that requirements.txt file.
flask
redis
Step 5: Create the file app.py . It will used to have the code for our flask app
$ touch app.py
Step 6: Now the Copy the below code to app.py
from flask import Flask, request, json
from redis import Redis

# initializing a new flask app
app = Flask(__name__)

# initializing a new redis database
# Hostname will be same as the redis service name
# in the docker compose configuration
redis = Redis(host ="localhost", db = 0, socket_timeout = 5,
 charset ="utf-8", decode_responses = True)

# Our app has a single route allowing two methods POST and GET.


@app.route('/', methods =['POST', 'GET'])
def animals():

 if request.method == 'POST':
 # Take the name of the animal
 name = request.json['name']
 # push the name to the end of animals list in the redis db
 redis.rpush('animals', {'name': name})
 # return a success
 return jsonify({'status': 'success'})

 if request.method == 'GET':
 # return complete list of names from animals
 return jsonify(redis.lrange('animals', 0, -1))
Here we are simply accepting two methods GET and POST requests for `/` route. When ever a POST request is done with the name, the name is added at the end of the animals list. For GET request we will return the list of names from animals list.
Step 7: Create the Dockerfile named file.
$ touch Dockerfile
Step 8: Now try to copy the below code to that created Dockerfile.
# Pulling the base image
FROM python:3.7.0-alpine3.8

# Creating a folder and moving into it
WORKDIR /usr/src/app

# Copying the dependency list
COPY requirements.txt ./

# Installing the python dependencies
RUN pip install --no-cache-dir -r requirements.txt

# Copying the flask code into the container
COPY . .

ENV FLASK_APP=app.py

EXPOSE 5000

# Starting the server
CMD flask run --host=0.0.0.0
Through configured definition of the Dockerfile we will start with the base image python:3.7.0-alpine3.8. We will copy the requirements.txt file and install all our flask app dependencies. Then we would copy the app.py file into the container and finally run the flask app.
And Now we ready with the docker application. Firstly let's see running the docker application without docker-compose and then docker-compose tool so that you can understand the performance of docker compose efficiently.
To deploy and use this application without docker compose tool would be tedious for a multi-container application. As you need to remember the complete configuration and usage whenever you run the application. Let's see how it is normally deployed and run without the compose tool.Till Now we have created the application file such as requirements.txt , app.py and Dockerfile in the gfg_docker_compose directory.
Step 1: Fristly In this Approach we will run and start our redis server container with docker run command as shown below:
$ docker run --name=redis redis:4.0.11-alpine
Step 2: From the following practical screenshot, you can see the software packages of redis version4.0.11 with alpine image is getting downloaded extracting docker hub and after starting the redis server.
Step 3: Now our redis has started so you should take it's container IP address
gfg_docker_compose/ $ docker inspect --format='{{range .NetworkSettings.Networks}}{{.IPAddress}}{{end}}' redis👁 Extract redis container IP Address
redis = Redis(host="IPAddress", db=0, socket_timeout=5,
 charset="utf-8", decode_responses=True)
where IPAddress is the IP address you get from the redis container.
Step 4: Build the flask application
$ docker build -t gfg/flask-app👁 Our gfg/flask-app image is successfully built
Step 5: Wait for some time, till the application image has built. Now we will start our flask app container as well.
Step 6: Open a new terminal tab and run the below command
$ docker run -p 5000:5000 gfg/flask-app👁 Our flask app is started
Step 7: So using that command we will pull the gfg/flask-app which we have built earlier and run our flask app container. Also, -p is used to map the port 5000 from container to the host.
Step 8: Finally when you route to the flask app on a browser you should see something like this.
👁 Our application is workingOn Using docker-compose tool the setup process for multi-containered docker applications will become so easy. The Simple idea behind this is, we will write the complete container configuration in a YAML file called docker-compose.yml file and then with simple commands we can start and stop these applications. This method will also help us to share our docker applications easily to other developers, by simply sharing the docker-compose file with the project.
Step 1: Firstly create the docker-compose.yml file.
$ touch docker-compose.yml
gfg_docker_compose
 --->> app.py
 --->> requirements.txt
--->> Dockerfile
--->> docker-compose.yml
Step 2: Now copy the below YAML code to docker-compose.yml file.
version: '3'

services:
 app:
 build: .
 image: gfg/flask-app
 environment:
 - FLASK_ENV=development
 ports:
 - 5000:5000

 redis:
 image: redis:4.0.11-alpine
The following are the keywords specified in the above configured Docker Compose File:
NOTE: Service names app and redis are also the hostname for the services(containers) we run because docker-compose automatically creates a network and adds our containers to that network so every container can recognize other containers by their service name as hostname within that network. So this is the reason we will keep the host parameter in the app.py file to redis itself.
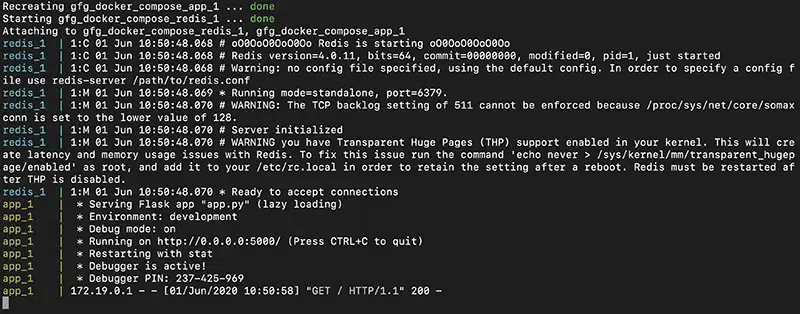
Step 3: Now Start the application with the following docker compose command:
$ docker-compose up --build
Step 4: To stop the complete application run the following docker compose command:
$ docker-compose down👁 Stoping the Containers with Docker compose
.webp)