 |
VOOZH | about |
|
VOOZH | about |
In Spring MVC, configuration is necessary to handle incoming web requests, resolve views and manage controllers. You can configure Spring MVC using either:
Both methods serve the same purpose, but the choice depends on the flexibility and maintainability requirements of the project.
XML-based configuration is the traditional way of configuring Spring applications. In this approach, beans such as controllers, view resolvers and other necessary components are declared in XML files. Though verbose, XML provides a clear and declarative approach, making it ideal for legacy systems.
1. DispatcherServlet is defined in web.xml, mapping requests to a specific URL pattern (e.g., /).
2. A separate XML file (often named dispatcher-servlet.xml) contains the bean definitions for:
3. The web.xml file initializes the DispatcherServlet, which reads from the XML file to know how to handle requests.
Step 1: Create a New Maven Project
Step 2: Add Required Dependencies (pom.xml)
Add required Spring MVC, Servlet API, and JSP support libraries. Add the following dependencies to pom.xml:
Explanation:
Step 3: Configure DispatcherServlet (web.xml)
Create web.xml inside WEB-INF:
Explanation:
Step 4: Create Spring MVC XML Configuration (spring-servlet.xml)
Create spring-servlet.xml inside WEB-INF:
Explanation:
Step 5: Create Controller Class
Create HomeController.java:
Explanation:
Step 6: Create JSP View
Create home.jsp inside /WEB-INF/views/:
Explanation:
Step 7: Configure Tomcat Server
Step 8: Run & Test Application
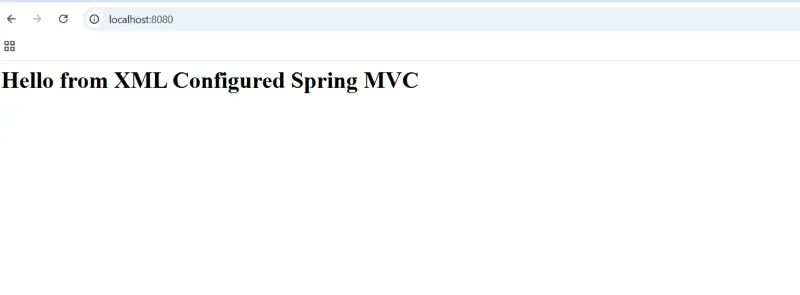
Open browser and hit:
http://localhost:8080/spring-mvc-xml/
Output:
Java-based configuration is a modern approach introduced in Spring 3.0, which eliminates the need for XML files by using annotations. With @Configuration, developers can configure Spring in plain Java classes, making the setup more concise and readable.
@EnableWebMvc enables Spring MVC features, such as controller and request mapping.@ComponentScan is used to scan the base packages for annotated components like @Controller.@Configuration classes are used to configure components like view resolvers, data sources and more.DispatcherServlet can be registered programmatically using WebApplicationInitializer or AbstractAnnotationConfigDispatcherServletInitializer.Step 1: Create a New Maven Project
Step 2: Add Dependencies (pom.xml)
Add Spring MVC, Servlet API, and JSTL.
Explanation:
Step 3: Create web.xml
Create web.xml inside WEB-INF.
Explanation:
Step 4: Create Java Configuration Class
Create WebConfig.java.
Explanation:
Step 5: Register Java Config with DispatcherServlet
Create a class extending AbstractAnnotationConfigDispatcherServletInitializer.
Explanation:
Step 6: Create Controller Class
Create HomeController.java.
Explanation:
Step 7: Create JSP View
Create home.jsp inside /WEB-INF/views.
<html>
<head>
<title>Home</title>
</head>
<body>
<h1>${message}</h1>
</body>
</html>
Explanation:
Step 8: Deploy on Tomcat
Step 9: Test the Application
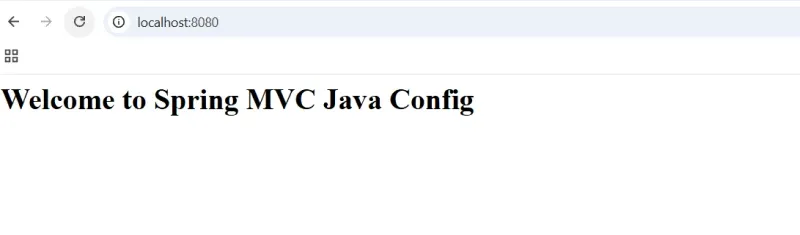
Open browser:
http://localhost:8080/spring-mvc-java-config/
Output:
XML Configuration | Java-based Configuration |
|---|---|
Syntax style is declarative. | Syntax is programmatic. |
Configuration files are applicationContext.xml or other XML files. | Configuration files are annotated with @Configuration. |
No compile-time checking. | Full compile-time type safety. |
Complex config can be verbose. | Concise and readable. |
Easy to separate config from code. | Tightly coupled with Java code. |
Beginneers friendly. | Requires understanding of Java and annotations. |