 |
VOOZH | about |
|
VOOZH | about |
JUnit is used testing framework for Java applications. JUnit 5, also known as JUnit Jupiter, is the latest version of the framework. Compared to JUnit 4, it provides more features, flexibility and a modern architecture for writing and executing tests.
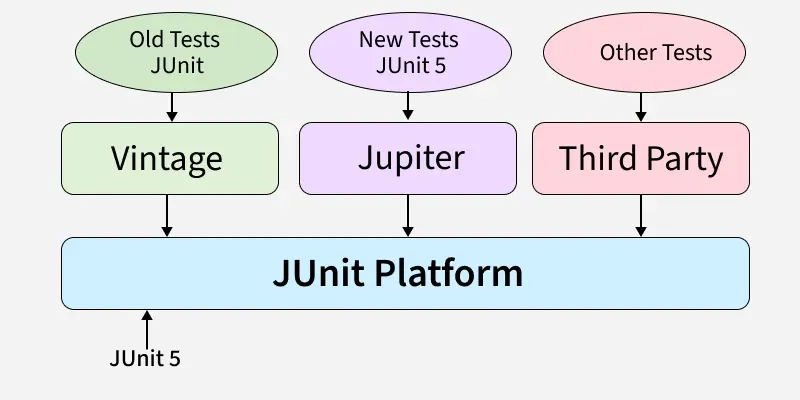
JUnit 5 is composed of three main modules:
These components collectively make it easier to define, organize and run tests efficiently.
The JUnit Platform is the foundation of JUnit 5. It provides a launching mechanism for running tests on the JVM. In real-world applications, the testing team designs various test cases to verify the functionality and behavior of an application. The JUnit Platform ensures that these test cases can be executed consistently on any Java Virtual Machine (JVM).
JUnit Jupiter is the module that provides new programming models and features for writing test cases in JUnit 5. It includes annotations, assertions, assumptions and more, enabling developers to write modern, clean and maintainable test code.
JUnit Vintage allows you to run legacy tests written with JUnit 3 or JUnit 4 on the JUnit 5 platform. This ensures backward compatibility during the transition to JUnit 5.
JUnit provides many features compared to JUnit 4. If you want to learn JUnit 5, then we need to know some basics of the JUnit 5 Framework. Now I provide the basic information about JUnit 5. The basics of JUnit 5 are,
To use JUnit 5 with Maven, you need to add the following dependencies to your pom.xml:
To use JUnit 5 with Gradle, you need to add the following dependencies to your build.gradle:
The JUnit 5 framework uses different Annotations based on the test case design. Mostly in JUnit 5 @Test, @BeforeEach, @AfterEach, @BeforeAll, @AfterAll, @DisplayName, @Disabled these annotations are used. Basically, Annotations provides supplement information about the program in java. Annotations are always start with "@" symbol.
The JUnit 5 life cycle methods are annotated methods which are always start with @ symbol, these methods are executed at specific point in the test life cycle. The Life cycle methods are,
The JUnit 5 provides different methods in Assertions class for checking the expected Result. Assertions are used to check if a condition is true. If the condition is false, the test fails. Common assertions include:
Example: Java program to demonstrate JUnit Assertion
For above code the test case passed successfully.
Assumptions in JUnit 5 provides a good way for checking the test cases conditionally based on preconditions and one more is if Assumptions is failed then it is marked as skipped rather then failed. Means Assumptions are used to when you want to skip a test then we use Assumptions in JUnit 5.
Example: Java program to demonstrate JUnit Assumption
This Parameterized Test is used to test a Test case with different parameters for this we use @ParameterizedTest annotations.
Example: Java program to demonstrate parameterized test
JUnit 5 introduces the concept of dynamic tests, which can be generated at runtime. These are created using the DynamicTest class.
For creating Dynamic Tests in Run time by using @TestFactory annotation. This TestFactory provides a feature to create dynamic test case in the run time of the Application.
Example: Java program to demonstrate Dynamic Test
We can tag our test cases by using @Tag annotation in the JUnit 5. Simply the Tags are labels for categorize the test cases. And Filter is used to filter and run the test cases by using the Tags.
Example: Java program to demonstrate Tagging and Filtering
Here we will understand one example for sum of two numbers by using such as @BeforeAll, @AfterAll, @BeforeEach, @AfterEach Annotations.
JUnit 5 tests can be run in so many ways: