 |
VOOZH | about |
|
VOOZH | about |
Spring Hibernate configuration integrates the Spring Framework with Hibernate ORM to simplify database operations and object-relational mapping. It allows developers to manage database connectivity, transactions, and entity mapping efficiently using configuration files or annotations.
Before setting up the project, create a schema (database) in MySQL where Hibernate will generate tables.
CREATE SCHEMA `examportal`;
This command creates a database named examportal. Hibernate will use it to create the mapped tables automatically.
👁 ImageUse Spring Initializr to create a new project with the following dependencies:
Alternatively, dependencies can be added manually to the pom.xml file.
pom.xml:
Add database and Hibernate configurations in the application.properties file located in the src/main/resources folder.
# Database Configuration
spring.datasource.url=jdbc:mysql://localhost:3306/examportal?useSSL=false&serverTimezone=UTC
spring.datasource.username=root
spring.datasource.password=root
spring.datasource.driver-class-name=com.mysql.cj.jdbc.Driver# Hibernate & JPA Configuration
spring.jpa.properties.hibernate.dialect=org.hibernate.dialect.MySQL8Dialect
spring.jpa.hibernate.ddl-auto=update
spring.jpa.show-sql=true
spring.jpa.properties.hibernate.format_sql=true
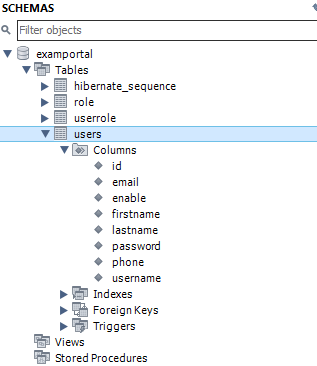
An entity class represents a database table. Use annotations to define the mapping between Java fields and database columns.
User.java:
Annotations Used:
When the application runs, Hibernate automatically creates a table named users in the examportal database.
The repository layer handles database operations. By extending JpaRepository, it provides built-in CRUD functionality.
UserRepository.java:
The service layer contains business logic and interacts with the repository.
UserService.java:
The controller layer exposes endpoints for performing CRUD operations.
UserController.java:
Run the application using your IDE or by executing the following command:
mvn spring-boot:run
Once started, Hibernate will automatically create the users table in the examportal schema based on the entity class.
Use Postman or any API testing tool to interact with the REST endpoints
| HTTP Method | Endpoint | Description |
|---|---|---|
| GET | /users | Retrieve all users |
| GET | /users/{id} | Retrieve a user by ID |
| POST | /users | Create a new user |
| DELETE | /users/{id} | Delete a user by ID |