 |
VOOZH | about |
|
VOOZH | about |
Spring Data JPA is a framework that simplifies database access in Spring Boot applications by providing an abstraction layer over the Java Persistence API (JPA). It enables seamless integration with relational databases using Object-Relational Mapping (ORM), eliminating the need for boilerplate SQL queries.
With Spring Data JPA, developers no longer need to:
JpaRepository to perform CRUD operations without writing SQL queries.findByName() or findByAgeGreaterThan() and Spring automatically generates the query.findAll(Pageable pageable).@Query annotation (JPQL or native SQL).1. Use Spring Initializr or your IDE:
2. Fill the following Details:
3. Add following Dependencies:
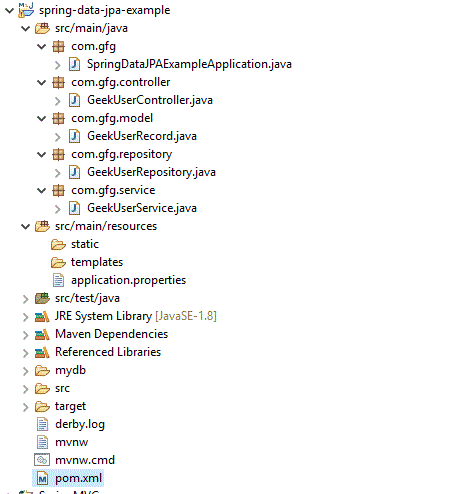
4. Project Structure:
After creating the project, Add the following classes then the folder structure will be like below:
If using Maven, ensure these dependencies (Initializr will generate them). Example snippet (dependencies only)
Configure database datasource inside src/main/resources/application.properties:
application.properties:
Let us see the key important files in the project. Starting with POJO class
GeekUserRecord.java:
Explanation: Represents a database table using a Java class. Annotations like @Entity, @Table, @Id map the class and fields to table and columns. It is used by JPA to store and retrieve data.
Let us see the controller file now.
GeekUserController.java:
Explanation: Handles HTTP requests and exposes REST APIs. It receives client requests, calls the service layer, and returns responses. Annotations like @GetMapping and @PostMapping define API endpoints.
Let us see the service file.
GeekUserService.java:
Explanation: Contains business logic and interacts with the repository layer. It processes data before sending it to the controller or database. @Transactional ensures safe database operations.
Now we need to add a repository interface and it should extend CrudRepository.
GeekUserRepository.java:
Explanation: Acts as the data access layer by extending JpaRepository. It provides built-in CRUD methods like save(), findAll() without writing SQL. Spring automatically generates query implementations.
Now, we need to execute this program and check the output. For that, we need to run the below file
SpringDataJPAExampleApplication.java:
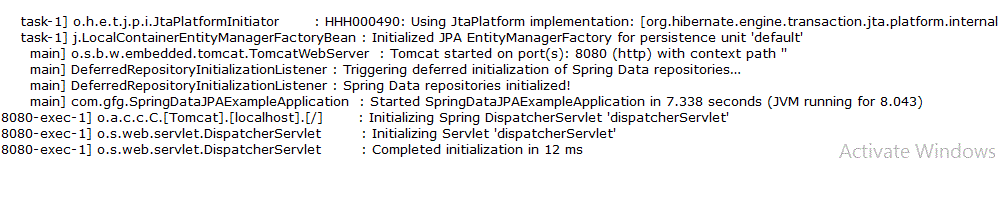
Right-click on the main class and run the file as a Java application, we can see the output in the console.
Output:
Initially as there are no records, when we hit http://localhost:8080, we won't be seeing any data. Let's add the data by adding via the Postman client. Postman client has to be installed for doing this operation. URL to add users: http://localhost:8080/add-geekuser (Remember that this URL matches the controller file requestmapping).
Now a user is added. Hence we can verify the same by using http://localhost:8080
JPA | Hibernate |
|---|---|
| It is a Java specification for mapping relational data in Java application. It is not a framework | Hibernate is an ORM framework and in that way data persistence is possible. |
| In JPA, no implementation classes are provided. | In Hibernate, implementation classes are provided. |
| Main advantage is It uses JPQL (Java Persistence Query Language) and it is platform-independent query language. | Here it is using HQL (Hibernate Query Language). |
| It is available under javax.persistence package. | It is available under org.hibernate package. |
| In Hibernate, EclipseLink, etc. we can see its implementation. | Hibernate is the provider of JPA. |
| Persistence of data is handled by EntityManager. | Persistence of data is handled by Session. |