 |
VOOZH | about |
|
VOOZH | about |
Spring WebFlux is most powerful framework for building reactive, non-blocking web applications. Unlike the traditional Spring MVC which can be based on the synchronous, blocking the I/O model, Spring WebFlux the reactor library enables asynchronous and nonblocking operations. It can allow for better scalability and performance, especially under high load conditions, by efficiently utilizing system resources.
The main concept behind the non-blocking I/O in the Spring WebFlux is to handle the requests and responses asynchronously. This means that the processing of one request does not block the processing of the other requests. It can achieved through the use of reactive streams and publishers like mono and Flux which can represent the single and multiple asynchronous values, respectively.
Reactive streams are the specification for asynchronous stream processing with non-blocking back pressure. It can implement this specification using the Reactor library.
These types enable the composing asynchronous, event-driven programs by the providing operators to transform, filter and combine the multiple asynchronous values.
In the non-blocking I/O model, threads are not tied up waiting for the I/O operations to complete. Instead, they can handle the other tasks while waiting for the I/O operations to finish. It can be particularly useful in the web applications, where the I/O operations such as the network calls and database access can be slow and frequent.
Below are the implementation steps of Non-Blocking I/O Operation with Spring WebFlux.
We will create the Spring project using Spring Initializr and on creating the project add the below dependencies into the project.
Dependencies:
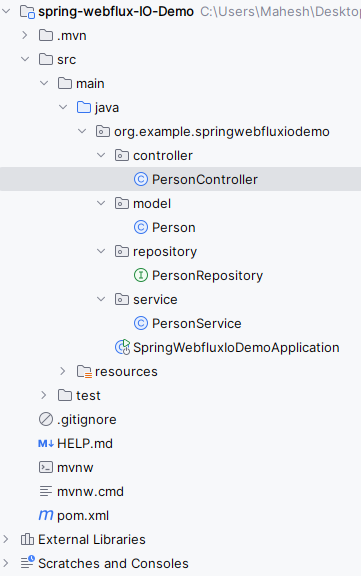
Once create the project then the file structure will look like the below image.
Open the application.properties fill and add the configuration of the application name and mongodb database of the spring application.
spring.application.name=spring-webflux-IO-Demo
spring.data.mongodb.uri=mongodb://localhost:27017/demoGo to src > main > java > org.example.springwebfluxiodemo > model > Person and put the below code.
Go to src > main > java > org.example.springwebfluxiodemo > repository > PersonRepository and put the below code.
Go to src > main > java > org.example.springwebfluxiodemo > service > PersonService and put the below code.
Go to src > main > java > org.example.springwebfluxiodemo > controller > PersonController and put the below code.
No changes are required in the main class of the project.
pom.xml:
Once complete the application then run the application, it will start at port 8080.
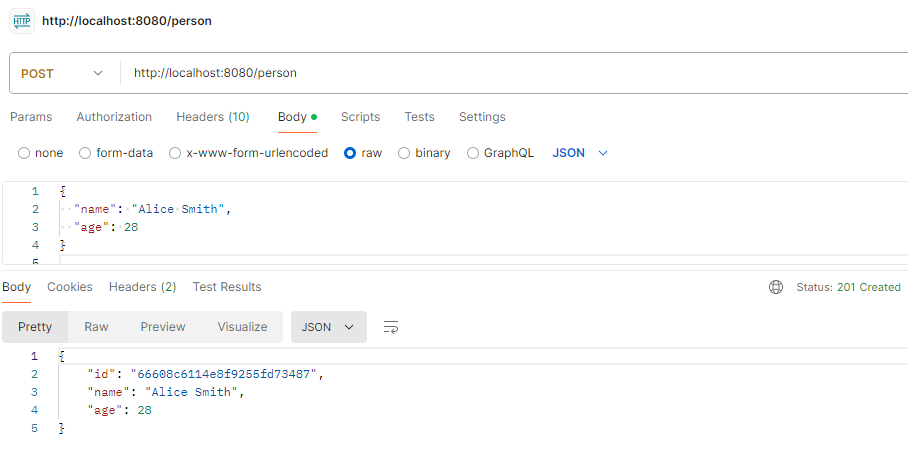
Create the Person Endpoint:
POST http://localhost:8080/personGet the Persons:
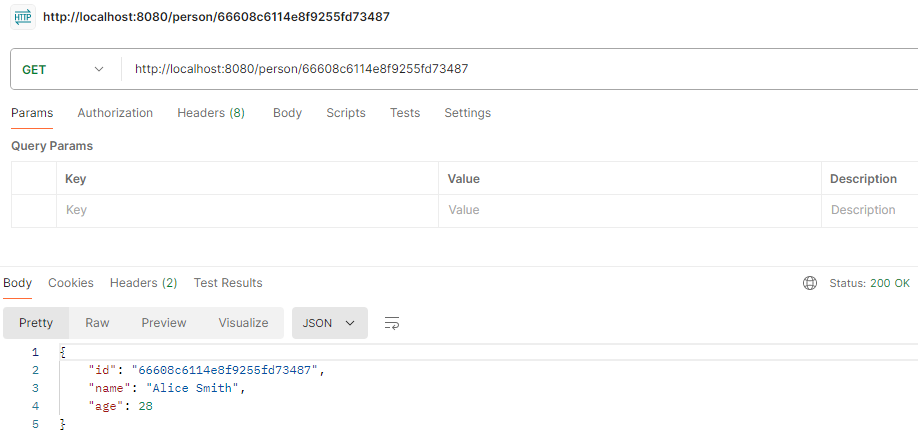
GET http://localhost:8080/personsGet the Person by Id:
http://localhost:8080/person/{id}