 |
VOOZH | about |
|
VOOZH | about |
In modern application development, integrating a database is crucial for persisting and managing data. Spring Boot simplifies this process by providing seamless integration with various databases through JPA (Java Persistence API) and Hibernate ORM (Object-Relational Mapping). This article will guide you through setting up database integration in a Spring Boot application using JPA with Hibernate, covering both MySQL and H2 in-memory databases.
In a Spring Boot application, database integration is essential for storing, retrieving, updating, and managing data. This integration is primarily achieved using JPA, Hibernate, and an underlying database like MySQL or H2. Spring Boot simplifies the configuration and use of these technologies by providing default settings and auto-setup, making it easier to work with databases without delving deeply into complex configuration files.
JPA is a specification that outlines how Java objects should be persisted in relational databases. It provides an abstraction over various ORM implementations like Hibernate and EclipseLink, handling the mapping of Java classes to database tables. This makes database operations more intuitive and aligned with object-oriented programming principles.
@Entity, representing database tables. Each entity instance corresponds to a row in the table.JpaRepository, abstracting the data access layer and eliminating boilerplate code.Hibernate is a popular implementation of JPA that handles the conversion of Java objects to database records and vice versa. It manages:
Spring Data JPA simplifies the development of JPA-based repositories by providing a repository abstraction over JPA. It allows you to perform common database operations (CRUD) without writing much code.
Features include:
findByName(String name) generates a query to find entities by the name field.To integrate MySQL, typically used in production environments:
1. Add the Dependencies: Include spring-boot-starter-data-jpa and mysql-connector-java in your pom.xml.
<dependency>
 <groupId>org.springframework.boot</groupId>
 <artifactId>spring-boot-starter-data-jpa</artifactId>
</dependency>
<dependency>
 <groupId>com.mysql</groupId>
 <artifactId>mysql-connector-j</artifactId>
 <scope>runtime</scope>
</dependency>
2. Configure MySQL Connection: Update application.properties with MySQL database configuration.
spring.datasource.url=jdbc:mysql://localhost:3306/springbootdb
spring.datasource.username=root
spring.datasource.password=password
spring.jpa.hibernate.ddl-auto=update
spring.jpa.show-sql=true
spring.jpa.properties.hibernate.dialect=org.hibernate.dialect.MySQL8Dialect
3. Database Initialization (Optional): Use schema.sql and data.sql files to initialize the database schema and data.
H2 is useful for development and testing:
1. Add the Dependencies: Include spring-boot-starter-data-jpa and h2 in your pom.xml.
<dependency>
 <groupId>org.springframework.boot</groupId>
 <artifactId>spring-boot-starter-data-jpa</artifactId>
</dependency>
<dependency>
 <groupId>com.h2database</groupId>
 <artifactId>h2</artifactId>
 <scope>runtime</scope>
</dependency>
2. Configure H2 Connection: Update application-dev.properties with H2 database configuration. Enable the H2 console for easy access to the in-memory database via the web interface.
spring.datasource.url=jdbc:h2:mem:testdb
spring.datasource.driver-class-name=org.h2.Driver
spring.datasource.username=sa
spring.datasource.password=password
spring.jpa.hibernate.ddl-auto=update
spring.h2.console.enabled=true
spring.h2.console.path=/h2-console
3. Auto Schema Generation: H2 will automatically generate the schema based on JPA entities.
Spring Boot makes it easy to switch between MySQL and H2 or other databases by changing the configuration in the application.properties file. This flexibility allows developers to use H2 for local development and MySQL in production without altering the codebase.
Here’s a simple Spring Boot project demonstrating integration with MySQL and H2 databases using JPA and Hibernate.
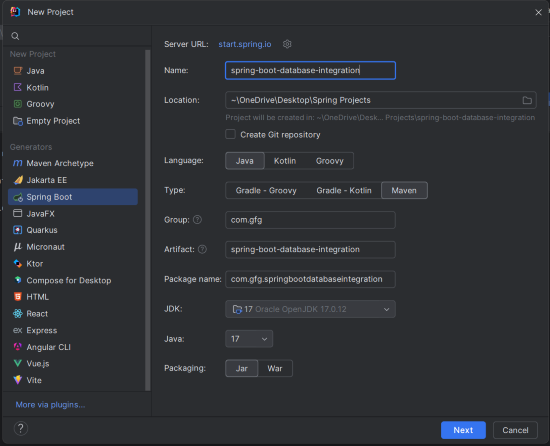
Use your preferred IDE to create a new Spring Boot project with the following settings:
Click on the Next button.
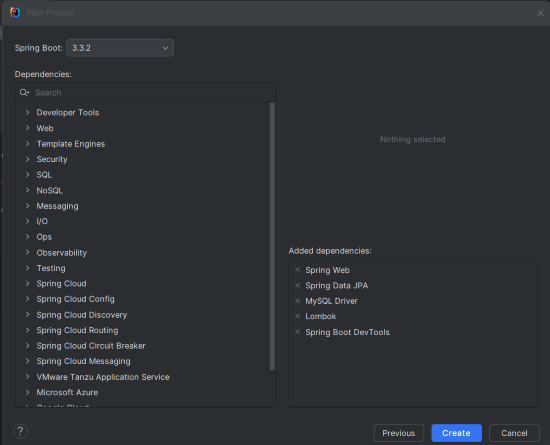
Add the following dependencies into the Spring Boot project.
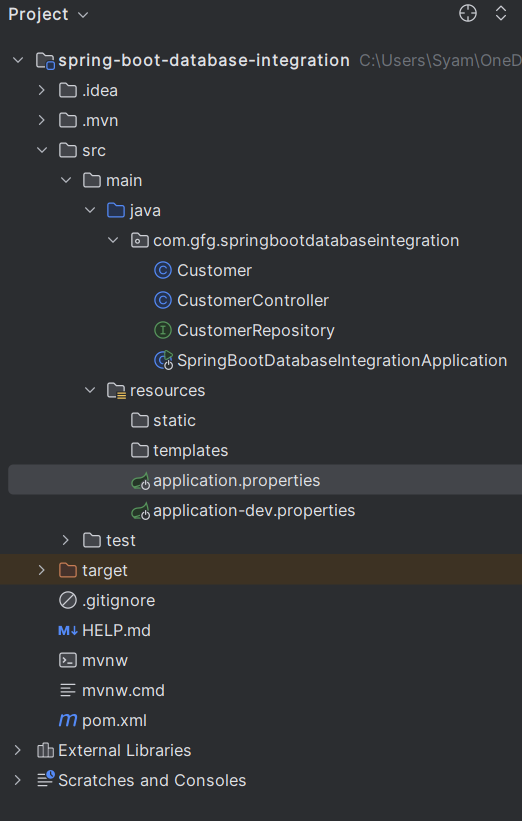
The project structure will look like this:
Open application.properties and add the MySQL configuration. This file configures the connection details required to integrate MySQL with your Spring Boot application.
spring.application.name=spring-boot-database-integration

# MySQL Configuration
spring.datasource.url=jdbc:mysql://localhost:3306/testdb
spring.datasource.username=root
spring.datasource.password=mypassword
spring.jpa.hibernate.ddl-auto=update
spring.jpa.show-sql=true
spring.jpa.properties.hibernate.dialect=org.hibernate.dialect.MySQL8DialectCreate application-dev.properties and add the H2 configuration. This file sets up the H2 in-memory database for development and testing purposes.
# H2 Database Configuration
spring.datasource.url=jdbc:h2:mem:testdb
spring.datasource.driverClassName=org.h2.Driver
spring.datasource.username=sa
spring.datasource.password=password
spring.jpa.hibernate.ddl-auto=update
spring.h2.console.enabled=true
spring.h2.console.path=/h2-consoleCustomer is an entity class representing the Customer table in the database. It defines the fields, constructors, and getter/setter methods required for the entity.
CustomerRepository is a Spring Data JPA repository that provides CRUD operations for the Customer entity. It extends JpaRepository to inherit standard data access methods.
CustomerController is a REST controller that handles HTTP requests for Customer entities. It provides endpoints for CRUD operations, allowing you to manage customers via RESTful services.
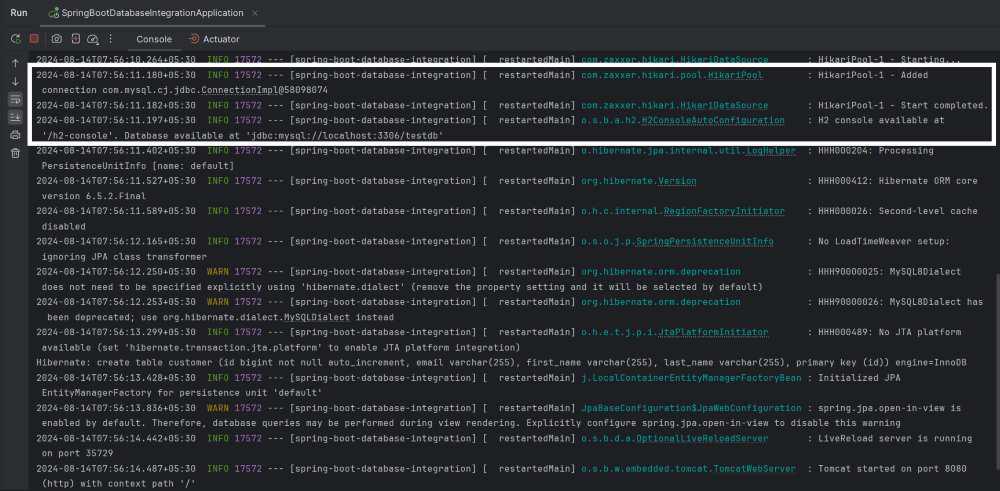
Now, run the application and it will start at port 8080.
This project demonstrates the integration of the MySQL and H2 database of the Spring Boot project. If you observe the application logs of the project, it shows the database connections of the MySQL and H2 Databases of the Spring Boot application.