VOOZH about

URL: https://www.geeksforgeeks.org/advance-java/spring-data-jpa-id-annotation/

โ‡ฑ Spring Data JPA - @Id Annotation - GeeksforGeeks


  • Courses
  • Tutorials
  • Interview Prep

Spring Data JPA - @Id Annotation

Last Updated : 9 Apr, 2026

The @Id annotation is used to define the primary key of a JPA entity, uniquely identifying each record in the database. It works with @GeneratedValue to automatically generate IDs.

  • Marks a field as the primary key
  • Ensures each entity instance is uniquely identifiable
  • Works with @GeneratedValue for auto ID generation

Syntax

import jakarta.persistence.*;

@Entity
public class ExampleEntity {

@Id
@GeneratedValue(strategy = GenerationType.IDENTITY)
private Long id;
}

Here:

  • @Id identifies the field as the primary key in the database table.
  • It can be applied to primitive or wrapper types (int, long, Integer, Long, etc.).
  • It is mandatory in every entity class managed by JPA.
  • Usually combined with @GeneratedValue to auto-generate IDs.

Common @GeneratedValue Strategies

  • GenerationType.IDENTITY: Uses the databaseโ€™s identity column for auto-increment. Common in MySQL.
  • GenerationType.SEQUENCE: Uses a database sequence to generate IDs. Common in PostgreSQL and Oracle.
  • GenerationType.TABLE: Uses a separate table to maintain and generate unique identifiers.
  • GenerationType.AUTO: Lets JPA automatically select the generation strategy based on the underlying database.

Steps to Implement @Id Annotation
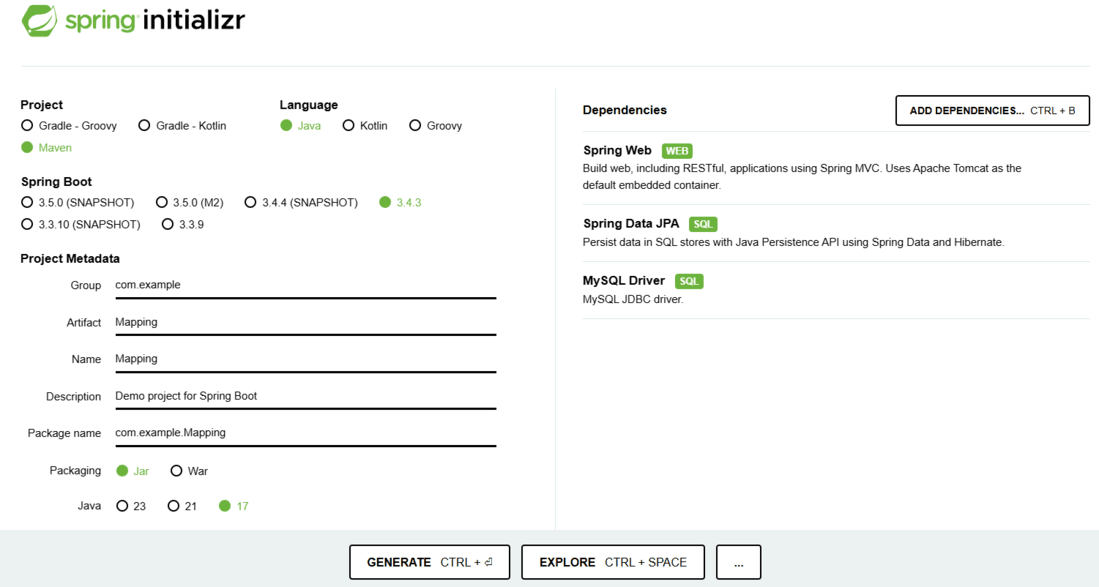
Weโ€™ll now create a simple Spring Boot application to demonstrate how the @Id annotation works with Spring Data JPA and MySQL.

Step 1: Create a New Spring Boot Project

Go to Spring Initializr and configure the project as follows:

  • Project: Maven
  • Language: Java
  • Spring Boot Version: 3.x (latest stable)
  • Dependencies: Spring Web, Spring Data JPA, MySQL Driver
๐Ÿ‘ Spring-Initializr
spring initializr

Click Generate, download the ZIP file, and import it into your IDE (e.g., IntelliJ IDEA or Eclipse).

๐Ÿ‘ Image

Step 2: Configure the Database Connection

Add the following properties in src/main/resources/application.properties:

spring.datasource.url=jdbc:mysql://localhost:3306/mapping
spring.datasource.username=root
spring.datasource.password=yourpassword
spring.datasource.driver-class-name=com.mysql.cj.jdbc.Driver

spring.jpa.hibernate.ddl-auto=update
spring.jpa.database-platform=org.hibernate.dialect.MySQLDialect
spring.jpa.show-sql=true

  • ddl-auto=update: Automatically updates the schema when entities change.
  • show-sql=true: Logs SQL queries executed by Hibernate.

Step 3: Create the Entity Class

Create a new file named StudentInformation.java under src/main/java/com/example/mapping/.

Explanation:

  • @Entity marks the class as a persistent entity.
  • @Table(name = "Student") maps it to the Student table in MySQL.
  • @Id marks rollno as the primary key.
  • @GeneratedValue(strategy = GenerationType.IDENTITY) allows MySQL to auto-generate roll numbers.

Note: Without @Id, Hibernate cannot map the entity properly to a table row.

Step 4: Create the Repository Interface

Create StudentRepository.java in the same package:

Explanation:

  • JpaRepository provides CRUD and query methods without needing boilerplate code.
  • The first parameter is the entity type (StudentInformation), and the second is the primary key type (Integer).

Step 5: Main Application Class

No changes in main application class.

Explanation:

  • @SpringBootApplication is a combination of @Configuration, @EnableAutoConfiguration, and @ComponentScan.
  • It marks the main entry point of the Spring Boot application.

Running the Application

Console Output:

๐Ÿ‘ Console-Output
Console Output

Verifying the Table in MySQL

1. Start the MySQL server.

2. Log in using the terminal:

mysql -u root -p

3. Switch to the database:

USE mapping;

4. List tables:

SHOW TABLES;

5. View table structure:

DESCRIBE Student;

๐Ÿ‘ Database-Output
Output
Comment
Article Tags:

Explore