 |
VOOZH | about |
|
VOOZH | about |
Spring Security provides mechanisms to protect applications from common security threats. One of the most important protections is Cross-Site Request Forgery (CSRF) defense. By default, Spring Security enables CSRF protection, but developers often disable it for APIs without understanding when it’s safe.
Cross-Site Request Forgery (CSRF) is an attack that tricks an authenticated user into unknowingly sending a malicious request to a web application.
Example:
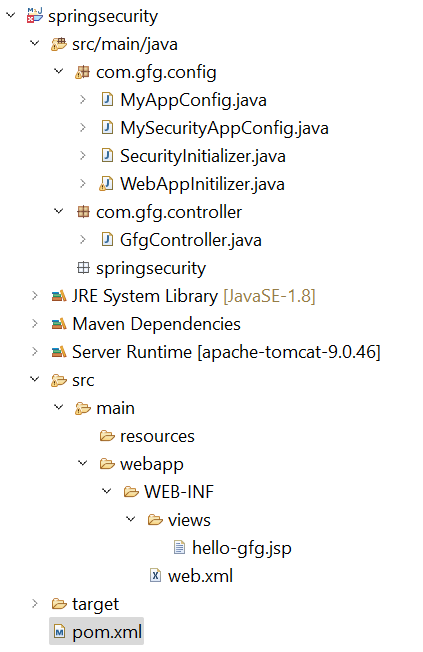
Folder Structure:
Before moving to the project, let’s have a look at the complete project structure for our Spring MVC application.
Add the following dependencies to your pom.xml file
Below is the complete pom.xml file. Please cross-verify if you have missed some dependencies.
pom.xml:
The DispatcherServlet handles all incoming requests in Spring MVC.
Go to the src > main > java and create a class WebAppInitilizer. Below is the code for the WebAppInitilizer.java file.
File: WebAppInitilizer.java
Create another class in the same location (src > main > java) and name it MyAppConfig. Below is the code for the MyAppConfig.java file.
MyAppConfig.java
Go to the src > main > java and create a class GfgController. Below is the code for the GfgController.java file.
File: GfgController.java
Go to the src > main > webapp > WEB-INF > right-click > New > Folder and name the folder as views. Then views > right-click > New > JSP File and name your first view. Here we have named it as hello-gfg.jsp file. Below is the code for the hello-gfg.jsp file. We have created a simple web page inside that file.
hello-gfg.jsp
Go to the src > main > java and create a class MySecurityAppConfig and annotate the class with @EnableWebSecurity annotation. This class will help to create the spring security filter chain. Below is the code for the MySecurityAppConfig.java file.
MySecurityAppConfig.java
SecurityInitializer.java
Go to the src > main > java and create a class SecurityInitializer. This class will help to register the spring security filter chain with our application. Below is the code for the SecurityInitializer.java file.
Default Behavior: CSRF is enabled by default in Spring Security.
Disabling CSRF (for APIs or stateless apps):
http://localhost:8080/springsecurity/gfg
You will see an authentication popup. Inspect the page source:
Now right-click and go to the View page source.