 |
VOOZH | about |
|
VOOZH | about |
In Java applications, it’s common to read input from System.in for interactive console applications. Unit testing such methods can be challenging because they rely on user input. We can achieve this by redirecting System.in to a ByteArrayInputStream that contains the input we want to simulate.
In this article, we will learn how to perform unit testing of System.in in Java using JUnit.
Include the below JUnit 5 dependencies into the pom.xml file to set up the testing environment.
<dependencies>
 <dependency>
 <groupId>org.junit.jupiter</groupId>
 <artifactId>junit-jupiter-api</artifactId>
 <version>5.8.2</version>
 <scope>test</scope>
 </dependency>
 <dependency>
 <groupId>org.junit.jupiter</groupId>
 <artifactId>junit-jupiter-engine</artifactId>
 <version>5.8.2</version>
 <scope>test</scope>
 </dependency>
</dependencies>
The purpose of unit testing is to ensure that individual pieces of code, functions or methods, in isolation are correct. Testing becomes more difficult when a method relies on external input such as the user input through System.in. By default, System.in expects users to provide input through the console, but in automated tests, we want to simulate this input programmatically.
The basic idea is to convert System.in to another input stream, such as ByteArrayInputStream, which allows automatic, repeatable hands-free testing. Basic steps include:
ByteArrayInputStream to simulate user input during the test.We can replace System.in with any input stream using the System.setIn(InputStream in) method. For testing purposes, ByteArrayInputStream can be used to simulate the input. After simulating the input, we can execute the method under test and make assertions to verify that the method behaves as expected.
Example:
System.inLet’s create a simple Java class, InputReader, with a method that reads user input from System.in and returns it.
public class InputReader {

 // This method reads from System.in and returns the input as a String
 public String readInput() {
 Scanner scanner = new Scanner(System.in);
 System.out.print("Enter input: ");
 return scanner.nextLine();
 }
}
In this class, readInput() reads a line of input from System.in and returns it. Normally, this method would wait for user input, but for testing purposes, we will simulate this input.
System.in for TestingTo test this method without requiring user interaction, we’ll use ByteArrayInputStream to simulate System.in. By setting System.in to an input stream containing test data, we can automate the input for testing purposes.
Here is a JUnit test for the InputReader class. We will set System.in to a ByteArrayInputStream that contains our simulated user input.
import org.junit.jupiter.api.AfterEach;
import org.junit.jupiter.api.BeforeEach;
import org.junit.jupiter.api.Test;
import java.io.ByteArrayInputStream;
import java.io.InputStream;
import static org.junit.jupiter.api.Assertions.assertEquals;

public class InputReaderTest {

 private final InputStream originalSystemIn = System.in;
 private ByteArrayInputStream testIn;

 @BeforeEach
 public void setUpInput() {
 // This method runs before each test to set up the input
 }

 @AfterEach
 public void restoreSystemIn() {
 // Restore System.in after each test
 System.setIn(originalSystemIn);
 }

 @Test
 public void testReadInput() {
 // Simulate user input "Hello World"
 String simulatedInput = "Hello World";
 testIn = new ByteArrayInputStream(simulatedInput.getBytes());
 System.setIn(testIn);

 // Invoke the method to be tested
 InputReader inputReader = new InputReader();
 String input = inputReader.readInput();

 // Assert that the method returns the correct result
 assertEquals(simulatedInput, input);
 }
}
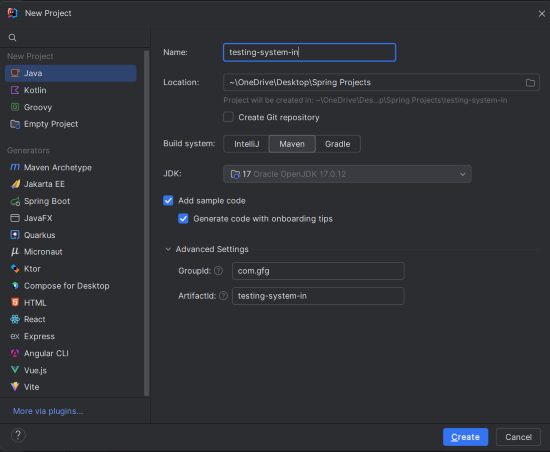
Create a new Maven project using IntelliJ IDEA. Choose the following options:
Click on the Create button.
After the project creation done, set the folder structure as shown in the below image:
pom.xmlOpen the pom.xml file and add the following JUnit 5 dependencies:
UserInput ClassCreate a class named UserInput to read a number from the user and return its square:
Create a main class to execute the program:
UserInputTest ClassTo test the UserInput class, create the following test class:
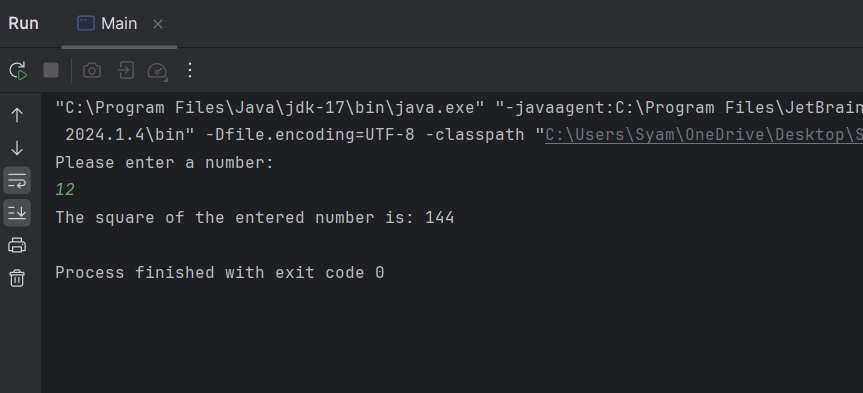
Once the project is complete, run the Main class. We will see the below output in the console:
Now, we will run the tests, use the following Maven command in the terminal.
mvn testIn this article, we demonstrated how to perform unit testing on methods that read from System.in using JUnit.
Simulating System.in in the unit tests is a powerful technique to test the input-dependent methods in the Java. By redirecting the input stream using the ByteArrayInputStream, we can simulate the various user inputs and verify the correctness of the methods. This approach can helps in the automating tests and ensuring the code quality.