 |
VOOZH | about |
|
VOOZH | about |
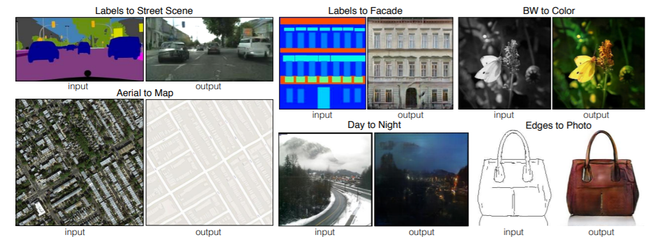
Pix2pix GANs were proposed by researchers at UC Berkeley in 2017. It uses a conditional Generative Adversarial Network to perform the image-to-image translation task (i.e. converting one image to another, such as facades to buildings and Google Maps to Google Earth, etc.
The pix2pix uses conditional generative adversarial networks (conditional-GAN) in its architecture. The reason for this is even if we train a model with a simple L1/L2 loss function for a particular image-to-image translation task, this might not understand the nuances of the images.
Generator:
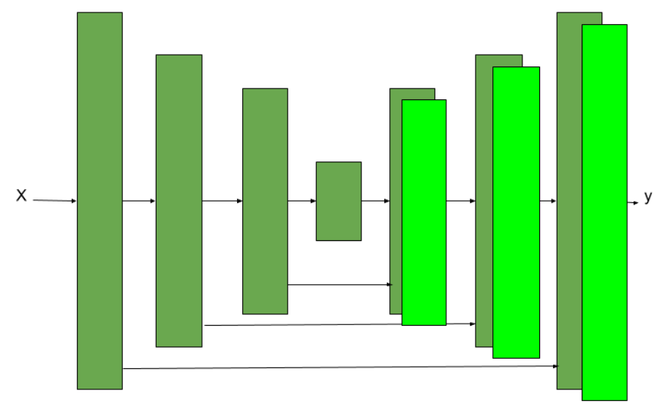
The architecture used in the generator was U-Net architecture. It is similar to Encoder-Decoder architecture except for the use of skip-connections in the encoder-decoder architecture. Skip connections are used because when the encoder downsamples the image, the output of the encoder contains more information about features and classification of class but lost the low-level features like spatial arrangement of the object of that class in the image, so skip connections between encoder and decoder layers prevent this problem of losing low-level features.
Discriminator:
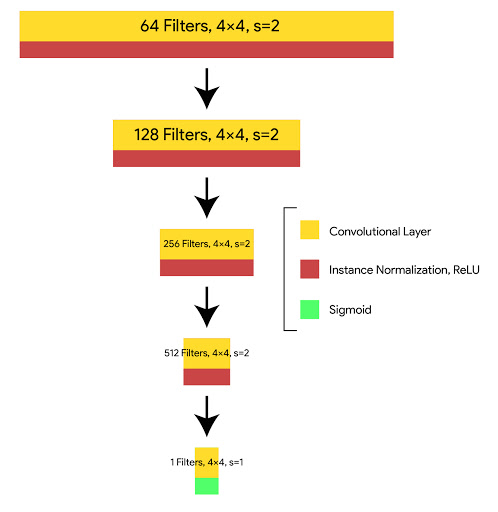
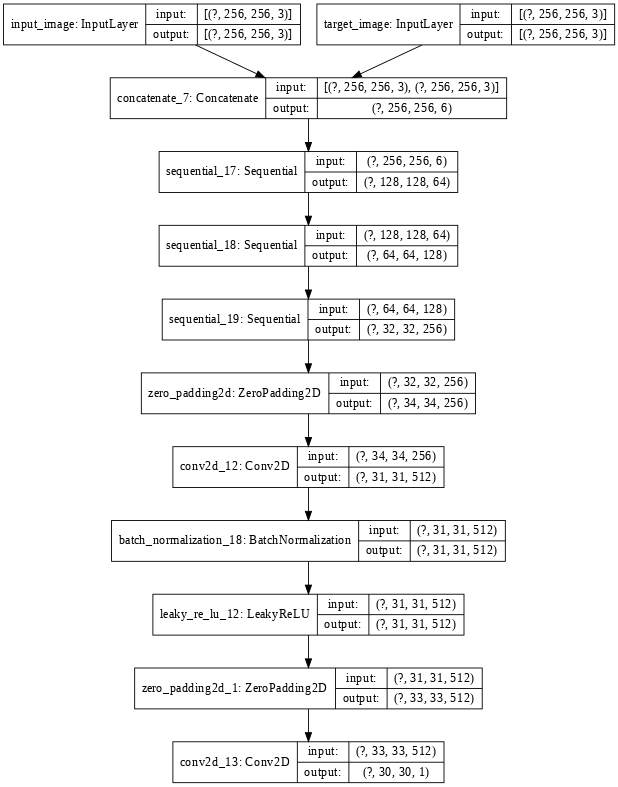
The discriminator uses Patch GAN architecture, which also uses Style GAN architecture. This PatchGAN architecture contains a number of Transpose convolutional blocks. This PatchGAN architecture takes an NxN part of the image and tries to find whether it is real and fake. This discriminator is applied convolutionally across the whole image, averaging it to generate the result of the discriminator D.
Each block of the discriminator contains a convolution layer, batch norm layer, and LeakyReLU. This discriminator receives two inputs:
The PatchGAN is used because the author argues that it will be able to preserve high-frequency details in the image, with low-frequency details that can be focused by L1-loss.
Generator Loss: The generator loss used in the paper is the linear combination of L1- loss between generated image, target image, and GAN loss as we define above.
Our generated loss will be:
Therefore, our total loss for generator
Discriminator Loss: The discriminator loss takes two inputs real image and generated image:
First, we download and preprocess the image dataset. We will use the CMP Facade dataset that was provided Czech Technical University and processed by the authors of the pix2pix paper. We will preprocess the dataset before training.
Code:
Now, we load train, and test data using the function we defined above.
Code:
After performing data processing, Now, we write the code for generator architecture. This generator block contains 2 parts encoder block and decoder block. The encoder block contains a downsampling convolution block and the decoder block contains an upsampling transpose convolution block.
Now we define our architecture for the discriminator. The discriminator architecture uses a PatchGAN model. For this architecture, we can use the above downsampling convolution block we defined. The loss of the discriminator is the sum of real loss (sigmoid cross-entropy b/w real image and array of 1s) and generated loss (sigmoid cross-entropy b/w generated image and an array of 0s).
Code:
In this step, we define optimizers and checkpoints. We will use Adam optimizer in both generator discriminator.
Code:
Now, we define the training procedure. The training procedure consists of the following steps:
Code:
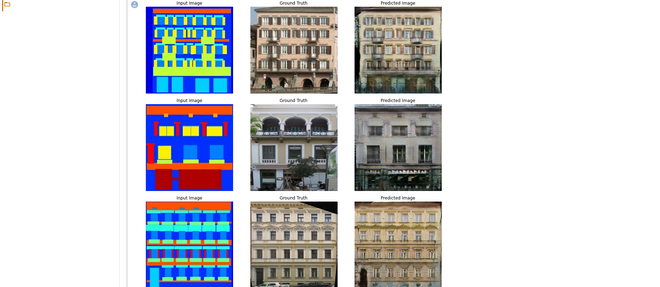
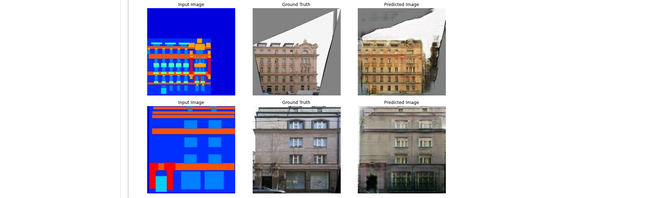
Now, we use the generator of the trained model on test data to generate the images.
Code: