 |
VOOZH | about |
|
VOOZH | about |
Chatbots are gaining popularity as a means for businesses to interact with their customers. Domino's Pizza is one such company that has used a chatbot to improve its customer service. In this article, we'll look at how to use Python to create a chatbot for Domino's Pizza.
Tools and Technologies Used:
The chatbot for Domino's Pizza will be built using Python. The libraries used in this project include:
The Domino's Pizza chatbot will be built with a combination of natural language processing (NLP) and machine learning techniques. NLP will be used by the chatbot to understand customer queries and respond appropriately. The chatbot will be trained using the machine learning algorithm to recognise patterns in customer queries and provide appropriate responses.
Step 1: Setting up a virtual environment
The first step is to set up a virtual environment to avoid dependency conflicts with other Python projects. To set up a virtual environment, run the following commands in your terminal:
pip install virtualenv
virtualenv chatbot_env
source chatbot_env/bin/activate
Step 2: Installing the necessary libraries
The next step is to install the libraries required for this project. Run the following command in your terminal:
pip install flask twilio requests
Step 3: Creating a Flask app
The next step is to create a Flask app. Create a new file called `app.py` and add the following code:
Step 4: Creating a Twilio account
The next action is to open a Twilio account. With the help of the communication platform Twilio, you can make and receive voice, text, and video conversations. Visit Twilio's website and register for a free account to get started.
Starting Over
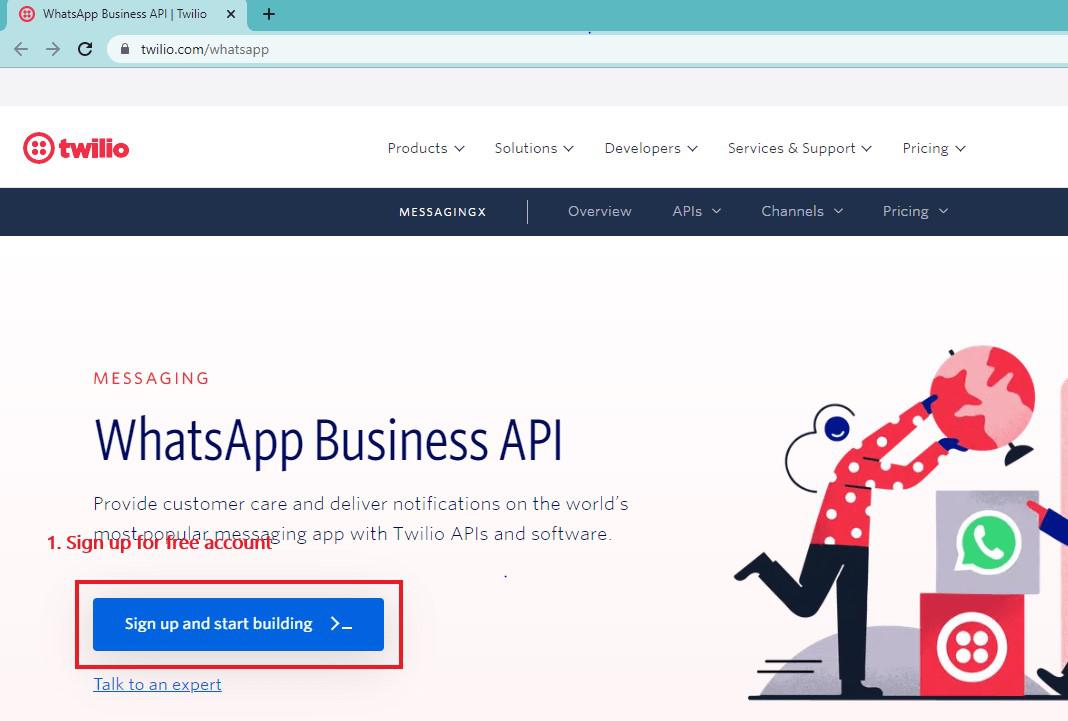
Step 4.1: Create a Twilio account with the Twilio WhatsApp API.
Go to this link and click the signup and start building button, then enter your information and verify your email address and mobile number.
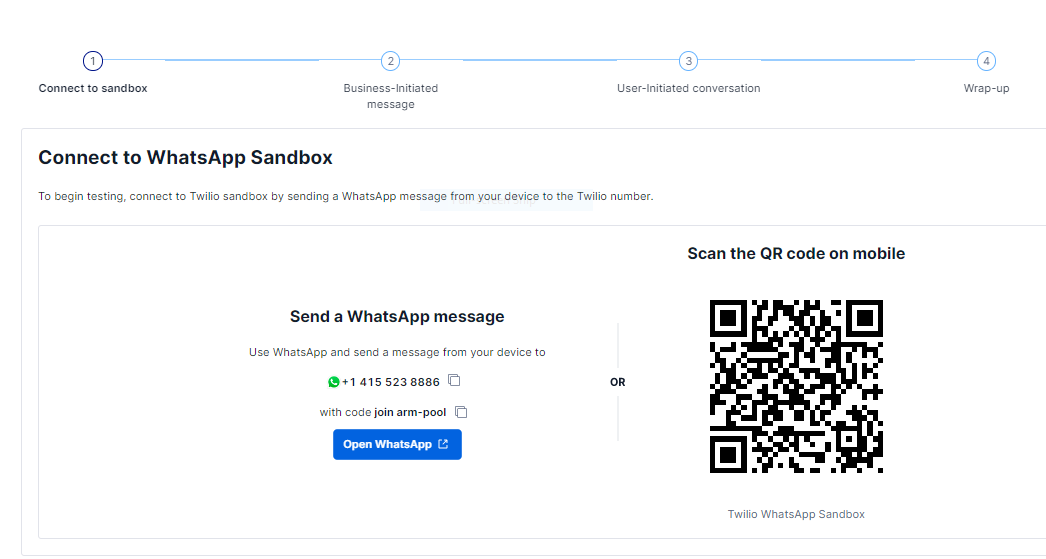
After logging in, select the Develop option from the left menu, then the Messaging subject, then the Try it out option, and finally Send a WhatsApp message. This will start taking you to a new page on which you can configure the WhatsApp Sandbox.
Step 4.2: Configure the Twilio WhatsApp Sandbox by sending a message to the following WhatsApp number with the secret unique security code:
Send the code in the format shown below to +14155238886.
secret code : join <secret-code>
Step 5: Adding Twilio credentials to the Flask app
After creating a Twilio account, you need to add your Twilio credentials to the Flask app. Open the `app.py` file and add the following code:
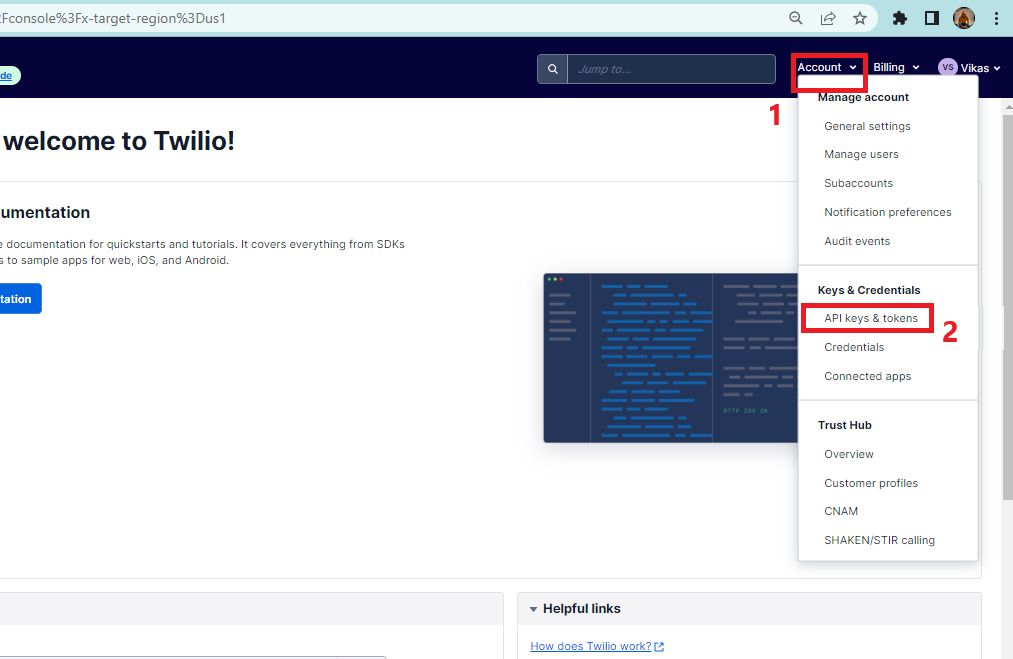
Getting Started with Twilio Credentials
Step 5.1: Go to your Twilio account Console and copy the Twilio credentials (i.e., Your Account SID, Your Auth Token)
Step 6: Setting up the chatbot
The next step is to set up the chatbot. Create a new file called `chatbot.py` and add the following code:
This function sends a query to the Domino's Pizza API and returns the response.
Getting started with how to get API Key in Twilio:
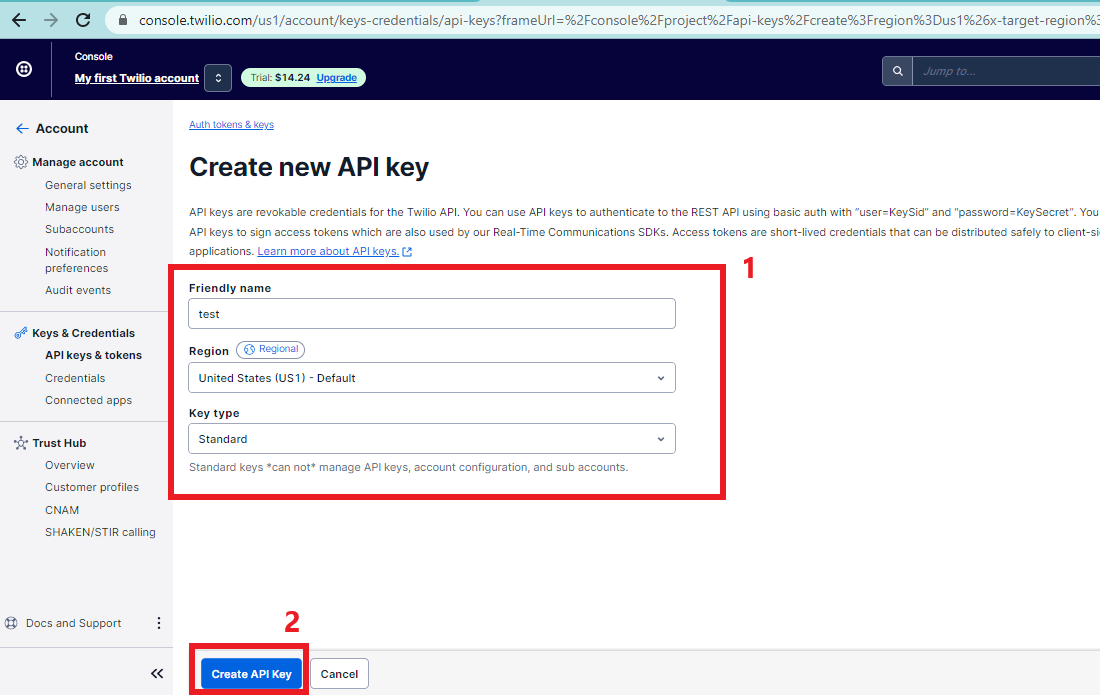
Step 6.1: Go to your Twilio account Console and select Account tab and then select API Keys and tokens
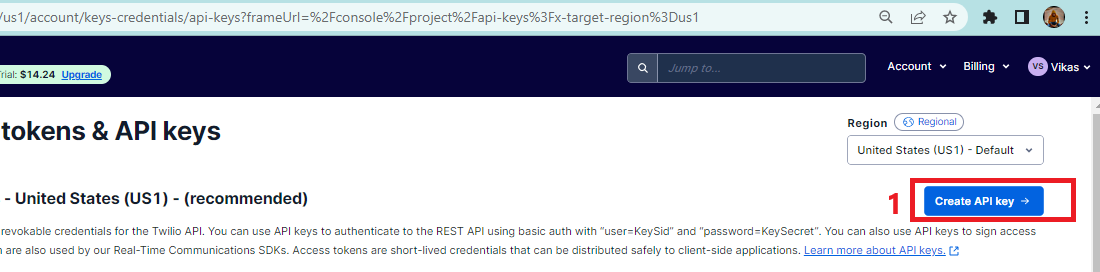
Step 6.2: Select create API Key
Step 6.3: Enter the API Key details and click on create API Key
Step 6.4: Copy the API Key and paste to 'Ocp-Apim-Subscription-Key': 'YOUR_API_KEY'
Step 7: Updating the Flask app
The Flask app has to be updated in order to handle incoming Twilio messages and respond with the proper messages. Add the following code to the `app.py` file by opening it:
Twilio will use the route '/sms' defined by this code to relay incoming messages to your Flask application. After extracting the message text from the incoming message and sending it to the `get_response` function to obtain the necessary response, the `sms+reply` function then replies to the user using Twilio's Messaging Response class.
Step 8: Testing the chatbot
It's time to put the chatbot to the test now that it's been built. To test the chatbot, launch the Flask app in your terminal by typing the following command:
python app.py
This will launch the Flask application and make it accessible at http://localhost:5000.
Create a Twilio sandbox to receive messages next. To do so, open the Twilio console and navigate to the "Messaging" section. Then, under "Phone Numbers," click "Try it out". To generate a sandbox number, follow the steps below.
Finally, test the chatbot by sending a message to the Twilio sandbox number. You should receive a response from the chatbot containing the necessary information.
Examples of Chatbot Template:
The following is the final code template for the chatbot with comments:
In the preceding code, we import the required libraries before starting the Flask app. The Twilio credentials are then configured, and a function is defined to send queries to Domino's API.
The Twilio sandbox is then directed to a route that we define. The 'sms_reply' function extracts the message text from the incoming message, passes it to the 'get_response' function to retrieve the appropriate response, and then responds to the user using Twilio's Messaging Response class.
Finally, we run the Flask app and point it to 'http://localhost:5000'.
This is a Python program that uses the Flask web framework and the Twilio messaging API to create a simple pizza ordering system. The program is designed to run as a web service that receives customer messages via the Twilio API and sends automated responses based on the message content.
The program generates a Flask application and configures routes to handle incoming messages. It also generates a dictionary for storing menu items and another for storing the customer's order.
The program responds to specific keywords in the message from the customer. If a customer sends the word "menu," the program will respond with a list of menu items. If the customer sends an "order," the program will begin the order process by asking what type of pizza they want to order. The program will then add the chosen pizza to the order and ask the customer how many they want. After selecting all of their pizzas and quantities, the customer can send "done" to complete the order. The program will calculate the total cost of the order and send it to the customer as a summary.
The program also handles variations in the messages of the customers. For example, if a customer sends the name of a pizza rather than the number, the program will still place the order for the correct pizza. If the customer sends a number that does not correspond to a pizza, the program will respond with an error message.
Output:
Terminal Screen
WhatsApp Bot