 |
VOOZH | about |
|
VOOZH | about |
This article revolves around a Django Project. It includes Email + Social Login integration in any Django project. We have used React as front end to demonstrate the working of the project. You can use your own front end to int
Before starting, we need to know that we will send authenticated requests by sending a Bearer token in Authorization headers of the request .This token will tell the server which user sent the request. For that we will do these:
After you have created a demo project. Create a app Accounts.
python manage.py startapp accounts
Then you can see that a new folder is created with accounts name, now lets add it to the INSTALLED_APPS in settings.py. So it should look something like this:
INSTALLED_APPS = [
 'django.contrib.admin',
 'django.contrib.auth',
 'django.contrib.contenttypes',
 'django.contrib.sessions',
 'django.contrib.messages',
 'django.contrib.staticfiles',
 # add this
 'accounts',
]
Inside the models.py lets create the model Account and its Manager & also import these:
from django.db import models
from django.contrib.auth.models import AbstractBaseUser,PermissionsMixin,BaseUserManager
from django.utils.translation import gettext_lazy as _

class Account(AbstractBaseUser,PermissionsMixin):
 email=models.EmailField(unique=True)
 username= models.CharField(_('User Name'),max_length=150)
 first_name = models.CharField(_('First Name'),max_length=150)
 last_name = models.CharField(_('last Name'),max_length=150)
 is_staff=models.BooleanField(default=False)
 is_active=models.BooleanField(default=True)

 objects=CustomAccountManager()

 USERNAME_FIELD='email'
 REQUIRED_FIELDS=['username','first_name']

 def __str__(self):
return self.emailclass CustomAccountManager(BaseUserManager):
def create_user(self,email,username,first_name,password,**other_fields):
if not email:
raise ValueError(_('Please provide an email address'))
email=self.normalize_email(email)
user=self.model(email=email,username=username,first_name=first_name,**other_fields)
user.set_password(password)
user.save()
return user
def create_superuser(self,email,username,first_name,password,**other_fields):
other_fields.setdefault('is_staff',True)
other_fields.setdefault('is_superuser',True)
other_fields.setdefault('is_active',True)
if other_fields.get('is_staff') is not True:
raise ValueError(_('Please assign is_staff=True for superuser'))
if other_fields.get('is_superuser') is not True:
raise ValueError(_('Please assign is_superuser=True for superuser'))
return self.create_user(email,username,first_name,password,**other_fields)Now add this in settings.py to use our custom user model :
AUTH_USER_MODEL='accounts.Account'
Then we need to migrate this model to database.
python manage.py makemigrations
python manage.py migrate
For that we need to install some libraries first which I will explain below why we need them:
pip install djangorestframework
pip install django-cors-headers
pip install drf_social_oauth2
Now inside the settings.py we should add these to INSTALLED_APPS for our app to work as expected:
INSTALLED_APPS = [
 'django.contrib.admin',
 'django.contrib.auth',
 'django.contrib.contenttypes',
 'django.contrib.sessions',
 'django.contrib.messages',
 'django.contrib.staticfiles',
 # add these
 'rest_framework',
 'oauth2_provider',
 'social_django',
 'drf_social_oauth2',
 'corsheaders',
 # LOCAL
 'accounts',
]
Let's also add these configurations to settings.py which I'll explain below:
AUTHENTICATION_BACKENDS = (
 'drf_social_oauth2.backends.DjangoOAuth2',
 'django.contrib.auth.backends.ModelBackend',
)
REST_FRAMEWORK = {
 'DEFAULT_AUTHENTICATION_CLASSES': (
 'oauth2_provider.contrib.rest_framework.OAuth2Authentication',
 'drf_social_oauth2.authentication.SocialAuthentication',
 )
}
CORS_ALLOWED_ORIGINS = [
 "http://localhost:3000",
 "http://127.0.0.1:3000"
]Alright now let's add some configuration to the MIDDLEWARE and TEMPLATES :
MIDDLEWARE = [
 'django.middleware.security.SecurityMiddleware',
 'django.contrib.sessions.middleware.SessionMiddleware',
 'django.middleware.common.CommonMiddleware',
 'django.middleware.csrf.CsrfViewMiddleware',
 'django.contrib.auth.middleware.AuthenticationMiddleware',
 'django.contrib.messages.middleware.MessageMiddleware',
 'django.middleware.clickjacking.XFrameOptionsMiddleware',
 # add these
 'corsheaders.middleware.CorsMiddleware',
 'django.middleware.common.CommonMiddleware',
]

TEMPLATES = [
 {
 'BACKEND': 'django.template.backends.django.DjangoTemplates',
 'DIRS': [],
 'APP_DIRS': True,
 'OPTIONS': {
 'context_processors': [
 'django.template.context_processors.debug',
 'django.template.context_processors.request',
 'django.contrib.auth.context_processors.auth',
 'django.contrib.messages.context_processors.messages',
 # add these
 'social_django.context_processors.backends',
 'social_django.context_processors.login_redirect',
 ],
 },
 },
]
Those are required by social logins and cors
Let's add some URL to django project's urls.py as those are required by both rest framework and oauth
from django.contrib import admin
from django.urls import path,include

urlpatterns = [
 path('admin/', admin.site.urls),
 # add these
 path('api-auth/', include('rest_framework.urls')),
 path('api-auth/', include('drf_social_oauth2.urls',namespace='drf')),
]For Registering / Signing Up a user we need to write a serializer and view . Note that after signing up , that user needs to login by himself , that won't happen automatically. However I have covered that as well! So a user can register and our backend will login that user!!
Let's create the serializer, I have already created a serializers.py in accounts folder , so now write this code:
from rest_framework import serializers
from .models import Account

class RegistrationSerializer(serializers.ModelSerializer):
 class Meta:
 model=Account
 fields=('email','username','password','first_name')
 extra_kwargs={'password':{'write_only':True}}

 def create(self,validated_data):
 password=validated_data.pop('password',None)
 instance=self.Meta.model(**validated_data)
 if password is not None:
 instance.set_password(password)
 instance.save()
 return instance
Inside the RegistrationSerializer :
Now we will write the view for creating users:
from django.shortcuts import render
from rest_framework.views import APIView
from rest_framework import status,generics
from rest_framework.response import Response
from .serializers import RegistrationSerializer
from rest_framework import permissions
from .models import Account

class CreateAccount(APIView):
 permission_classes=[permissions.AllowAny]

 def post(self,request):
 reg_serializer=RegistrationSerializer(data=request.data)
 if reg_serializer.is_valid():
 new_user=reg_serializer.save()
 if new_user:
 return Response(status=status.HTTP_201_CREATED)
 return Response(reg_serializer.errors,status=status.HTTP_400_BAD_REQUEST)
also create a urls.py in accounts directory and write this
from django.urls import path
from .views import CreateAccount

app_name = 'users'

urlpatterns = [
 path('create/', CreateAccount.as_view(), name="create_user"),]
finally add this url to project's urls.py
from django.contrib import admin
from django.urls import path,include

urlpatterns = [
 path('admin/', admin.site.urls),
 path('api-auth/', include('rest_framework.urls')),
 path('api-auth/', include('drf_social_oauth2.urls',namespace='drf')),
 #add this
 path('api-auth/', include('accounts.urls'))
]
Now for login we don't need to write any extra code as login is nothing but getting access token from server and all these is already taken care of by drf-social-oauth2. We don't even need to write any endpoints for that !
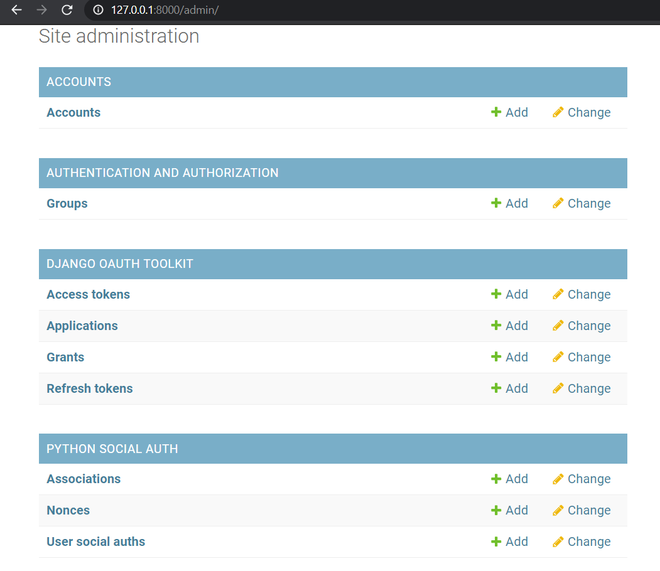
We need to create a Application and get client_id and client_secret to get access tokens, So let's visit admin running on http://127.0.0.1:8000/admin/ and you should see something like this:
Here you can see Applications, press the add button of that and create a new application. Don't touch the Client id and Client secret, select user as your admin superuser, and Client type will be confidential, Authorization grant type will be Resource owner password-based , then save it.
That's it we are ready to check our application now so let's create a superuser and pass the required values and then run server inside virtual environment
python manage.py runserver
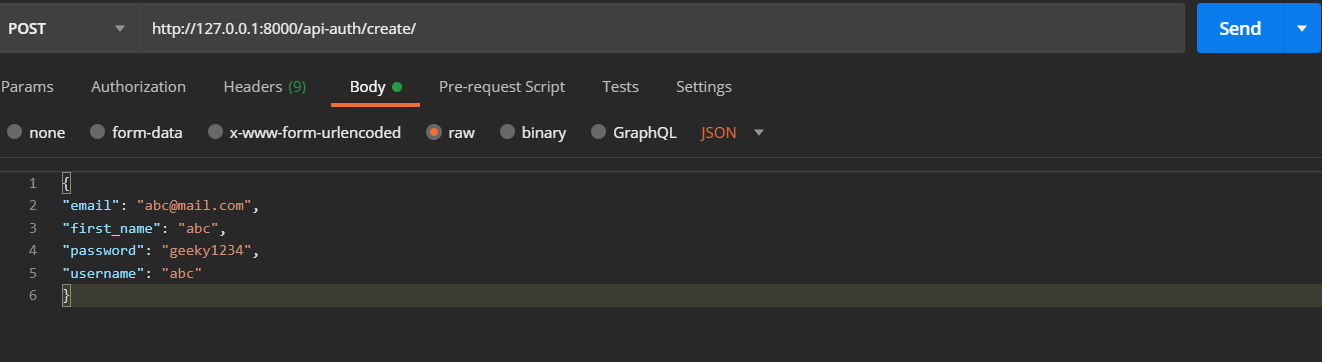
Now open Postman and write this URL and in the body write this and send the request!
You should get a blank response like this
Thus the user is created so it is working fine!
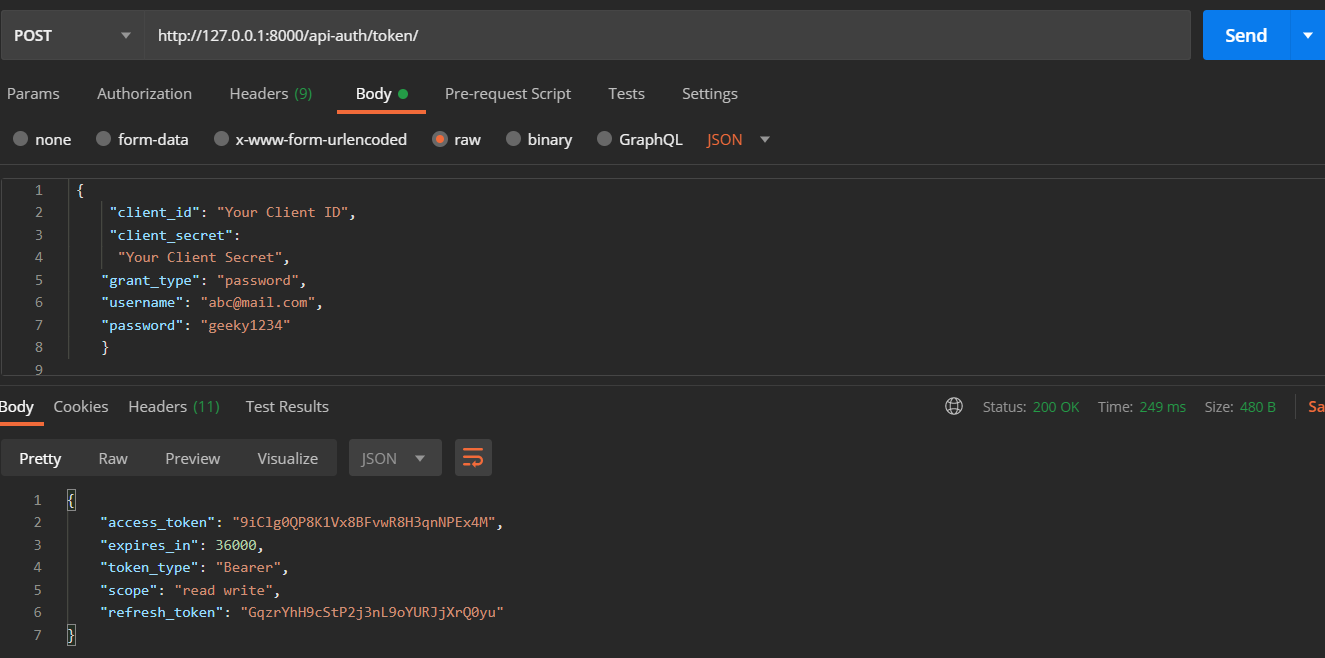
For sending request for token we will pass client_id, client_secret, email as username, password and grant_type=password to let server know this is for getting fresh new access_token and refresh token
Now we can send requests for token, so back in postman send this request to http://127.0.0.1:8000/api-auth/token :
Note that we pass email to username field in request as passing username is mandatory
Remember I said we will revisit that CreateAccount view to login the user after saving the serialized data , Lets do that
import requests # add this

class CreateAccount(APIView):
 permission_classes=[permissions.AllowAny]

 def post(self,request):
 reg_serializer=RegistrationSerializer(data=request.data)
 if reg_serializer.is_valid():
 new_user=reg_serializer.save()
 if new_user:
 #add these
 r=requests.post('http://127.0.0.1:8000/api-auth/token', data = {
 'username':new_user.email,
 'password':request.data['password'],
 'client_id':'Your Client ID',
 'client_secret':'Your Client Secret',
 'grant_type':'password'
 })
 return Response(r.json(),status=status.HTTP_201_CREATED)
 return Response(reg_serializer.errors,status=status.HTTP_400_BAD_REQUEST)
So after saving the new user we will send a post request to get the token and send it back as Response. This will automatically login the user after signup!
Google and Facebook authentications need a frontend for complete demonstrations so I will show you that with react , however any frontend can do if you know what to do ! (I'll do that after the necessary steps)
We will create a different serializer which will return info about users and current user through two different views, one will be authenticated request and another will be a non-authenticated request.
so the serializer will look like this :
class UsersSerializer(serializers.ModelSerializer):
 class Meta:
 model=Account
 fields=('email','username','first_name')
We will write this two views :
from rest_framework import status,generics

class AllUsers(generics.ListAPIView):
 permission_classes=[permissions.AllowAny]
 queryset=Account.objects.all()
 serializer_class=UsersSerializer

class CurrentUser(APIView):
 permission_classes = (permissions.IsAuthenticated,)
 def get(self, request):
 serializer = UsersSerializer(self.request.user)
 return Response(serializer.data)
urls.py will look like this :
from django.urls import path
from .views import CreateAccount,AllUsers,CurrentUser

app_name = 'users'

urlpatterns = [
 path('create/', CreateAccount.as_view(), name="create_user"),
 path('all/', AllUsers.as_view(), name="all"),
 path('currentUser/', CurrentUser.as_view(), name="current"),
]So let's send non-authenticated request first and it returns this response (Note that Authorization header has nothing in it)
Now let's get the access token we previously received on step 3
It will return the current user now if you have by chance sent the request without Authorization header it would have returned like this
Now what if the access token expires what to do then ??
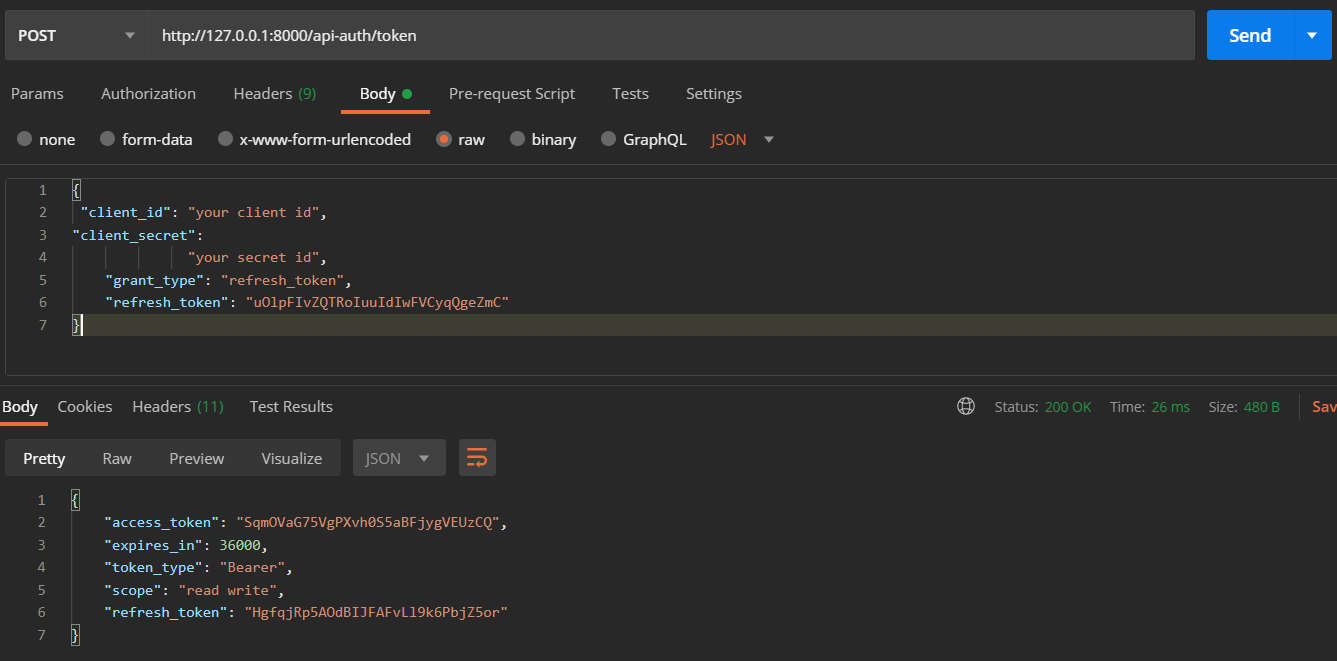
For that we need to send refresh token to the same endpoint to get new access and refresh token
Let me show you how ! So we send the request to /token with client_id, client_secret, grant_type = refresh_token (so that server understands request has a refresh token which then converts old access and refresh token to new access and refresh token ) and refresh_token will be the token we received in third step
It returns new tokens as a response you can use this new access token as Bearer token to Authenticate requests
Add these in settings.py and to get required keys for facebook and google you need to visit here for fb and here for google and perform the necessary steps there.
AUTHENTICATION_BACKENDS = (
 'social_core.backends.google.GoogleOAuth2',
 'social_core.backends.facebook.FacebookAppOAuth2',
 'social_core.backends.facebook.FacebookOAuth2',

 'drf_social_oauth2.backends.DjangoOAuth2',
 'django.contrib.auth.backends.ModelBackend',
)
# Facebook configuration
SOCIAL_AUTH_FACEBOOK_KEY = 'your facebook key'
SOCIAL_AUTH_FACEBOOK_SECRET = 'your facebook secret'

# Define SOCIAL_AUTH_FACEBOOK_SCOPE to get extra permissions from Facebook.
# Email is not sent by default, to get it, you must request the email permission.
SOCIAL_AUTH_FACEBOOK_SCOPE = ['email']
SOCIAL_AUTH_FACEBOOK_PROFILE_EXTRA_PARAMS = {
 'fields': 'id, name, email'
}
SOCIAL_AUTH_USER_FIELDS=['email','first_name','username','password']

SOCIAL_AUTH_GOOGLE_OAUTH2_KEY = "your google oauth2 key"
SOCIAL_AUTH_GOOGLE_OAUTH2_SECRET = "your google oauth2 secret"

# Define SOCIAL_AUTH_GOOGLE_OAUTH2_SCOPE to get extra permissions from Google.
SOCIAL_AUTH_GOOGLE_OAUTH2_SCOPE = [
 'https://www.googleapis.com/auth/userinfo.email',
 'https://www.googleapis.com/auth/userinfo.profile',
]Before using this part of tutorial, checkout React JS Tutorial. After you have made a react App, perform the following steps -
Its very easy to authenticate once you have the keys , now we need to install axios , react-facebook-login , react-google-login
Then create a login component where we render these fb and google login button which will take required keys and every user when tries to login with these buttons, will return an access token as well as info about user
import ReactFacebookLogin from "react-facebook-login";
import ReactGoogleLogin from "react-google-login";
import { facebookLogin, googleLogin } from "../axios";# I'll create this later

export default function LogIn() {

 function responseFb(response) {
 console.log(response);
 facebookLogin(response.accessToken);
 }
 function responseGoogle(response) {
 console.log(response);
 googleLogin(response.accessToken);
 }

 return (
 <>
 <ReactFacebookLogin
 appId="Your App Id"
 fields="name,email"
 callback={responseFb}
 />
 <ReactGoogleLogin
 clientId="your google client id"
 buttonText="Login"
 onSuccess={responseGoogle}
 onFailure={responseGoogle}
 cookiePolicy={"single_host_origin"}
 />
 </>
 );
}
However our server has no clue that we have logged in a user as this access token is returned from google , facebook and not from our server.
So how to let our server know ? Send this token to our server or set this token as our Authorized Bearer token ? No in that case we cannot create a account object with our Accounts model or access any account object as current user thus our user will not be technically registered or connected.
So we need to convert this token to get access token, refresh token from our server, (registering our user) and for that I created a axios.js file and there I put this code:
export function facebookLogin(accessToken) {
 axios
 .post(`http://127.0.0.1:8000/api-auth/convert-token`, {
 token: accessToken,
 backend: "facebook",
 grant_type: "convert_token",
 client_id: "your client id",
 client_secret:"your client secret ",
 })
 .then((res) => {
 // Save somewhere these access and refresh tokens
 console.log(res.data);
 });
}
export function googleLogin(accessToken) {
 axios
 .post(`http://127.0.0.1:8000/api-auth/convert-token`, {
 token: accessToken,
 backend: "google-oauth2",
 grant_type: "convert_token",
 client_id: "your client id",
 client_secret: "your client secret",
 })
 .then((res) => {
 // Save somewhere these access and refresh tokens
 console.log(res.data);
 });
}
what we are doing here is:
So how to refresh a token if access tokens expire ?? We want that to happen automatically without letting the user bothered.
axiosInstance.interceptors.response.use(
 (response) => {
 return response;
 },
 async function (error) {
 const originalRequest = error;
 console.log(originalRequest);

 if (typeof error.response === "undefined") {
 alert("a server error happNeD, we will fix it shortly");
 return Promise.reject(error);
 }

 if (
 error.response.status === 401 &&
 !localStorage.getItem("refresh_token")
 ) {
 window.location.href = "/login/";
 return Promise.reject(error);
 }

 if (
 error.response.status === 401 &&
 error.response.statusText === "Unauthorized" &&
 localStorage.getItem("refresh_token") !== undefined
 ) {
 const refreshToken = localStorage.getItem("refresh_token");

 return axios
 .post("http://127.0.0.1:8000/api-auth/token", {
 client_id: "Your client id ",
 client_secret:
 "Your client secret",
 grant_type: "refresh_token",
 refresh_token: refreshToken,
 })
 .then((response) => {
 localStorage.setItem("access_token", response.data.access_token);
 localStorage.setItem("refresh_token", response.data.refresh_token);
 window.location.reload();
 axiosInstance.defaults.headers["Authorization"] =
 "Bearer " + response.data.access_token;
 })
 .catch((err) => console.log(err));
 }
 }
);
This way we can authenticate a user from Django and React using social logins.