 |
VOOZH | about |
|
VOOZH | about |
Jinja is a powerful templating engine for Python that allows developers to generate dynamic text-based content such as HTML, XML, and configuration files. It is widely used in frameworks like Flask and Django for rendering templates with data. This article introduces Jinja, explains its syntax, and demonstrates how to render templates using Python. It provides:
Its syntax is heavily influenced by Django and Python which is good for anyone already familiar with Python.
Jinja can render any text-based format, such as HTML, XML, LaTeX, and plain text. Rendering involves combining a template with data to generate the final output.
To run the examples in this article, Python 3 and Jinja2 must be installed on the system. Jinja2 can be installed using the pip package manager:
Windows: py -m pip install jinja2
Linux: python3 -m pip install jinja2
Following examples use this project structure:
jinjaTests/
|_ templates/
|_ renders/
Although Jinja templates can use any file extension (or none at all), the .jinja extension is recommended because it improves file recognition and editor support. This convention is used throughout the article.
Rendering a jinja template always results in some text (obviously, since this is what jinja is all about as stated earlier). Rendering a template using a python file involves the following steps:
Create a Jinja template named helloWorld.jinja inside the templates directory:
Next, create a Python file named helloWorld.py inside the jinjaTests directory. This file loads and renders the template.
Output
Hello World!
The rendered output can be saved to a file instead of printing it to the console. To do this, replace the print(output) statement in helloWorld.py with the following code:
with open("renders/outputFileName.txt", 'w') as f:
print(output, file = f)
Explanation:
Running helloWorld.py with this change creates a file named outputFileName.txt inside the renders directory containing the rendered output.
Data can be passed to a Jinja template through the render() method using keyword arguments. Inside the template, these values can be accessed using expression delimiters ({{ }}).
Example: Create a template named helloName.jinja inside the templates directory and create a file named helloName.py inside the jinjaTests directory and render the template by passing a value for name.
Output
Hello Geeks!
Explanation:
Note: Variables and expressions are written inside {{ }} delimiters. These delimiters are discussed in more detail in the next section.
Jinja uses delimiters to embed dynamic content and control structures within templates. These delimiters allow display data, write conditions, iterate over collections and add comments while keeping the template readable and maintainable.
All the jinja syntax goes inside the delimiters inside the template. All the text outside the delimiters is rendered as it is. There are three types of delimiters by default:
Expressions are written inside {{ }} delimiters and are evaluated when the template is rendered. They can be used to display variables, perform calculations, or combine values. The result of the expression replaces the delimiter in the final output.
Jinja supports conditional rendering using if, elif, and else statements. These statements allow different content to be displayed based on specific conditions.
{% if <condition> %}
<if block>
{% elif <condition2> %}
<elif block>
{% else %}
<else block>
{% endif %}
The elif and else blocks are optional. During rendering, Jinja evaluates the conditions and renders only the block whose condition evaluates to True.
Jinja provides a for loop that works similarly to Python's for loop. It allows you to iterate over sequences such as lists, tuples, dictionaries, and ranges, making it easy to generate repetitive content dynamically.
{% for <variable name> in <sequence> %}
<loop body>
{% endfor %}
Example:
{% for fruit in fruits %}
{{ fruit }}
{% endfor %}
Output:
Apple
Mango
Orange
Jinja can be used to generate complete HTML pages dynamically by combining HTML markup with Jinja expressions and control structures. After rendering, the generated content can be saved as an .html file and viewed in any web browser.
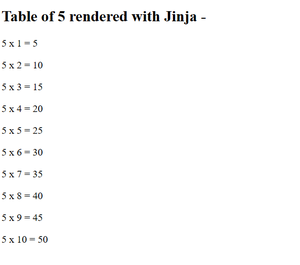
Create a template named webTable.jinja inside the templates folder and add the following code:
Explanation: This template uses the tableOf variable and a for loop to generate the multiplication table dynamically.
Create a Python file named webTable.py in the jinjaTests folder and add the following code:
Running the above file produces a file named "output.html" in renders folder. You can check it out by opening it with a web browser. The output -
Explanation: