We can implement authentication, login/logout functionality in flask app using Flask-Login. In this article, we'll explore how to add authentication to a Flask app using Flask-Login.
To get started, install Flask, Flask-Login, Flask-SQLAlchemy and Werkzeug using this command:
Import necessary classes from Flask, Flask-SQLAlchemy, Werkzeug and Flask-Login.
Create a Flask app and configure it to use an SQLite database.
Set a secret key for session security.
Initialize Flask-SQLAlchemy and LoginManager.
Step 2: Create a User Model & Database
Define a Users class inheriting from db.Model and UserMixin.
Define columns for id, username, and password.
Initialize the database and create the table schema.
Step 3: Adding a user loader
Before adding user authentication, we need a function for Flask-Login to retrieve a user by ID. Flask-SQLAlchemy handles this, so we can simply use the get() method with the user ID.
Step 4: Registering new accounts with Flask-Login
Create an HTML registration form (sign_up.html).
Create a /register route to handle user registration.
sign_up.html code:
To define a new route in Flask, we use the @app.route decorator, which specifies the URL path and allowed methods. By default, it only supports GET requests, but for form submissions, we need to enable POST as well.
Explanation:
We check if the request method is POST using Flask’s request object.
If so, we create a new user using the Users model, getting the username and password from request.form.get().
The user is added to the session, and changes are committed.
Finally, we redirect the user to the login route using redirect(url_for("login")).
Step 5: Allowing users to log in with Flask-Login
Create an HTML login form (login.html).
Implement a /login route to authenticate users.
login.html
login route:
Explanation:
Check if the request method is POST.
If POST, filter the database for a user with the entered username.
Compare the stored password with the entered password.
If they match, log in the user using Flask-Login’s login_user function.
Redirect the user to the dashboard route.
If the request is GET, render the login template.
dashboard.html
Step 6: Logout Functionality
Implement a /logout route using Flask-Login’s logout_user function.
Complete Code
Add the logout functionality and code initializer.
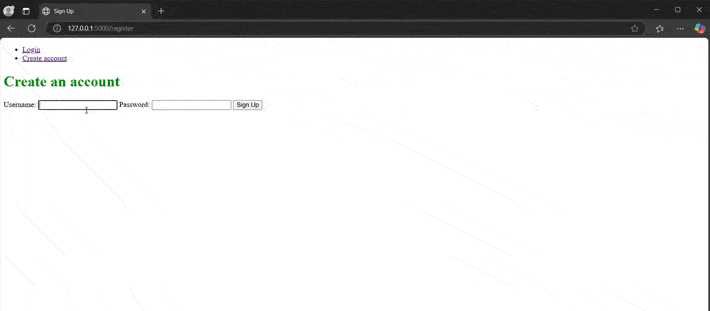
Output and Testing
Navigate to /register to create an account.
After registering, you will be redirected to /login.
Upon logging in, users will be redirected to the dashboard page.
Clicking "Logout" will end the session and redirect to the home page.
Now, whenever the user is logged in, they can log out by clicking the logout link on the dashboard page using the logout_user() function provided by Flask-Login.
