 |
VOOZH | about |
|
VOOZH | about |
Flask and MySQL can be combined to build database-driven web applications that support user registration, authentication, and profile management. This project demonstrates how to create a profile application where users can register, log in, view their profile information, update their details, and store data in a MySQL database using Flask.
Step 1: Install MySQL workbench. Refer to: How to Install SQL Workbench For MySQL on Windows?
Step 2: Install 'mysqlbd' module in your venv.
pip install flask-mysqldb
Step 3: Open MySQL workbench.
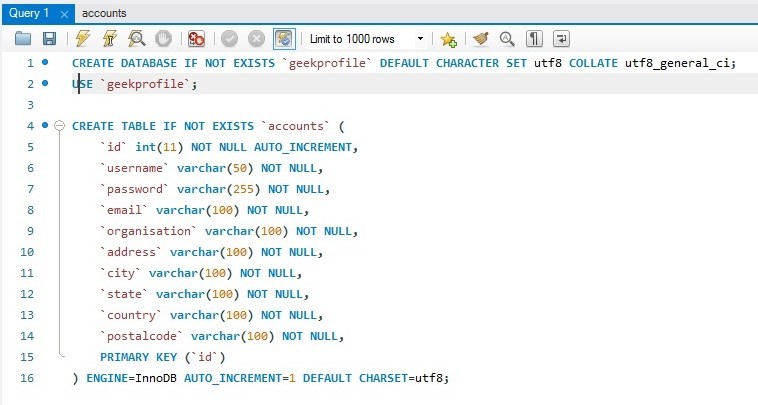
Step 4: Write the following code. The above SQL statement will create our database geekprofile with the table accounts. :
CREATE DATABASE geekprofile;
USE geekprofile;
CREATE TABLE accounts (
id INT AUTO_INCREMENT PRIMARY KEY,
username VARCHAR(50) NOT NULL,
password VARCHAR(255) NOT NULL,
email VARCHAR(100) NOT NULL,
organisation VARCHAR(100),
address VARCHAR(255),
city VARCHAR(100),
state VARCHAR(100),
country VARCHAR(100),
postalcode VARCHAR(20));
Step 5: Execute the query. 👁 Image
Step 1:Create an environment, and install Flask
Step 2: Create an empty folder 'geeksprofile'.
Step 3: Now open your code editor and open this 'geeksprofile' folder.
Step 4: Create 'app.py' folder and write the code given below.
Step 5: Create the folder 'templates'. create the files 'index.html', 'display.html', 'update.html', 'login.html', and 'register.html' inside the 'templates' folder.
Step 6: Open the 'login.html' file and write the code given below. In 'login.html', we have two fields i.e. username and password. When a user enters the correct username and password, it will route you to the index page otherwise 'Incorrect username/password' is displayed.
Step 7: Open 'register.html' file and write the code given below. In 'register.html', we have nine fields i.e. username, password, email, organisation, address, city, state, country, postal code. When user enters all the information, it stored the data in the database and 'Registration successful' is displayed.
Step 8: Open 'index.html' file and write the code given below. When a user logs in successfully, this page is displayed, and 'Logged in successful!' is displayed.
Step 9: Open 'display.html' file and write the code given below. Here, the user information stored in database are displayed.
Step 10: Open 'update.html' file and write the code given below. The user can update his/her data which also updates the database.
Step 11: Create the folder 'static'. create the file 'style.css' inside the 'static' folder and paste the given CSS code.
Step 12: The project structure will look like this.
Step1: Run the server.
Step2: Browse the URL 'localhost:5000'.
Step 3: The output web page will be displayed.
Step 1: If you are new user, go to sign up page and fill the details.
Step 2: After registration, go to login page. Enter your username and password and sign in.
Step 3: If your login is successful, you will be moved to index page and your name will be displayed.
Step 4: You can view your profile details in display page and also you can update your details in update page.
Output:Login page:
Register page:
If login is successful, Index Page:👁 Image
Update Page:👁 Image
Before updation, Display page:👁 Image
After updation, Display page:👁 Image
Database: Before update:
Database: After update: