Test-Driven Development (TDD) for Web APIs using Django REST Framework (DRF) and Docker focuses on writing tests first to ensure reliable, maintainable, and bug-free API development. Docker enables a consistent, isolated environment, making testing and deployment reproducible across different systems.
Docker
Docker is an open-source container platform used to package applications with all their dependencies so they can run anywhere.
- Applications run inside containers that include code, libraries, and settings.
- Ensures the application works the same on developer, tester, and production systems.
- Removes dependency and environment mismatch issues.
- Makes deployment faster and more reliable.
Test-Driven Development (TDD)
Test-Driven Development (TDD) is a software development approach where tests are written before the actual code. It follows an iterative cycle of writing tests, coding, and refactoring. Unit tests are the test for testing different functionalities of the code.
Three key steps for writing tests:
- Setup: Prepare sample data or functions needed for the test.
- Execution: Run the code or function being tested.
- Assertion: Compare the actual output with the expected result.
Creating the project and Setting Up the Dockerfile
Follow the below steps to create a project and set up the Dockerfile.
Step 1: Create Dockerfile.
- Create a file name Dockerfile. A Dockerfile is a file that contains instructions to build our docker image.
Step 2: Populate Dockerfile.
FROM python:3.8-alpine
ENV PYTHONBUFFERED=1
- The first line of our dockerfile specifies the existing python image over which we are going to build our image we are going to use python:3.8 alpine image as our base image, if you want you can create your own base image, the reason to use alpine is it is lightweight and takes less time to build
- Next set environment pythonbuffered as 1 this prevents output buffering and decreases build time
COPY ./requirements.txt /requirements.txt
RUN pip3 install -r requirements.txt
- This command means copying our local requirements.txt to our images requirements.txt
- Running our requirements file to install all dependencies
RUN mkdir /app
WORKDIR /app
COPY ./app /app
RUN adduser -D user
USER user
- We are going to keep our work directory named app and copy the local app directory to the image.
- Creating a new user for our image so that we won't use root as our main user is a security practice
Step 3: Create a Project folder.
- Create a folder named app besides Dockerfile. This will be our project folder.
Step 4: Create requirements.txt.
- This file holds required dependencies for our project, add the following to your requirements.txt
Django==3.2.12
djangorestframework==3.13.1
Step 5: Build Docker image.
$ docker build .
Run above command your docker image must be start building
Step 6: Create docker-compose.
- Create file name docker-compose.yml besides Dockerfile. Docker-compose files are files that contain different services which we implement in our app and also contains different instruction to set up and run those services.
- Include this in your docker-compose.yml
Note: We are using version 3 of docker-compose and our app contains a service called app which is stored in a folder named app we will use port 8000 to run it using the above command.
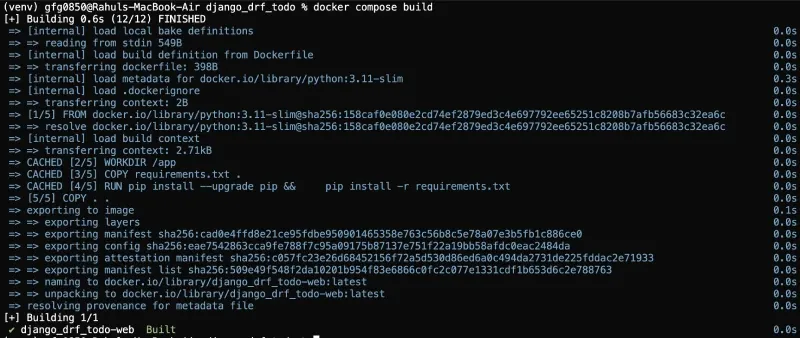
Step 7: Build docker-compose.
- Run the below command to start building your docker-compose.
$ docker-compose build
Step 8: Create Django project:
$ docker-compose run app sh -c "django-admin startproject app ."
Step 9: Run Django Server.
- Run the below command to start your Django app and head to https://127.0.0.1:8000 to check if your app is started
$ docker-compose up
Step 10: Create a Django app called "api".
$ cd app
$ docker-compose run app sh -c "python manage.py startapp api"
- This will create an API app where we are going to create store all of our API CRUD operations as well as our tests for our api app. Now go to app>settings.py and in installed_apps add “api”, “rest_framework as new apps.
Now that we have set up our project we can move to writing actual code but first let’s understand how to write tests in python Django.
Rules for Writing Tests in Django:
Following rules need to be followed while writing a Django test:
- Rule 1: Create a folder named tests in the app. In this folder, we will store tests delete, the already existing tests.py file
- Rule 2: Create __init__.py in the tests folder
- Rule 3: Create different python files for testing different parts, in our case, for example, different files for testing models and views. Keep in mind that every file name must be started from “test” for test_model.py.
- Rule 4: Each file must contain a class that contains different unit tests as functions testing different functionalities also the function name must be start from “test” for ex: def test_<functionality name>()
Writing Tests for Testing task Model:
Follow the below steps to write the test for the task model:
Step 1: Create a test_models.
- In our tests folder in the API app create a file named test_models.py this will store tests related to our model which we are going to create.
Step 2: Writing the first Model test.
- Above we Imported the required modules, we haven't create our models yet but we will create them in a second.
- Create class ModelTest() and extend it with TestCase
- Here we created a unit test to test the model and wrote an assertion to check if the output result is the same as the expected result using assertEqual() which compares the two.
Create Task model:
Follow the below steps to create the task model:
Step 1: In our API app in models.py file include the below code:
- Create a class and extended it with models.Model.
- Write different class fields which represent columns of our model.
- At last, we return task_name for verification.
Step 2: Register Task Model.
- Head over to admin.py and register the model using the following code:
Step 3: Migrating changes.
- It’s time to migrate our changes (make sure you migrate every time you change/create a model). First, make your migrations using
$ docker-compose run app sh -c "python manage.py makemigrations"
docker-compose run app sh -c "python manage.py migrate"
Step 4: Create Model Serializer.
- Create a serializer for our model in the API app create a file called serializers.py and include serializers are used to validate the incoming request data.
Step 5: Test the task model.
- Run the following command:
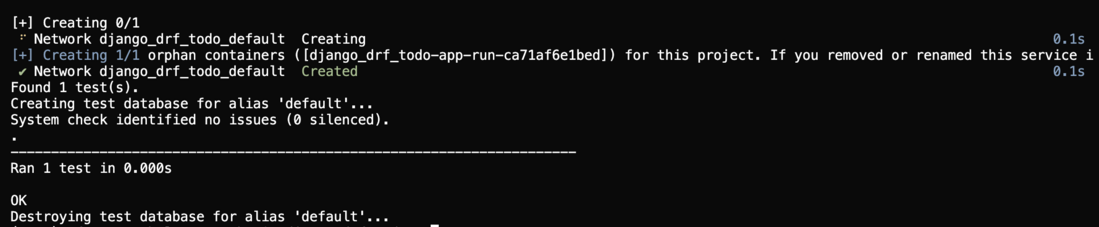
docker-compose run app sh -c "python manage.py test"
- Make sure all the tests pass.
- Now that we have our model created its time to write API views.
Writing test for API Views:
Follow the below steps to write the test for API view:
Step 1: Create a test file.
- Head to the tests folder in the API app and create the file test_task_api.py, this is where we are going to write tests for testing API.
Step 2: Write the test.
- The following code contains unit tests for different API operations:
Above we imported the required modules then we use the reverse function which allows retrieving URL details from urls.py file through the name-value provided there, then we created sample_payload which is a sample task model object creating sample functions that make our code clean and fast.
Above we have different unit tests for different views, first we create a class and extend it with TestCase and write a function to test different views (notice how every function name starts with test), override setup function from TestCase and use it to initialize class variables, then write code and perform require assertions to compare given output with the expected output.
Writing API Views and URLs:
Follow the below steps to write the API views and URLs:
Step 1: Creating views
- Head to views.py and write the following code. The below views are to handle different requests and produce desired output to our API, here we are using function-based views with api_view decorator. The core of this functionality is the api_view decorator, which takes a list of HTTP methods that your view should respond to.
- To send the output we are using Response(), Unlike regular HttpResponse objects, you do not instantiate Response objects with rendered content. Instead, you pass in unrendered data, which may consist of any Python primitives.
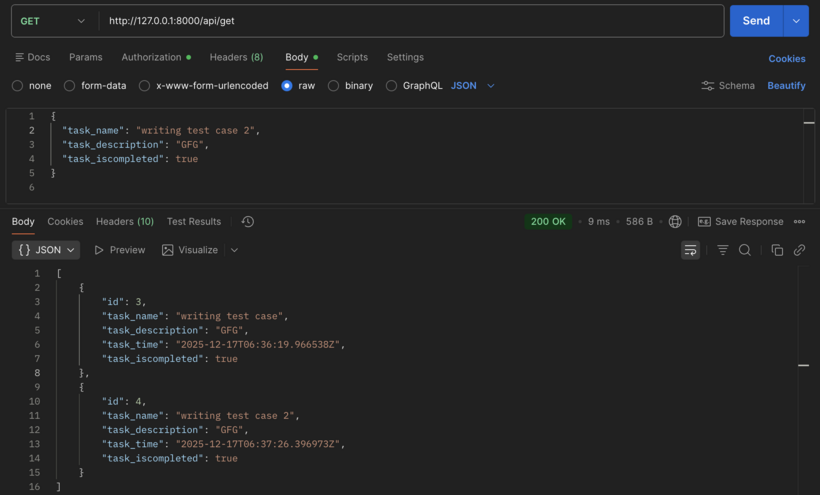
- Here we imported the required modules and wrote the first view to get a list of created tasks, first we get tasks using the Task model then we serializer data and return a response with data and 200 status codes.
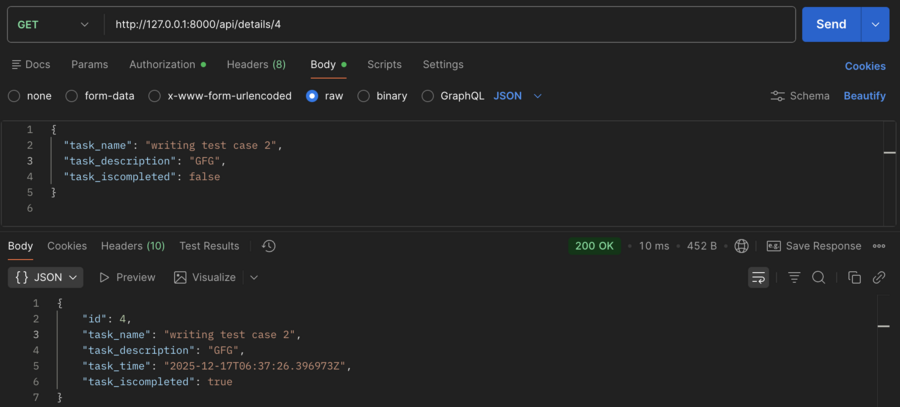
- Then we created a view to get details of a single task using its id.
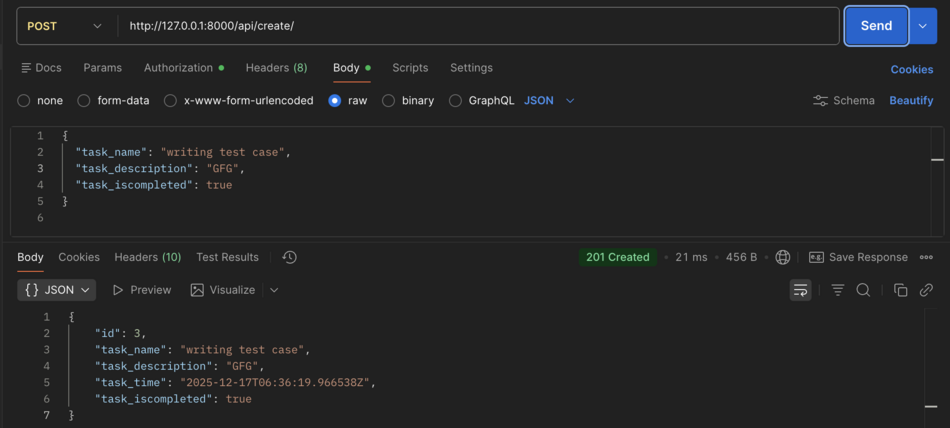
Above is a view for creating a new task first we need to get data from the request and serialize it if serialized data is valid then simply save the serializer and return desired response.
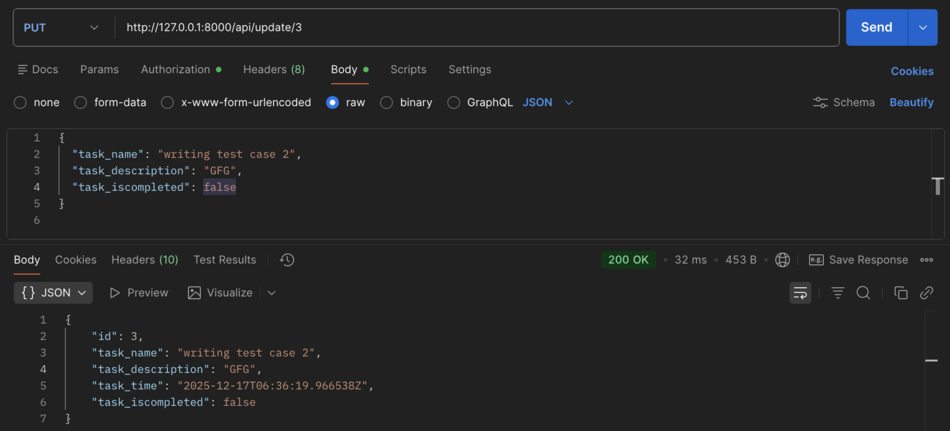
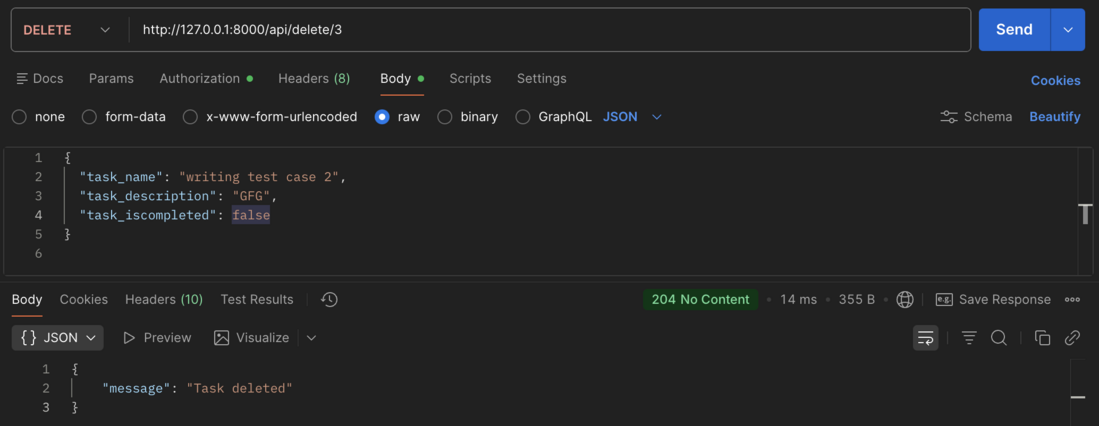
- Next is an update and delete a task in update accept id of the task to be updated then check the validity of serializer and return a response, same with delete view get task object id from request and delete the task and return response.
Here we are completed with writing views.
Step 2: Configuring URL's.
- Goto urls.py in API app if there’s isn’t one create urls.py and include the following code:
Above are different URL patterns to make requests to different views and get a response.
- Also, goto urls.py in the main project folder app goto urls.py and in URL patterns add:
