Prerequisites: Introduction to Tkinter
Python offers multiple options for developing a GUI (Graphical User Interface). Out of all the GUI methods, Tkinter is the most commonly used method. Python with Tkinter outputs the fastest and easiest way to create GUI applications. In this article, we will learn how to create a GUI Calendar application using Tkinter, with a step-by-step guide.
To create a Tkinter:
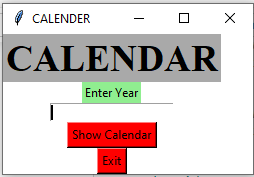
Importing the module – Tkinter Create the main window (container) Add any number of widgets to the main window. Apply the event Trigger on the widgets. The GUI would look like below:
👁 Image 👁 Image
Below is the implementation:
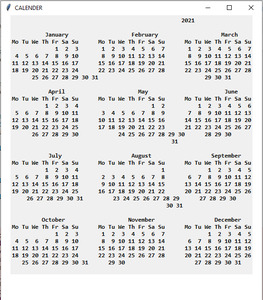
Output :
Code Explanation:
The code starts by creating a new Tkinter window. The window has a white background and the title "CALENDAR". Next, the window's geometry is set to be 550x600 pixels. The calendar module is imported and the showCal() function is defined. This function will be used to display the calendar for the given year. The showCal() function first creates a GUI window and sets its background color to white. It also sets the title of the GUI window to "CALENDAR". Finally, it sets the configuration of the GUI window. Next, two labels are created: CALENDAR and ENTER YEAR. CALENDAR's text is set to be "CALENDAR", its background color is changed from white to dark gray, and its font size is set to 28 points bold. ENTER YEAR's text is set to be "Enter Year", its background color is changed from light green to red, and its font size is set to 10 points bold. A text entry box named year_field is created next and assigned as an attribute of year_field object instance . Finally, a Show Calendar button (with appropriate attributes) and an Exit button (with appropriate attributes) are created and The code creates a window and sets its background color to white. The window's title is set to "CALENDAR" and its geometry is set to 550x600. The calendar module is imported and the method calendar.calendar() is called with the given year as an argument. This returns the calendar for the given year. A label named cal_year is created and it has a grid with five rows and one column. The first row of the grid will be at position (5, 1), the second row at (4, 1), etc., until row 5 which will be at position (0, 0). Similarly, column 1 will be at position (0, 0), column 2 at (1, 0). 