 |
VOOZH | about |
|
VOOZH | about |
Quantum computing is an emerging computing paradigm that uses quantum bits (qubits) instead of classical bits. Unlike classical bits that store only 0 or 1, qubits can exist in multiple states at the same time due to superposition and entanglement, enabling quantum systems to solve certain complex problems much faster than classical computers.
Python has become the preferred language as it allows researchers and developers to focus on quantum concepts rather than low-level programming complexity.
1. Simple and Readable Syntax: Python’s clear and beginner-friendly syntax makes it easier to understand and implement complex quantum ideas, especially for those new to quantum mechanics.
2. Strong Library Support: Most leading quantum computing frameworks are built using Python
3. Rapid Prototyping: Python enables quick testing and iteration of quantum algorithms, making it ideal for research, experimentation and academic learning.
Access to large-scale quantum hardware is still limited. As a result, quantum simulators are widely used to test and understand quantum algorithms. Python-based simulators allow developers to:
These simulations run on classical computers but mimic quantum behavior mathematically.
Quantum Machine Learning (QML) combines quantum computing with classical machine learning. Python plays a key role by enabling hybrid quantum–classical workflows. Libraries like PennyLane integrate seamlessly with:
This allows developers to experiment with quantum-enhanced machine learning models using familiar Python tools.
Qiskit is one of the most widely used quantum computing frameworks and is fully Python-based. Before starting, you need to install Qiskit using pip:
pip install qiskit
pip install qiskit-aer
Example: This example creates a quantum circuit with one qubit, applies a Hadamard gate to create superposition, and measures the result.
Step 1: Import the Required Libraries
This step imports the core Qiskit classes needed to create a quantum circuit, run it on a simulator and visualize results.
Explanation:
Step 2: Create a Quantum Circuit
In this step, we build a simple quantum circuit with one qubit, apply a quantum gate, and measure the result.
Explanation:
Step 3: Simulate the Quantum Circuit
Here, the quantum circuit is executed on a simulator to observe probabilistic outcomes.
Explanation:
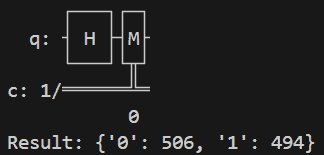
Output: After running the code, we get this:
Explanation: After executing the circuit 1000 times, the measurement results are: {'0': 506, '1': 494}
This shows that the qubit was measured as 0 and 1 almost equally, which is expected because the Hadamard gate places the qubit in a superposition state. Due to quantum randomness, the exact counts may vary slightly each time the program runs.
While Python is a fantastic tool for quantum computing, there are challenges:
Python is expected to remain central to quantum computing due to:
As quantum technology matures, Python will continue to bridge the gap between theory, simulation and real-world quantum execution.