VOOZH about

URL: https://www.geeksforgeeks.org/python/twitter-sentiment-analysis-webapp-using-flask/

⇱ Twitter Sentiment Analysis WebApp using Flask - GeeksforGeeks


  • Courses
  • Tutorials
  • Interview Prep

Twitter Sentiment Analysis WebApp using Flask

Last Updated : 30 Mar, 2026

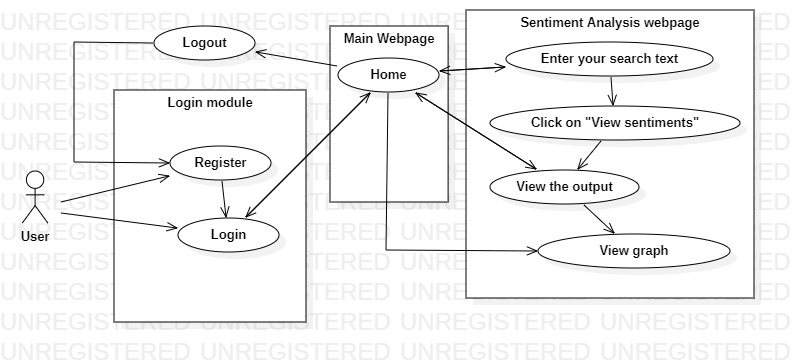
This is a web app made using Python and Flask Framework. It has a registration system and a dashboard. Users can enter keywords to fetch live tweets from Twitter and analyze them for sentiment. The results are then visualized in a graph. The project uses the popular Tweepy API to connect to X (formerly twitter) in real time, retrieving tweet text and metadata for analysis.

Features of this Application

  • Helps companies study the customer sentiment around a particular product.
  • To enable system users analyze a huge amount of data, quickly and efficiently.
  • To segregate customer sentiment on a scale of -1 to 1, where -1 represents a strong negative sentimentality towards the keyword(s) and 1 represents a strongly positive reaction.
  • Visualize the collected data clearly and effectively.

Detailed Project Implementation Video:

Tools and Technologies Used

  • Python: A high-level language known for its readability and wide use in machine learning.
  • Flask: A lightweight web framework that simplifies building web applications and handling backend logic.
  • Tweepy: A Python package that makes it easy to access Twitter’s API and retrieve tweet data.
  • Apache SQL on XAMPP: A local SQL server (via phpMyAdmin) used for storing and managing user login credentials.
  • Bootstrap: A front-end framework that helps create modern, responsive web pages.
  • jQuery: A JavaScript library used to easily fetch data from APIs and update web pages.
  • HTML/CSS: The core technologies for structuring and styling the website's front end.

This project requires installing xampp, install it from here. It comes with MySQL installation as well so you don't have to install it seperately.

Before creating the app, make sure to create a "user" databse in MySQL with 3 columns (name, email id and password).

Creating Flask App

To set up a basic flask app, refer to Create flask App.

Create app.py file, this will be our main flask app. In this file we establish a connection to our SQL database using the 'conn' object and also set a user cookie variable, which checks if the user has logged in, before redirecting him/her to the home page. This script also handles the user input on the login/register pages. 

Breakdown:

Imports & Setup

  • Imports Flask, MySQL connector and a blueprint (second).
  • Sets a secret key for session security.

Database Connection

  • Connects to MySQL (XAMPP) and initializes a cursor.
  • Handles connection errors with a try-except block.

Routes

  • / – Renders the login page.
  • /register – Renders the registration page.
  • /home – Checks session; redirects to login if not authenticated.
  • /login_validation – Validates user credentials, sets session, redirects to home or login.
  • /add_user – Adds a new user to the database, sets session, redirects to home.
  • /logout – Clears session and redirects to login.

sentiments.py

This file takes user input (a keyword and tweet count), fetches live tweets via the Tweepy API, cleans and analyzes them for sentiment (from -1 for negative to 1 for positive) and then creates a pie chart saved as an image for later display in HTML pages.

Explanation:

Tweet Fetching & Sentiment Analysis

  • Connects to Twitter API and retrieves tweets based on user input.
  • Cleans tweet text and analyzes sentiment using TextBlob.
  • Categorizes sentiment as positive, weakly positive, strongly positive, neutral, weakly negative, negative or strongly negative.

Data Processing & Visualization

  • Saves tweet data in a CSV file.
  • Calculates sentiment percentages and determines overall sentiment.
  • Generates a pie chart to visualize sentiment distribution.

Routes

  • /sentiment_analyzer: Displays the sentiment analysis page.
  • /sentiment_logic: Processes user input, analyzes tweets and shows results.
  • /visualize: Displays the sentiment pie chart.

Creating Templates

Templates in flask contains all the HTML files for the flask app. Let's look at the HTML files we need to create for this project one by one-

Login template:

HTML code for the page that displays the login form. The user enters a username and password, which has validations. Once the data is validated, these variables are passed to the main.py file, which connects to the SQL database to check if the login is valid.  

The Registration template:

HTML code for the page that displays the registration form. The user enters a username and password, which has validations. Additionally, the user's name becomes a value for the cookie that is set in the main.py file. 

Once the data is validated, these variables are passed to the main.py file, which connects to the SQL database to check if the login is valid.  

 The HomePage Template:

HTML home page. The page has 2 main parts 

  • Navigation bar- The navigation bar has links for all other pages, it retrieves the user's name from the cookie and displays "Welcome Sam" [users name]. This bar also has a logout button.
  • Bootstrap carousel- This carousel is a customized version of the basic carousel which can be found here.

sentiment_analyzer.py template

This template asks the users to enter a topic/word of their interest and the number of tweets based on that topic that users would like to analyze. 

Please note that Twitter has daily and hourly rate limits, which cannot be exceeded. 

This form passes the data to second.py file, which calculates the output and sets "jinja" variables. (Jinja allows passing values between python and HTML).These variables then display the output to users. 

The PieChart Generation template: 

This HTML template simply displays an image file saved in our project. This image file is generated in the second.py file code. The image is a Pie Chart, which visually represents the results of sentiment analysis. The image is overwritten every time the code is run. 

Detailed project Implementation guidelines:

  1. Users can create an account with proper validations by clicking “Create Account.” Cookies help prevent URL rewriting.
  2. After logging in, they are redirected to the home page, which features a Bootstrap carousel slider.
  3. The logged-in user’s name is displayed using cookies, which also prevent unauthorized access to /home.
  4. The home page welcomes users by name and provides navigation options. Clicking “Get Started” leads to the main module.
  5. Users enter a keyword and the number of tweets to analyze, then click “Analyze” to fetch and process tweets via Tweepy.
  6. Results are displayed and users can generate a Pie Chart by clicking “Generate Visualization.”
  7. Clicking “How This Project Works” redirects users to Tweepy documentation.
  8. Users can log out anytime to end their session.
👁 Image
Use Case Diagram

Running the Application

To run the flask application, use this command in terminal-

python app.py

And then uprn the development URL in a browser= "http://127.0.0.1:5000"

Note: Since March 2023, Twitter’s search endpoints require a paid plan (e.g., Basic tier, $100/month). The Free tier no longer supports searching tweets, so this app’s search feature won’t work without a subscription.

Comment