 |
VOOZH | about |
|
VOOZH | about |
The DNS or the Domain Name System Server is the backbone of what we do daily on browsers using the internet. But the concept of the DNS is not a recent one, the first milestone was established in 1983. Before the establishment of the DNS server, the process was executed with the help of the host machine name.
Encountering the "DNS Server Not Responding" error can be frustrating and disrupt your internet connectivity. This common issue occurs when your DNS server is unable to translate domain names into IP addresses, preventing you from accessing websites. Whether you're using Windows or another operating system, there are several methods to fix DNS server errors and restore your internet connection.
The DNS is a series of alphanumeric letters that converts itself to the form of an IP Address when a client-server is reached. Let us make it an easy one. Suppose a user puts a URL into its browser. Now, the browser shares the address with the DNS Server & the DNS Server sends the IP Address in return of. This complete process executes there.
During this process, if the server takes a long time or encounters an error, it shows a message & it is termed as an Unresponsive DNS Server. Such an error means that the connection is not made with the DNS. Most of the time, such issues occur due to the fault of the internet or Wi-Fi. However, such issues can be resolved with a few methods.
The "DNS Server Not Responding" error in Windows can be caused by several factors, often related to network or system configurations. Below are the primary reasons for this issue:
If you're facing a DNS server error in Windows, explore 11 methods to fix the "DNS server not responding" issue and select the ones that resolve your problem.
Switch browsers (e.g., from Chrome to Firefox or Edge) to check if the issue is browser-related. Also, test the same webpage on another device (like a smartphone or tablet) to determine if the problem is with your device.
Power off your router, wait a few minutes, and reconnect. Repeat this process a few times to clear any cached data that might be causing the issue. If the problem persists, there could be a deeper issue with the router.
Step 1: In the Start Menu, press the Power Button to get the Restart button. While pressing the Restart button, press the Shift Key on the keyboard.
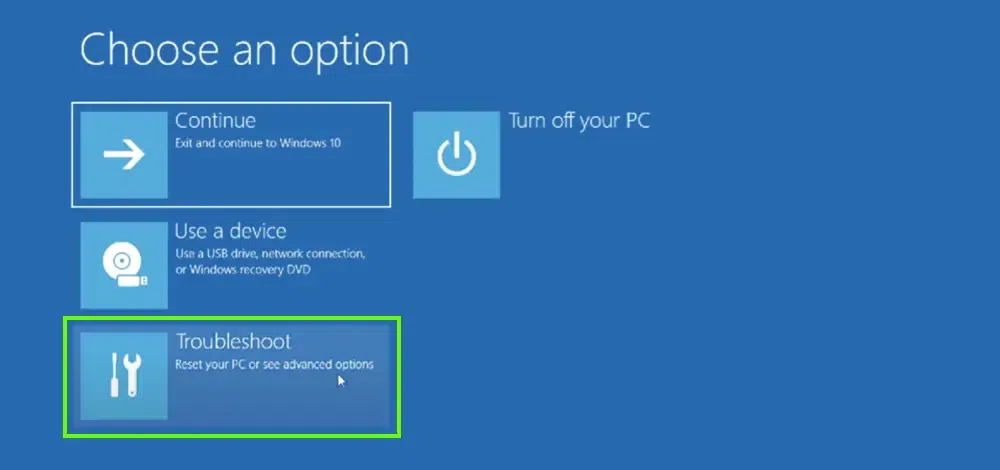
👁 1--GO-FOR-RESTARTStep 2: After restarting it will enter into the boot menu. Now, browse to the Troubleshoot option.
👁 Fix-DNS-Server-Not-Responding-Error01Step 3: Under the Troubleshoot option, get the Advanced Option.
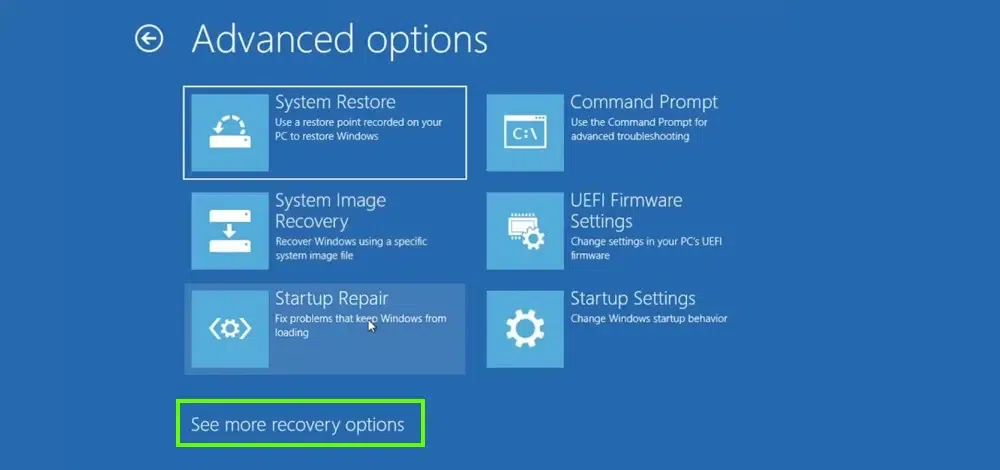
👁 Fix-DNS-Server-Not-Responding-Error03Step 4: Under the Advanced option, go for the See More Recovery option.
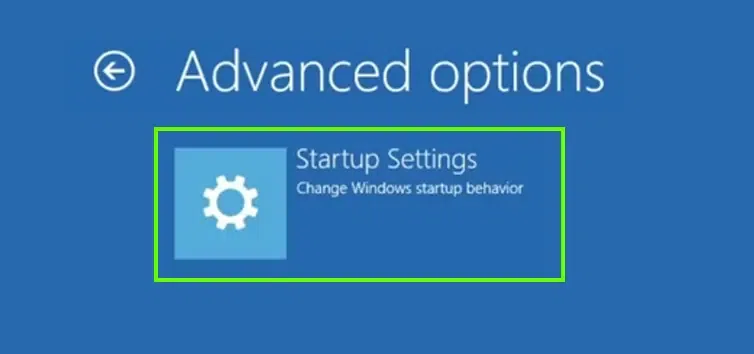
👁 Fix-DNS-Server-Not-Responding-Error02Step 5: Now, select the Start-Up Settings & press the F4 Key during the restarting of the device.
👁 Fix-DNS-Server-Not-Responding-Error04Hence, we have successfully resolved the DNS Server issue by landing on the Safe Mode.
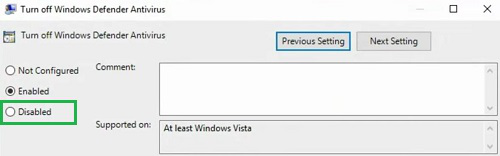
Step 1: Press the Windows + R button to open the Run command prompt. Now, execute the command gpedit.msc command there.
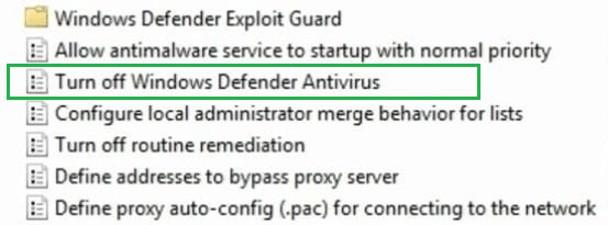
👁 6--RUN-gpeditmsc-COMMANDStep 2: Now, under the Windows Components, an option will present as Windows Antivirus. Clicking that a few more options will be present on the right-hand side. Among them, click on the Turn Off Windows Defender Antivirus.
👁 CLICK-TURN-OFF-WINDOWS-DEFENDER-ANTIVIRUS01Step 3: Now, click on the Disabled option and the OK button will present below that should be clicked.
Hence, we have successfully resolved the DNS Server issue by disabling Windows Antivirus.
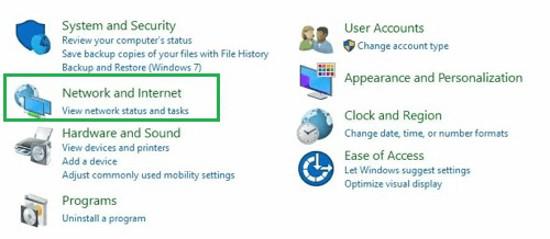
Step 1: Open the Control Panel & Among a few options go for the Network And Internet.
👁 network-settings01Step 2: Now, on the left-hand side, click on the Change Adapter Settings option.
👁 10--CLICK-CHANGE-ADAPTER-SETTINGS
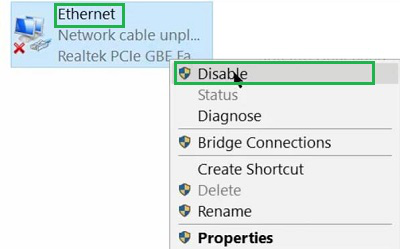
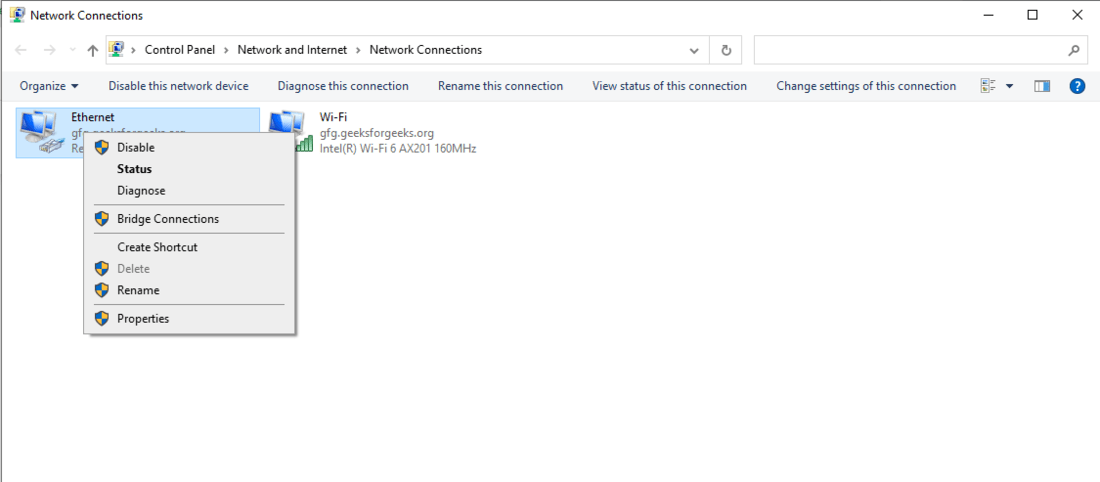
Step 3: Now, Right-Click on the Ethernet option. Press the Disable option present there.
👁 11--CLICK-ETHERNET-&-DISABLEHence, we have successfully resolved the DNS Server issue by disabling the Ethernet.
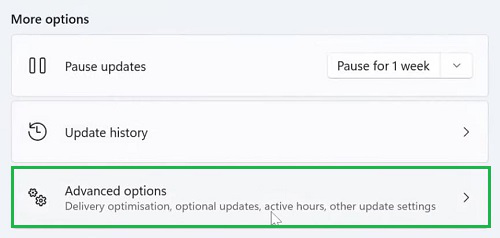
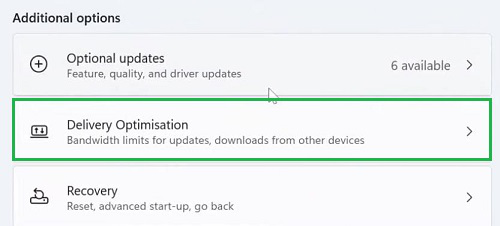
Step 1: Open the Settings option & go for the Windows Update from the left-hand side.
Step 2: Now, on the Right-Hand side you will find an option called Advanced Option, go for it.
👁 13--GO-FOR-ADVANCED-OPTIONSStep 3: Under that option, you will find the Delivery Optimization option. Click on that.
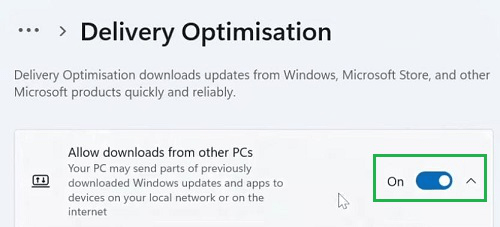
👁 14--CLICK-DELIVERY-OPTIMIZATION
Step 4:Disable the button to complete the process.
👁 15--DISABLE-THE-BUTTONHence, we have successfully resolved the DNS Server issue by disabling the Delivery Optimization feature.
Step 1: Open the Search Bar & search for Command Prompt. Go with the best available result & open the CMD in the Administrative form.
Step 2: Execute the following command. The command will help to flush all kinds of DNS Cache from the device.
👁 17--EXECUTE-THE-COMMANDCommand: ipconfig /flushdns
Hence, we have successfully resolved the DNS Server issue by flushing all DNS Cache.
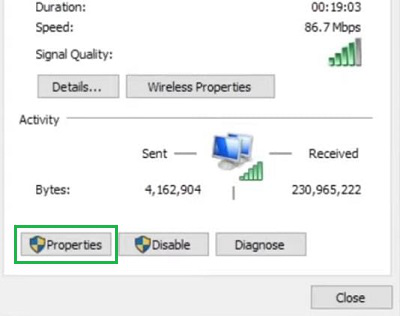
Step 1: Open the Control Panel & click on the Network And Internet.
Step 2: Now, on the left-hand side, click on the Change Adapter Settings option.
👁 19--CLICK-CHANGE-ADAPTER-SETTINGSStep 3: A small new window will appear there. In that window, go for the Properties option.
Step 4: In the next window, uncheck theInternet Protocol Version 6 (IPv6) & click on OK to save.
👁 wifi-properties03Hence, we have successfully resolved the DNS Server issue by disabling Internet Protocol Version 6 (IPv6).
After performing all the above operations, if the DNS is still not responding, then the problem might be with the Windows Network Adapter. It is a very rare kind of thing an individual can witness. Normally, the Windows Network Adapter gets updated with time & Windows Updates. But a few times it can't able to update.
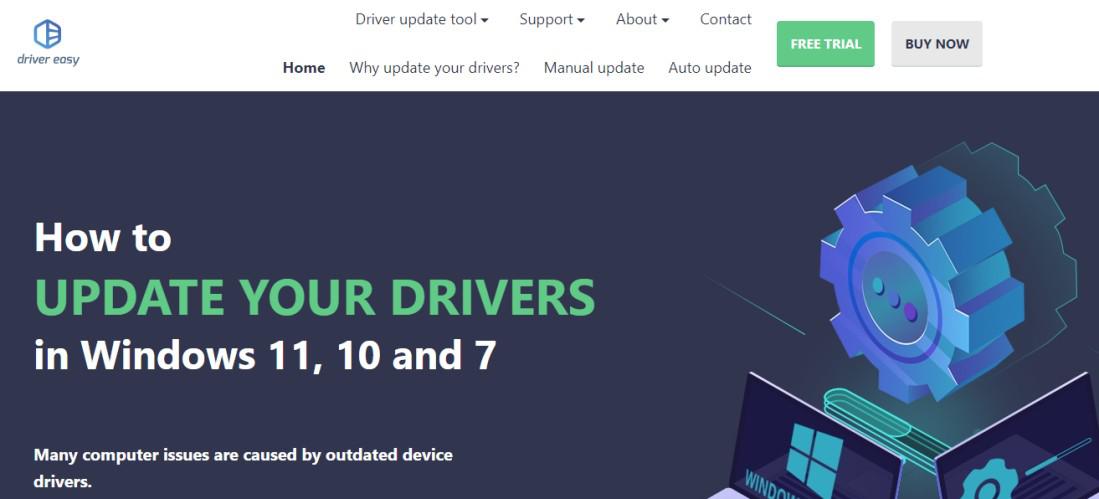
In such cases, the Windows Network Adapter becomes old or outdated one that stops working. Updating the Drivers manually can become a tedious task. So, many software programs take care of the Network Adapters on the internet. Some free software is present along with some paid ones like Driver Easy or SDI, etc.
👁 driver-easy01Your PC might give you faulty error code of "DNS Not Responding" and another method to fix this issue is to restart your system. This might help your PC to run efficiently after reeboting.
Below are the steps to Restart PC:
By following the above steps, you can easily restart your PC to avoid getting DNS server issue.
If the above methods are not working out for you then changing the DNS server address might help to provide you a stable connectivity.
To fix DNS not responding issue, follow the below-mentioned steps:
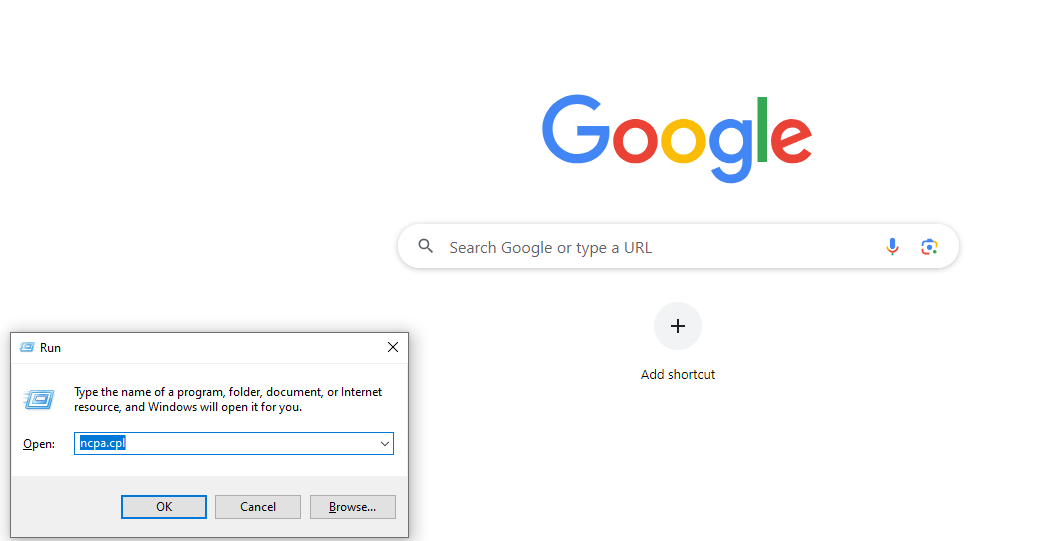
1. Open Windows Search Box or press Windows+R and type ncpa.cpl
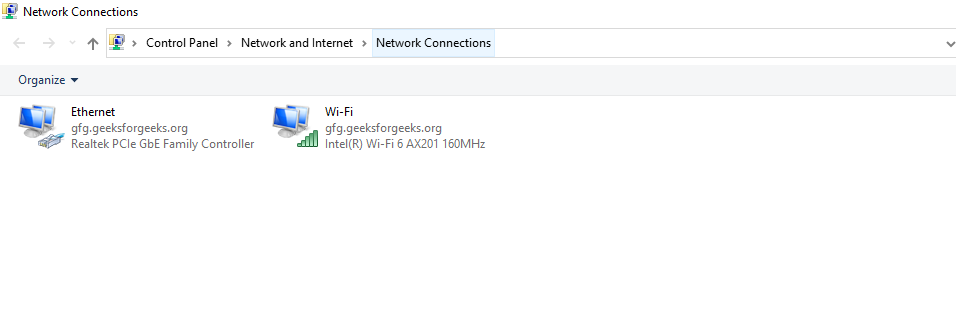
2. A new window will open as Network Connections with options of Ethernet, Wifi, etc. Right click on the Properties of any option that you're using
3. A drop down will appear, click on Properties-> Internet Protocol Version 4->Properties
4. Now, select the Obtain an IP address automatically and Use the following DNS server Address
👁 Internet-protocol-version-4-properties
5. Now, select the DNS server address within Preferred DNS Server and Alternate DNS Server field boxes
7. Select OK & Restart your PC
This option is well convenient to change the DNS Server Address and this can possibly resolve "not responding" issue.
So, these are the few methods that can be used to get rid of the DNS Server problem. We understand how it feels when a desired item is not coming to the screen due to a DNS problem. The internet is the core element for which an individual sits on a laptop or desktop.