 |
VOOZH | about |
|
VOOZH | about |
JFreeChart is a popular open-source chart library for the Java programming language. It offers a wide range of chart types and customization options, making it a powerful tool for creating professional-grade charts and graphs. If you're working in Visual Studio Code (VS Code) and want to integrate JFreeChart into your projects, this guide will walk you through the installation process step-by-step.
👁 How-to-install-jfreechart-in-VS-Code
By the end of this article, you'll be able to set up JFreeChart in VS Code and start creating stunning visualizations for your data.
The JFreeChart is the library that is 100% made for the Java Runtime Environment. The JFreeChart can be used to produce the different kinds of graphs & charts in the Java program. You have to align it with any IDE to use the tool. It can produce output in many different formats like JPEG, PNG, PDF, etc.
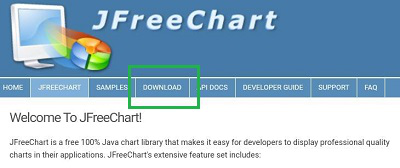
Step 1: Browse to the Official Page of JFreeChart. And click on the Download button.
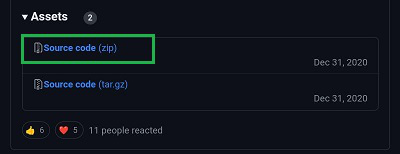
Step 2: A GitHub Page will open. And you will find the Source Code as the zip format. Download & Extract the file on your device.
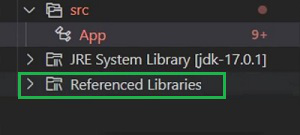
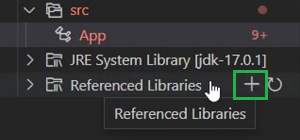
Step 3: Now, open the Java Project you were working in the VS Code. You will find an option called Referenced Libraries.
Step 4: Put the Cursor on the option. Select the Plus Symbol and Add the JFreeChart Extracted Library to the project.
Installing JFreeChart in VS Code is a straightforward process that involves setting up your Java development environment, downloading the JFreeChart library, and integrating it into your projects. By following the steps outlined in this guide, you can quickly get up and running with JFreeChart and take advantage of its powerful charting capabilities. Whether you're developing a small application or working on a large-scale project, JFreeChart can help you create impressive visualizations that enhance your data analysis and presentation.