 |
VOOZH | about |
|
VOOZH | about |
Data loss accurs alomost daily with many people but what if you have lost your important photos from your personal device? It can feel like a nightmare, especially if they’re permanently deleted. Generally, if you have deleted your pictures accidentally, then you can easily recover them, but the question is how?
In this guide, we’ll walk you through simple steps to recover permanently deleted photos on iPhone, using tools like iCloud, iTunes, and third-party recovery software. Let’s get started and bring your photos back to life.
👁 How-to-Recover-Permanently-Deleted-Photos-on-iPhoneFor reverting deleted photos on iPhone, the following methods can be executed that will restore from your backup. We will start with the iTunes application.
On your iPhone, go to Albums now scroll to Utilities and tap Recently Deleted.
Now, tap Select (top-right) and Choose the photos you want to recover.
Once you have choose the photoes you want to recover, tap Recover and confirm by selecting Recover [X] Photos.
Note: Photos deleted within the last 30 days. After 30 days, photos are permanently erased from this folder.
Here are the steps to recover permanently deleted photos on your iPhone effortlessly using iTunes backup, ensuring a seamless restoration of lost images with just a few clicks.
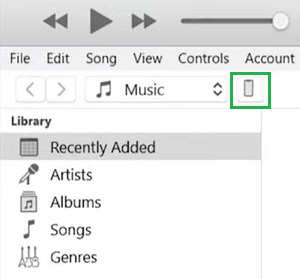
Plug your iPhone into your MacBook using a USB cable and launch the iTunes application. Click on the mobile phone icon in the top-left corner to access your device settings.
Under the Backups section, choose This Computer and click on Restore Backup to initiate the recovery process.
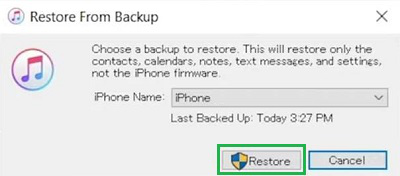
A pop-up window will appear. Select the most recent backup and click Restore to begin the process. Wait for the restoration to complete, and your deleted photos will be recovered.
Hence, we have successfully restored all the permanently deleted photos on the iPhone using iTunes.
You can try recovering permanently deleted photos on Mac using Finder by searching for hidden files, checking previous versions, or restoring from Time Machine backups.
Launch Finder from the Dock or press Command (⌘) + Space and search for Finder.
Go to the folder where your photos were originally stored, such as Pictures or a specific subfolder.
In Finder, use the Search bar at the top-right and type the name of the deleted photo or file extension (e.g., .jpg, .png).
Press Command (⌘) + Shift + . (Period) to reveal hidden files and check if the deleted photos are still in the folder.
If you have Time Machine enabled, open Finder, navigate to the original photo location, then click Time Machine from the menu bar and restore a previous version.
To recover permanently deleted photos on your iPhone effortlessly using iCloud backup, follow the steps given below:
Unlock your iPhone and open the Settings app. Scroll down and tap on General to access various system settings.
Inside the General section, scroll to the bottom, where you will find the Reset option. Tap on it to proceed with resetting your device.
From the reset options, select Erase All Content & Settings. This will initiate the factory reset process, wiping all current data and making your iPhone restart as a new device.
👁 6-Erase-All-Content-&-Settings
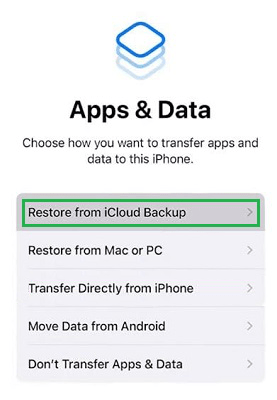
Once your iPhone restarts, follow the on-screen setup instructions. When prompted with setup options, choose Restore from iCloud Backup and sign in to your iCloud account. Select the latest backup that contains your photos, and wait for the restoration to complete.
Hence, we have successfully restored all the permanently deleted photos on the iPhone using iCloud.
There are many third-party applications present on the internet that works as the alternative of the iTunes and iCloud application. If you find them convenient, you can easily go ahead with them. Here, we are talking about a sample third-party application. You can go for any other one as well.
Choose a reputable iPhone data recovery software. Download the software from the official website and install it on your MacBook or Windows PC.
Use a USB cable to connect your iPhone to your computer. Ensure that the connection is stable, and launch the installed recovery software. Once detected, select the Recover from iOS Device option.
Click on Start Scan or a similar option to allow the software to analyze your device. The scanning process may take a few minutes, depending on the storage size and the number of deleted files.
Once the scan is complete, the software will display a list of recoverable files, including your deleted photos. Browse through the results and select the photos you wish to restore.
Click on the Recover button to restore the selected photos. Depending on the software, you may have the option to save them directly to your iPhone or export them to your computer for safekeeping.
Getting back photos that were permanently deleted from your iPhone is achievable with the proper equipment and methods. By making use of the iPhone's own functions, iCloud's storage, and recovery applications from other companies, you can bring back your missing photos and protect your precious memories. It's important to consistently back up your photos to avoid any future data loss and to simplify the recovery procedure. Keep ahead of the game in organizing your photos to make certain you never miss out on significant photos again.