A Virtual Private Network (VPN) secures your internet connection by encrypting data and hiding your IP address, helping you browse privately and access restricted content. Windows 11 includes built-in VPN support, allowing users to create secure VPN connections without installing third-party software.
Using a VPN on Windows 11 helps you:
Protect personal and work data on public networks Bypass geo-restricted websites and services Maintain online privacy and anonymity Method 1: Set Up VPN Using Windows Settings Here are easy steps to add VPN by using Windows 11 setting:
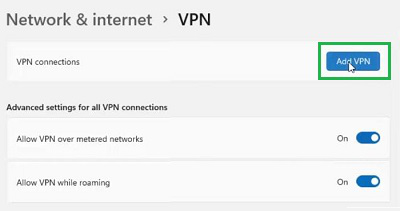
Step 1: Open Network & Internet Settings Press Windows + I to open Settings. Go to Network & Internet → VPN. Click Add VPN. 👁 1--Click-Add-VPN Open Network & Internet Settings Step 2: Provide Necessary VPN Information Fill in the required information:
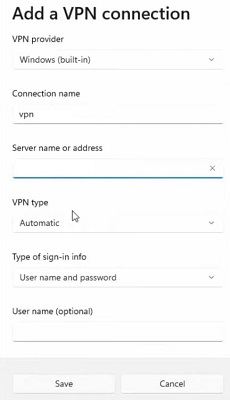
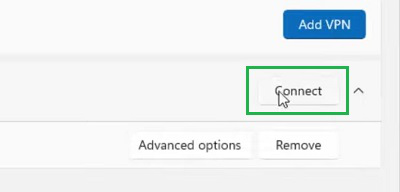
VPN Provider: Windows (built-in) Connection Name: Any name (e.g., Work VPN) Server Name or Address: Provided by your VPN service VPN Type: Select as recommended by your provider Username & Password: VPN credentials (optional auto-connect) 👁 2--Fill-Credentials Provide Necessary VPN Information Step 3: Save and Connect Click Save. Select the VPN profile and click Connect. Note: Incorrect server details or credentials may cause connection errors.
👁 3--Click-Connect Save and Connect Method 2: Configure VPN Using the Control Panel Here are easy steps to setup VPN by using windows 11 control panel:
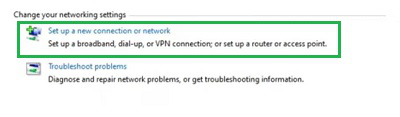
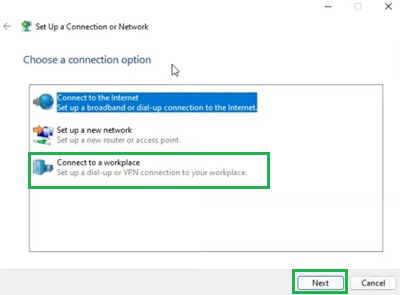
Step 1: Access Network & Security Settings Press Windows + R, type control , and press Enter. Go to Network and Internet → Network and Sharing Center. 👁 4--Click-Setup Access Network & Security Settings Step 2: Choose VPN Connection Click Set up a new connection or network. Select Connect to a workplace → Next. 👁 5--Connect-to-Workplace
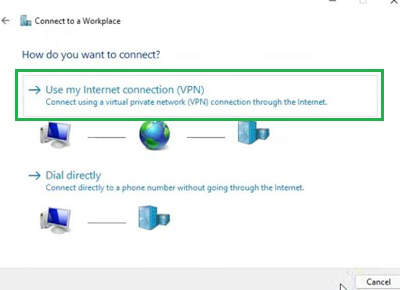
Choose Use my Internet connection (VPN). 👁 6--VPN
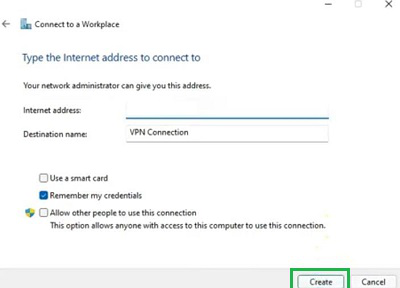
Step 3: Add VPN Address Enter the VPN server IP or address. Click Create and enter your login credentials. Connect to start using the VPN. 👁 7--Click-Create
From the above discussion, we can say that VPN Windows 11 Setup is not that much of a difficult task.
How to Fix VPN Not Working on Windows 11 If your VPN fails to connect, try these solutions in order:
Check Internet Connectivity: Ensure your internet works before connecting to the VPN. Restart VPN & PC: Clears temporary glitches that may block connections. Verify Login Credentials: Incorrect usernames or passwords will prevent authentication. Change VPN Protocol: Switch between IKEv2, OpenVPN, or WireGuard if supported. Disable Firewall or Antivirus (Temporarily): Add your VPN to the allowed apps list if it connects afterward. Switch VPN Server: Overloaded or blocked servers may cause failures. Update or Reinstall VPN App: Outdated or corrupted installations often break connections. Reset Network Settings Go to: Settings → Network & Internet → Advanced network settings → Network reset Enable Split Tunneling (If Available): Allows certain apps to bypass the VPN to avoid conflicts. Contact VPN Support: If all else fails, your VPN provider can diagnose server-side issues. 