 |
VOOZH | about |
|
VOOZH | about |
Spring Data JDBC is part of the Spring Data ecosystem that offers a straightforward approach for working with relational databases using plain SQL and simple Java objects. Unlike Spring Data JPA, built on JPA (Java Persistence API) and ORM (Object-Relational Mapping) frameworks, Spring Data JDBC focuses on a more direct and less abstract interaction with the database. This makes it ideal for applications that require high performance and simplicity.
Before you begin to study Spring Data JDBC, you should first have a basic understanding of the following:
Ensure you have the following software installed and configured:
By using this example, we would be able to understand Spring Data JDBC in the best way. The task is simple and specifically required the development of a simple RESTful API to manage the book collection with Spring Boot and Spring Data JDBC. The API has to make it possible for users to create, read, and update a list of books in the database. Further, the following project details are described in the book.
Here, we are using IntelliJ IDE for illustration purpose, one can use any IDE for creating a spring boot project. To create a spring boot project in IntelliJ follow the below steps:
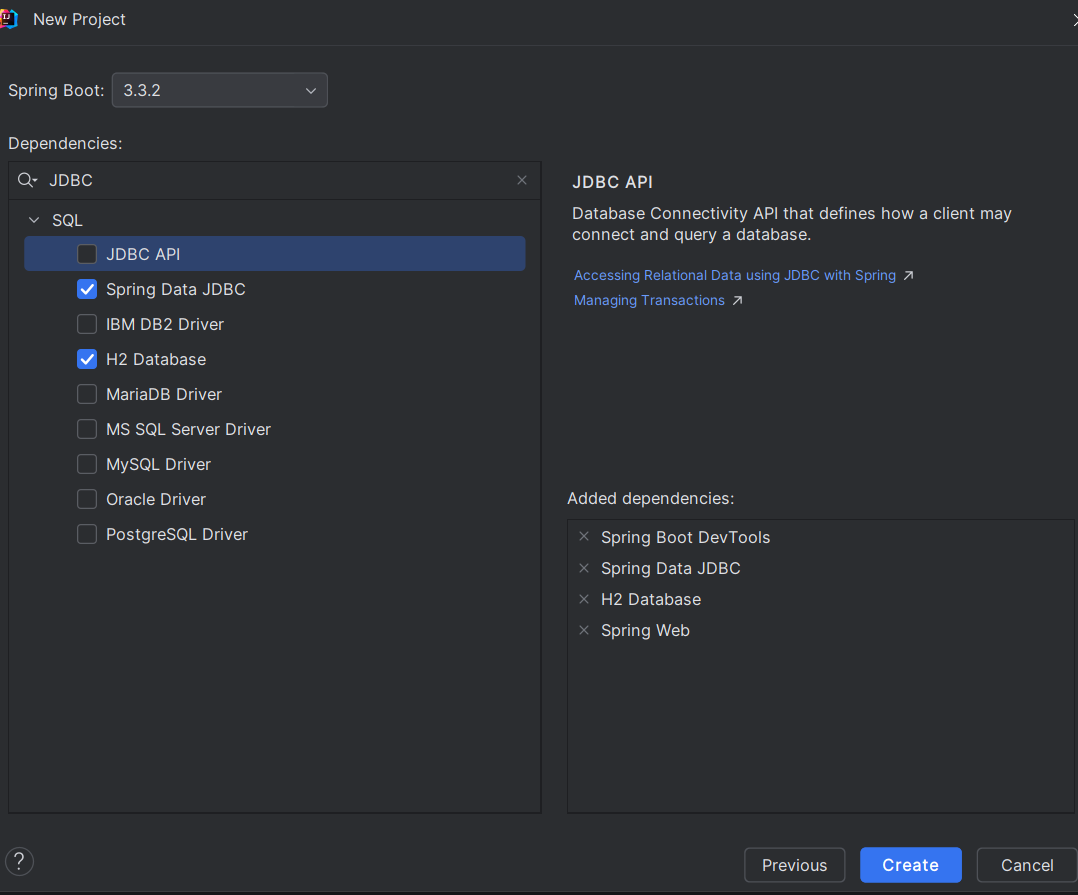
Select the below configurations for the project.
Choose Java 17 SDK from the list or download it if not available. Click Continue.
Select the dependencies:
spring-boot-starter-data-jdbcH2 Database (for an in-memory database)Click Create to generate the project.
Now, configure the DataSource in your 'application.properties' or 'application.yml' file. The code describes the connection configuration for the H2 database. In src/main/resources/application.properties (or application.yml), configure the H2 database connection:
spring.datasource.url=jdbc:h2:mem:testdb
spring.datasource.driver-class-name=org.h2.Driver
spring.datasource.username=sa
spring.datasource.password=password
spring.h2.console.enabled=true
spring.h2.console.path=/h2-console
spring.datasource.initialization-mode=alwaysCreate an entity class named Book.java that represents a table in the database. This class includes getter, setter, and toString() methods. In Spring Data JDBC, you only need to use @Id to identify the entity. The @Table annotation maps the class to the BOOKS table.
Define a BookRepository interface that extends CrudRepository. This interface provides methods for CRUD operations:
Create BookController.java to handle HTTP requests for CRUD operations. Use @RestController to define RESTful endpoints, and @RequestMapping to map HTTP requests to methods.
Note: Also try handling exceptions while making any project on your own, as it is a necessary concept.
Create schema.sql and data.sql files in src/main/resources to define the database schema and initial data.
-- schema.sql

-- Drop the table if it exists (useful for development purposes)
DROP TABLE IF EXISTS books;

-- Create the books table
CREATE TABLE BOOKS (
 id BIGINT AUTO_INCREMENT PRIMARY KEY,
 title VARCHAR(255) NOT NULL,
 author VARCHAR(255) NOT NULL
);
-- data.sql
INSERT INTO BOOKS (TITLE, AUTHOR) VALUES ('The Catcher in the Rye', 'J.D. Salinger');
INSERT INTO BOOKS (TITLE, AUTHOR) VALUES ('To Kill a Mockingbird', 'Harper Lee');
INSERT INTO BOOKS (TITLE, AUTHOR) VALUES ('1984', 'George Orwell');Some might get errors while building an application which would be as follows:
Description:

Parameter 0 of constructor in com.bookmanagement.bookmanagementsystem.controller.BookController required a bean of type 'com.bookmanagement.bookmanagementsystem.repository.BookRepository' that could not be found.


Action:

Consider defining a bean of type 'com.bookmanagement.bookmanagementsystem.repository.BookRepository' in your configuration.
So, in order to avoid this error one needs to add the following code into the main application i.e. BookManagementSystemApplication:
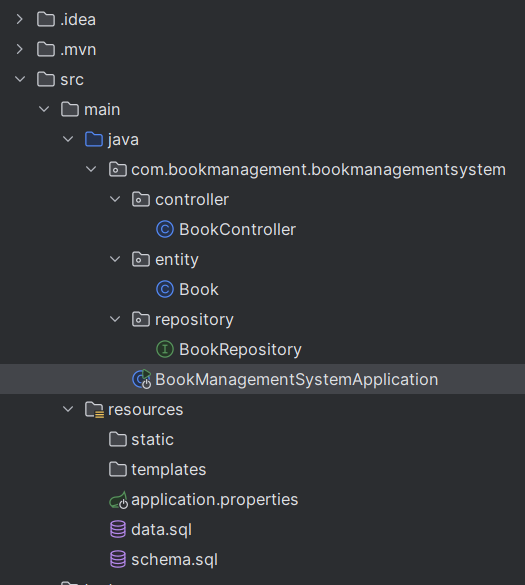
Project Structure:
After doing all the necessary changes the project structure would look similar to the one mentioned below:
Navigate to your BookManagementSystemApplication then Run your application. After successful build and run the application will start running in the port 8080. Then we can start verifying our API using Postman.
Now, open the Postman and hit the following URL for verifying:
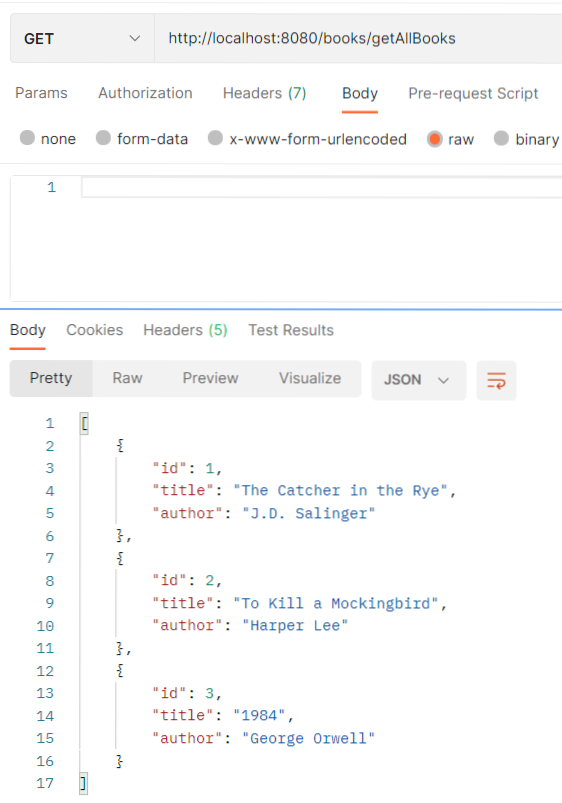
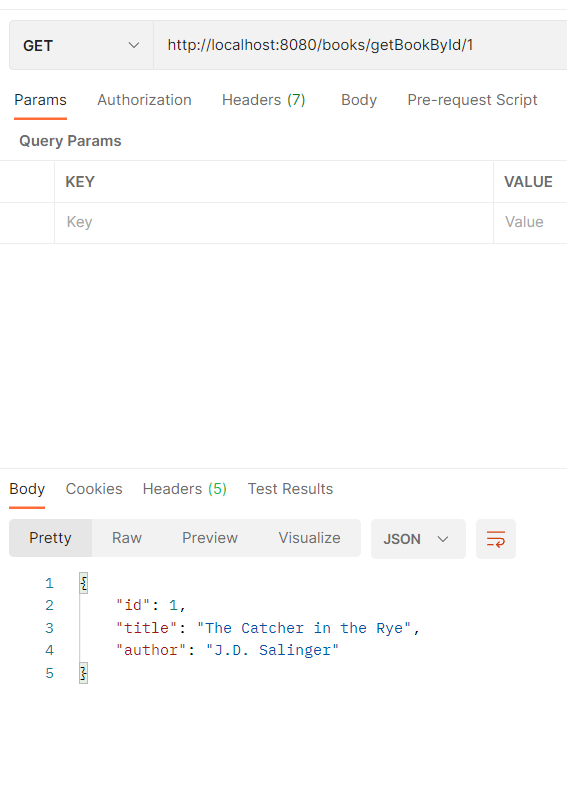
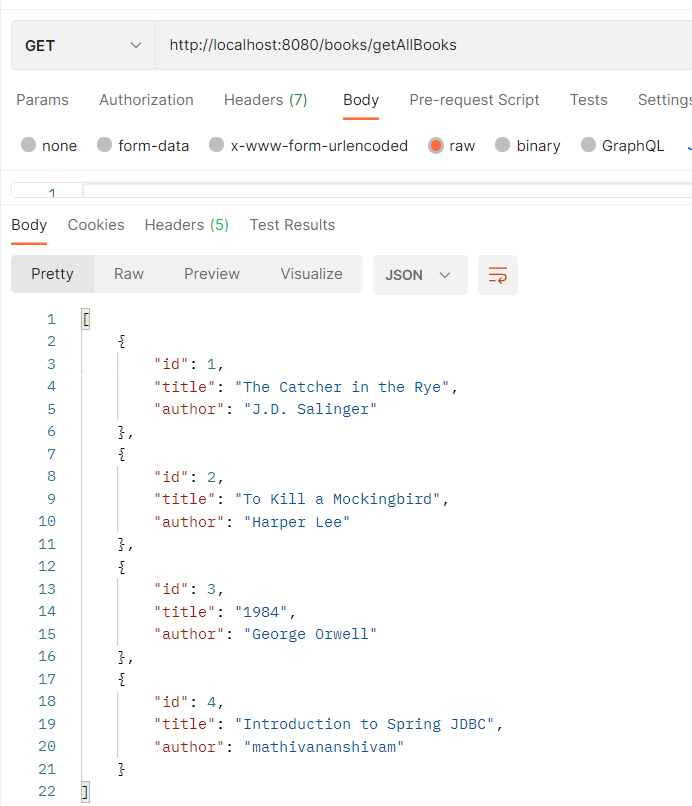
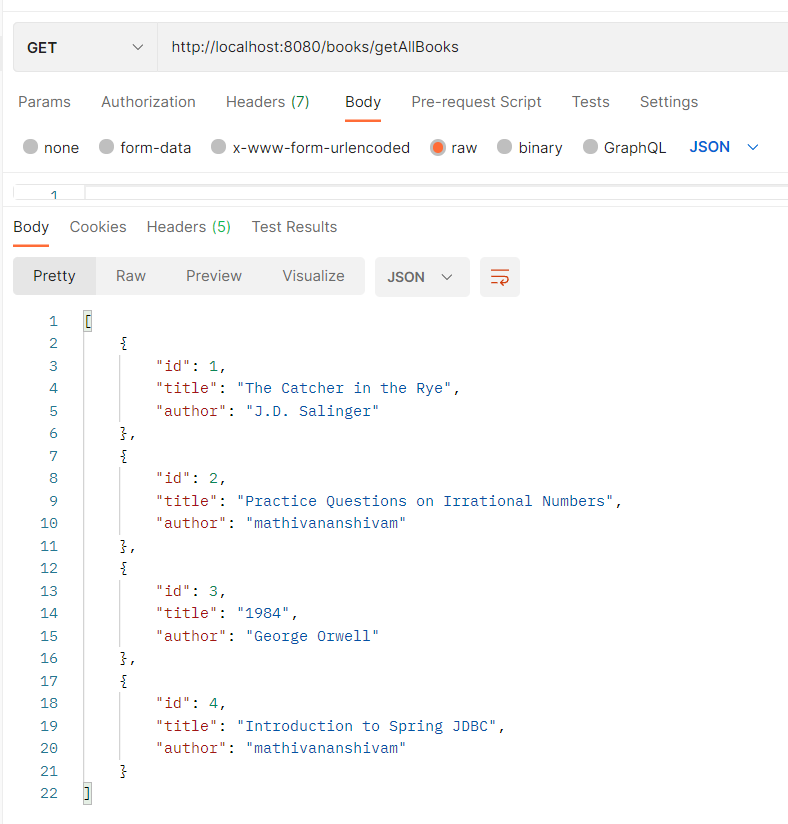
Enter the below mentioned url and you would get the response to the one mentioned in the same image downwards.
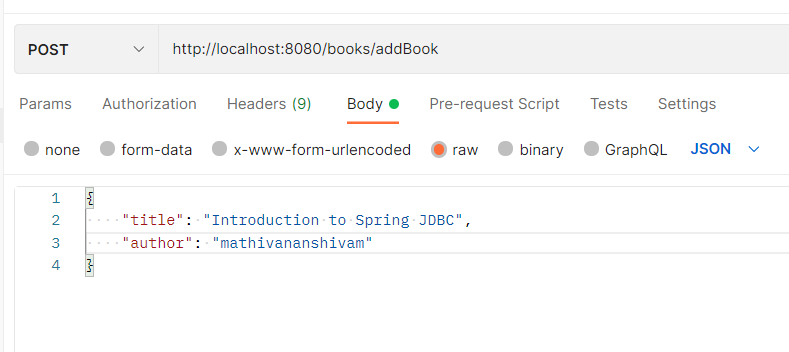
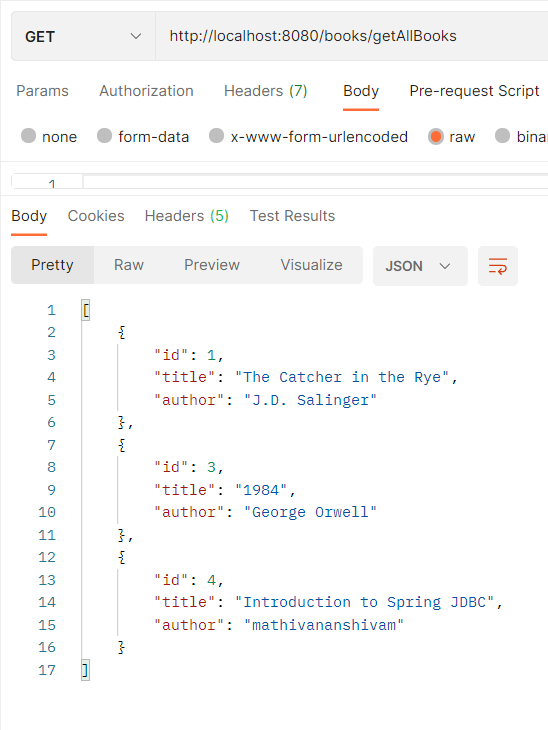
GET: http://localhost:8080/books/getAllBooksGET: http://localhost:8080/books/getBookById/{id}POST: http://localhost:8080/books/addBookAfter using POST request the books list would be updated which is mentioned below:
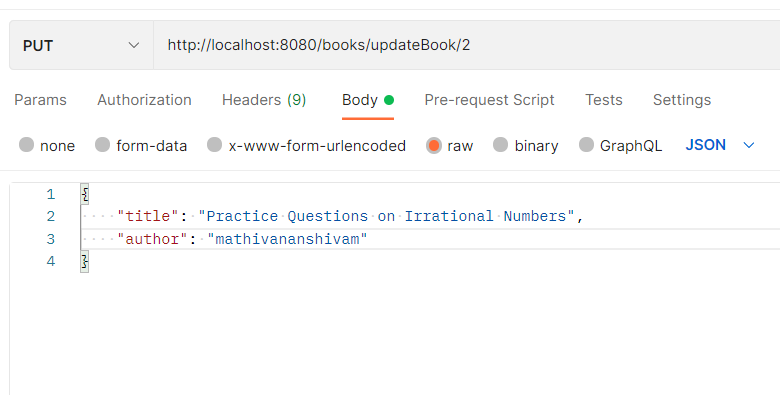
PUT: http://localhost:8080/books/updateBook/{id}After using PUT request the books list would be updated which is mentioned below:
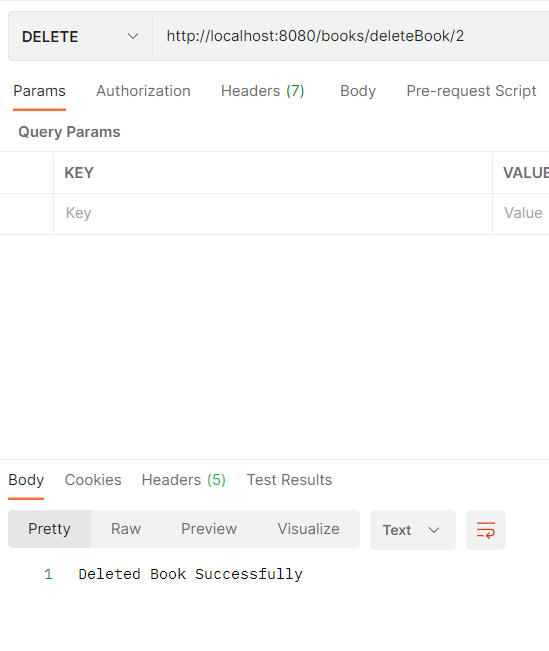
DELETE: http://localhost:8080/books/deleteBook/{id}After using DELETE request the books list would be updated which is mentioned below:
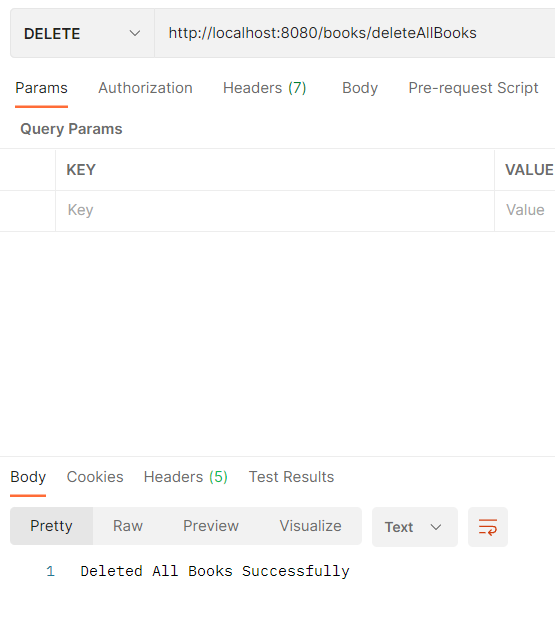
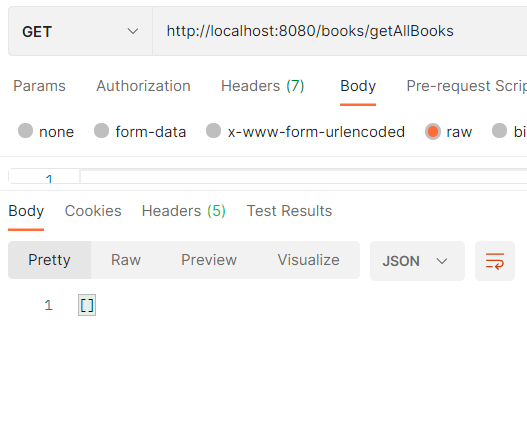
DELETE: http://localhost:8080/books/deleteAllBooksAfter using DELETE request the books list would be updated which is mentioned below:
Spring Data JDBC offers a simplified and high-performance approach to data access, bypassing the complexities of ORM frameworks. This example of a Book Management System demonstrates the ease of setting up and using Spring Data JDBC for CRUD operations. For further enhancements, consider adding exception handling, unit testing, and integrating additional Spring features.