 |
VOOZH | about |
|
VOOZH | about |
Nowadays, with the rapidly changing world of IT infrastructure, the ability to provision and manage virtual machines (VMs) automatically is indispensable. Virtual machines offer great flexibility and scalability for deploying various applications, services, or development environments. Provisioning and setting up these VMs manually is a very time-consuming process and is prone to errors. This is where Ansible comes in.
Ansible is a free open-source automation tool for the provisioning and configuration of IT environments. With Ansible, you can automate VM provisioning effortlessly and make sure your infrastructure management remains consistent and effective. Define automation tasks with YAML, an easily human-readable language. that is easy for developers and system administrators to use.
This guide will walk you through provisioning virtual machines using Ansible, common terminologies that you need to know, the steps involved, practical examples, and best practices that run. No matter if you're managing a small number of VMs or scaling to a large infrastructure, there is the right set of automation and productivity tools available in Ansible so that you can easily get your job done.
Step 1: Launch EC2 Instance
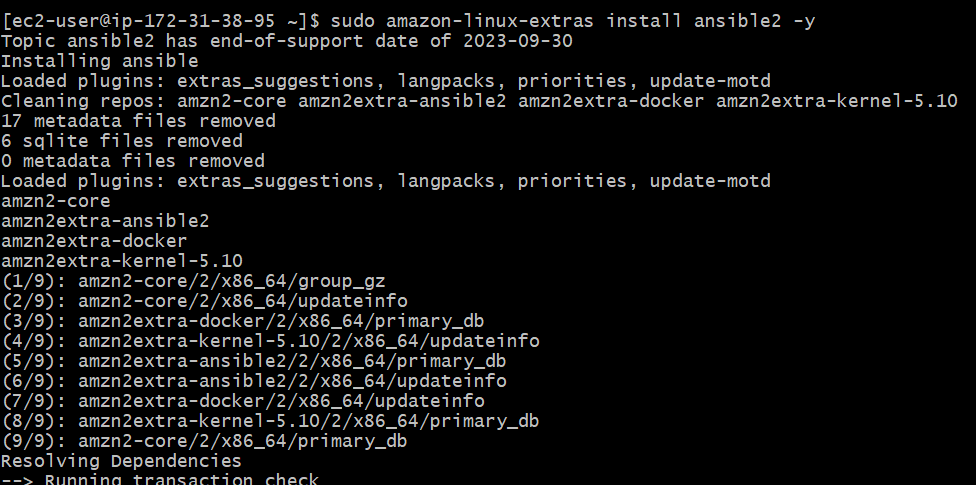
Step 2:Install Ansible
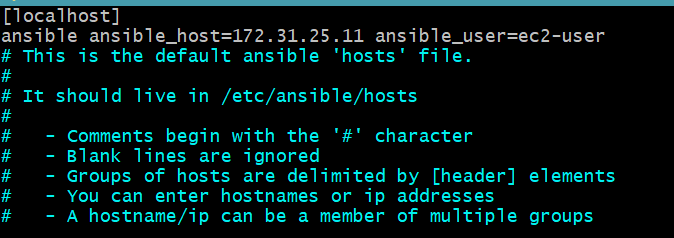
sudo amazon-linux-extras install ansible2 -yStep 3: Create Inventory file or Host file.
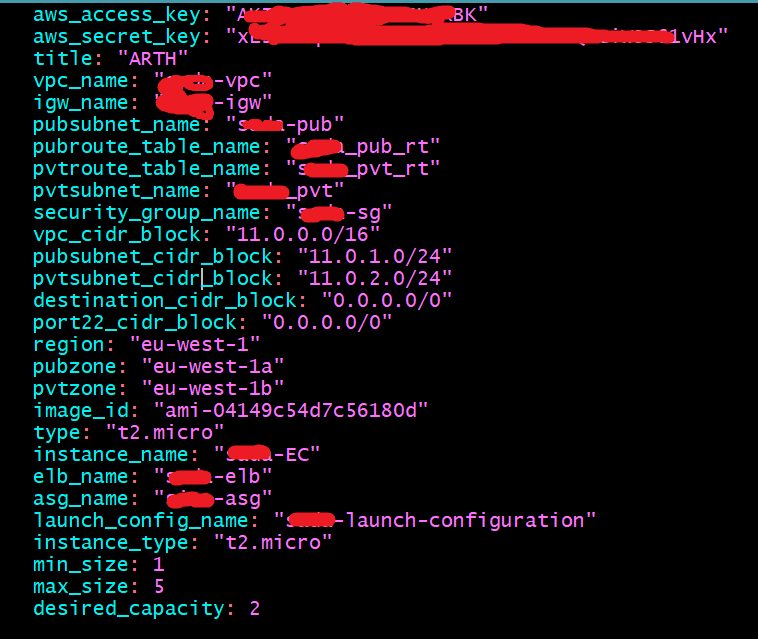
Step 4: Create Variable file
aws_access_key: "YOUR_AWS_ACCESS_KEY"
aws_secret_key: "YOUR_AWS_SECRET_KEY"
region: "us-east-1" #replace all with your own configurations
vpc_cidr_block: "10.0.0.0/16"
vpc_name: "my-vpc"
igw_name: "my-igw"
pubsubnet_cidr_block: "10.0.1.0/24"
pubsubnet_name: "public-subnet"
pvtzone: "us-east-1a"
pubroute_table_name: "public-route-table"
security_group_name: "my-security-group"
image_id: "ami-0abcdef1234567890"
type: "t2.micro"
Step 5: Create Playbook
- hosts: localhost
become: yes
gather_facts: false
vars_files:
- var.yml
tasks:
# VPC creation
- name: Create VPC
ec2_vpc_net:
aws_access_key: "{{ aws_access_key }}"
aws_secret_key: "{{ aws_secret_key }}"
cidr_block: "{{ vpc_cidr_block }}"
name: "{{ vpc_name }}"
region: "{{ region }}"
dns_support: yes
dns_hostnames: yes
tenancy: default
state: present
register: vpc_result
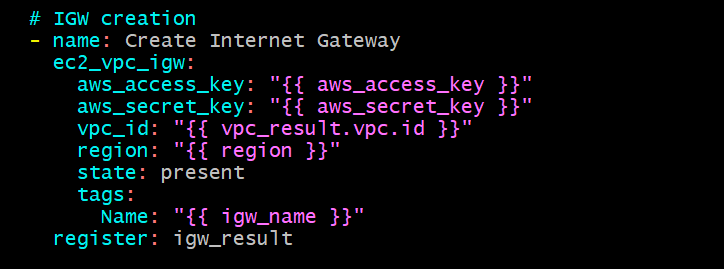
- name: Create Internet Gateway
ec2_vpc_igw:
aws_access_key: "{{ aws_access_key }}"
aws_secret_key: "{{ aws_secret_key }}"
vpc_id: "{{ vpc_result.vpc.id }}"
region: "{{ region }}"
state: present
tags:
Name: "{{ igw_name }}"
register: igw_result
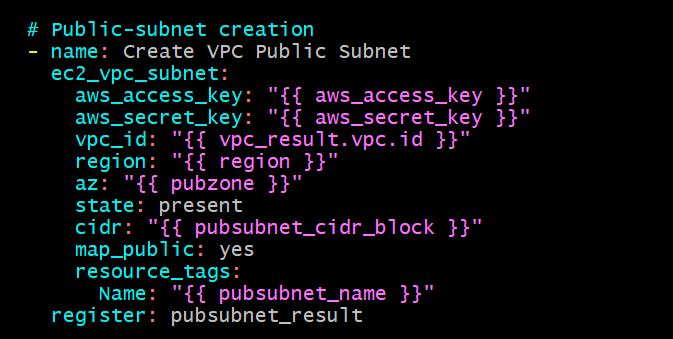
Public-subnet creation
- name: Create VPC Public Subnet
ec2_vpc_subnet:
aws_access_key: "{{ aws_access_key }}"
aws_secret_key: "{{ aws_secret_key }}"
vpc_id: "{{ vpc_result.vpc.id }}"
region: "{{ region }}"
az: "{{ pubzone }}"
state: present
cidr: "{{ pubsubnet_cidr_block }}"
map_public: yes
resource_tags:
Name: "{{ pubsubnet_name }}"
register: pubsubnet_result
Public-Route table
- name: Create VPC Public Route Table
ec2_vpc_route_table:
aws_access_key: "{{ aws_access_key }}"
aws_secret_key: "{{ aws_secret_key }}"
vpc_id: "{{ vpc_result.vpc.id }}"
region: "{{ region }}"
state: present
tags:
Name: "{{ pubroute_table_name }}"
subnets:
- "{{ pubsubnet_result.subnet.id }}"
routes:
- dest: 0.0.0.0/0
gateway_id: "{{ igw_result.gateway_id }}"
register: public_route_table
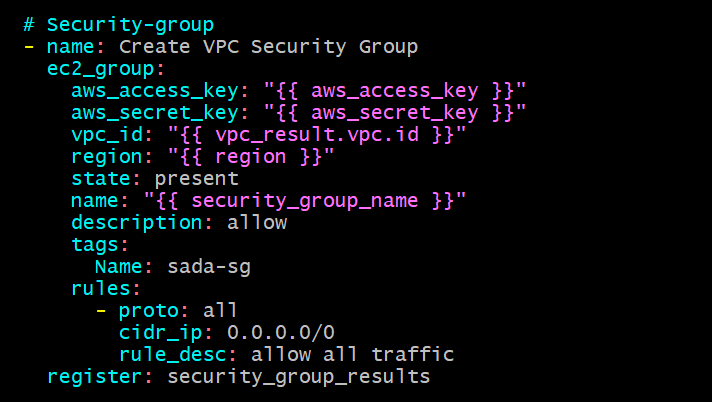
Security-group
- name: Create VPC Security Group
ec2_group:
aws_access_key: "{{ aws_access_key }}"
aws_secret_key: "{{ aws_secret_key }}"
vpc_id: "{{ vpc_result.vpc.id }}"
region: "{{ region }}"
state: present
name: "{{ security_group_name }}"
description: allow
tags:
Name: "{{ security_group_name }}"
rules:
- proto: all
cidr_ip: 0.0.0.0/0
rule_desc: allow all traffic
register: security_group_results
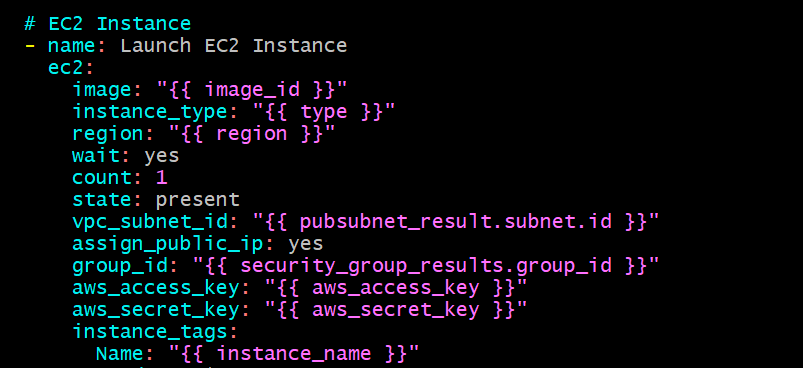
EC2 Instance
- name: Launch EC2 Instance
ec2:
image: "{{ image_id }}"
instance_type: "{{ type }}"
region: "{{ region }}"
wait: yes
count: 1
state: present
vpc_subnet_id: "{{ pubsubnet_result.subnet.id }}"
assign_public_ip: yes
group_id: "{{ security_group_results.group_id }}"
aws_access_key: "{{ aws_access_key }}"
aws_secret_key: "{{ aws_secret_key }}"
instance_tags:
Name: "{{ instance_name }}"
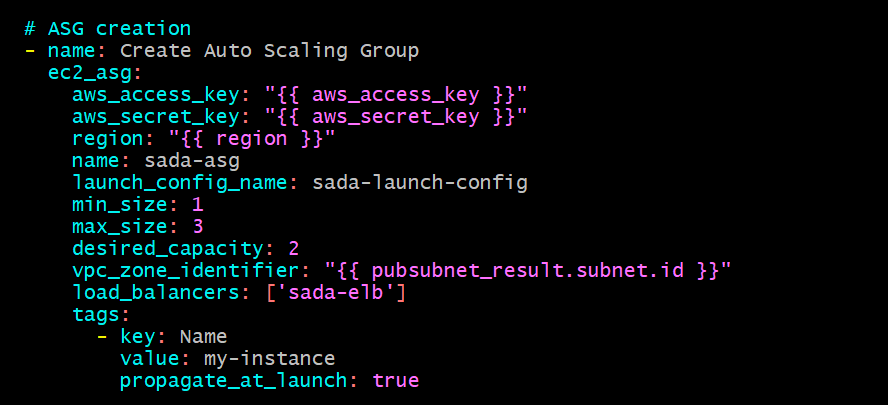
Auto Scaling Group
- name: Create Auto Scaling Group
ec2_asg:
aws_access_key: "{{ aws_access_key }}"
aws_secret_key: "{{ aws_secret_key }}"
region: "{{ region }}"
name: my-auto-scaling-group
launch_config_name: my-launch-config
min_size: 1
max_size: 3
desired_capacity: 2
vpc_zone_identifier: "{{ pubsubnet_result.subnet.id }}"
tags:
- key: Name
value: my-instance
Step 6: Run playbook
Step 7: Verify Virtual Machines
Therefore, Ansible eases the process of creating playbooks that describe how to provision virtual machines, making the task easier for automating the process of building and configuring infrastructure. Use its simple, declarative language to define the desired state of the infrastructure in your playbooks and let the magic of Ansible work with the intricacies of execution.
In this documentation, we have gone through the base terminologies that are crucial for handling Ansible: playbooks, tasks, roles, and modules. Besides, a detailed explanation was given about how to provision VMs: the importance of proper inventory management, using variables, and the steps to customize templates.
The ability of Ansible to interact with many cloud providers and manage infrastructure as code makes it one of the prime tools for current-day DevOps practices. Idempotence is one of its attractive features, ensuring that tasks are only executed when necessary and result in a desired state without causing unintended changes.
Learn the ways to be efficient in deploying infrastructure and make your systems reliable with Ansible. Whether you are provisioning just a few virtual machines or managing a complex, multi-cloud environment, Ansible provides the ease, flexibility, and power to enable you to automate your workflows.
As you continue your journey into Ansible, remember to use its documentation and community resources. With practice and experience, you unlock the full power of Ansible; your infrastructure provisioning process becomes more effective and scalable.
.png)