Autonomous Driving Car is one of the most disruptive innovations in AI. Fuelled by Deep Learning algorithms, they are continuously driving our society forward and creating new opportunities in the mobility sector. An autonomous car can go anywhere a traditional car can go and does everything that an experienced human driver does. But it's very essential to train it properly. One of the many steps involved during the training of an autonomous driving car is lane detection, which is the preliminary step. Today, we are going to learn how to perform lane detection using videos.
Brief steps involved in Road Lane Detection
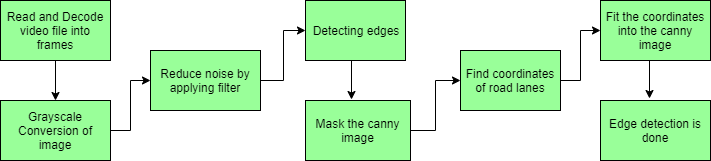
Road Lane Detection requires to detection of the path of self-driving cars and avoiding the risk of entering other lanes. Lane recognition algorithms reliably identify the location and borders of the lanes by analyzing the visual input. Advanced driver assistance systems (ADAS) and autonomous vehicle systems both heavily rely on them. Today we will be talking about one of these lane detection algorithms. The steps involved are:
Capturing and decoding video file: We will capture the video using VideoFileClip object and after the capturing has been initialized every video frame is decoded (i.e. converting into a sequence of images).
Grayscale conversion of image: The video frames are in RGB format, RGB is converted to grayscale because processing a single channel image is faster than processing a three-channel colored image.
Reduce noise: Noise can create false edges, therefore before going further, it's imperative to perform image smoothening. Gaussian blur is used to perform this process. Gaussian blur is a typical image filtering technique for lowering noise and enhancing image characteristics. The weights are selected using a Gaussian distribution, and each pixel is subjected to a weighted average that considers the pixels surrounding it. By reducing high-frequency elements and improving overall image quality, this blurring technique creates softer, more visually pleasant images.
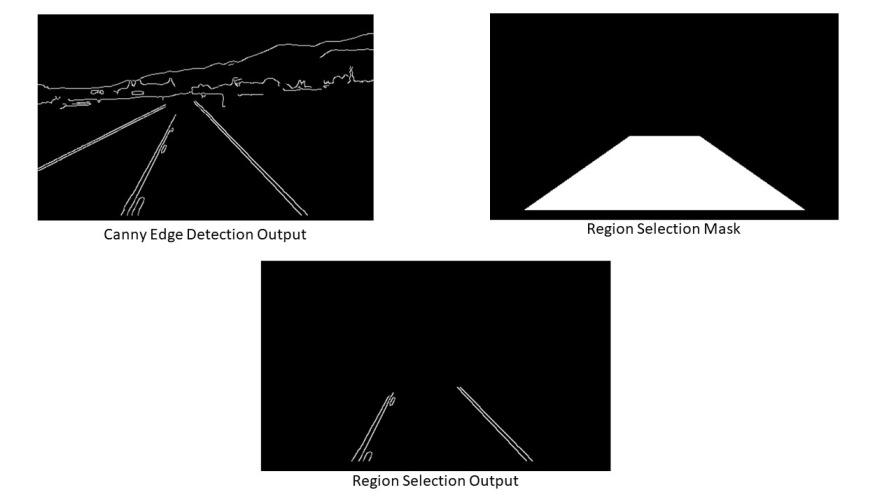
Canny Edge Detector: It computes gradient in all directions of our blurred image and traces the edges with large changes in intensity. For more explanation please go through this article: Canny Edge Detector
Region of Interest: This step is to take into account only the region covered by the road lane. A mask is created here, which is of the same dimension as our road image. Furthermore, bitwise AND operation is performed between each pixel of our canny image and this mask. It ultimately masks the canny image and shows the region of interest traced by the polygonal contour of the mask.
Hough Line Transform: In image processing, the Hough transformation is a feature extraction method used to find basic geometric objects like lines and circles. By converting the picture space into a parameter space, it makes it possible to identify shapes by accumulating voting points. We'll use the probabilistic Hough Line Transform in our algorithm. The Hough transformation has been extended to address the computational complexity with the probabilistic Hough transformation. In order to speed up processing while preserving accuracy in shape detection, it randomly chooses a selection of picture points and applies the Hough transformation solely to those points.
Draw lines on the Image or Video: After identifying lane lines in our field of interest using Hough Line Transform, we overlay them on our visual input(video stream/image).
Dataset: To demonstrate the working of this algorithm we will be working on a video file of a road. You can download the dataset from this GitHub link - Dataset
Note: This code is implemented in google colab. If you are working on any other editor you might have make some alterations in code because colab has some dependency issues with OpenCV
Steps to Implement Road Lane Detection
Step 1: Install OpenCV library in Python.
Step 2: Import the necessary libraries.
Step 3: Define the driver function for our algorithm.
Step 4: Define "frame_processor" function where all the processing happens on a frame to detect lane lines.
Till now we have converted frames from RGB to Grayscale, applied Gaussian Blur to reduce noise and used canny edge detection. Next we will select the region where we want to detect road lanes.
Now that we have received the coordinates using Hough Transform, we will plot them on our original image(frame) but as we can see that we are getting coordinates of more than 2 lines so we will first find slope of left and right lane and then overlay them over the original image.
We have define 4 functions here to help draw left and right lane on our input frame:
Average_Slope_Intercept: This function takes in the hough transform lines and calculate their slope and intercept. If the slope of a line is negative then it belongs to left lane else the line belongs to the right lane. Then we calculate the weighted average slope and intercept of left lane and right lanes.
Pixel_Points: By using slope, intercept and y-values of the line we find the x values for the line and returns the x and y coordinates of lanes as integers.
Lane_Lines: The function where Average_Slope_Intercept and Pixel Points are called and coordinates of right lane and left lane are calculated.
Draw_Lane_Lines: This function draws the left lane and right lane of the road on the input frame. Returns the output frame which is then stored in the variable "processed" in our driver function "process_video".
Output:
👁 Image Road Lane Line Detection Output on an image
Complete Code for Real-time Road Lane Detection
Final Output:
Conclusion
We covered one of many ways for detecting road lanes using Canny Edge Detector and Hough Transform. Some other ways for road lane detection use complex neural networks and sensor data. This kind of advanced techniques and algorithms are currently used in Tesla for autonomous driving. The algorithm discussed in this article is the first step in understanding the basic working of autonomous vehicle. We will be coming up with more articles to help you understand difficult concepts like autonomous driving easily.

.jpg)