 |
VOOZH | about |
|
VOOZH | about |
Pug is a template/view engine that works with JavaScript libraries and frameworks. It simplifies the process of writing HTML by reducing traditional HTML syntax. Among all of these features, it also provides support for Mixins. Mixins is a block of code that can be reused in multiple templates.
In this article, we will learn how to use Mixins with its syntax and examples.
Table of Content
Mixins is a block of code that can be reused. It is declared by using the mixinkeyword with the name of the mixin and inside that we will define a block of code that we are going to reuse. To reuse the mixin block we have to use +mixin_name.
//Declaration
mixin mixin_name
 //block of code
//Using Declared Mixin
+mixin_name
+mixin_name
Suppose you have a form element intended for multiple instances across your application, each requiring independent styling. While you could employ conditional logic, this approach may lack efficiency. Instead, leveraging PugJS mixin functionality offers a more optimal solution. We'll delve into an advanced example utilizing attributes in mixins. Let's start by crafting a partial file to define our mixin. Within the partials folder, establish a new file named mixins.pug, housing the subsequent content.
mixin user-form(attributes)
 form(action="/" method="post" class!=attributes.class)
 input#user-email(type="email" name="user-email" class!=attributes.emailClass)
 button(type="submit") Update
After declaring our user form mixin, the intriguing aspect lies in class!=attributes.class. As outlined in the Pug documentation, mixins receive an implicit 'attributes' argument, which we'll utilize to append attributes to our form. Now, let's integrate our form into action. Insert the following line at the top of main-layout.pug, just above the DOCTYPE declaration.
include ../partials/mixinsBy following this approach, our mixin becomes accessible from any file that extends main-layout. To integrate the mixin into index.pug, append the following line at the end of the file (ensuring correct indentation):
+user-formUpon visiting the home page in your browser, you'll notice the form at the bottom of the page without any added class. Let's now incorporate the form in a different location and assign it a class. In about.pug, append the following line as the last line of the file:
+user-form()(class='modal')
By specifying this usage, we've indicated the application of the 'modal' class to the form. Upon visiting the 'about' page, you should observe the form with the appropriate class applied.
Step 1: Create a NodeJS application using the following command:
npm init -yStep 2: Install required Dependencies using the following command.
npm i pug expressThe updated dependencies in package.json file will look like:
"dependencies": {
 "express": "^4.18.2",
 "pug": "^3.0.2"
}
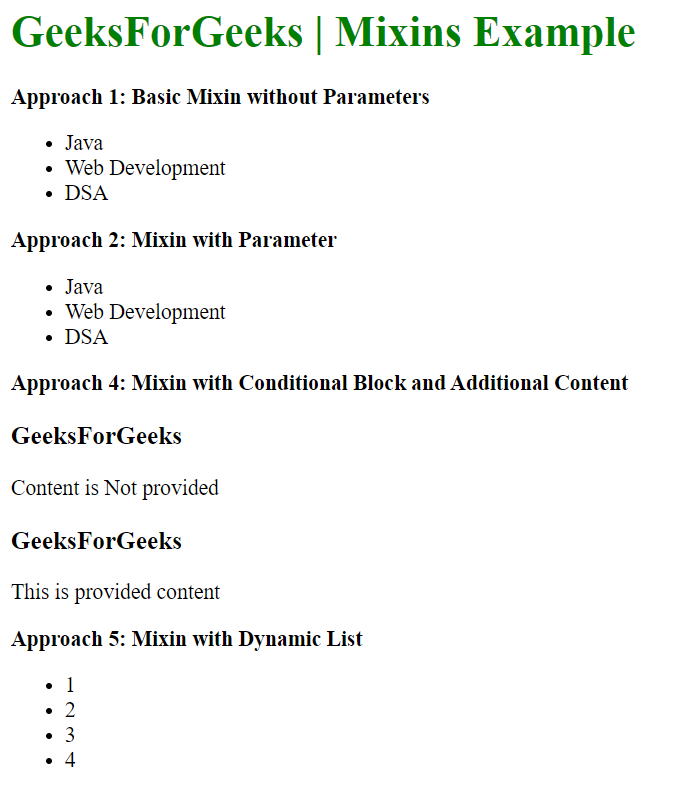
Example: This example demonstrate the use of Mixins in Pug.js with different approaches
To run the application use the following command:
node app.js Output: Now go to http://localhost:3000 in your browser: