 |
VOOZH | about |
|
VOOZH | about |
We will implement phone number-based authentication in Django by creating a custom user model that uses phone numbers instead of usernames for login. You’ll learn how to build a custom user manager, update settings, and integrate the new user model with the Django admin panel to enhance security and streamline the authentication process.
Prerequisites:
To start the project use this command
django-admin startproject newton
cd newton
python manage.py startapp accounts
Note: Phone number authentication is a critical feature in modern web applications. To implement this and other advanced features, the Django Web Development Course will help you build secure and user-friendly systems.
INSTALLED_APPS = [
"django.contrib.admin",
"django.contrib.auth",
"django.contrib.contenttypes",
"django.contrib.sessions",
"django.contrib.messages",
"django.contrib.staticfiles",
"accounts", //App name
]
In accounts/models.py, define a custom user model that uses phone instead of username:
accounts/manager.py: We import BaseUserManager from django.contrib.auth.base_user to create a custom user manager.We define a custom UserManager class that extends BaseUserManager. This manager is responsible for creating and managing user instances.The create_user method is used to create a standard user with a phone number, an optional password, and any extra fields passed as keyword arguments. It checks if a phone number is provided and raises a ValueError if not.
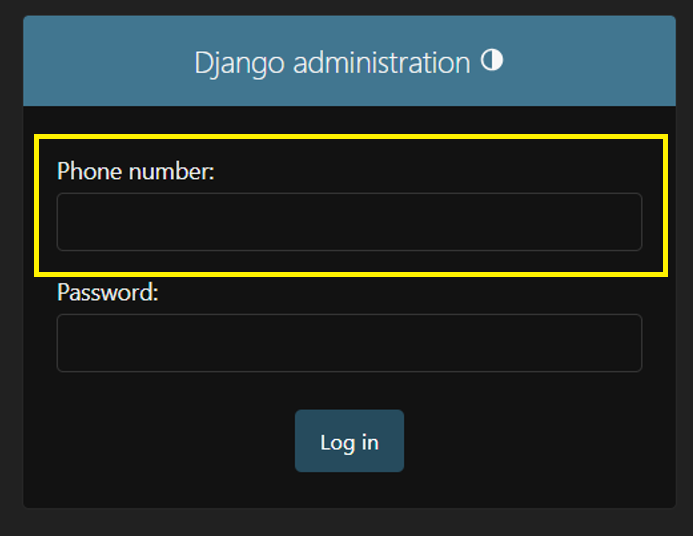
In accounts/admin.py:
In newton/settings.py, tell Django to use your custom user model:
Make and apply migrations for your custom user model:
python manage.py makemigrations
python manage.py migrate
Start the development server:
python manage.py runserver
Output