 |
VOOZH | about |
|
VOOZH | about |
RESTful APIs play an important role in communicating between various software components. The interface used to consume APIs significantly impacts the chances of achieving business and technological objectives. In this article, we'll dive into the importance of RESTful API documentation and how Swagger simplifies this process.
Swagger, now known as OpenAPI, is a framework for documenting RESTful APIs. It provides a standardized way to describe the functionalities of an API, making it easier for developers to understand and consume the API. The main features of Swagger/OpenAPI include documenting various HTTP methods such as GET, POST, PATCH, and DELETE, along with specifying parameters and responses. Let's explore how Swagger/OpenAPI can be used to document these HTTP methods for a RESTful API.
To implement Swagger documentation in Python, you can use tools like Flask-RESTful or Django REST framework along with Swagger UI.
Below, are the step-by-step Implementation of college management system using RESTful APIs with Swagger.
First, create the virtual environment using the below commands
python -m venv env
.\env\Scripts\activate.ps1
To install the necessary library for creating the CMS using RESTful APIs with Swagger, we will use Flask. Flask is a lightweight web framework for Python. To install Flask, execute the below command in your terminal
pip install FlaskBelow are the step-by-step code explanation of CMS using RESTful APIs with Swagger that we have written in main.py file.
Step 1: Flask Setup and Imports
In below code we sets up a Flask application and imports necessary modules (Flask, request, Api, Resource, and Swagger). The Api class is from Flask-RESTful for building RESTful APIs, and Swagger is used to generate interactive API documentation.
Step 2: In-memory Data Storage
In below code we initializes in-memory data storage for courses and students. It provides sample data for illustration, and additional data can be added as necessary.
Step 3: Course Resource
In below code, two classes are defined for handling course-related API operations. CourseResource deals with operations on the collection of courses, while CourseItemResource handles operations on individual courses (GET, PUT, DELETE).
Step 4: Student Resource
In below code, two classes are defined for handling student-related API operations. StudentResource deals with operations on the collection of students, while StudentItemResource handles operations on individual students (GET, PUT, DELETE).
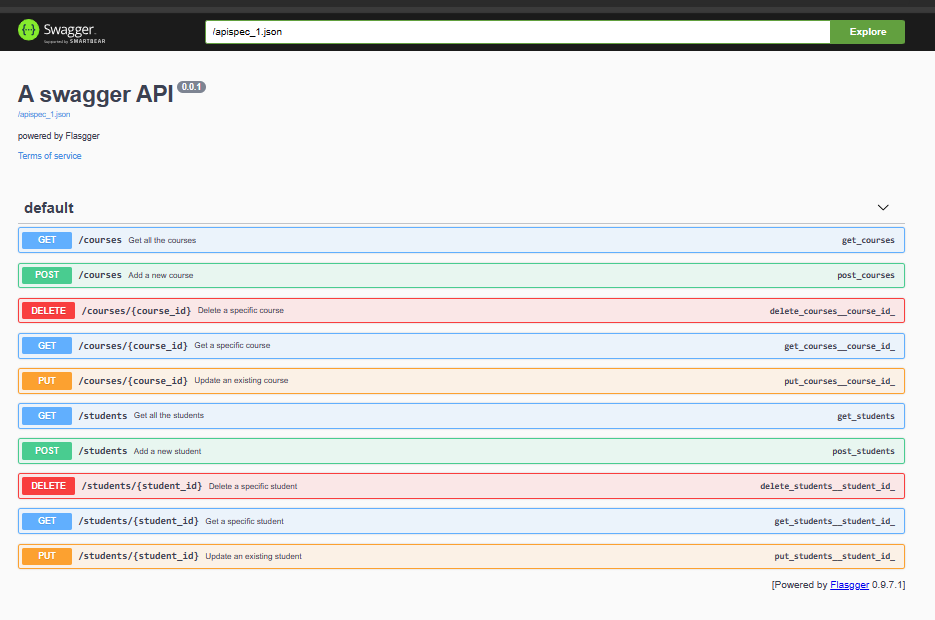
Step 5: API Routes
In below code API routes are defined here using the add_resource method. These routes map to the defined classes and specify the URL patterns for accessing course and student resources.
Step 6: Run the Application
Below code checks if the script is the main module and runs the Flask application in debug mode. This enables automatic reloading of the server on code changes, making development easier.
Below is the complete code implementation of the main.py file that we have used in making this project.