 |
VOOZH | about |
|
VOOZH | about |
In this article, we will explore a note-making app. In this article, we will create a note-making app using Django. We will also use the Django authentication system. Users need to create an account on the web to access the note-making app. After that, users will have access to the note-making app. This means users can create notes, update them with a simple click of a button, and also delete notes with a single click. Additionally, users have the option to log out by clicking on a button.
Users can create notes, update them with a simple click of a button, and also delete notes with a single click. Additionally, users have the option to log out by clicking on a button.
To install Django follow these steps.
To start the project use this command
django-admin startproject notes
cd notes
To start the app use this command
python manage.py startapp documentNow add this app to the 'settings.py'
INSTALLED_APPS = [
 'django.contrib.admin',
 'django.contrib.auth',
 'django.contrib.contenttypes',
 'django.contrib.sessions',
 'django.contrib.messages',
 'django.contrib.staticfiles',
 'document'
]
File Structure
Building a note-taking app is a great way to apply your Django skills. For those looking to gain a comprehensive understanding of Django, the Django Web Development Course offers in-depth knowledge.
models.py: This code defines a Django model for a document with fields for title, content, creation date, and modification date. The documents are ordered by their titles.
views.py: Below are the explaiantion of the each function:
In summary, it's a note-making app with user authentication and registration
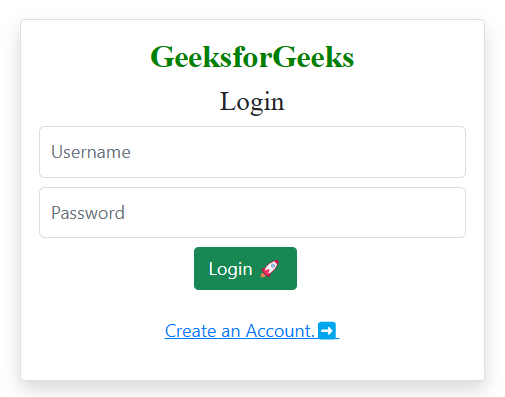
login.html: This is an HTML template for a login page with a minimalistic design. It includes a form for users to enter their username and password, along with a "Login" button. If the login is successful, a success message is displayed. Users can also navigate to a registration page using a provided link. The styling is done using Bootstrap and Font Awesome.
register.html: This HTML template is designed for a registration page with a clean and simple layout. Users can input their username and password, and upon successful registration, a success message is shown. The page features styling using Bootstrap and Font Awesome icons, providing a visually appealing user experience.
editor.html: This HTML template is for a web page with a header for creating and managing notes. It uses the Bulma CSS framework for styling and features a navigation bar with options to create a new document and log out. The main content area allows users to enter a title and content for their notes and provides options to save and delete them. The page uses a custom font style for a unique look and feel.
admin.py :Here we are registering the models in the admin file.
urls.py: This Django code configures URL patterns, linking specific URLs to corresponding views or functions. It handles user authentication, custom logout, an editor page, and document deletion. The "admin/" URL is reserved for Django's admin site. Each pattern has a symbolic name for easy reference and URL generation.