 |
VOOZH | about |
|
VOOZH | about |
Razorpay is a popular payment gateway in India that allows businesses to accept online payments via credit/debit cards, UPI, wallets, and net banking. Integrating Razorpay with Django enables secure and seamless payment processing for your web applications.
Consider a project named 'dj_razorpay' having an app named 'payment', and create a Payment model to track transactions and apply migrations.
In payment/models.py:
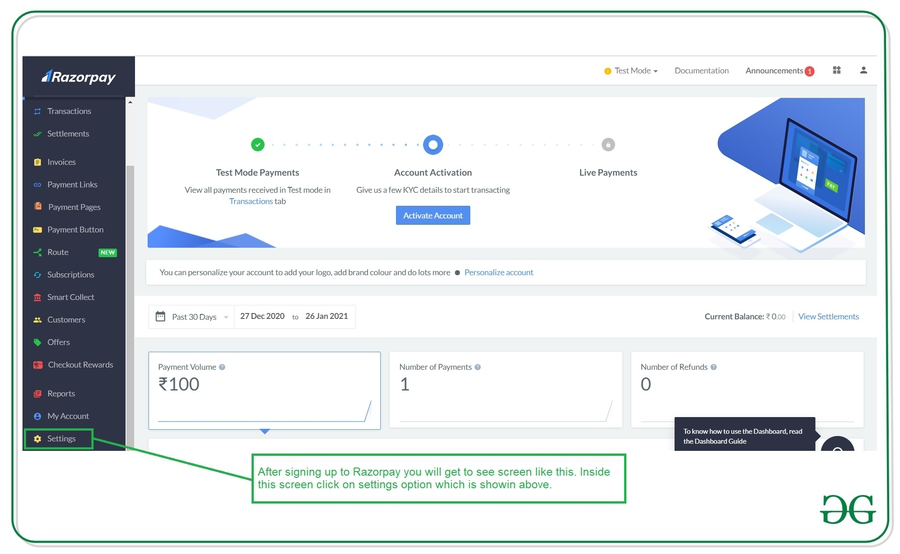
Create an account on the Razorpay website by signing up with your email address and password. During registration, provide the required basic details such as your phone number. After the account is set up, complete the KYC verification by submitting your identity documents and business details.
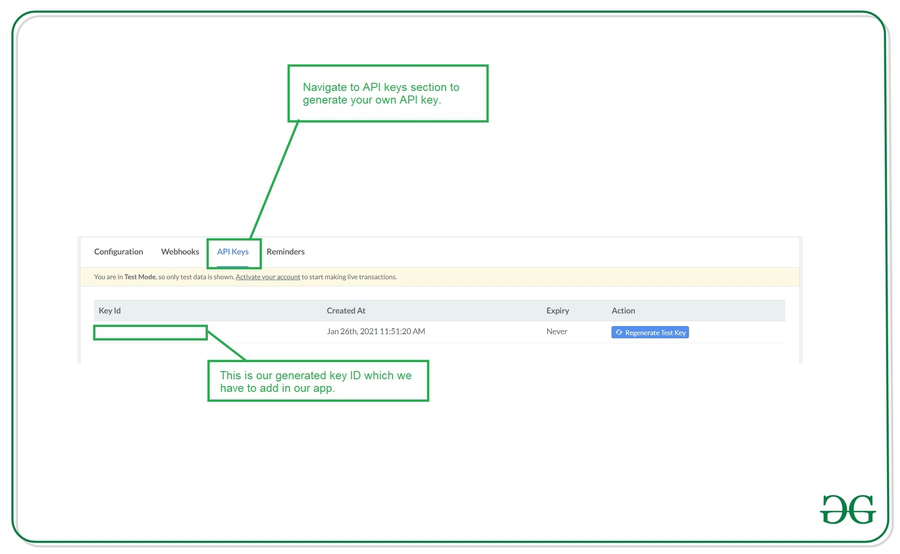
Once verified, navigate to the Razorpay Dashboard to obtain the API Key ID and Key Secret, which are required for integration. For live transactions, you will also need to add your bank account details to enable settlements.
Note: After successful verification, you will see a similar user interface as below.
Inside the Razorpay settings screen, select 'Create a new key' to generate your API credentials. This will provide a Key ID and a Key Secret.
At this stage, payments operate in test mode, meaning no real transactions occur and only limited payment methods are available. To enable live transactions and unlock all payment options, complete the KYC verification process and add bank account details. The integration process remains identical for both test and live modes.
Add the 'Key Id' and 'Key Secret' to settings.py file.
RAZOR_KEY_ID = 'YOUR_KEY_ID'
RAZOR_KEY_SECRET = 'YOUR_KEY_SECRET'
Install razorpay's python package:
pip install razorpay
In payment/views.py:
Note: It is necessary to capture the payment, otherwise it would be auto refunded to the payer.
In dj_razorpay/urls.py:
Pass the Razorpay Order ID along with other options generated in the previous step. Include Razorpay's JavaScript in the template to render the payment window and initialize it with backend-provided options.
Add an event listener to the payment button so the payment window opens when the button is clicked. The payment button is rendered on the homepage. Two additional pages are required to handle payment success and payment failure.
Run the Server:
python manage.py runserver
Visit development URL- http://127.0.0.1:8000