 |
VOOZH | about |
|
VOOZH | about |
JUnit testing plays a vital role in validating Java applications that interact with databases like MySQL. It helps ensure that database operations such as fetching, inserting, and updating data work correctly and reliably.
Follow below steps to setting up and testing a MySQL-based Java application using JUnit to ensure correct database operations.
1. Open IntelliJ IDEA
2. Click New Project
3. Select Maven
4. Choose JDK (Java 8 or above)
5. Enter details:
6. Click Finish
Project Structure:
After creation, your project should look like:
Relevant Maven dependency for JUnit. This has to be available in pom.xml
pom.xml
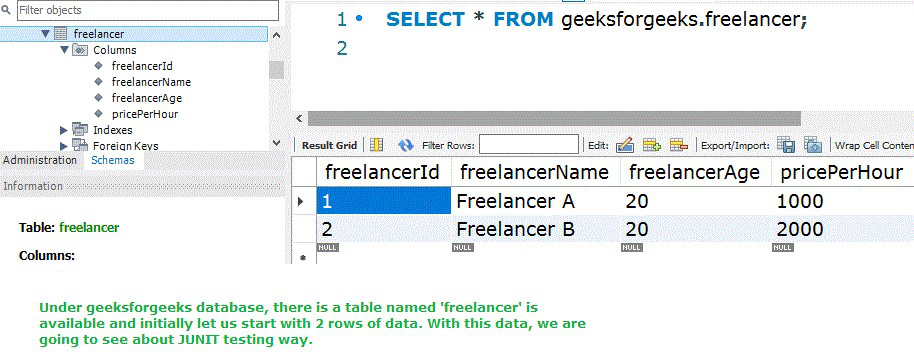
Let us assume that MySQL got installed in the system and there is a database named "geeksforgeeks" is available
Let us see the important files of the project.
ds-connection.properties
ds.database-driver=com.mysql.jdbc.Driver
ds.url=jdbc:mysql://localhost:3306/geeksforgeeks
ds.username=root
ds.password=your_password
ConnectionClass.java
Each and every field should match with the corresponding freelancer table(MySQL) column
Freelancer.java
FreelancerQueries.java
Now, let us see the JUnit test case preparation file. Here we have to include positive, and negative scenarios for each and every requirement. Multiple assert statements we can write in a method and all should get passed and that will tell about our software code is correct in all aspects and for any test data, the written code will be correct.
Each and every method has to start with @Test and inside the method, the methods written in "FreelancerQueries.java" should be called. Testcases can be written with
AppTest.java
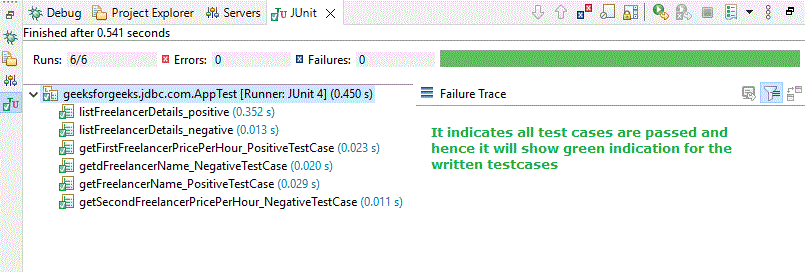
Let us execute the JUnit test cases now. We have to run the test cases in the following way
Once everything is successful, we will get the output as follows
In cases of any error, it will be clearly indicated as follows :