Project Object Model (POM) is an XML file (pom.xml) that defines a project's configuration, dependencies, build plugins, and settings. It is the core of Apache Maven's build automation. Maven uses the POM to manage the build lifecycle and resolve dependencies from remote repositories. When a Maven command is executed, it reads the POM to compile, test, and package the project accordingly.
Workflow of Maven POM:
- Initialization: The Maven reads the pom.xml file and initializes the build process.
- Dependency Resolution: Downloads the specified dependencies from remote repositories.
- Build Life cycle Execution: Executes the build life cycle phases like compile, test, package, verify, and other phases.
- Plugin Execution: Runs the configured plugins for various tasks, such as code analysis and other tasks.
- Packaging: Packages the compiled code into specified format like JAR, WAR and other formats.
- Deployment: Deploys the packaged code to a remote repository or server.
👁 LightboxBasic Structure of pom.xml:
👁 Lightboxpom.xml:
Key Components of a POM File
Project Coordinates:
- <groupId>: Defines the group or organization to which the project belongs.
- <artifactId>: The unique name of the project.
- <version>: The specific version of the project.
Build Configuration:
- <build>: Contains the build configuration for the project, such as the source directory, test source directory, and output directory.
Dependencies:
- <dependencies>: Contains the list of dependencies required by the project. Each dependency is defined by its groupId, artifactId, version, and scope.
Plugins:
- <plugins>: Defines the list of plugins that are used in the build process.
Repositories:
- <repositories>: Defines the list of remote repositories from which dependencies and plugins can be downloaded.
Profiles:
- <profiles>: Allows the definition of different configurations for different environments, such as development, testing, and production.
Example Project of a Basic POM File using IntelliJ IDEA
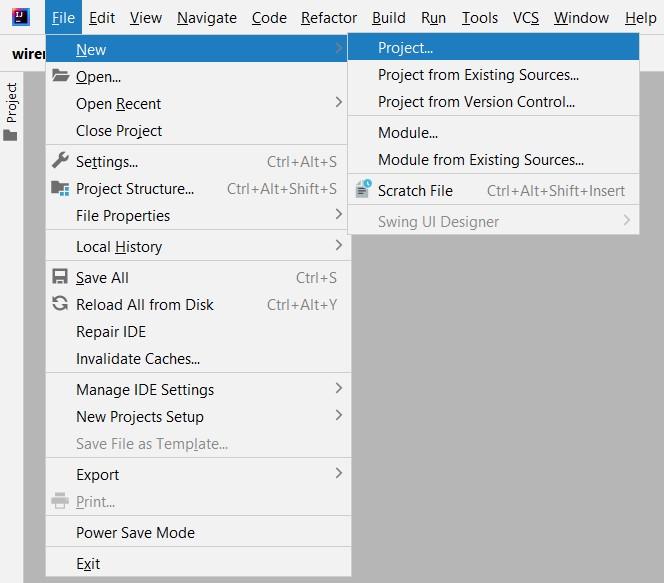
Step 1: Create new project with IntelliJ.
Open your IntelliJ IDE, and go to File > New > Project. This will allow you to create a new project in IntelliJ.
👁 creating-java-new-project-in-IntelliJ-You can also create project from existing ongoing project with the New>project option.
👁 Intellij-project-creationStep 2: On the next screen
When setting up a new project in IntelliJ IDE, you'll be prompted to provide specific information such as:
- Name: Provide a suitable name as per your requirement.
- Location: Choose the location you want to store your project.
- Language: Choose the programming language as per your requirement .
- Build System: Here you have to choose Maven.
- JDK: Choose the JDK you want to use.
Once you have entered these details, click on the Create button to complete the project setup and initialize your new project
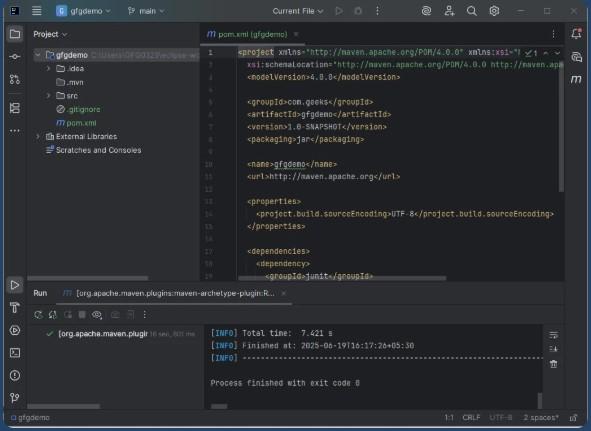
👁 ImageAfter successfully creating a Maven project using IntelliJ pom.xml file should look like
👁 LightboxUses Of Maven POM
- Dependency Management: It can declares and manages project dependencies.
- Build Configuration: It can specifies plugins and their configuration for various build tasks.
- Project Information: It contains metadata like project version, description, developers and other things.
- Reporting: Defines reporting plugins for generating Project reports like Java Docs.
- Build Profiles: It configures Different build profiles for various environments.
Advantages of Maven POM
The Maven Tools provides lot of advantages below we listed them.
- Standardization: Provides a standard way to manage project builds.
- Dependency Management: Automatically handles dependency resolution and version conflicts.
- Reproducibility: It Builds are reproducible by using versioned dependencies.
- Integration with CI/CD: Easily integrates with continuous integration and delivery pipelines.
- Extensibility: Supports a wide range of plugins to extend build functionality.
