 |
VOOZH | about |
|
VOOZH | about |
The @RequestParam annotation enables Spring to capture input data that may be passed as a query, form data, or any arbitrary custom data. It is used to bind a web request parameter to a method parameter. Here, we are going to understand these two above lines, and we will see how we can capture data using this annotation.
Note: We are going to use Spring Tool Suite 4 IDE for this project. Please go through how to download and Install Spring Tool Suite (Spring Tools 4 for Eclipse) IDE.
Let's create a simple MVC application and use the @RequestParam Annotation inside the application.
1.1: Go to your STS IDE, then create a new maven project, File > New > Maven Project, and choose the following archetype as shown in the image below.
1.2: Configure the DispatcherServlet in the web.xml file.
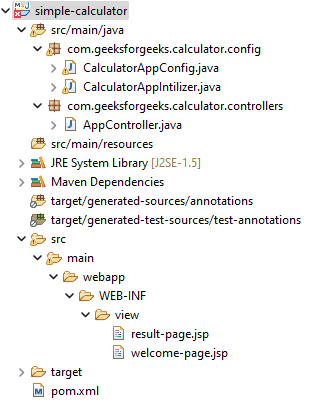
Let us have a look at the project structure before moving into the coding part via the below media as follows:
2.1: So at first create an src/main/java folder and inside this folder create a class named CalculatorAppIntilizer and put it inside the com.geeksforgeeks.calculator.config package and extends the AbstractAnnotationConfigDispatcherServletInitializer class.
Refer to the below image as follows:
And whenever you are extending this class, it has some pre abstract methods that we need to provide the implementation. Now inside this class, we have to just write two lines of code to Configure the Dispatcher Servlet. Before that, we have to create another class for the Spring configuration file. So, go to the src/main/java folder and inside this folder create a class named CalculatorAppConfig and put it inside the com.geeksforgeeks.calculator.config package.
package com.geeksforgeeks.calculator.config;
// Importing required classes
import org.springframework.context.annotation.ComponentScan;
import org.springframework.context.annotation.Configuration;
// Class
@Configuration
@ComponentScan(basePackages = "com.geeksforgeeks.calculator.controllers")
public class CalculatorAppConfig {}
And below is the complete code for the CalculatorAppIntilizer.java file.
This class will initialize the Dispatcher Servlet.
Spring MVC is a Web MVC Framework for building web applications. In generic all MVC frameworks provide a way of working with views. Spring does that via the ViewResolvers, which enables you to render models in the browser without tying the implementation to specific view technology. Read more here: ViewResolver in Spring MVC. So for setting up ViewResolver go to the CalculatorAppConfig.java file and write down the code as follows:
@Bean
public InternalResourceViewResolver viewResolver() {
InternalResourceViewResolver viewResolver = new InternalResourceViewResolver();
viewResolver.setPrefix("/WEB-INF/view/");
viewResolver.setSuffix(".html");
return viewResolver;
}
And below is the updated code for the CalculatorAppConfig.java file after writing the code for setting up the ViewResolver.
This class will enable Spring MVC and set up the ViewResolver.
Go to the src/main/java folder and inside this folder create a class named AppController and put it inside the com.geeksforgeeks.calculator.controllers package.
package com.geeksforgeeks.calculator.controllers;
import org.springframework.stereotype.Controller;
import org.springframework.ui.Model;
import org.springframework.web.bind.annotation.GetMapping;
@Controller
public class AppController {
@GetMapping("/home")
public String showHomePage() {
return "welcome-page";
}
@GetMapping("/process-homepage")
public String showResultPage(@RequestParam("number1") String num1,
@RequestParam("number2") String num2,
Model model) {
model.addAttribute("number1", num1);
model.addAttribute("number2", num2);
return "result-page";
}
}
Now we have to create a view named "welcome-page" inside the WEB-INF/view folder with the .html extension
The view is looking like below:
So, here we want to put some values inside the label and we want to capture that value so that we can display that value on our next page after clicking on the Capture button. So how to do it? And here @RequestParam Annotation comes into the picture.
As we have written this line inside the welcome-page.jsp file
<form action="process-homepage" method="get">
So, we have to create a controller with the "process-homepage" endpoint. So now come to the AppController.java file again and write down the following code inside this file.
@RequestMapping("/process-homepage")
public String showResultPage(@RequestParam("number1") String num1,
@RequestParam("number2") String num2, Model model)
{
model.addAttribute("number1", num1);
model.addAttribute("number2", num2);
return "result-page";
}
So, in the above code snippet let's understand this line
@RequestParam("number1") String num1, @RequestParam("number2") String num2, Model model
Here, inside the @RequestParam, we have passed "number1" and we have also given the same name inside the welcome-page.jsp file on this line of code.
<label for="num1">Enter First Number : </label> <input type="text"
id="num1" name="number1" />
And in "String num1" we have stored that value inside the "num1" variable. And the same goes for "number2" also. But now we have to send that value to the second page and how to do it. And here, "Model" comes into the picture.
Tip: In order to know more about Model in Spring, refer to How to Create Your First Model in Spring MVC
This class will handle requests and capture data using the @RequestParam annotation.
Now, we have to create another view named "result-page" to display the captured values. So below is the code for the result-page.jsp file.
<html>
<head>
</head>
<body>
<h1 align="center">Capture Data using @RequestParam Annotation in Spring</h1>
<hr/>
<p>First Number is: ${number1}</p>
<p>Second Number is: ${number2}</p>
</body>
</html>
So, now we have done with the coding part. Let's run and test our application.
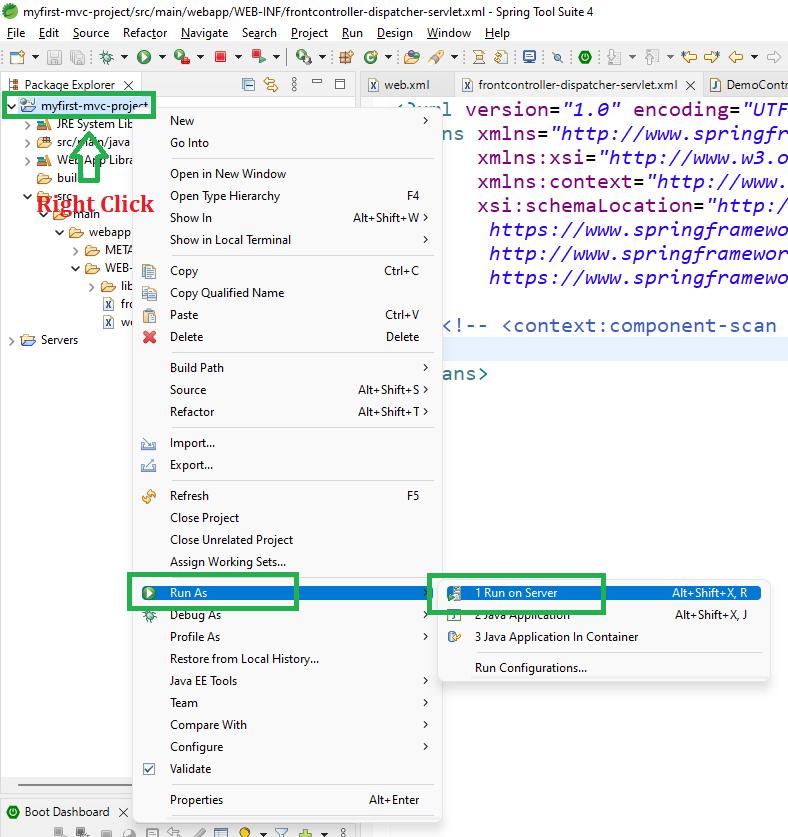
7.1: To run our Spring MVC Application right-click on your project > Run As > Run on Server. And run your application as shown in the below image as depicted below as follows:
7.2: After that use the following URL to run your controller
http://localhost:8080/simple-calculator/geeksforgeeks.org/home
Output:
Now, let us put some values inside the label and click on the 'Capture' button. Suppose here we have put 23 and 45 and whenever we click on the Capture button an URL is generated as below as follows:
http://localhost:8080/simple-calculator/geeksforgeeks.org/process-homepage?number1=23&number2=45
And we can see on the next page the values are displayed and it is made possible via @RequestParam Annotation.