 |
VOOZH | about |
|
VOOZH | about |
Spring Security is a framework that allows a programmer to use JEE (Java Enterprise Edition) components to set security limitations on Spring Framework-based web applications. As a core part of the Spring ecosystem, it’s a library that can be utilized and customized to suit the demands of the programmer. Because it is a part of the same Spring family as Spring Web MVC, it works well together. The most significant benefit of this framework is that it is both strong and very adaptable. Although it adheres to Spring’s set-up conventions, programmers may select between default provisions and modify them to their specific requirements. Read more on Spring Security and its features in this article, Introduction to Spring Security and its Features.
In this article, we are going to learn how to implement basic authentication in a Spring MVC application using Spring Security. Basic Authentication sends user credentials with each HTTP request, and it's a straightforward way to protect web resources. We will walk through the steps of setting up Basic Authentication in a Spring Boot application and securing a simple UI.
A sample code is given below:
@Override
protected void configure(HttpSecurity http) throws Exception {
http
.authorizeHttpRequests() // Updated to 'authorizeHttpRequests' in newer versions
.anyRequest()
.authenticated()
.and()
.httpBasic(); // Configures HTTP Basic Authentication}
Here we are using the httpBasic() element to define Basic Authentication by overriding the configure method.
We are going to use Spring Tool Suite IDE for this project. Please refer to this article to install STS in your local machine How to Download and Install Spring Tool Suite (Spring Tools 4 for Eclipse) IDE. Create a Dynamic Web Project in your STS IDE. You may refer to this article to create a Dynamic Web Project in STS: How to Create a Dynamic Web Project in Spring Tool Suite?
Note: Spring Boot uses embedded Tomcat by default instead of requiring an external one.
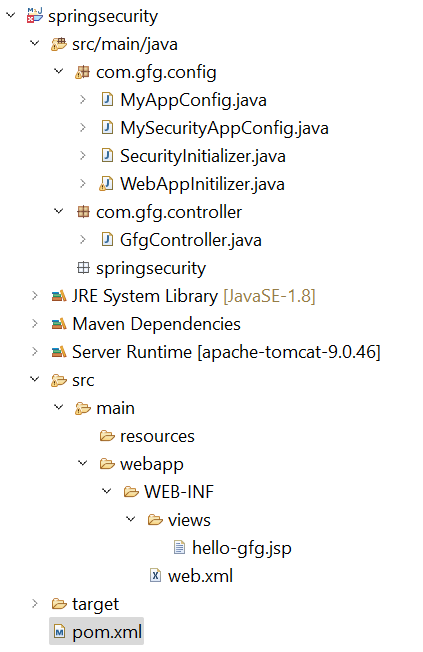
Before moving to the project let’s have a look at the complete project structure for our Spring MVC application.
Add the following dependencies to your pom.xml file:
Below is the complete pom.xml file. Please cross-verify if you have missed some dependencies.
Please refer to this article What is Dispatcher Servlet in Spring? and read more about Dispatcher Servlet which is a very very important concept to understand. Now, we are going to configure Dispatcher Servlet with our Spring MVC application.
Go to the src > main > java and create a class WebAppInitilizer. Below is the code for the WebAppInitilizer.java file.
File: WebAppInitilizer.java:
Create another class in the same location (src > main > java) and name it MyAppConfig. Configure Spring MVC to enable view resolution and component scanning. Below is the code for the MyAppConfig.java file.
File: MyAppConfig.java
Reference article:Spring – Configure Dispatcher Servlet in Three Different Ways
Create a simple controller to handle the request for /gfg. Go to the src > main > java > com.gfg.controller and create a class GfgController. Below is the code for the GfgController.java file.
File: GfgController.java
Reference article:Create and Run Your First Spring MVC Controller in Eclipse/Spring Tool Suite
Create a simple JSP page to display a message. Go to the src > main > webapp > WEB-INF > right-click > New > Folder and name the folder as views. Then views > right-click > New > JSP File and name your first view. Here, we have named it as hello-gfg.jsp file. Below is the code for the hello-gfg.jsp file. We have created a simple web page inside that file.
File: hello-gfg.jsp
Reference article: How to Create Your First View in Spring MVC?
Create a class to configure Spring Security and set up basic authentication. Go to the src > main > java > MySecurityAppConfig.
File: MySecurityAppConfig.java
Initialize Spring Security in the application by registering the security filter chain. Go to the src > main > java and create a class SecurityInitializer. This class will help to register the spring security filter chain with our application. Below is the code for the SecurityInitializer.java file.
Note: This file is optional in Spring Boot 3.x but kept for backward compatibility.
File: SecurityInitializer.java
Now we are done with setting up our Spring Security Filter Chain.
Now, let's run the application and test it out.
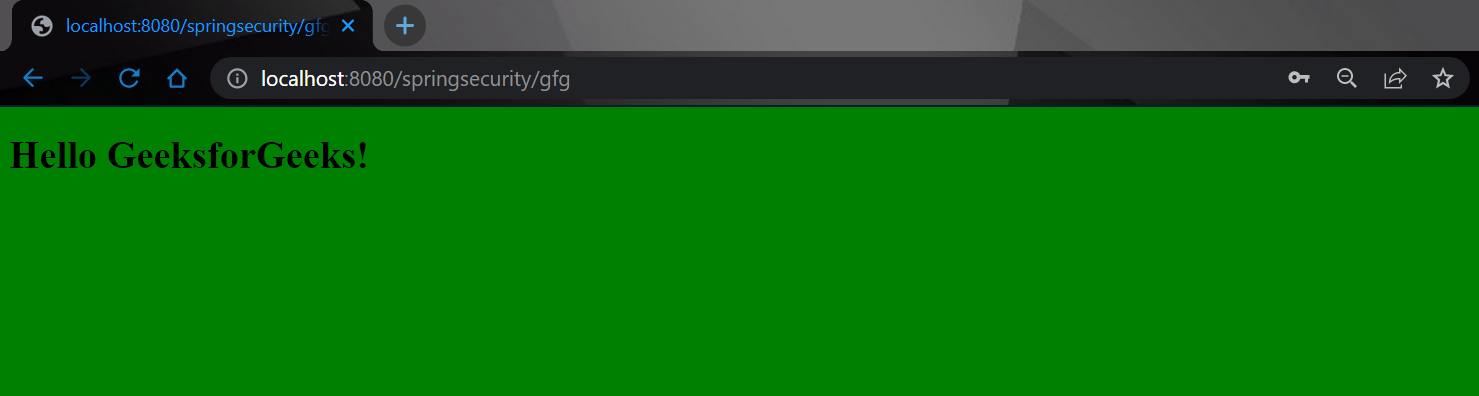
To run our Spring MVC Application right-click on your project > Run As > Run on Server. After that use the following URL to run your controller.
http://localhost:8080/springsecurity/gfg
And it will ask for authentication to use the endpoint and a pop-up screen will be shown like this.
Now sign in with the following credentials
And now you can access your endpoint.
👁 Image