Image classification is a machine learning task where a model assigns labels to images based on their content. CNNs are designed to effectively analyze visual data by learning patterns from images.
Extracts features like edges, shapes, and textures from images.
Learns hierarchical patterns through multiple layers.
Used for tasks like object, scene, and animal classification.
Key Components of CNNs
Convolutional Layers: Filters or kernels that detect features such as edges or textures.
ReLU Activation: Adds non-linearity, helping the model learn complex patterns.
Pooling Layers: Reduce the dimensions of the image making the network more efficient while preserving important features.
Fully Connected Layers: After feature extraction, these layers make the final prediction based on the detected patterns.
Softmax Output: Converts the network’s output into probabilities, showing the likelihood of each class.
CNNs Workflow
Image preprocessing: Images are resized, normalized, and sometimes augmented to improve model performance and reduce overfitting.
Feature extraction: CNNs automatically learn hierarchical features, starting from simple edges to complex objects in deeper layers.
Classification: Fully connected layers use extracted features to assign the image to a predefined class.
Implementation
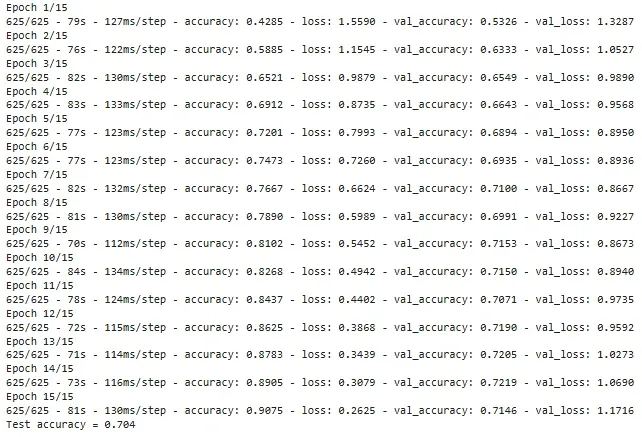
Let's see the implementation of Image Classification step-by-step:
Step 1: Importing Libraries
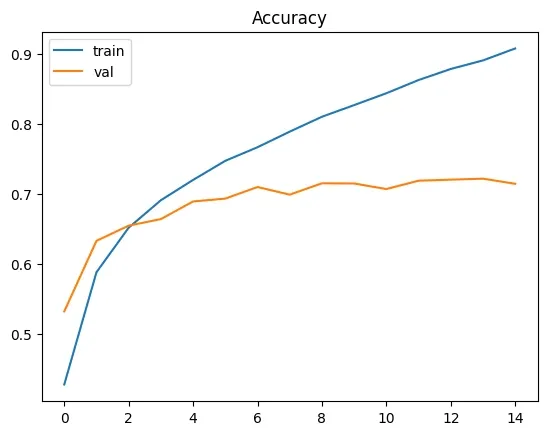
Importing Tensorflow and Matplotlib libraries for building, training and visualizing accuracy of the model.
Step 2: Downloading and Preparing the Dataset
Loading and preprocessing the CIFAR-10 dataset, which contains 60,000 32×32 color images across 10 categories.
Scaling: Pixel values are normalized from [0, 255] to [0, 1] by dividing by 255.
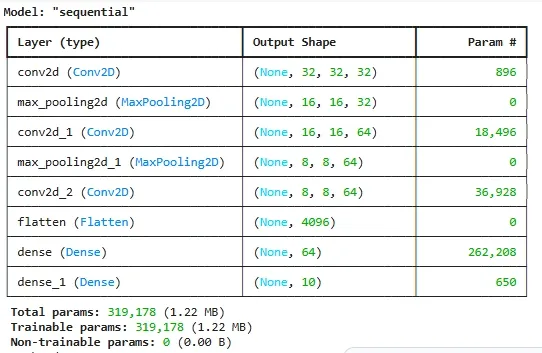
Defining the CNN architecture starting with convolutional and max-pooling layers, followed by flattening and fully connected layers for classification.
Flatten layer: Converts 2D feature maps into a 1D vector for dense layers.
Dense layers: Perform final decision making, with softmax used in the output layer to generate class probabilities.
