 |
VOOZH | about |
|
VOOZH | about |
The Census module includes reports based on demographic data and household information. The topics below cover generating Census-related reports and information.
The Address Change report can be used to get a list of all students who had an address change for an entered date range. Both the new and end dated addresses will be displayed for students.
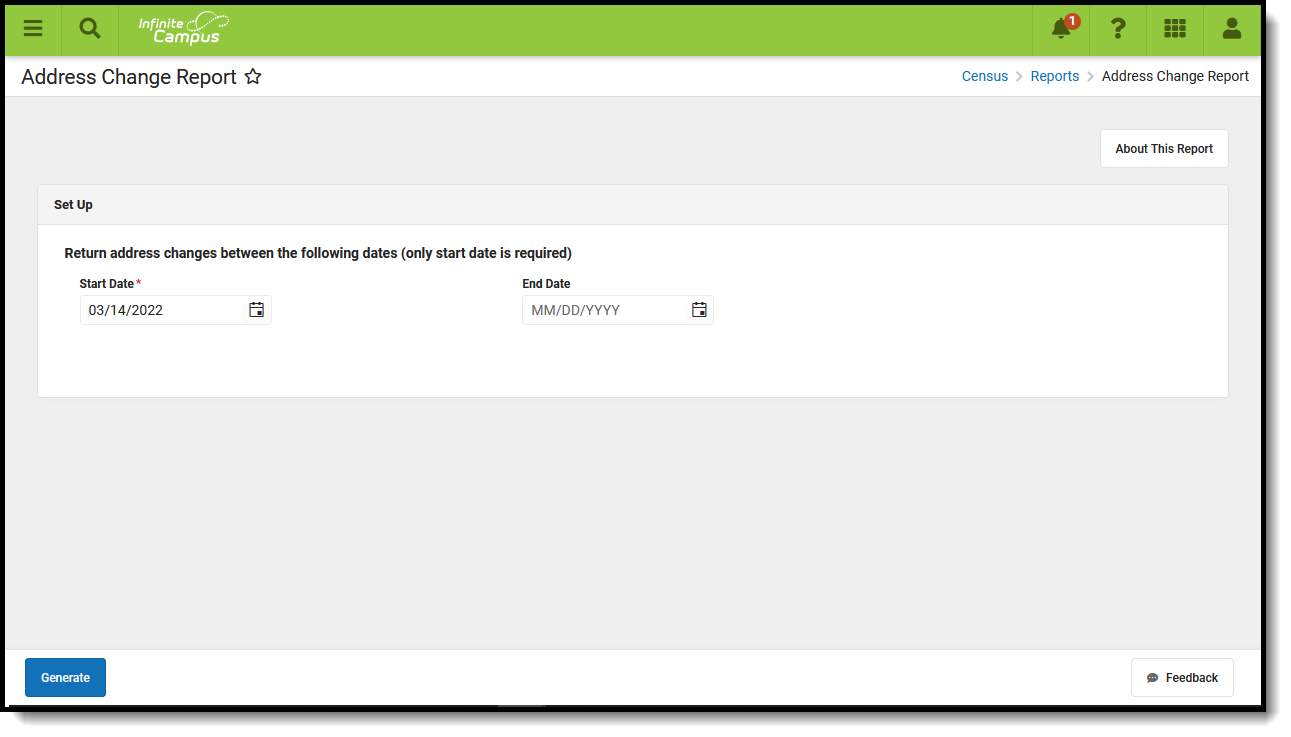
Tool Search: Address Change
The Address Change report generates a list of students who have a new address based on the entered Start Date of the report. This report includes changes to mailing addresses and secondary addresses. Only address changes to students are included on the report. It also includes address changes to inactive students (those not currently enrolled in the selected calendar).
A school calendar must be selected from the Campus toolbar in order to generate report.
👁 Screenshot of the Address Change Repot located at Census, Reports
Address Change Report
Submit feedback for the Address Change Report by clicking the Feedback button in the bottom right hand corner. This takes you to the Campus Community Address Change Report forum topic where you can add your suggestions for this report.
See the Census Reports Tool Rights article for information about rights needed to use this tool.
This report uses data from the student's active household membership to determine which addresses to include in the report. The addresses listed include both street addresses and PO Boxes (if applicable), and the start and end dates of the student residing at that address.
Students are included in the report when their address start or end dates fall within the Start and End Dates entered on the report editor. When there is no end date available for the address (meaning, the address is still active), only the start date is listed on the report.
This information is entered on the Household Addresses tool.
The Address Change Report requires the entry of a Start Date in order to generate the report. The Start Date field is auto-populated with the current date, but can be changed by selecting the calendar icon to choose a new date or enter a new date in mmddyy format. An End Date can also be entered to view address changes within a specific date range.
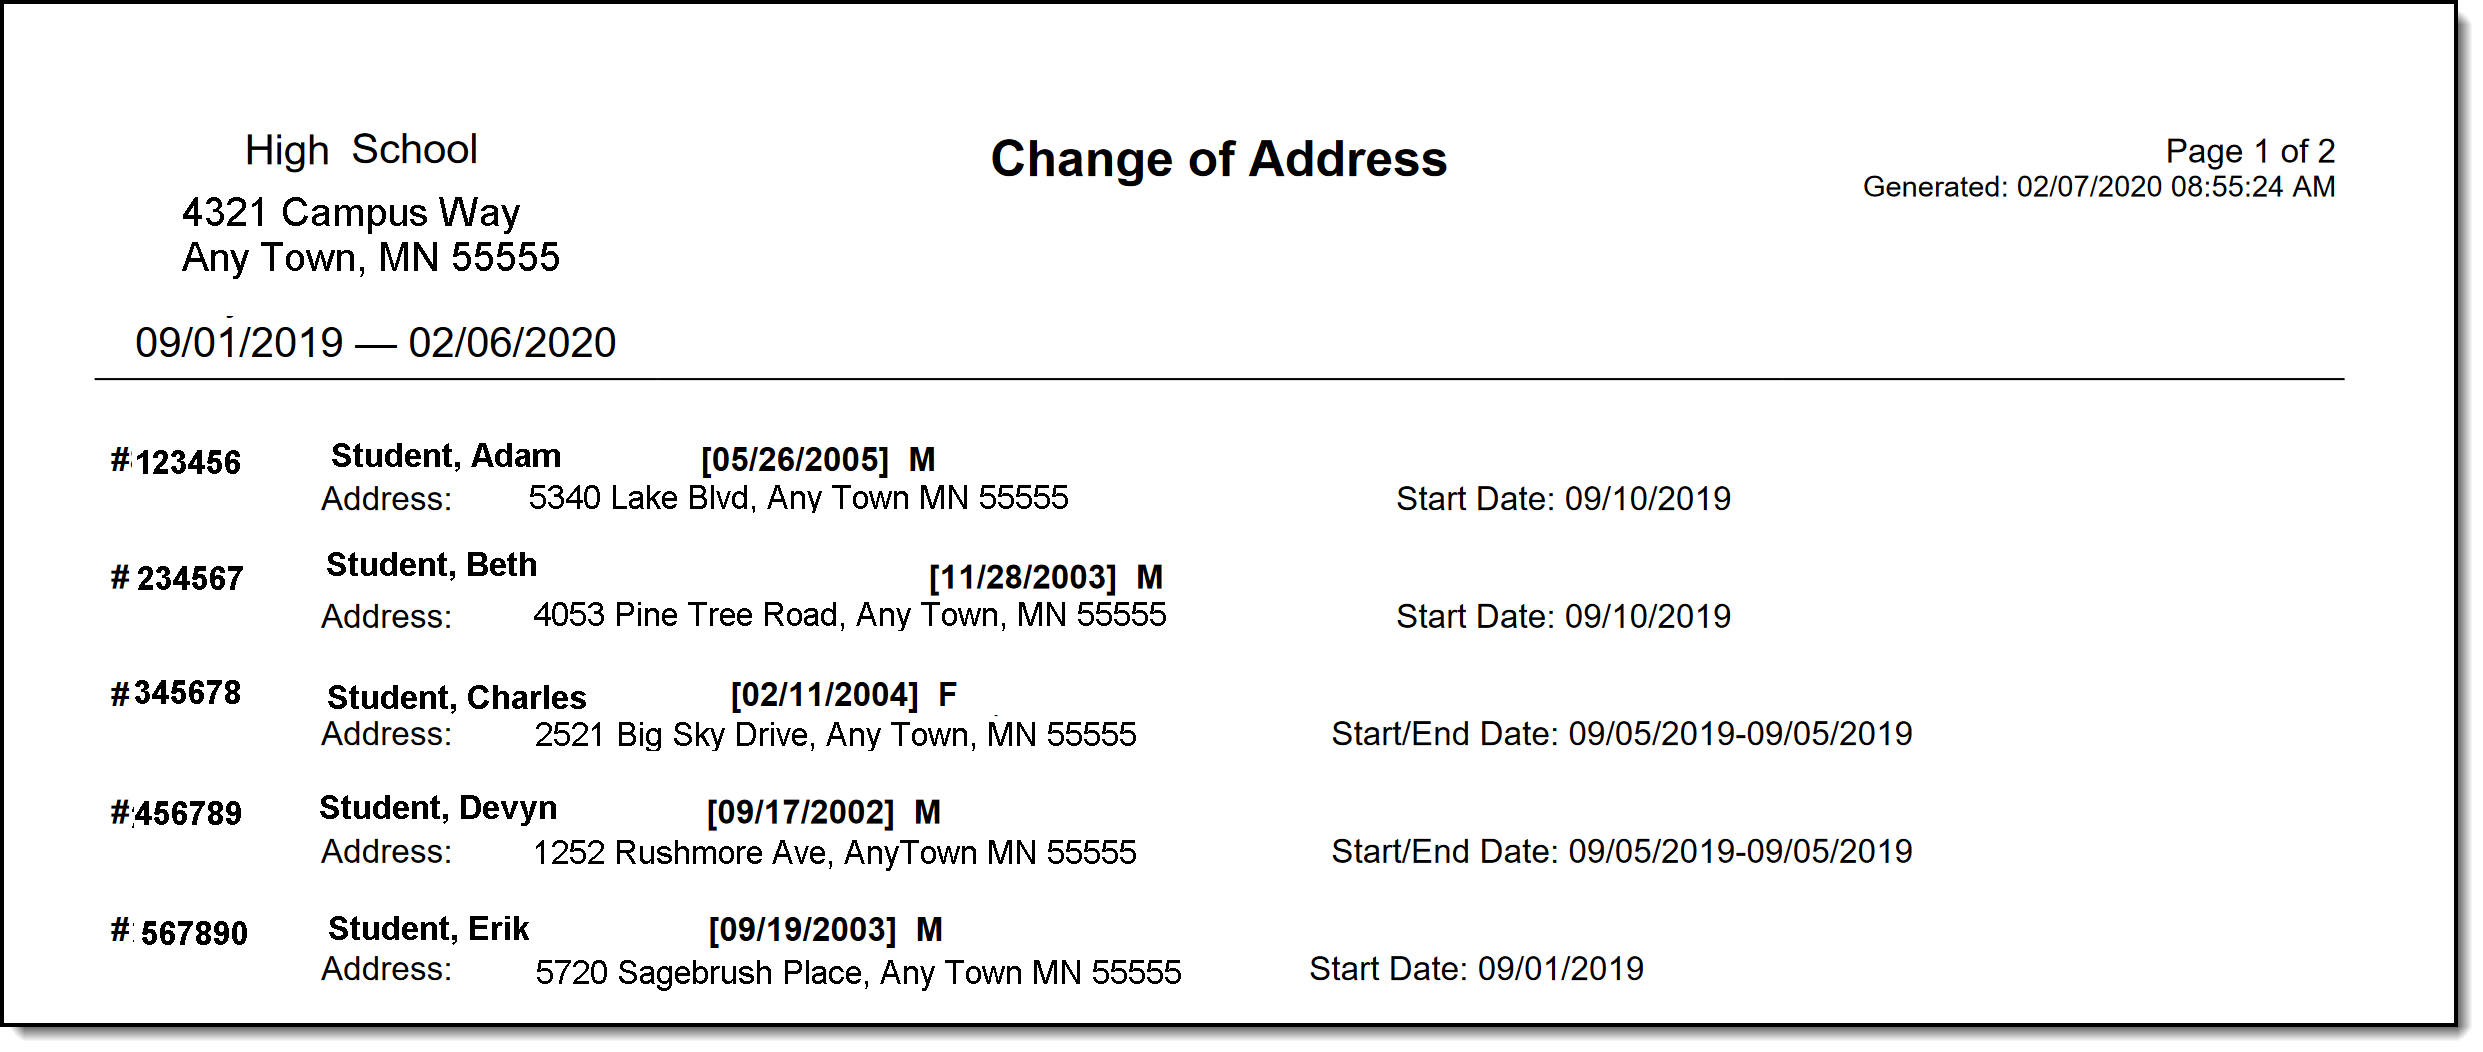
The report includes the name of the school for which the report was generated and the entered dates for the changed addresses. If no end date is entered, only the Start Date prints. Students included in the report display in alphabetical order by last name.
👁 Screenshot of the printed view of the Change Address report.
Address Change Report, Print View
The Census by Address report can be used to locate the latest active student addresses for a specific date range.
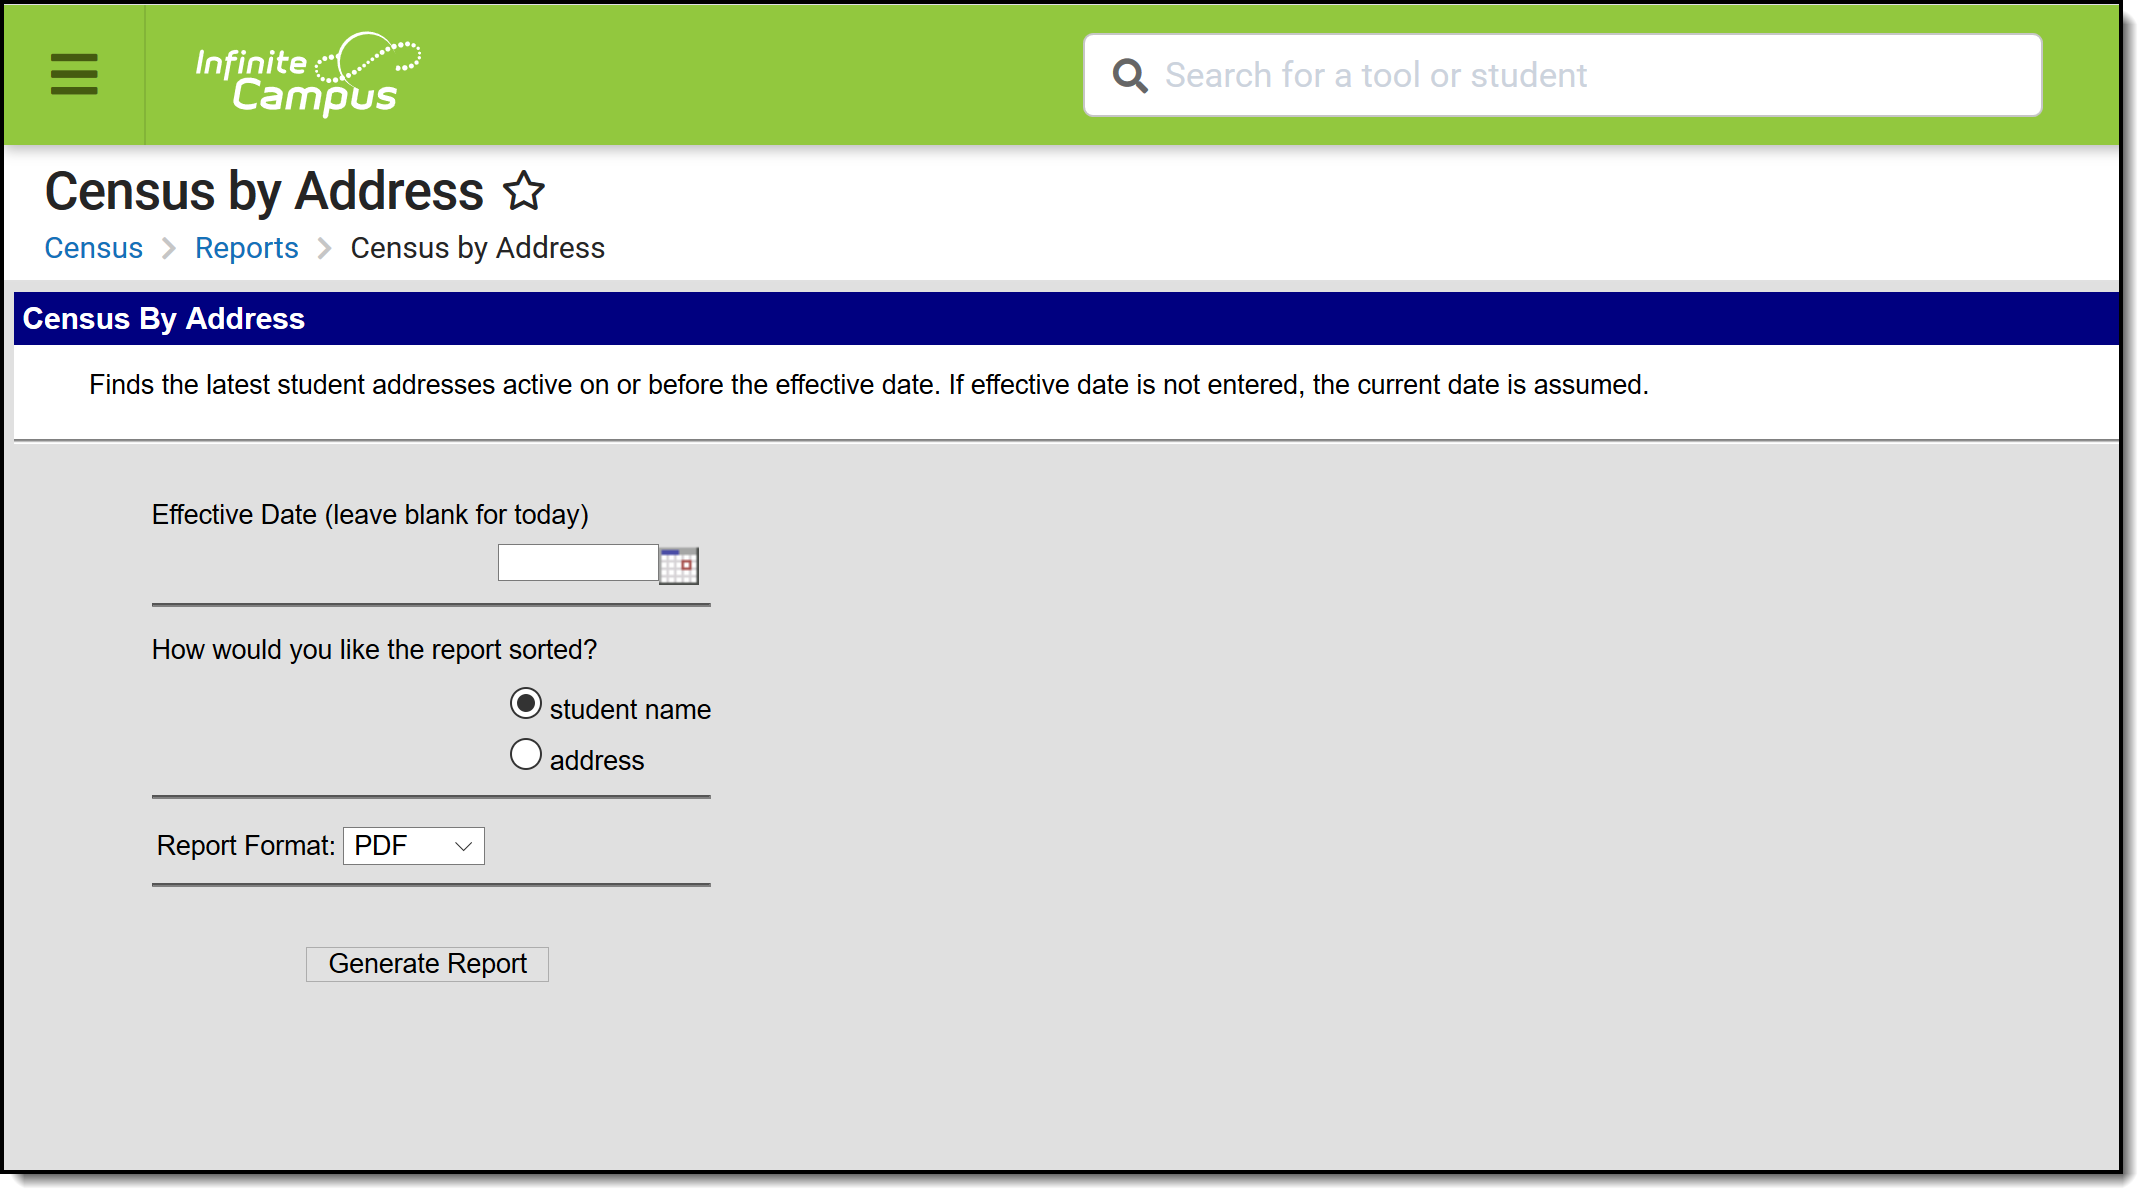
Tool Search: Census by Address
The Census by Address report lists the latest student addresses active on or before the effective date. If effective date is not entered, the current date is assumed.
👁 Screenshot of Census by Address tool.
Census by Address Report
See the Census Reports Tool Rights article for information about rights needed to use this tool.
The Census by Address Report uses information from Household Address to find the latest active (most current) address for the student as of the entered Effective Date.
| Field | Description |
|---|---|
| Effective Date | This date is used to return current membership and address information for a household. The current date auto-populates; to change this date, type in mmddyy format or use the calendar icon to select a new date. |
| Sort Options | The report can be sorted by Student Name or by Address. When sorting by Student Name, information displays in the following descending order:
When sorting by Address, information displays in the following descending order:
Location codes are only used when the Location Code field is populated. |
| Report Format | Determines how the report generates, in PDF or DOCX format. |
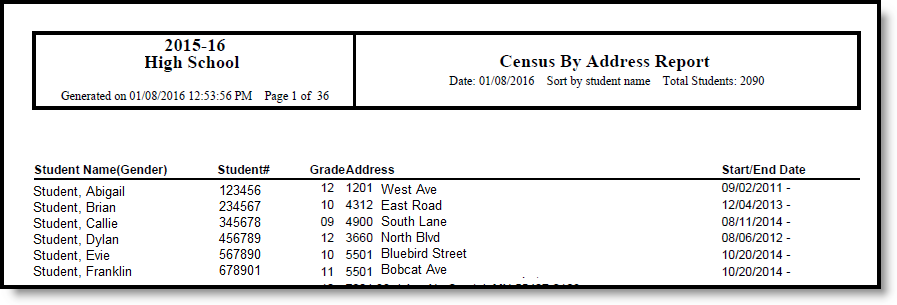
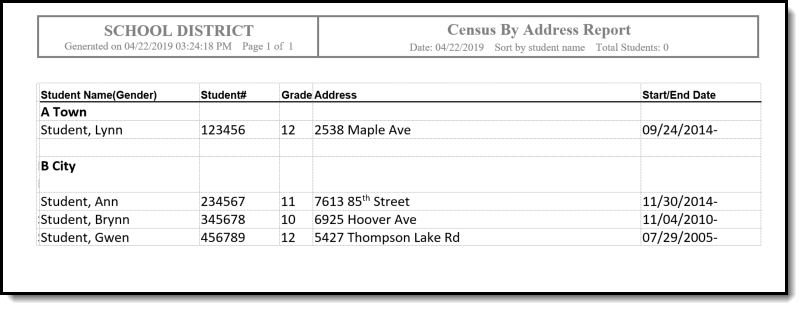
For both formats, the report lists the student's Name and Gender, Student Number, Grade Level, Address and Address Start and End Date.
If a dash appears for the date, it signifies that no other address has been entered on the household or that there is no end date for that address.
👁 Screenshot of Census by Address Report output in PDF.
Census by Address - Student Name Sort, PDF Format
👁 Screenshot of Census by Address Report output in DOCX.
Census by Address - Address Sort, DOCX Format
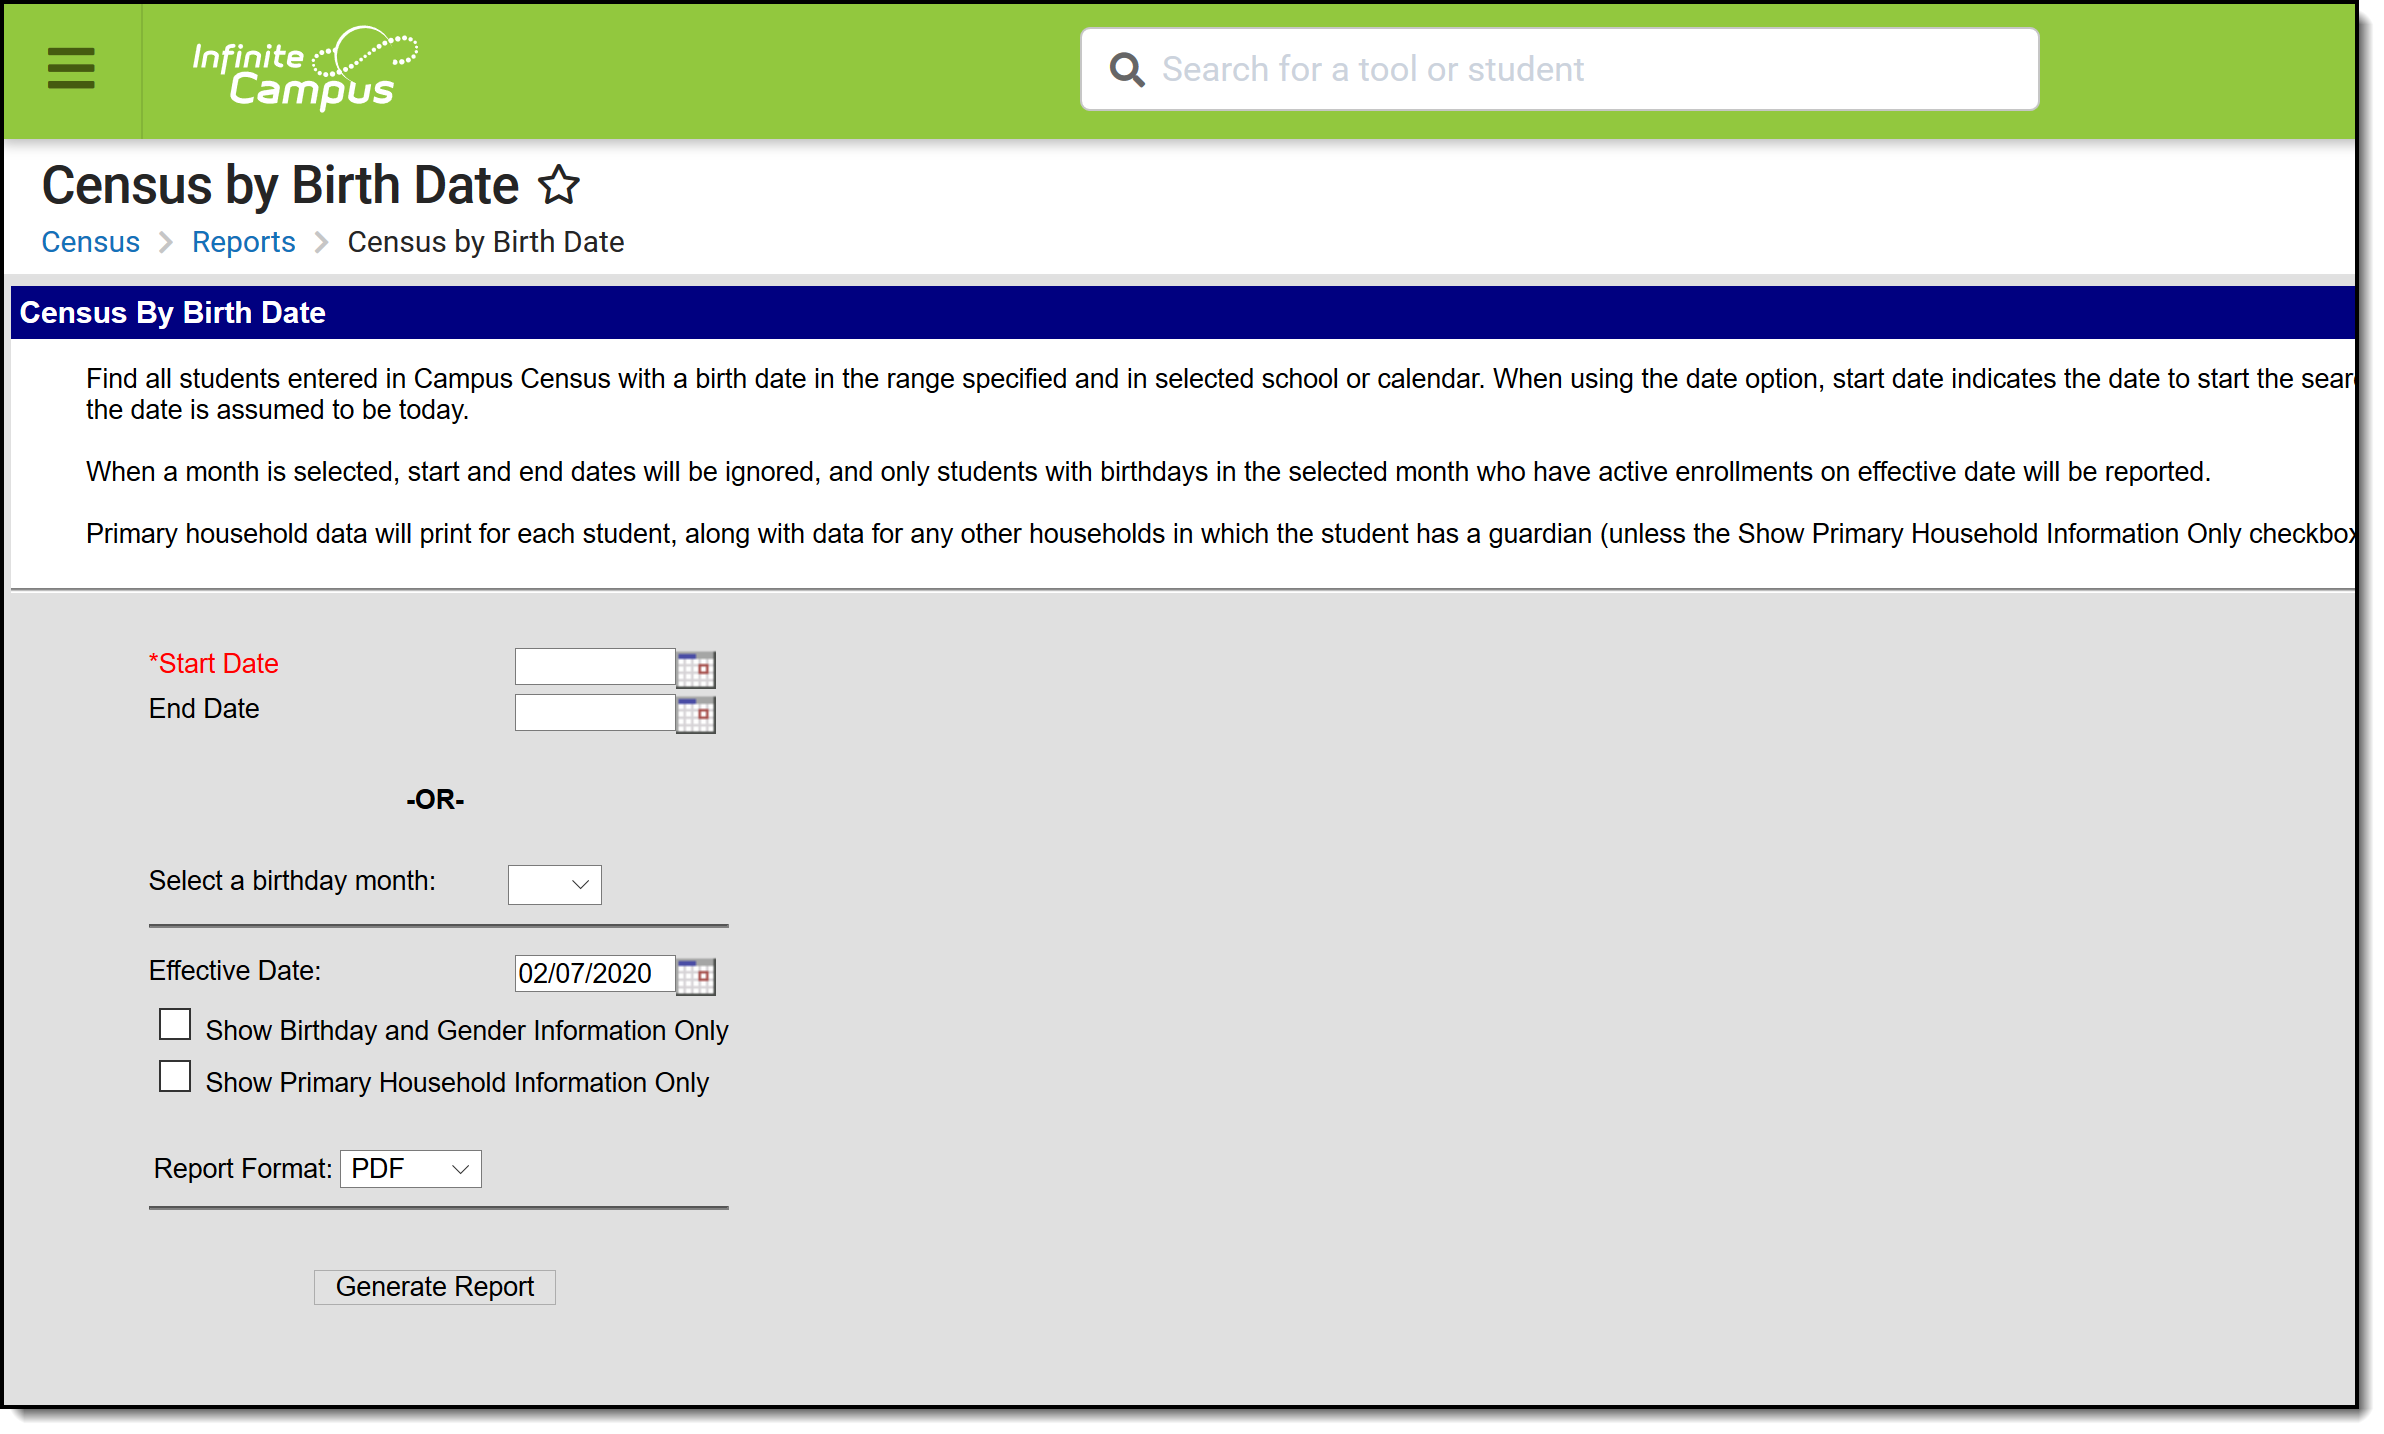
The Census by Birthdate report will list all students entered in Campus with a birth date in the date range specified. The report will display student birthdates, gender and household information.
Tool Search: Census by Birth Date
The Census by Birth Date Report provides a list of students within a birth date range, along with the students' dates of birth, student number, phone number, guardian information and address information. This report can be used by any school staff member to find a student's birthday.
👁 Screenshot of Census by Birth Date tool.
Census by Birth Date Report
See the Census Reports Tool Rights article for information about rights needed to use this tool.
This report orders students based on birth date. Primary household mailing address and phone information are listed for each student, in addition to all of the guardians (if any) in that household.
In addition to primary household information, secondary and non-primary household information is included for any household in which a student has a guardian. If only primary household information should be reported, the Show Primary Household Information Only checkbox can be selected on the report editor.
The Effective Date defaults to the current date and is used to find active enrollments. Only students who have active enrollments on the effective date are included in the report.
| Field | Description |
|---|---|
| Start Date/End Date | Entered date (in mm/dd/yyyy format) returns students born as of the entered date. For example, a start date of 04/01/2001 returns anyone with a birth date of April 1, 2001 through the entered End Date. |
| Birthday Month | Selected date returns students with the selected birth month. There is no date range needed, and the Start and End date fields are ignored. |
| Effective Date | Entered date is used to return students who are actively enrolled as of the entered date. |
| Show Birth and Gender Information Only | When marked, only birth and gender information displays on the report, not household information. |
| Show Primary Household Information Only | When marked, only primary household information displays on the report. When not marked, all household information (primary, secondary, non-household contact) displays on the report. |
| Report Format | Indicates how the report generates - in PDF or DOCX formats. |
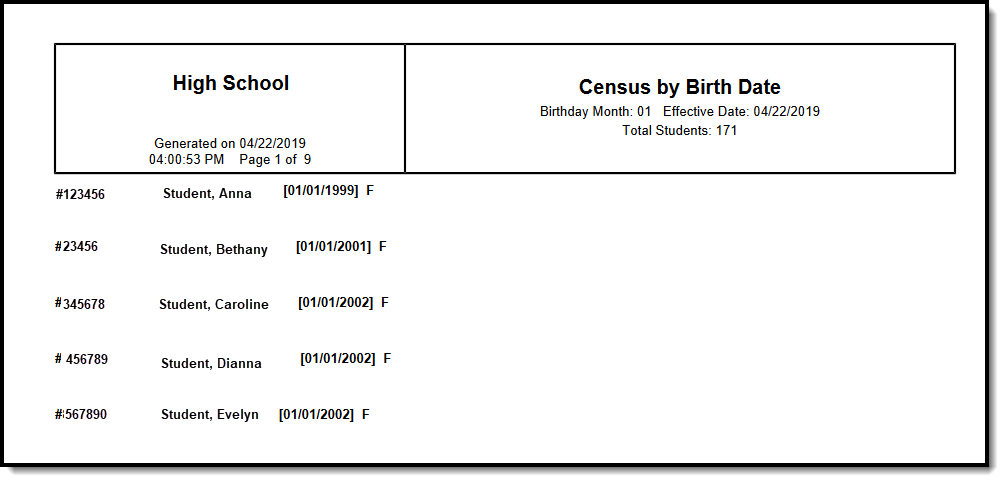
👁 Screenshot of Census by Birth Date report output in PDF.
Census by Birth Date - Birthday Month, Show Birth and Gender Information Only, PDF Format
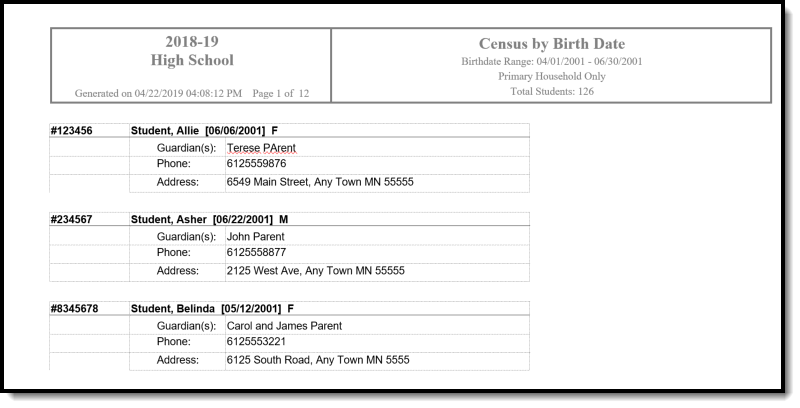
👁 Screenshot of Census by Birth Date report output in DOCX.
Census by Birth Date - Start Date and End Date, Show Primary Household Information Only, DOCX Format
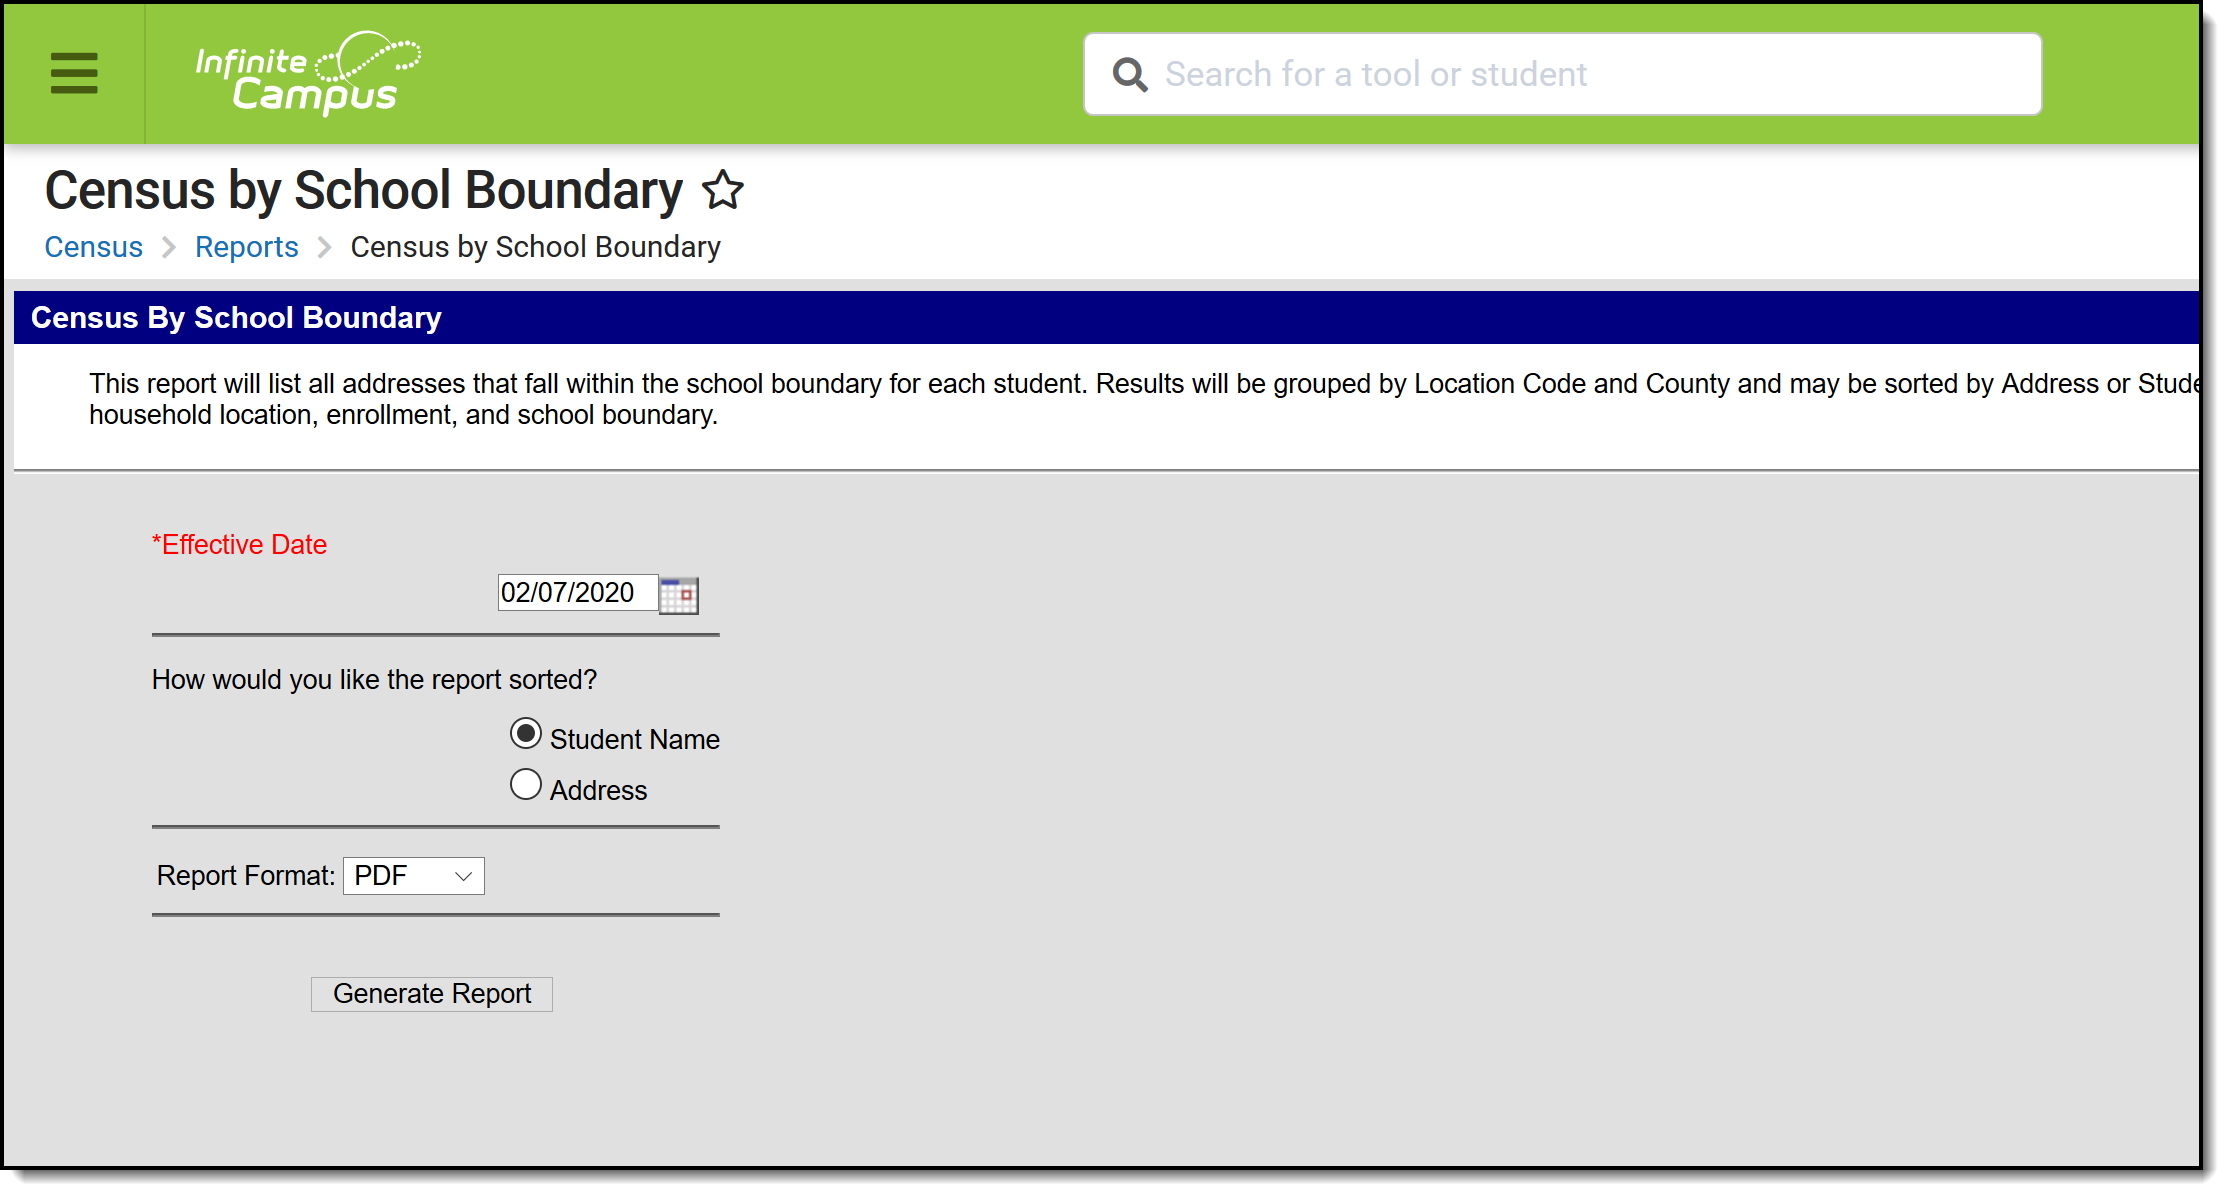
The Census by School Boundary report can be used to verify students whose addresses are within school boundaries.
Tool Search: Census by School Boundary
The Census by School Boundary report lists students whose addresses are within the school boundary.
👁 Screenshot of Census by School Boundary report tool.
Census by School Boundary Report
See the Census Reports Tool Rights article for information about rights needed to use this tool.
The Census by School Boundary Report uses information from the Schools tab attached to the Address to find the latest active (most current) address for the student as of the entered Effective Date. Information returned in the report is limited to the calendar selected in the Campus toolbar.
| Field | Description |
|---|---|
| Effective Date | Indicates the date used to return current membership and address information for a household. The current date auto-populates; to change this date, enter a new date in mmddyy format or use the calendar icon to select a new date. |
| Sort Options | The report can be sorted by Student Name or by Address. When sorting by Student Name, information displays in the following descending order:
When sorting by Address, information displays in the following descending order:
Location codes are only used when the Location Code field is populated. |
| Report Format | Indicates how the report generates in PDF or DOCX formats. |
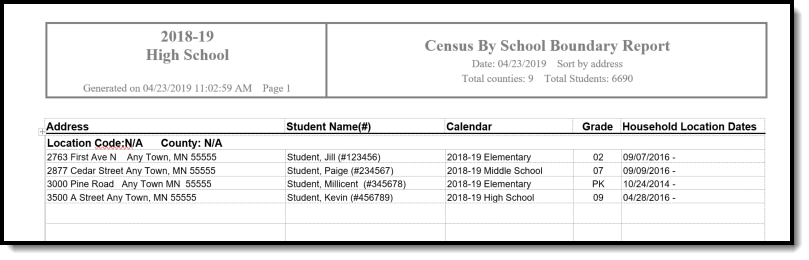
The report lists the student's Name and Student Number, Calendar of Enrollment, Grade Level, Address and Address Start and End Date.
👁 Screenshot of Census by School Boundary report output in PDF.
Census by School Boundary - Sort by Student Name, PDF Format
👁 Screenshot of Census by School Boundary report output in DOCX.
Census by School Boundary - Sort by Address, DOCX Format
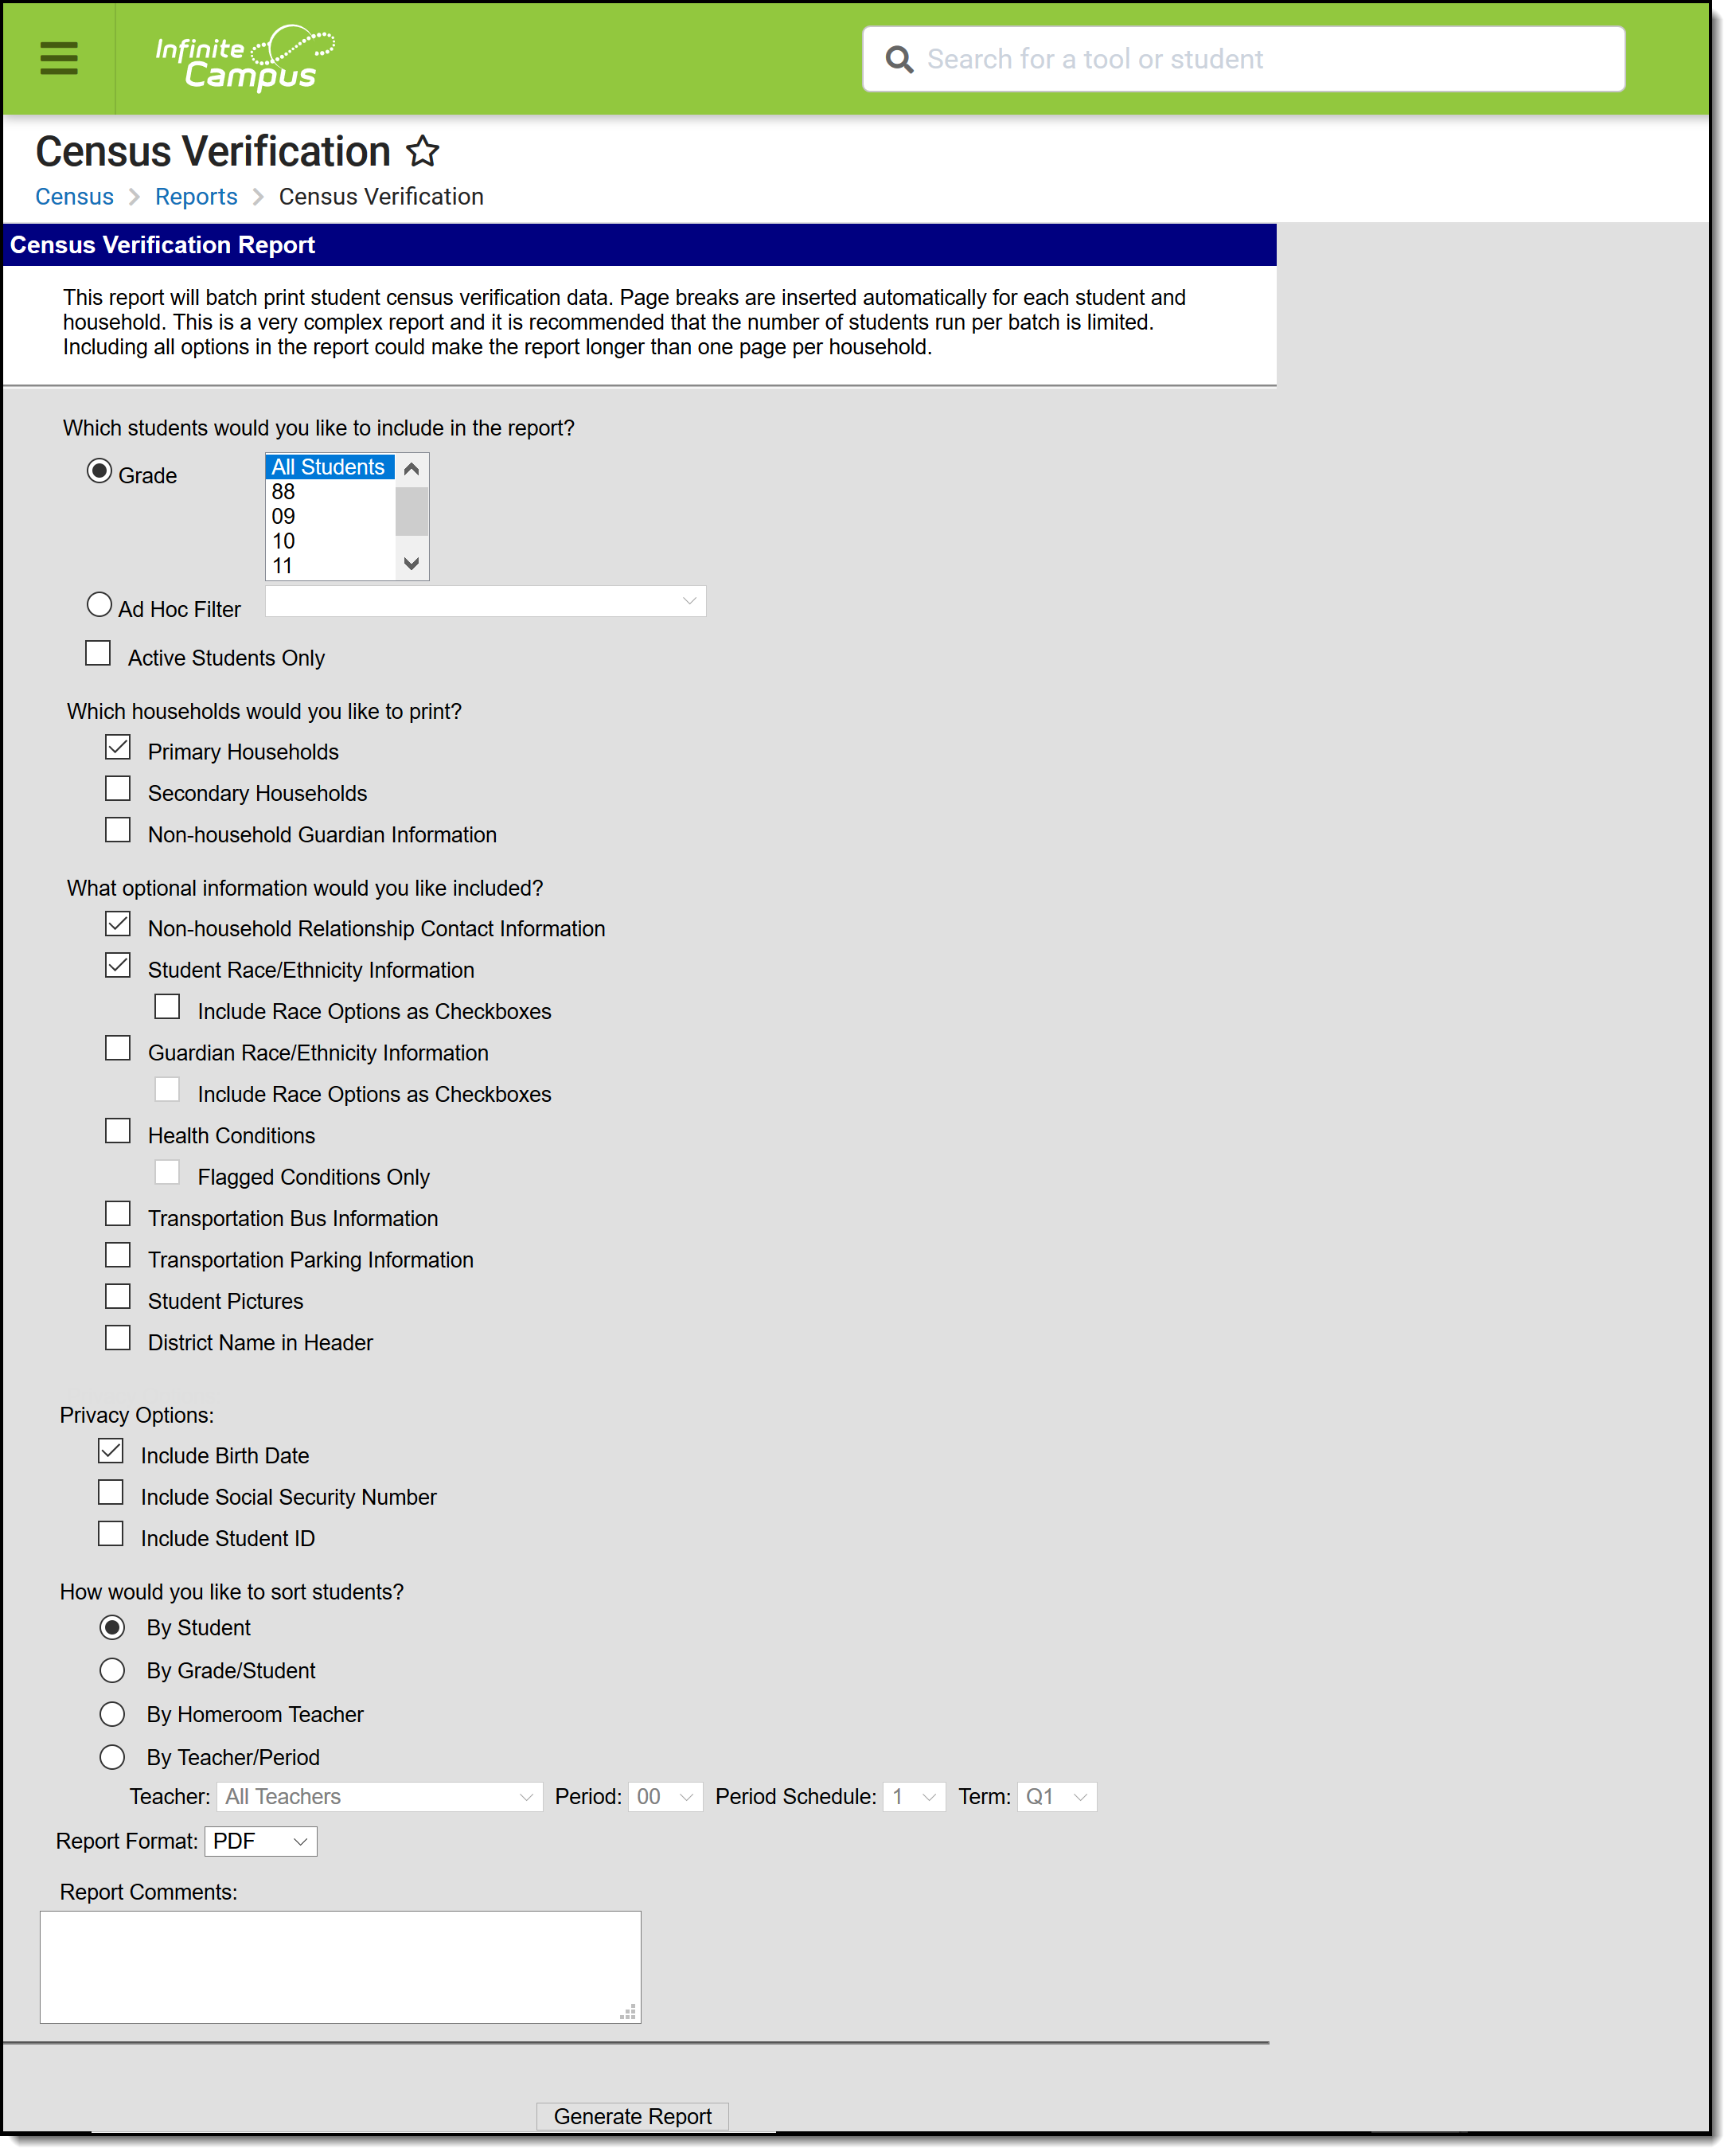
This report can be used as a hard copy to send home to parents/guardians to verify current data within Census. The report is generated one page per student.
Tool Search: Census Verification
The Census Verification report batch prints student’s census verification data. This data includes race/ethnicity data, household guardian information, contact details and other student-specific information that is verified at the beginning of a school year.
👁 Screenshot of the Census Verification Report tool.
Census Verification Report
See the Census Reports Tool Rights article for information about rights needed to use this tool.
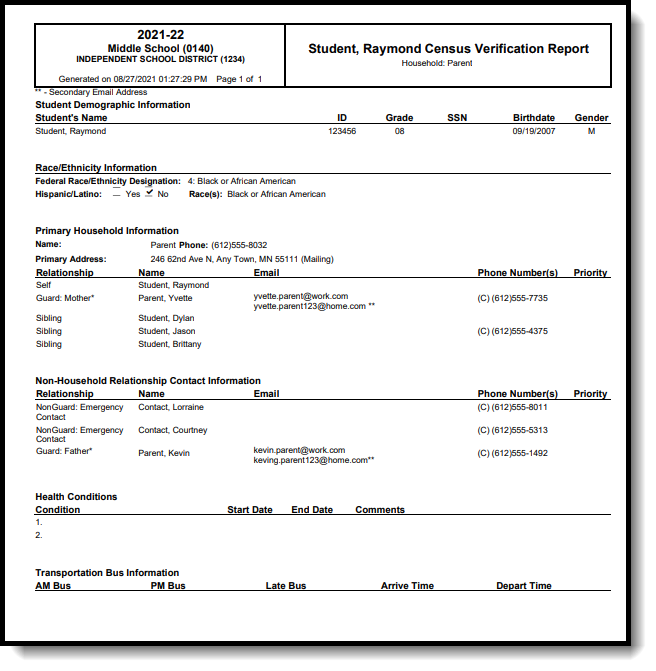
People do not display on the report unless there is a relationship relative to a student being reported. In the instance of a student (Student A) being a member of Household 1 and Household 2, and another student (Student B) being a member of Household 1, Student B displays as a household member for Student A in Household 1 and a Non-Household Contact for Student A in Household 2. This is due to how non-household contacts are constructed. A person can be specifically added as a non-household contact or by being in a household with a person, which automatically makes the first person become a non-household contact in any other household in which the second person belongs.
Information included on the Census Verification Report reports from the following areas in the Census module:
Active Address information is based on the End Date entered on the address. This end date is inclusive of the last day. For example, when the address is ended for a household as of September 19, that address is considered active until the next day (September 20), at which point the new address is active and prints on reports and displays on the Summary page.
The following information is pulled from Student Information:
The table below provides information on the fields included in the report from the respective areas above.
Census Verification Report Fields | Campus Path | Campus Field |
|---|---|---|
| Student Demographics | ||
Name | Census > People > Demographics > Person Information | Last Name |
Student ID | Census > People > Demographics > Person Identifiers | Local Student Number |
Grade | Student Information > General > Enrollments > General Enrollment Information | Grade Level |
Social Security Number | Census > People > Demographics > Person Information | Social Security number |
Birth Date | Census > People > Demographics > Person Information | Birth Date |
Gender | Census > People > Demographics > Person Information | Gender |
Federal Designation | Census > People > Demographics > Person Information > Race/Ethnicity | Federal Designation |
Hispanic/Latino | Census > People > Demographics > Person Information> Race/Ethnicity | Is the Individual Hispanic/Latino? |
Race(s) | Census > People > Demographics > Person Information > Race/Ethnicity | Is the individual from one or more of these races? |
Primary Household Information and Non-Household Relationship Contact Information
| ||
Household Name | Census > People > Households | Household Name |
Household Phone | Census > People > Households | Phone |
Primary Address | Census > People > Households | Address |
Relationship | Census > People > Households | Relationship |
Name | Census > People > Households | Name |
Secondary Email | Census > People > Households | |
Phone Numbers | Census > People > Households | Phone(s) |
Priority | Census > People > Relationships | Emergency Priority |
Guardian Race/Ethnicity
| ||
Guardian Name | Census > People > Demographics > Person Information | Last Name |
Hispanic/Latino | Census > People > Demographics > Person Information > Race/Ethnicity | Is the Individual Hispanic/Latino |
Races | Census > People > Demographics > Person Information > Race/Ethnicity | Is the individual from one or more of these races? |
Health Conditions When selected in the report editor, only those conditions that are flagged appear in the Verification report. | ||
Condition | Student Information > Health > Conditions | Description |
Start Date | Student Information > Health > Conditions | Start Date |
End Date | Student Information > Health > Conditions | End Date |
Comments | Student Information > Health > Conditions | Comments |
| Transportation Bus and Parking Information | ||
AM Bus | Student Information > General > Transportation > Transportation Detail | In Bus |
PM Bus | Student Information > General > Transportation > Transportation Detail | Out Bus |
Late Bus | Student Information > General > Transportation > Transportation Detail | Late Bus |
Arrive Time | Student Information > General > Transportation > Transportation Detail | In Time |
Depart Time | Student Information > General > Transportation > Transportation Detail | Out Time |
Make | Student Information > General > Transportation > Parking Detail | Make |
Model | Student Information > General > Transportation > Parking Detail | Model |
Color | Student Information > General > Transportation > Parking Detail | Color |
License Number | Student Information > General > Transportation > Parking Detail | Plate Number |
Permit Number | Student Information > General > Transportation > Parking Detail | Parking Permit |
The following provides information on the available options on the Census Verification Report Editor.
When fields are chosen to be included in the report, but no data is stored in Infinite Campus for that field, the item still appears on the report but does not contain any data.
| Field | Description |
|---|---|
| Student Selection | The Census Verification Report allows students to be selected by choosing which grade levels or by selecting an Ad hoc Filter. The report can also be generated to include all students in the school who are currently enrolled and have ended enrollment, or just for those active students. The default selection is by Grade. When generating the report for Active Students Only, an Effective Date must be entered. When the Active Students Only checkbox is marked, select students by choosing grade levels (not an ad hoc filter). |
| Household Selection | The following options are available:
At least one option must be selected in order for the report to generate. The default selection is Primary Households. All students appear when this option is chosen; however, when a student does NOT have a primary household, the report for that student reads "lastName, firstName has incomplete Census data and does not belong to a primary household." When selecting Secondary Households, only students who have at least one secondary household are included (meaning, a student who only has a primary household does not print when only the Secondary Households option is chosen). When selection both Secondary Households and Primary Households, both household types are included on the report. When selecting Non-household Guardian Information, a page only prints for a student when that student has a Non-Household Contact with a guardian relationship and that guardian is a member of a household. |
| Optional Information Selection | Additional information that can be selected includes race/ethnicity data, student pictures, transportation data and health conditions. The following is a list of the optional items that can be selected:
Transportation data looks at a specific date from which to pull data. When the Active Students Only option is selected, the transportation record that is active on the date entered is used. When no transportation record is active on that date but the student has a record starting in the future, that data is used. When a student has no transportation data on that day or in the future, the section reports blank. |
| Privacy Options | Mark the desired privacy options to include - Birth Date, Social Security Number and/or Student ID. The default option is Include Birth Date. The Social Security Number selection is only available when a user has the Social Security number Tool Rights assigned. |
| Sort Options | Select the appropriate sort option for the report. The following options and logic applies:
Teacher names, when sorting by Homeroom Teacher or Teacher/Period displays in the header of the report. |
| Report Format | Indicates how the report generates - in PDF or DOCX format. |
| Report Comments | Custom comments can be added to the report. These comments print on each student's verification data. |
Selecting all available options may cause the report to be longer than one page.
A Year and School must be selected from the Campus Toolbar in order to generate the Census Verification Report.
👁 Screenshot of Census Verification Report output in PDF.
Census Verification Report - PDF Format
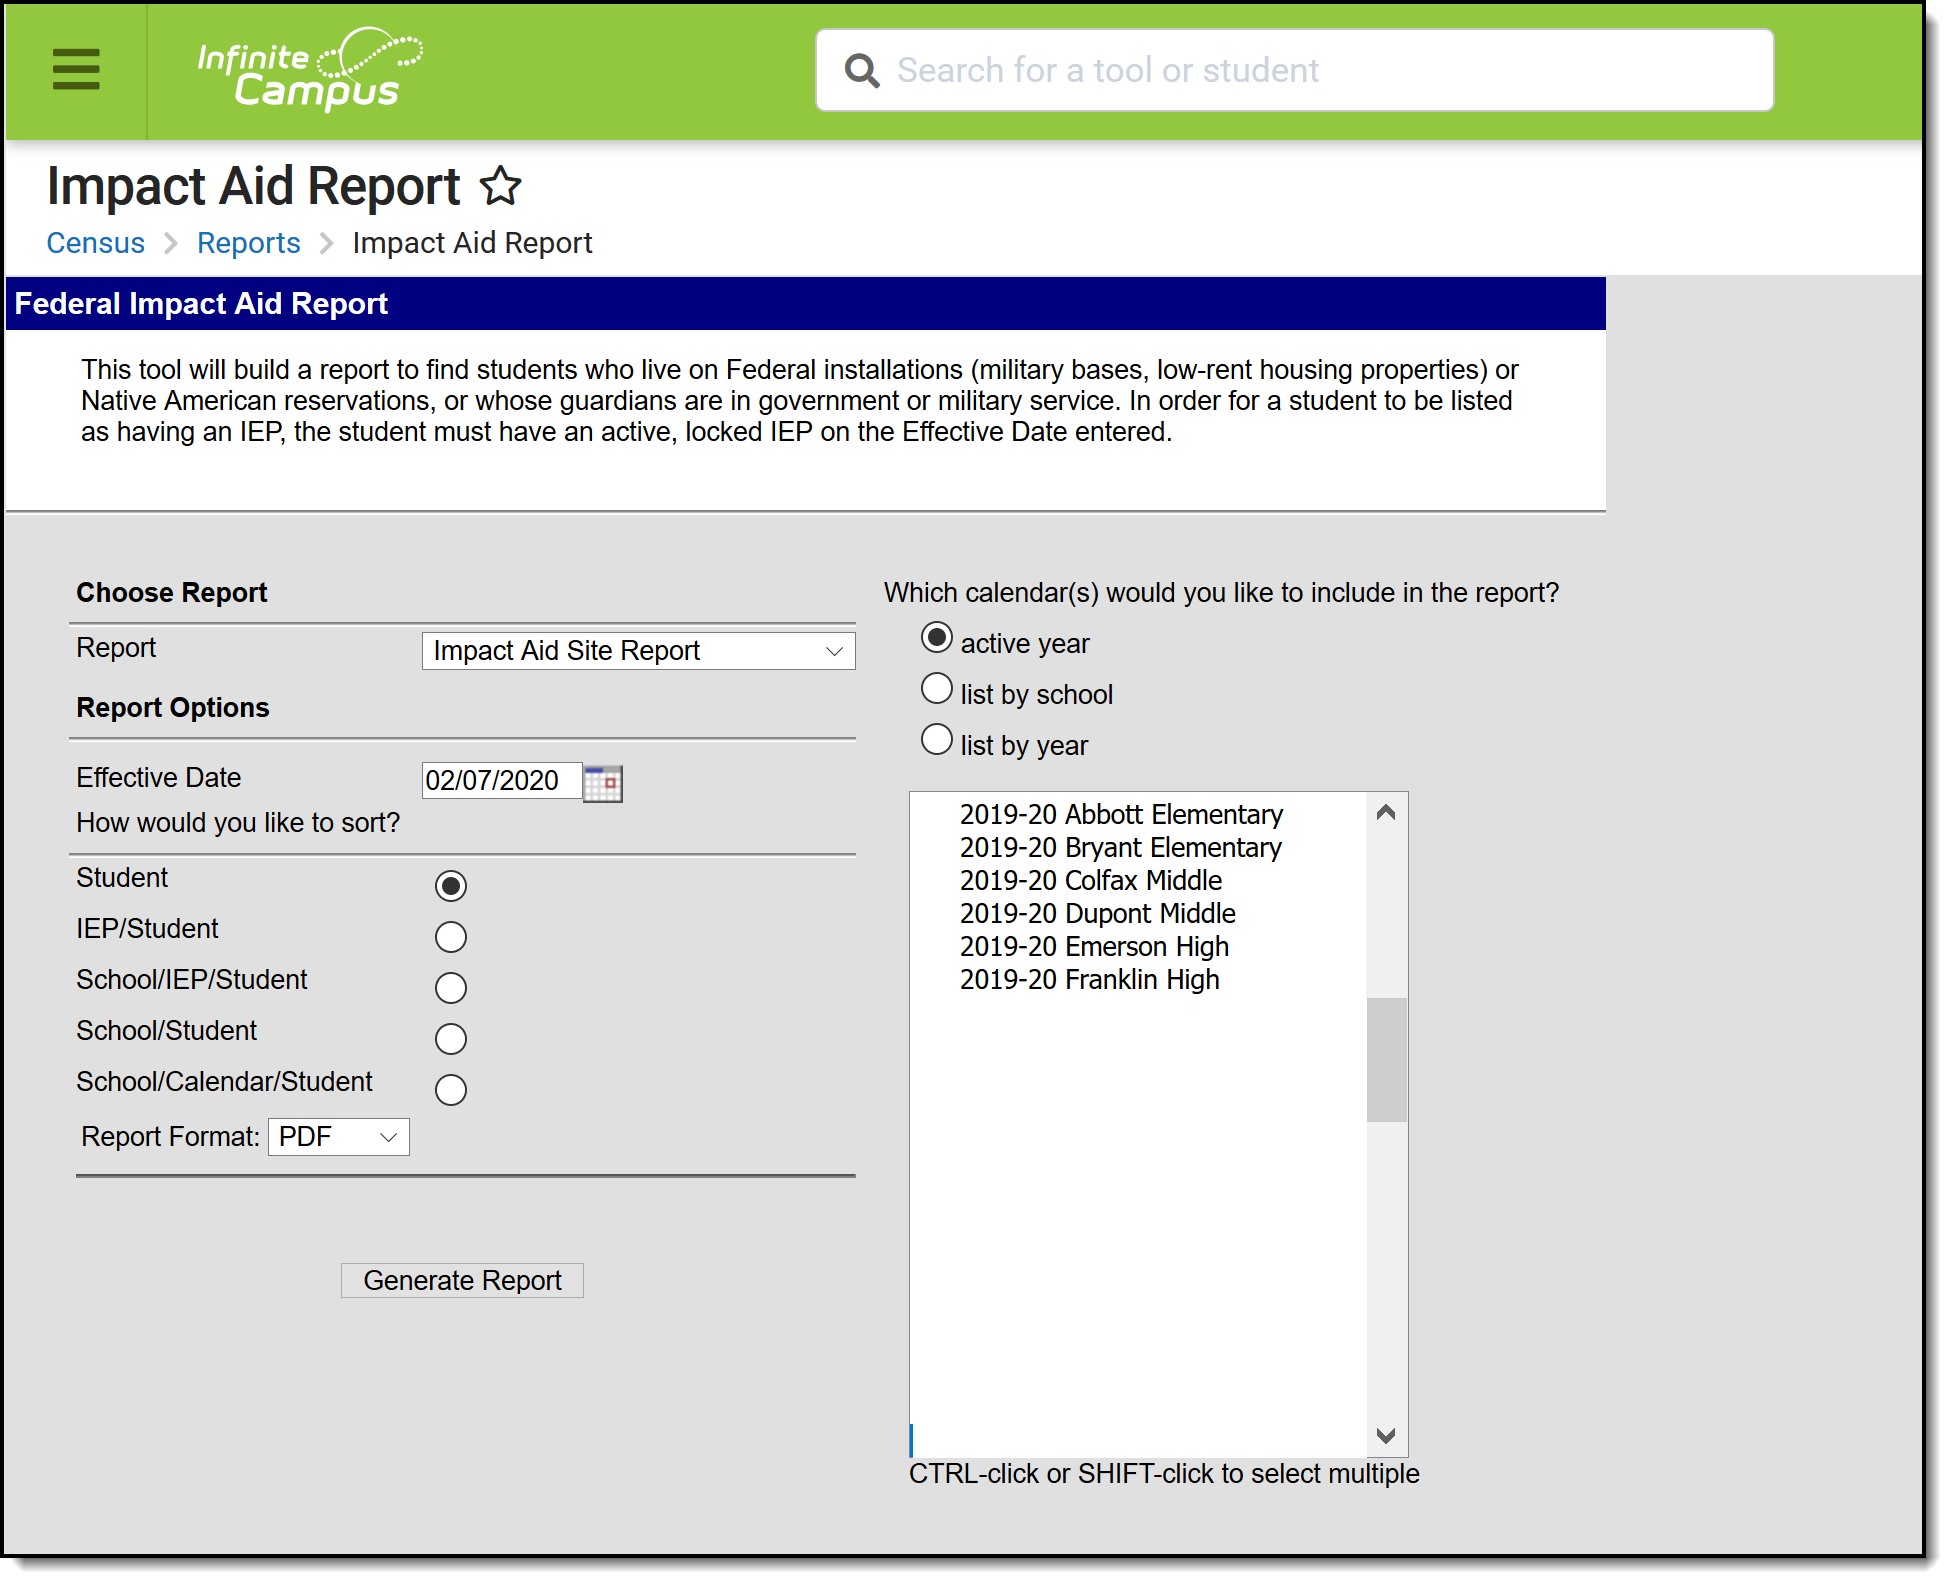
The Impact Aid Report can be used to generate a detailed list of students living on military bases, low-rent housing properties and Native American reservations. This can also be used to report students who have parents that are in government and/or military service.
Tool Search: Impact Aid
The Impact Aid Report provides details on students who live on federal installations (military bases, low-rent housing properties) or Native American reservations, or whose guardians are in government or military service.
👁 Screenshot of the Impact Aid Report Editor.
Impact Aid Report
See the Census Reports Tool Rights article for information about rights needed to use this tool.
There are two reports that can be generated from the Impact Aid Report:
Before either report can be generated, the following must be done:
Follow these steps to track Impact Aid information in Campus.
Done | Task |
|---|---|
Create Impact Aid Sites. | |
Turn on the System Preference for tracking Federal Impact Aid. | |
Assign Impact Aid Sites to household guardians on the Impact Aid tool. | |
Assign Impact Aid Sites to Addresses within the district. | |
Generate the Impact Aid Site Report to find students who live on Federal installations. | |
Generate the Impact Aid Employment Report to find guardians who are employed by the government. |
The Impact Aid report queries students based on the Impact Aid settings and also indicates which students are disabled. A student with a disability is defined by the Federal Government as "any child with an individualized education plan (IEP) or an individualized family service plan (IFSP) for whom the LEA is providing a free appropriate public education in accordance with the Individuals with Disabilities Education Act (IDEA)."
Students must have a current, locked IEP that is signed and active on the survey date. The Effective Date entered on the report editor is used to determine the existence of an IEP, along with an active enrollment record.
Any address that has an Impact Aid Site assigned reports on the Impact Aid Site Report (not the Employment Report). This means a student may have multiple addresses listed on the report.
The following options are available for selection on the Impact Aid Report.
Report Option | Description |
|---|---|
Report | Select either the Impact Aid Employment Report or the Impact Aid Site Report.
|
Effective Date | This date is defaulted to the current date and is used to list students who have a current locked education plan and an active enrollment record. |
Sort Options | The report can be sorted in one of the following manners:
These options are only for the Impact Aid Employment Report. The Impact Aid Site Report always sorts by the Impact Aid Site first. |
| Report Format | Indicates how the report generates - in PDF or DOCX format. |
| Calendar Selection | At least one calendar needs to be selected in order for the report to generate. Calendars can be selected by active year, by school name or by year. |
This report option requires the Impact Aid Site to be assigned on the Household Address.
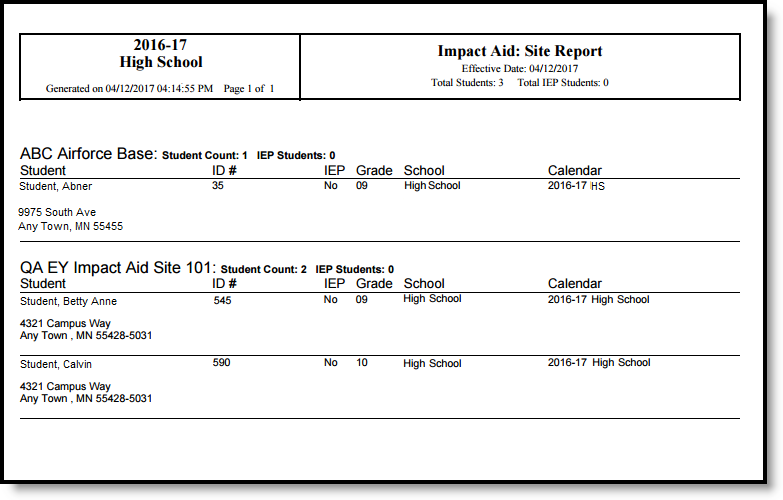
👁 Screenshot of a sample Impact Aid report in pdf format.
Impact Aid Site Report - PDF Format
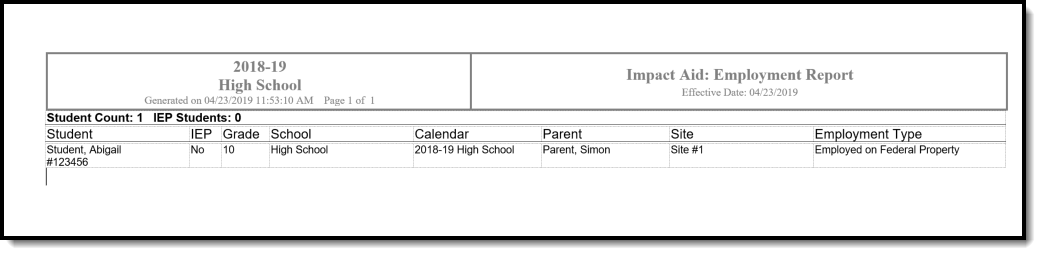
This report option requires the Impact Aid Site and Impact Aid Employment Code to be assigned on a student's guardian's Demographics tab.
👁 Screenshot of a sample Impact Aid report in DOCX format.
Impact Aid Employment Report - DOCX Format
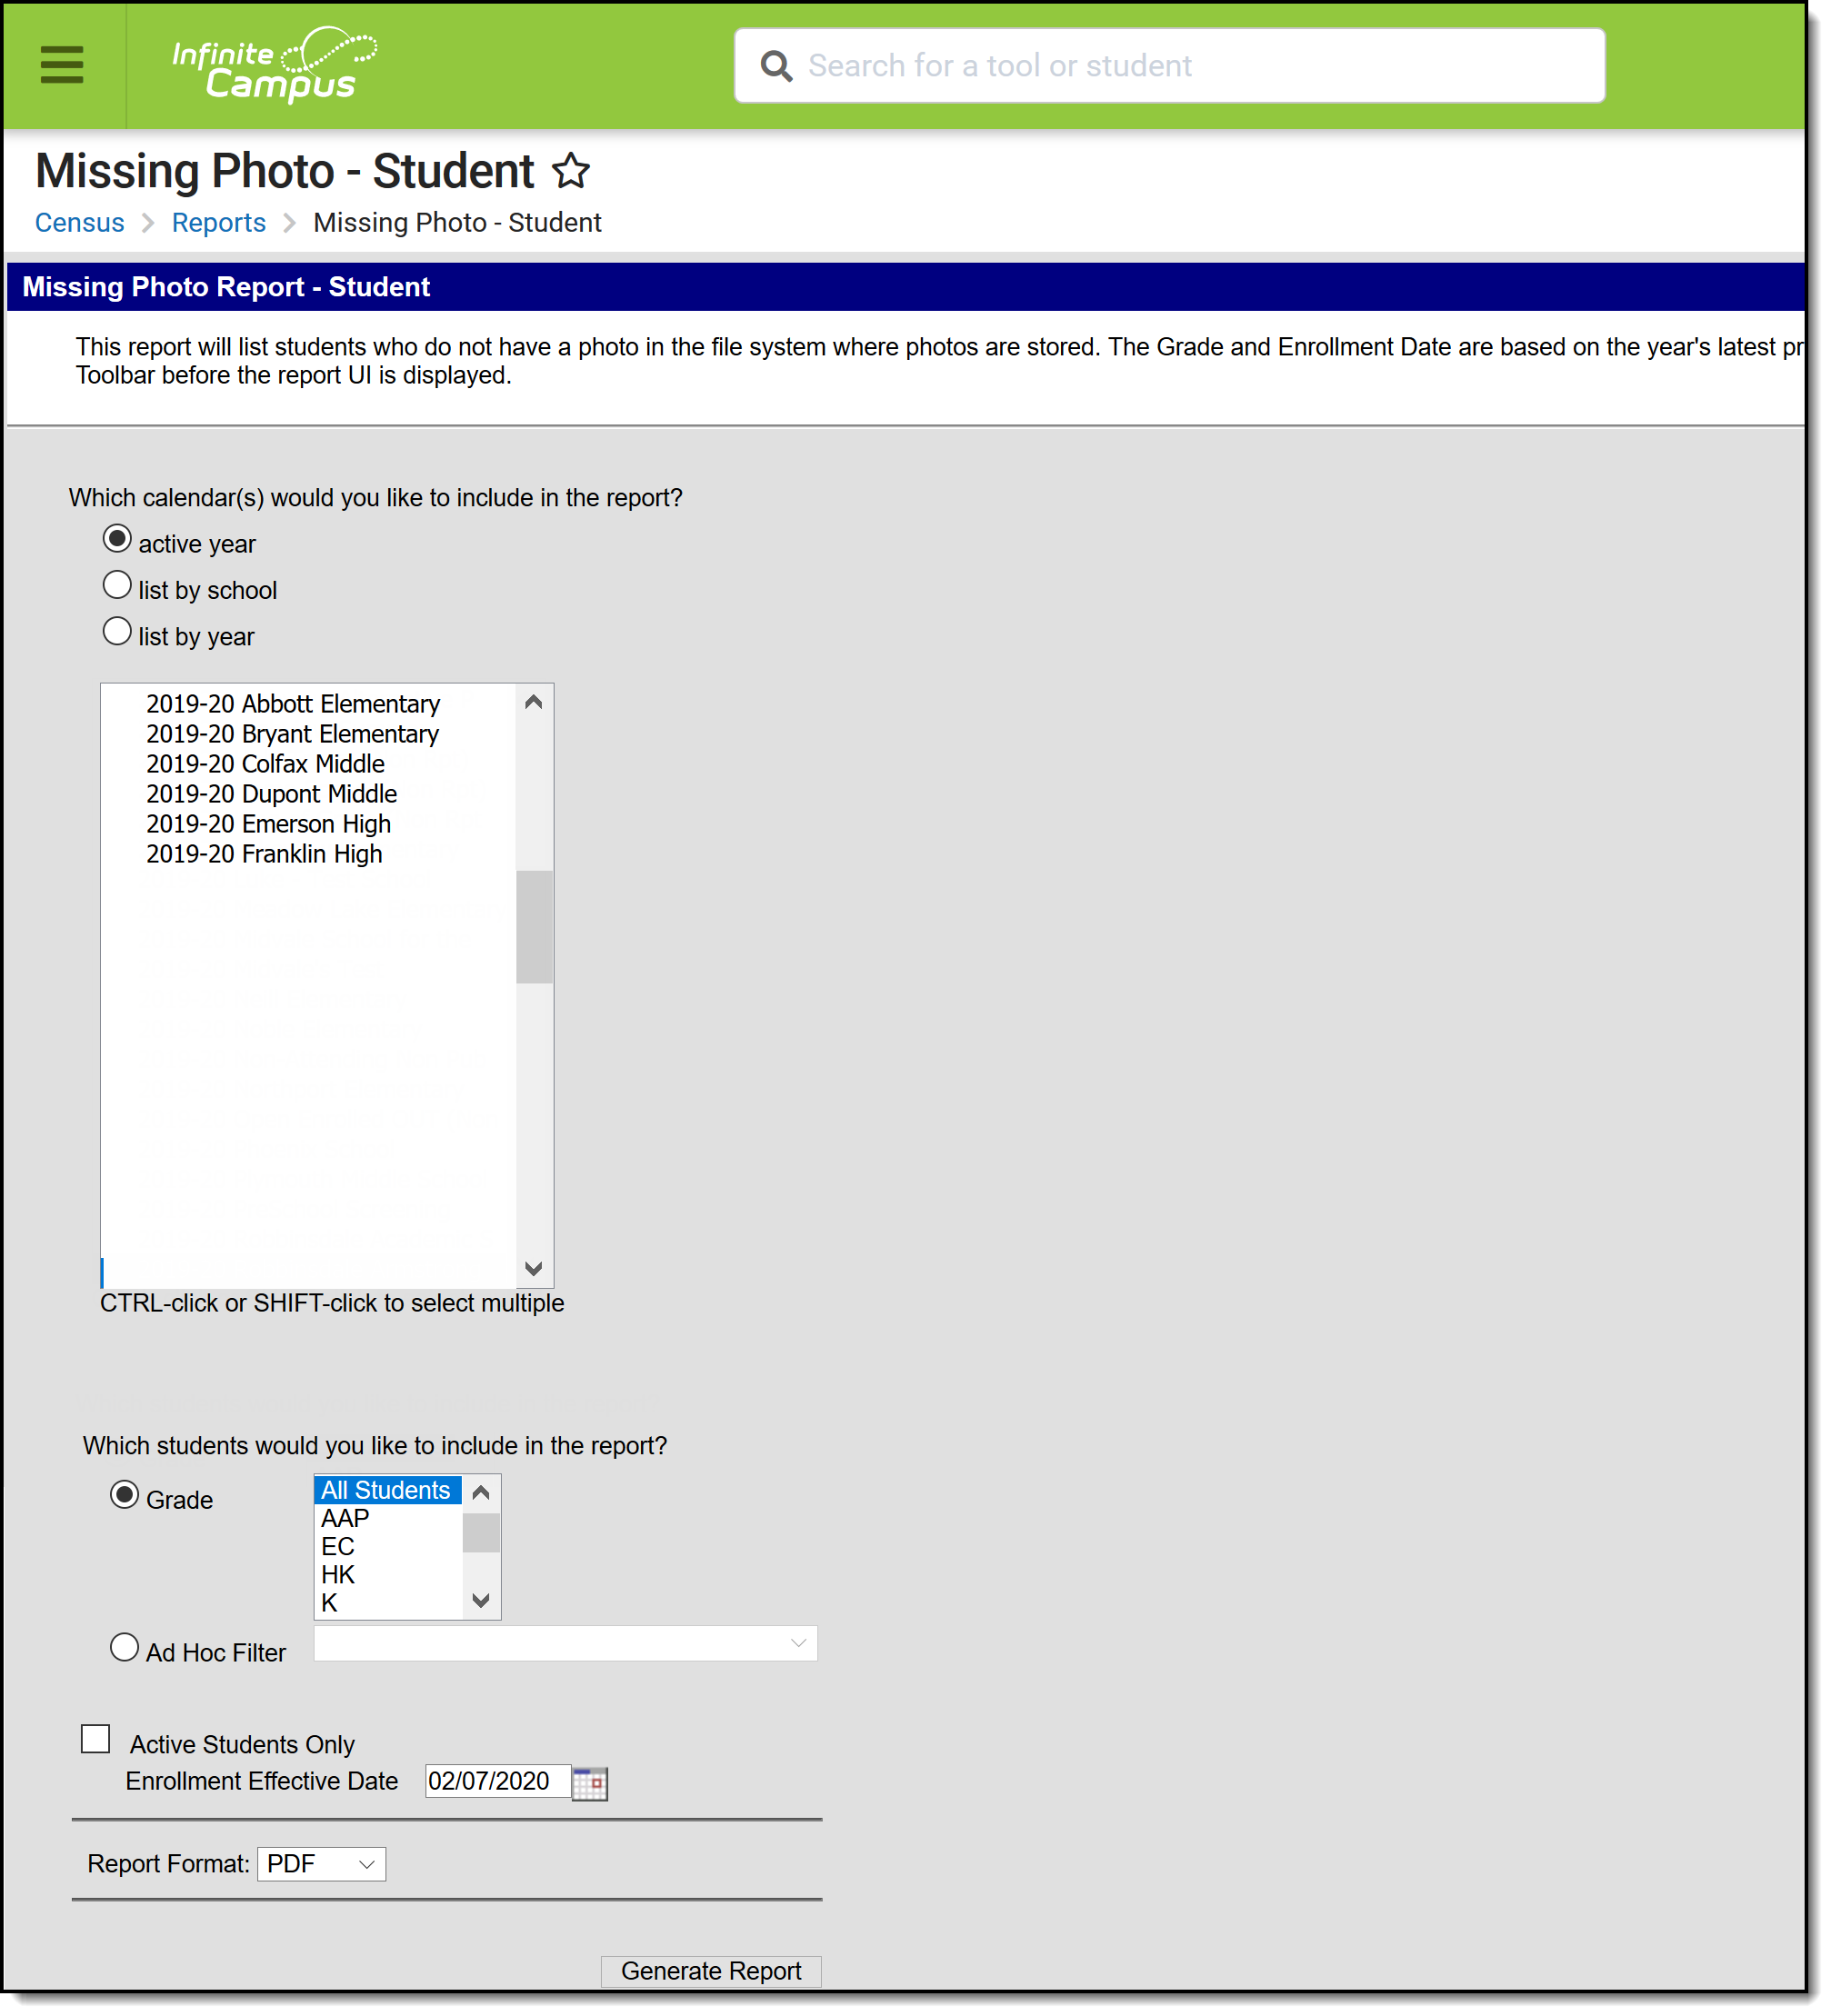
This report will provide a list of students who do not have a photo in the file where photos are stored in Campus.
Tool Search: Missing Photo
The Missing Photo - Student Report returns a list of students who do not have a photograph of themselves stored in Campus. This report can be generated after importing student pictures using the Photo Import tool (when adding multiple photos) or the Demographics tab (when adding just one image).
👁 Screenshot of the Missing Photo Student report editor.
Missing Photo Student Report
See the Census Reports Tool Rights article for information about rights needed to use this tool.
Only students are included in the report; staff are not included in this report. Students marked as No Show on their enrollments records are excluded from the report.
This report cannot be run at the state edition level.
| Field | Description |
|---|---|
| Calendar Selection | Selection determines from which calendar(s) the students are reported. At least one calendar must be selected in order to generate the report. When a calendar is selected in the Campus toolbar, that calendar is automatically selected in the calendar. Calendars can be selected by active year, by school name or by year. |
| Student Selection | Students can be selected by Grade Level or by an Ad hoc Filter. When generating by grade levels, all Students can be selected, if desired. While this is a simple report, remember that in larger schools, choosing the entire student population may cause performance issues. Instead of selecting a grade level, select an ad hoc filter that includes the students who should be included in the report. Only those students included in the filter are considered to be included in the report (e.g., if students in that filter have a picture uploaded, they are not included on the report). |
| Active Students Only | When marked, only currently enrolled students in the selected year and calendar are included, based on the entered Enrollment Effective Date. When not marked, all students enrolled in the selected year and school calendar are included, which could include students whose enrollment records are ended. |
| Enrollment Effective Date | This entry only applies when the Active Students Only checkbox is marked. Enrollments active as of the entered date (defaulted to the current date) are included in the report. Enter dates in mmddyy format or use the calendar icon to select a date. |
Report Format | The report can be generated in CSV, DOCX or PDF format. |
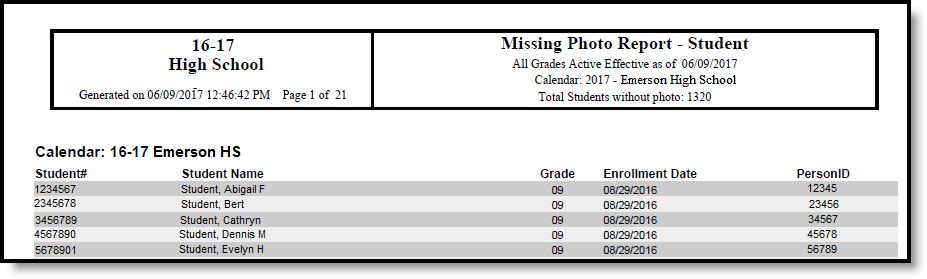
The report sorts students by school number, grade level, and student last name.
👁 Screenshot of a CSV report example.
Missing Photo Student Report - CSV Format
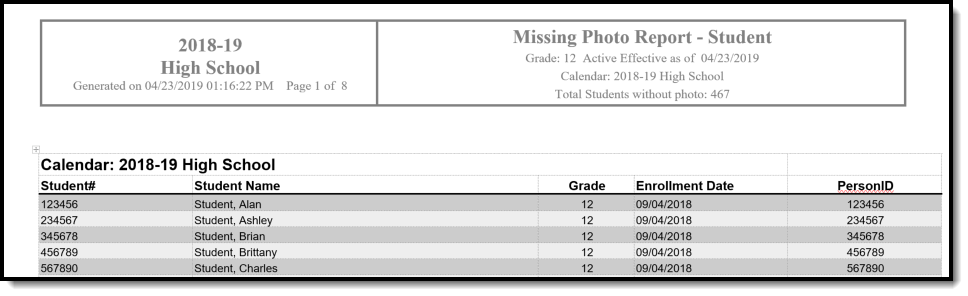
👁 Screenshot of a PDF report example.
Missing Photo Student Report - PDF Format
👁 Screenshot of a DOCX report example.
Missing Photo Student Report - DOCX Format
| Data Element | Description | Location |
|---|---|---|
| Student Number | Reports the district-defined student number. Note that when generating in CSV format, leading zeros are stripped from the student number, so a student number of 012345 prints as 12345. Format the columns accordingly in Excel to display the leading zeros. Numeric, 10 digits | Census > People > Demographics > Person Identifiers > Local Student Number Person.studentNumber |
| Student Name | Reports the student's last name, first name and middle name. When generating the report in CSV format, the name fields are separated into separate columns, and the middle name prints the student's complete middle name. When generating the report in PDF format, the student's name fields display in one column as Last Name, First Name, Middle Initial. Alphanumeric, 75 characters | Census > People > Identities > Identity Information > Last Name, First Name, Middle Name Identity.lastName Identity.firstName Identity.middleName |
| Grade | Reports the student's grade level of enrollment, based on the selected calendar and entered effective date (if applicable). Note that when generating in CSV format, leading zeros are stripped from the grade level, so a grade level of 09 prints as 9. Format the columns accordingly in Excel to display the leading zeros. Numeric, 2 digits | Student Information > General > Enrollments > General Enrollment Information > Grade Enrollment.grade |
| Enrollment Date | Prints the start date of enrollment for the selected calendar. Note that when generating in CSV format, leading zeros are stripped from the date, so a start date of August 29 prints as 8/29/2016 Format the columns accordingly in Excel to display the leading zeros. Date field, 10 characters (MM/DD/YYYY) | Student Information > General > Enrollments > General Enrollment Information > Start Date Enrollment.startDat |
| Person ID | Prints the student's Campus internal person identifier. Note that when generating in CSV format, leading zeros are stripped from the personID, so an ID of 012345 prints as 12345. Format the columns accordingly in Excel to display the leading zeros. Numeric, 10 digits | Census > People > Demographics > Person Information > PersonID Person.personID |
The Mailing Labels Report will generate a list of mailing labels for students/households. This report is formatted to print on labels with dimensions of 1" x 2-5/8", such as Avery 5160.
Tool Search: Mailing Labels
The Mailing Labels report generates mailing labels with the dimensions of 1" x 2-5/8", such as Avery 5160. Labels can be printed for:
The Report Editor includes Set Up, Calendar Picker, and Format Options.
Specific Details about generating each type of mailing label follows.👁 Screenshot of the Mailing Labels Report editor.
Mailing Labels Reports
See the Printing Labels article to review Print Properties prior to printing labels.
See the Census Reports Tool Rights article for information about rights needed to use this tool.
The Mailing Labels report prints address mailing labels for students, student guardians, teachers, staff and district staff.
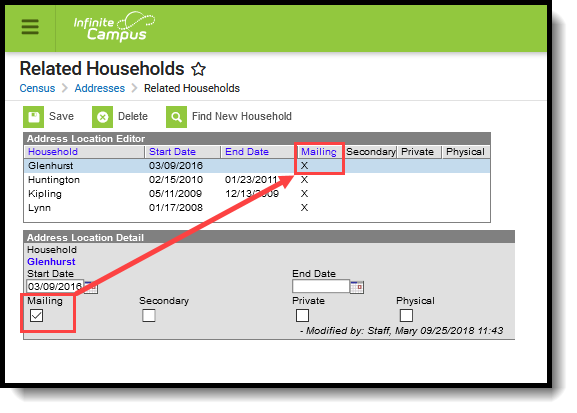
For ALL mailing label types (students, guardians, etc.), the Mailing checkbox must be marked on the Household Address in order for a label to generate. If an address is not marked for mailing, a label does not generate for that address. If more than one address associated with a household is marked for mailing, more than one label generates.
Ended membership records are ignored when determining if a household requires a label to generate. However, if all membership records are ended but the student is still part of a household with an address that is marked for mailing, a label generates with the student's name for both Student labels and Guardian labels.
Additional logic exists for each of the different label types. Review the following information for specific requirements for each label type.
👁 Screenshot of the Related Households tool with the Mailing checkbox marked.
Address Mailing Checkbox
Student mailing labels print one label per actively enrolled student in a household. Only household addresses marked as mailing addresses are included in the report.
Student labels can be generated by Grade or by Course/Section:
👁 Screenshot of the Student mailing labels organized by grade.
Student Mailing Labels by Grade
👁 Screenshot of the student mailing labels report organized by course/section.
Student Mailing Labels by Course/Section
The Effective Date entered on the report is used to return ONLY actively enrolled students in the selected calendar(s) on that date. If a student ended enrollment in the selected calendar(s) prior to the entered date, a label does not generate for that student.
When an Ad hoc Filter is selected, the filter is applied to the school chosen from the Campus toolbar. If All Schools is selected, the filter applies to all schools in the district.
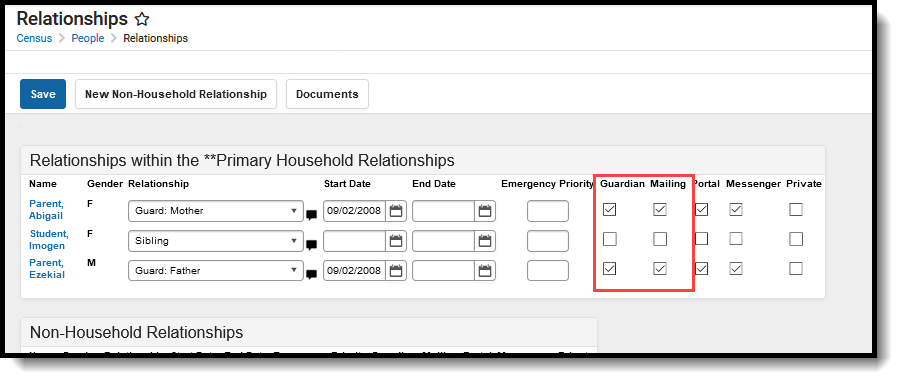
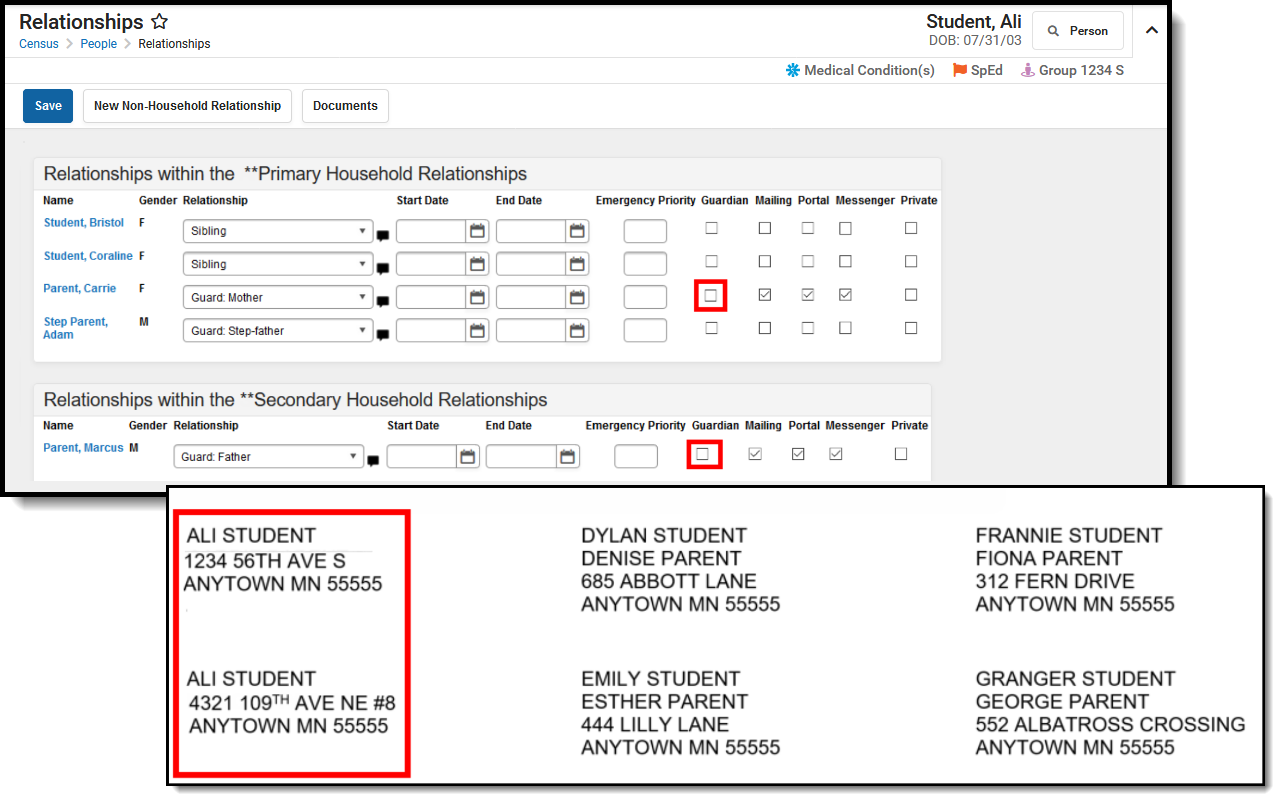
In addition to the Mailing checkbox being marked on the household address, the guardians of the student must have the Mailing checkbox and the Guardian checkbox marked on the Relationships tab. 👁 Screenshot of the Guardian and Mailing checkboxes marked on the relationships tool.
Relationships - Guardian, Mailing checkbox
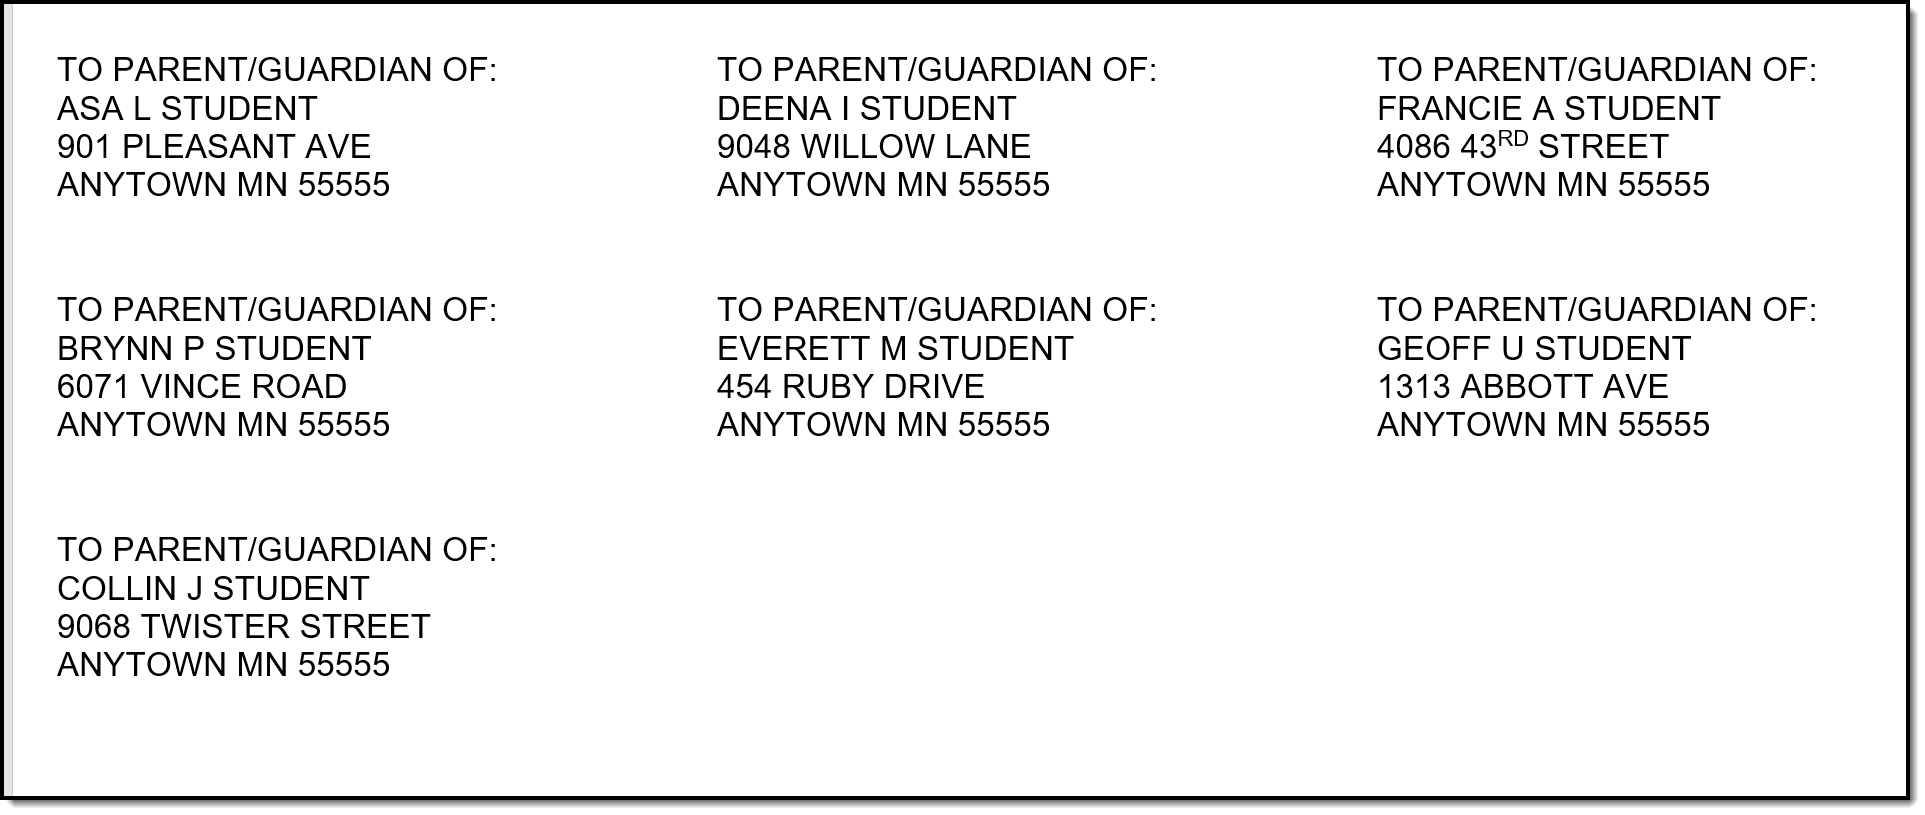
In this example, the student has relationships with two guardians in one household who are both marked as Guardian and Mailing. Only one label with one guardian name and the student's name prints. In this example, the student's mother is listed on the label.
👁 Two-part screenshot of the guardian and mailing checkboxes on the relationships tool and the student labels report showing both guardians in the household.
Student Labels - Two Guardians, One household
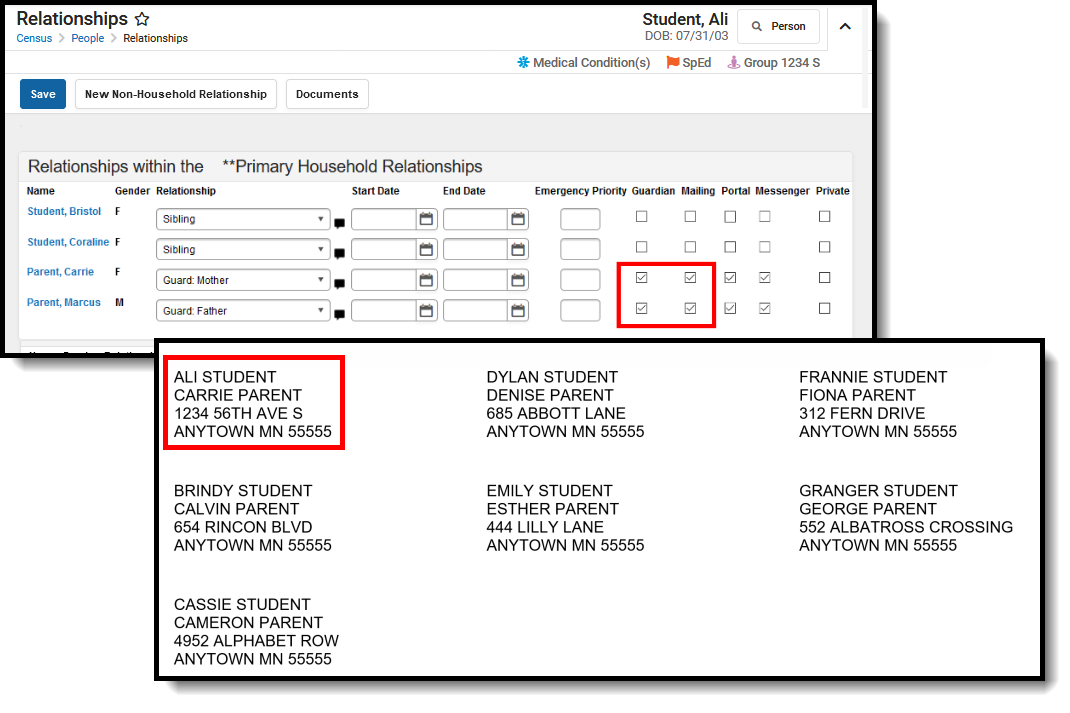
In this example, the student has relationships with two guardians in two different households. Both guardians are marked as Guardian and Mailing. Two labels print, one for each household. 👁 Two-part screenshot of the guardian and mailing checkboxes on the relationships and the student labels report showing two guardians in two different households.
Student Labels - Two Guardians, Two Household
In this example, the student has relationships established, but neither are marked as Guardian. Because the student lives in two households, two labels generate for the student - one label for each address that is marked as mailing, but only the student's name prints on the labels.
👁 Two-part screenshot of the guardian and mailing checkboxes on the relationships and the student labels report showing no guardians in two households.
Student Labels - No Guardians, Two Households
The Student Mailing Labels Report can be generated by either a Grade Level and Ad hoc filter or by a Course Section. The available report options vary based on this selection.
| Field | Description |
|---|---|
| Set Up | |
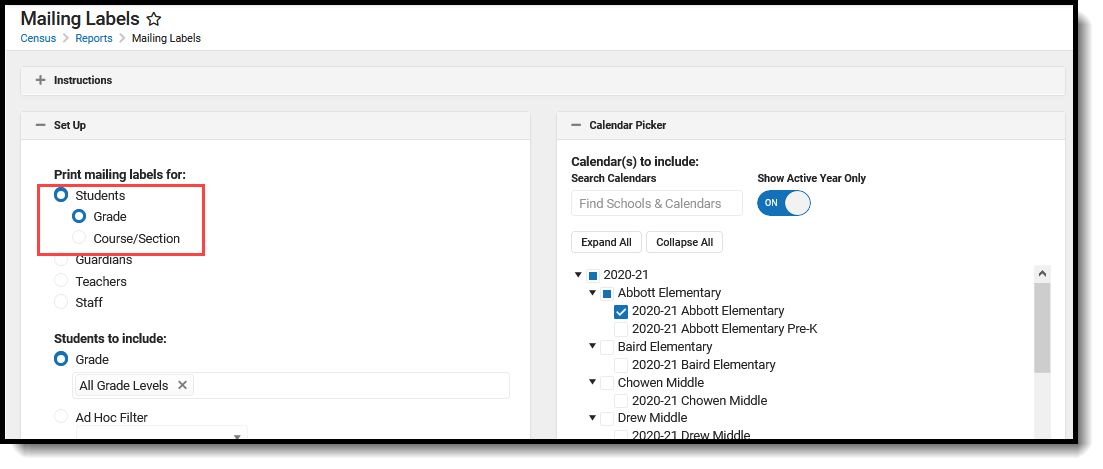
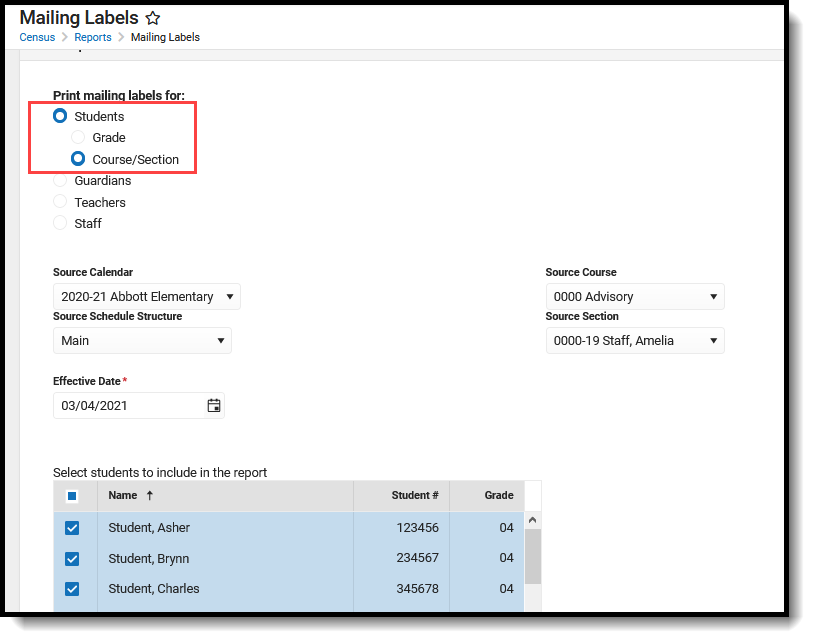
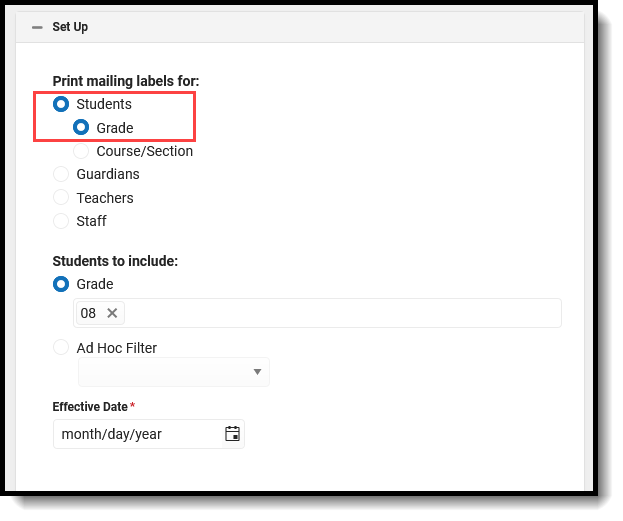
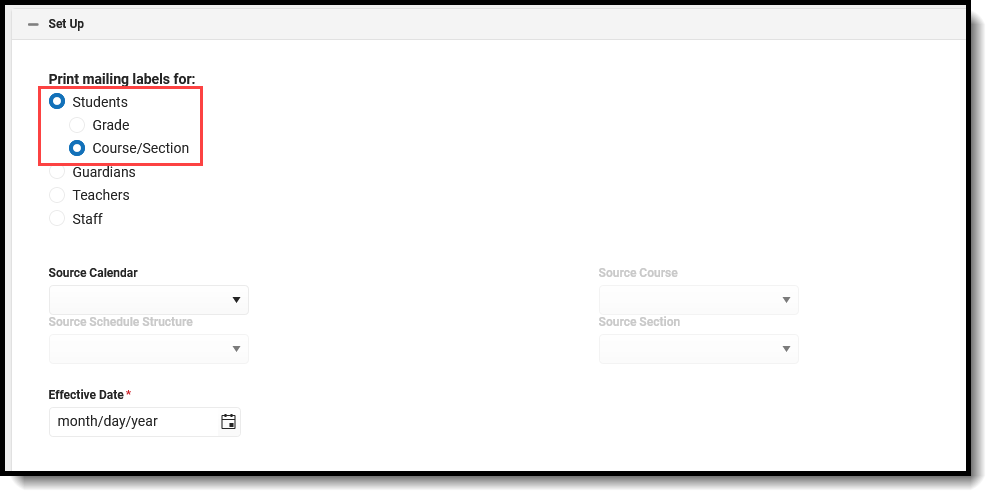
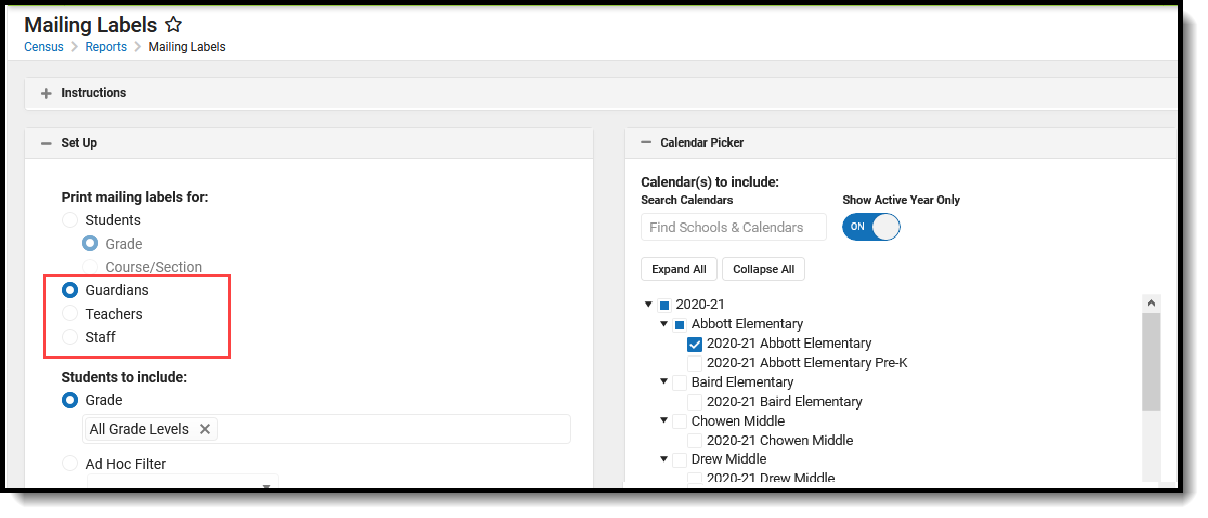
| Print Mailing Labels For | This selection determines which type of mailing label generated. Select the Students radio button and the Grade radio button. 👁 Screenshot of the students and grade radio buttons. |
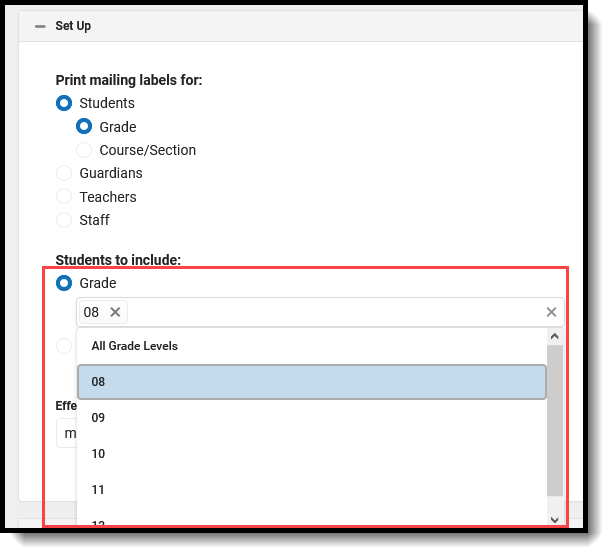
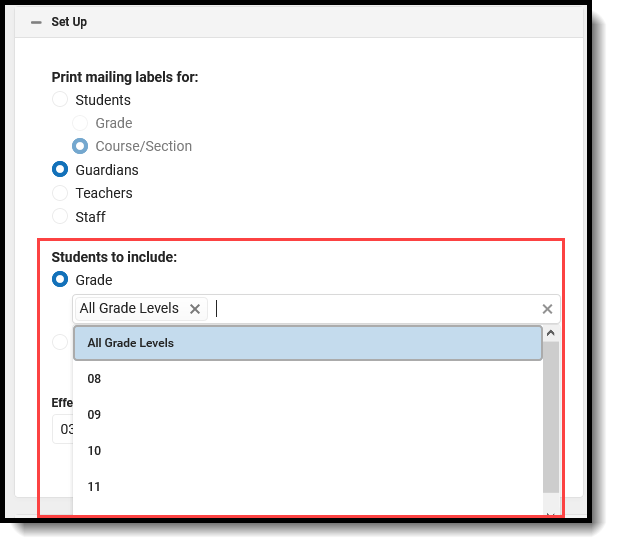
| Students to Include | Select students by a Grade level or an Ad hoc Filter. All Grade Levels (default selection) can be selected; or, click in the Grade field to select specific grade levels. 👁 Screenshot of the students to include options.
Student and Census Data Type filters are available for selection when generating the Student Labels. |
| Effective Date | The Effective Date is entered in mmddyy format and causes the report to only include enrollment records that are active on the entered date. This means students who ended enrollment BEFORE the entered date do not have a label generate for them. |
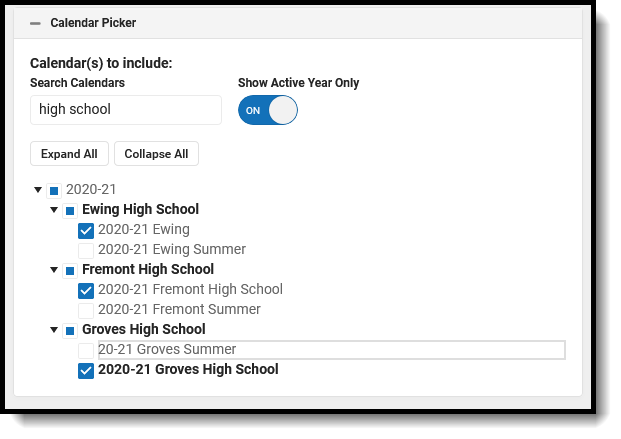
| Calendar Picker At least one calendar needs to be selected in order to generate the report. | |
| Search Calendars | Search for a calendar by typing in the name of that calendar. Matching results are filtered as the name is entered in the field. Only those calendars to which the calendar has rights are available for selection. |
| Show Active Year Only | When set to ON, only those calendars for the active school year. When set to OFF, all calendars from all school years are available for selection. |
| Expand All/Collapse All | Use the Expand All/Collapse All to open and close the list of available calendars. |
| It is recommended that not all calendars be selected at one time, as this increases the report generation time and could potentially cause server response issues. 👁 Screenshot of the calendar selection options. | |
| FormatOptions | |
| Include | The following print options are available for generating Student Mailing Labels for Grades:
A label can be printed with all of these print options selected. Be aware that when the option for Include Guardian's Name is selected AND the option for Include Salutation, both the guardian's name and the student's name are included on the label. Labels print vertically in the selected sort order, not horizontally. |
| Sort Order | The Mailing Labels Report can be sorted by either the Student's Name (alphabetical by last name), the City and Name, or the Zip code. The City and Name sort option first sort by the state associated with the address. Sorting by Zip code can be used for bulk mail rates. |
| Report Format | The report can be generated in PDF or DOCX format. |
| Field | Description |
|---|---|
| Set Up | |
| Print Mailing Labels For | This selection determines which type of mailing label generated. Select the Students radio button and the Course/Section radio button. 👁 Screenshot of the students and course/section radio buttons. |
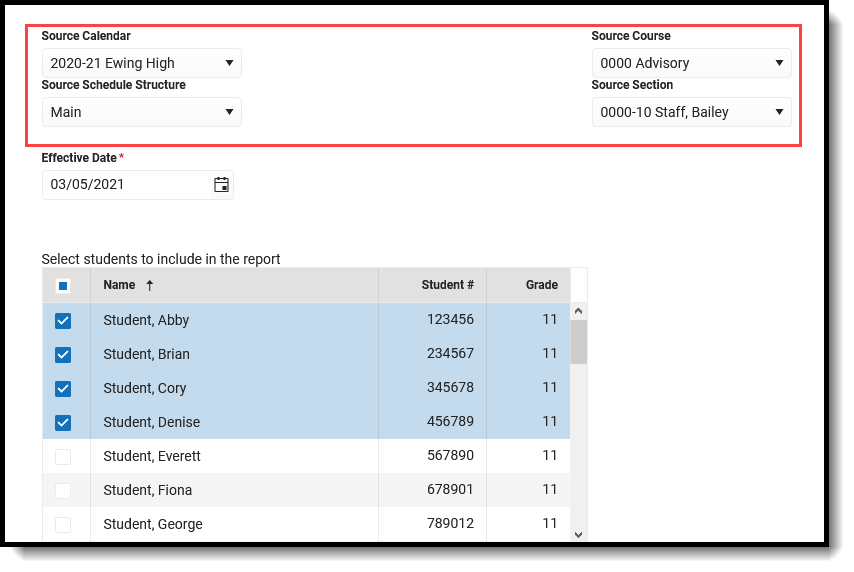
| Source Calendar Source Schedule Structure Source Course Source Section | Generating student labels by a course/section requires the selection of one calendar and schedule structure, much like selecting the Calendar and Structure from the Campus toolbar. Only one calendar can be selected, only one course and section can be selected. Select the desired options from the dropdown lists. 👁 Screenshot of the source calendar, schedule structure, course and section options. |
| Effective Date | The Effective Date is entered in mmddyy format and causes the report to only include enrollment records that are active on the entered date. This means students who ended enrollment BEFORE the entered date do not have a label generate for them. This field defaults to the current date. |
| Student Selection | Once the Source fields are populated and an Effective Date are entered, a list of students who are or have been scheduled into the selected section based on the entered Effective Date displays. Select which students to include in the report. By default, all active students in the selected course section are marked. Remove the checkbox next to the their name if they should not be included. Inactive students in the selected section display in red and are not automatically selected. |
| FormatOptions | |
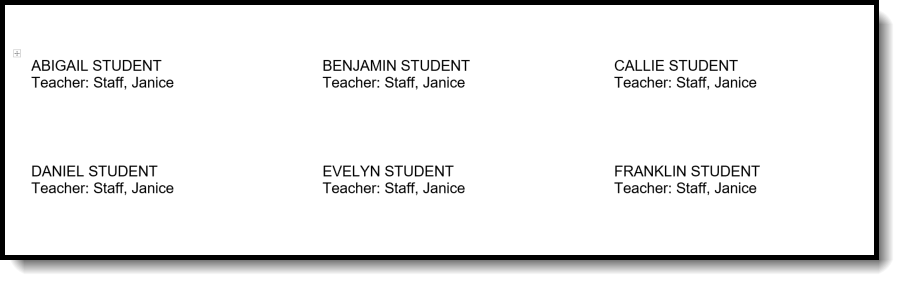
| Label Option | When the Mailing Label option is selected, labels for the selected Course and Section and the selected students print on a standard mailing label. When Student/Teacher is selected, the selected student's name and the selection Course/Section Teacher's name print. |
| Include | The following print options are available for generating Student Mailing Labels for Course/Section for the Mailing Label option:
The following print options are available for generating Student Mailing Labels for Course/Section for the Student/Teacher Label option:
A label can be printed with all of these print options selected. Be aware that when the option for Include Guardian's Name is selected AND the option for Include Salutation, both the guardian's name and the student's name are included on the label. Labels print vertically in the selected sort order, not horizontally. |
| Report Format | The report can be generated in PDF or DOCX format. |
Student labels print as follows. This example was generated using the Grade level option (all of these students are seniors), and does not include the guardian's name, but does include a salutation and private mailing addresses. The starting position was set to Row 1, Column 1.
See the Save Options and Apply Options for information on saving these selections as a template.
To remove the selected Source Calendar, Schedule Structure, Course and Section values, click the Reset button. These fields return to having no values selected and other option can be chosen, if desired. The Reset option removes the values in each of the Source fields.
See the Save Options and Apply Options for information on saving these selections as a template.
Guardian mailing labels print for each person marked as guardian in the household. The only difference between the Guardian label and the Student label is the ability to print the salutation line with or without the guardian name. The guardian label only prints the name(s) of the guardian.
One label per household prints. If siblings attend the same school, only one label prints for those siblings.
Guardian labels require the household address to be marked as Mailing.
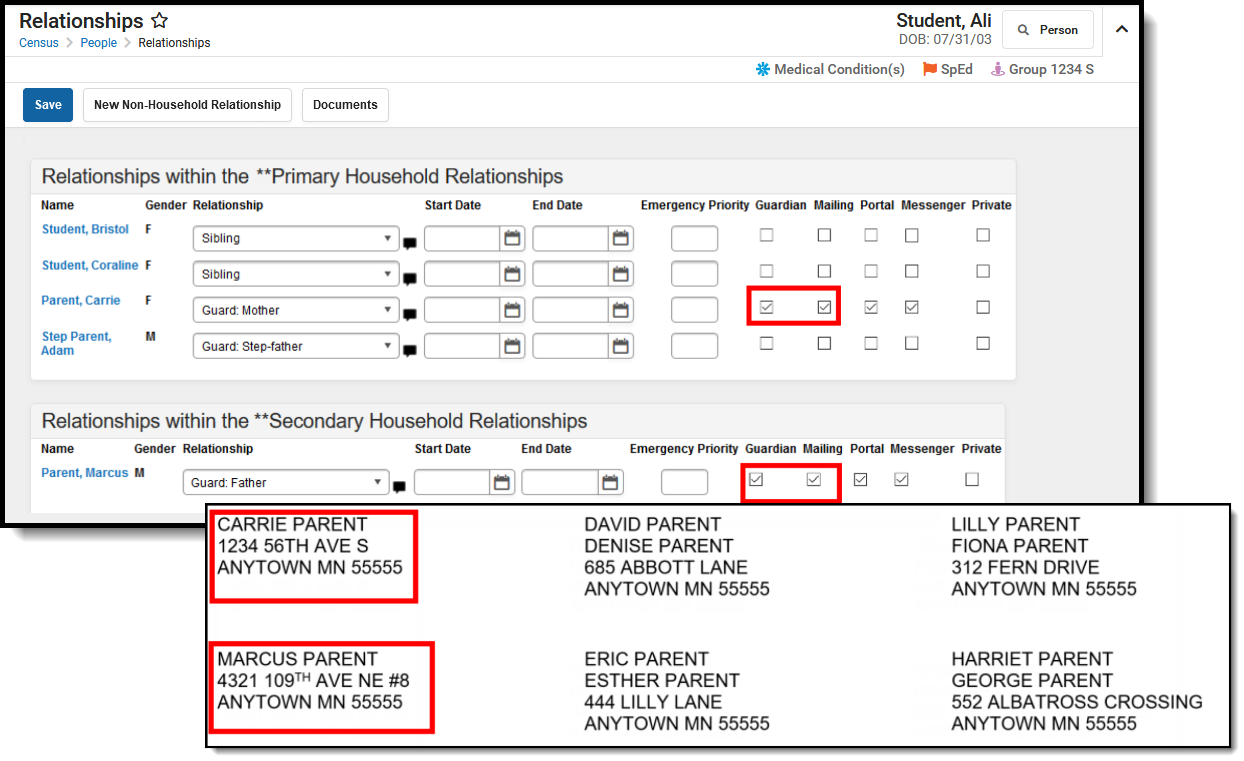
Anyone who is marked as a Guardian and as Mailing on the Relationships tab prints on the label. If the household has three guardians living in it, those three guardians print. Each guardian pints on separate lines. If a student has two guardians in the primary household and another guardian in a secondary household, the two guardians in the primary household print on one label and the guardian in the secondary household prints on a second label. If a student has a non-household relationship that has been marked as Guardian and Mailing, a label will be printed for that person.
The student must be actively enrolled in the selected calendar in order to have a guardian label generate.
If a student does not have any relationship records with another person marked as guardian, the student's name prints on the label. It is assumed that the student is his own guardian. That means each student, with or without guardians, can receive the mailing.
In this scenario, the student's guardians reside in separate households, where the student is a member of each household. Two labels print for the student, one for each household.This is the same scenario as the Student Mailing labels for the student living in two households, the only difference being the student's name does not print on the label.
👁 Two part screenshot of the guardian and mailing checkboxes on the relationships tool and one label for each household with a guardian.
Guardian Labels - One label for each household with a guardian
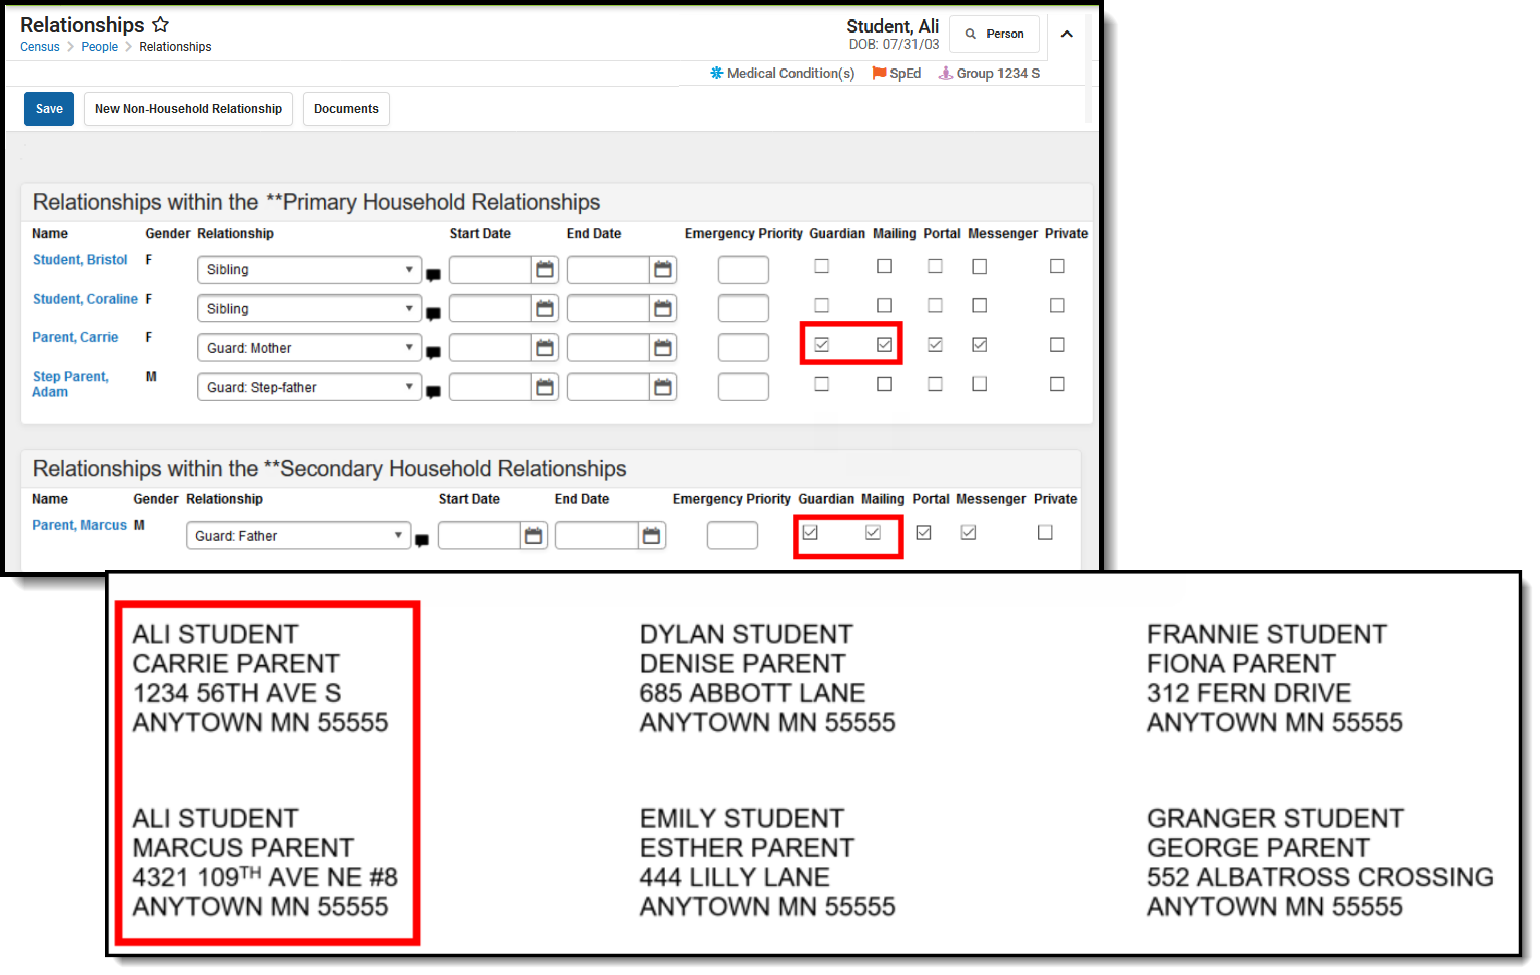
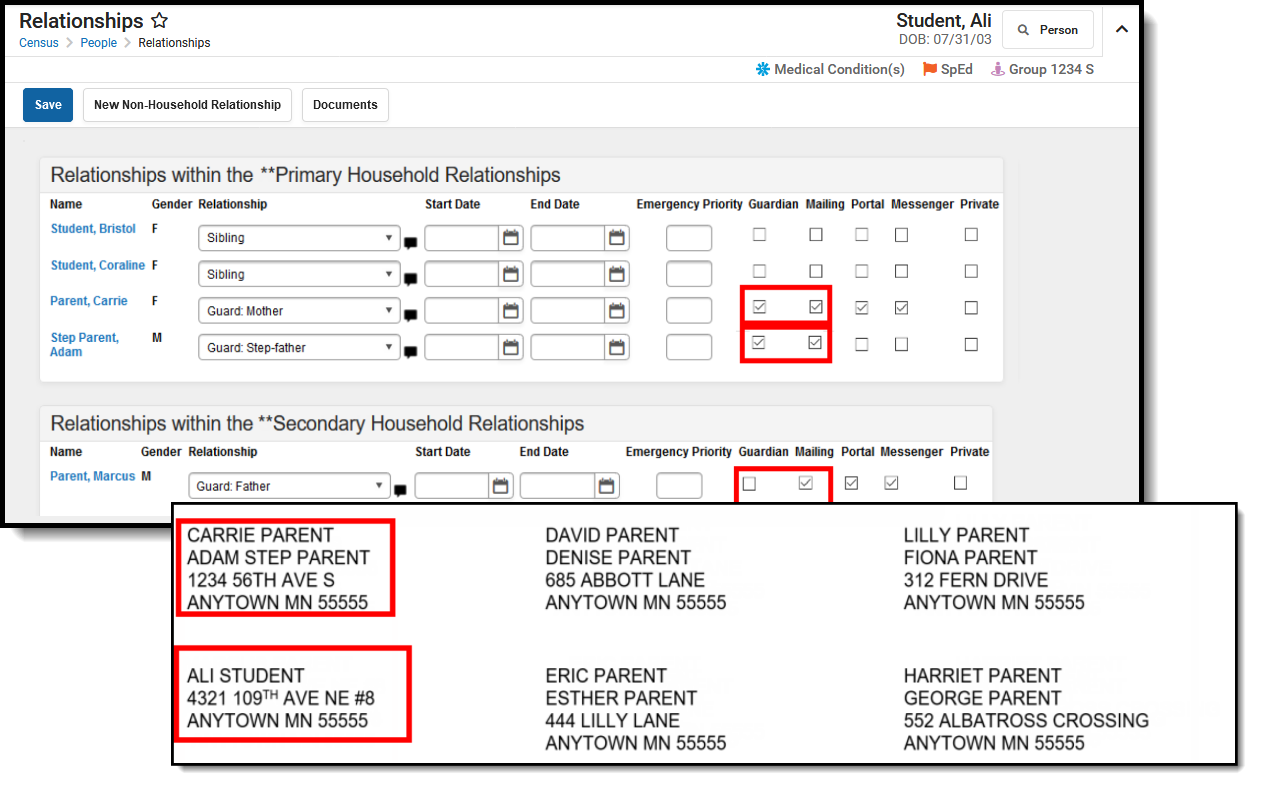
In this situation, one label prints for the household with the two guardians in the primary household printing on one label. The guardian in the secondary household is no longer marked as a guardian, so instead of the guardian's name printing, the student's name prints.
👁 Two part screenshot of the guardian and mailing checkboxes on the relationships tool and Two Guardians in one household, no guardians in second household.
Guardian Labels - Two Guardians in one household, no guardians in second household
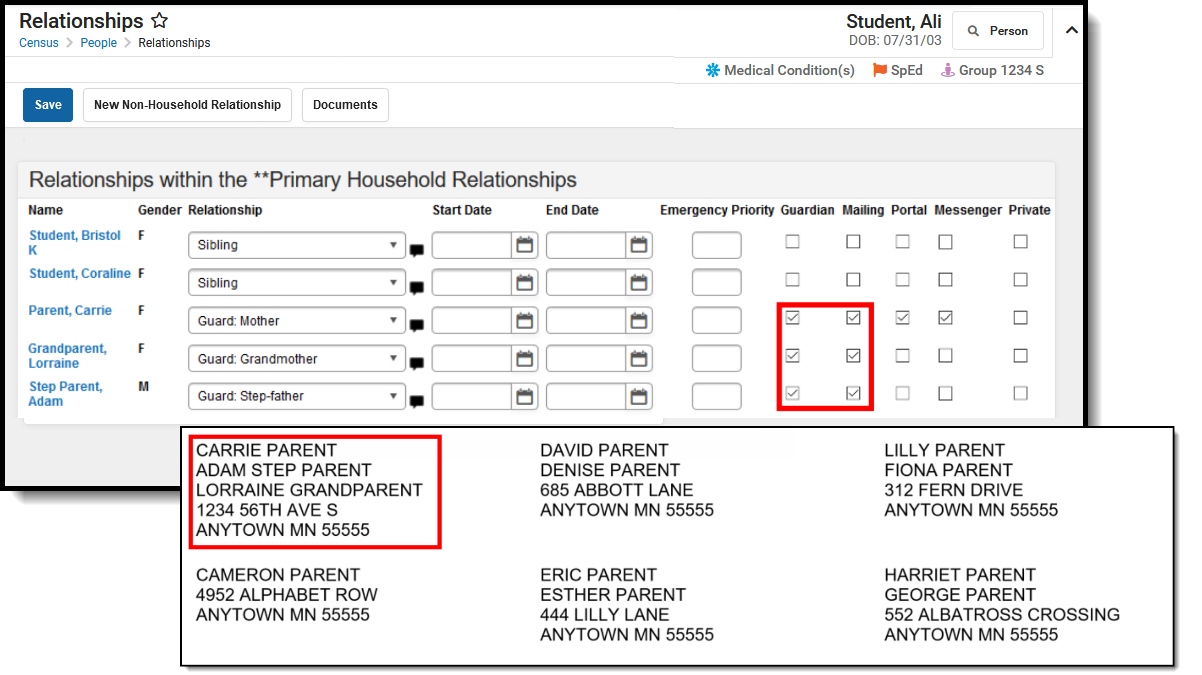
In this situation, all of the student's guardians live in one household. This household has the mother, the step-father and a grandparent marked as guardians. All of their names print on one label, each on a separate line of the label.
👁 Two part screenshot of the guardian and mailing checkboxes on the relationships tool and three guardians in one household.
Guardian Labels - Three Guardians, One Household
| Field | Description |
|---|---|
| Set Up | |
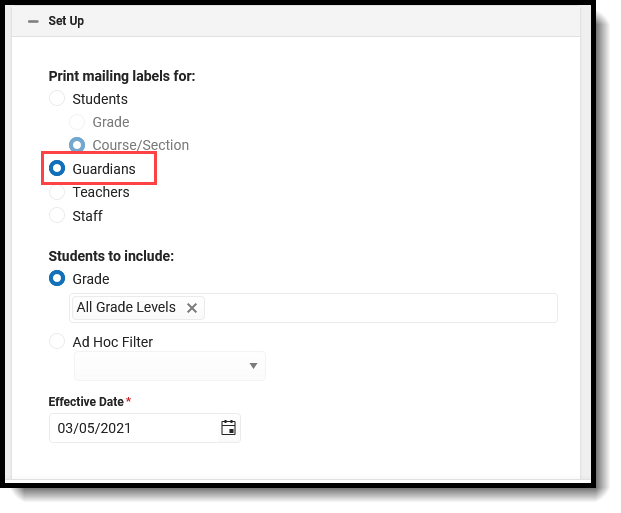
| Print Mailing Labels For | This selection determines which type of mailing label generated. Select the Guardians radio button. 👁 Screenshot of the guardians radio button. |
| Students to Include | For this option, choose Grade. All Grade Levels (default selection) can be selected; or, click in the Grade field to select specific grade levels. 👁 Screenshot of the students to include options.
Student and Census Data Type filters are available for selection when generating the Guardian Labels. |
| Effective Date | The Effective Date is entered in mmddyy format and causes the report to only include enrollment records that are active on the entered date. This means students who ended enrollment BEFORE the entered date do not have a label generate for them. This field defaults to the current date. |
| Calendar Picker At least one calendar needs to be selected in order to generate the report. | |
| Search Calendars | Search for a calendar by typing in the name of that calendar. Matching results are filtered as the name is entered in the field. Only those calendars to which the calendar has rights are available for selection. |
| Show Active Year Only | When set to ON, only those calendars for the active school year. When set to OFF, all calendars from all school years are available for selection. |
| Expand All/Collapse All | Use the Expand All/Collapse All to open and close the list of available calendars. |
| It is recommended that not all calendars be selected at one time, as this increases the report generation time and could potentially cause server response issues. 👁 Screenshot of the calendar selection options. | |
| FormatOptions | |
| Include | The following print options are available for Guardian Mailing Labels:
Labels print vertically in the selected sort order, not horizontally. |
| Sort Order | The Mailing Labels Report can be sorted by either the Student's Name (alphabetical by last name), the City and Name, or the Zip code. The City and Name sort option first sort by the state associated with the address. Sorting by Zip code can be used for bulk mail rates. |
| Report Format | The report can be generated in PDF or DOCX format. |
See the Save Options and Apply Options for information on saving these selections as a template.
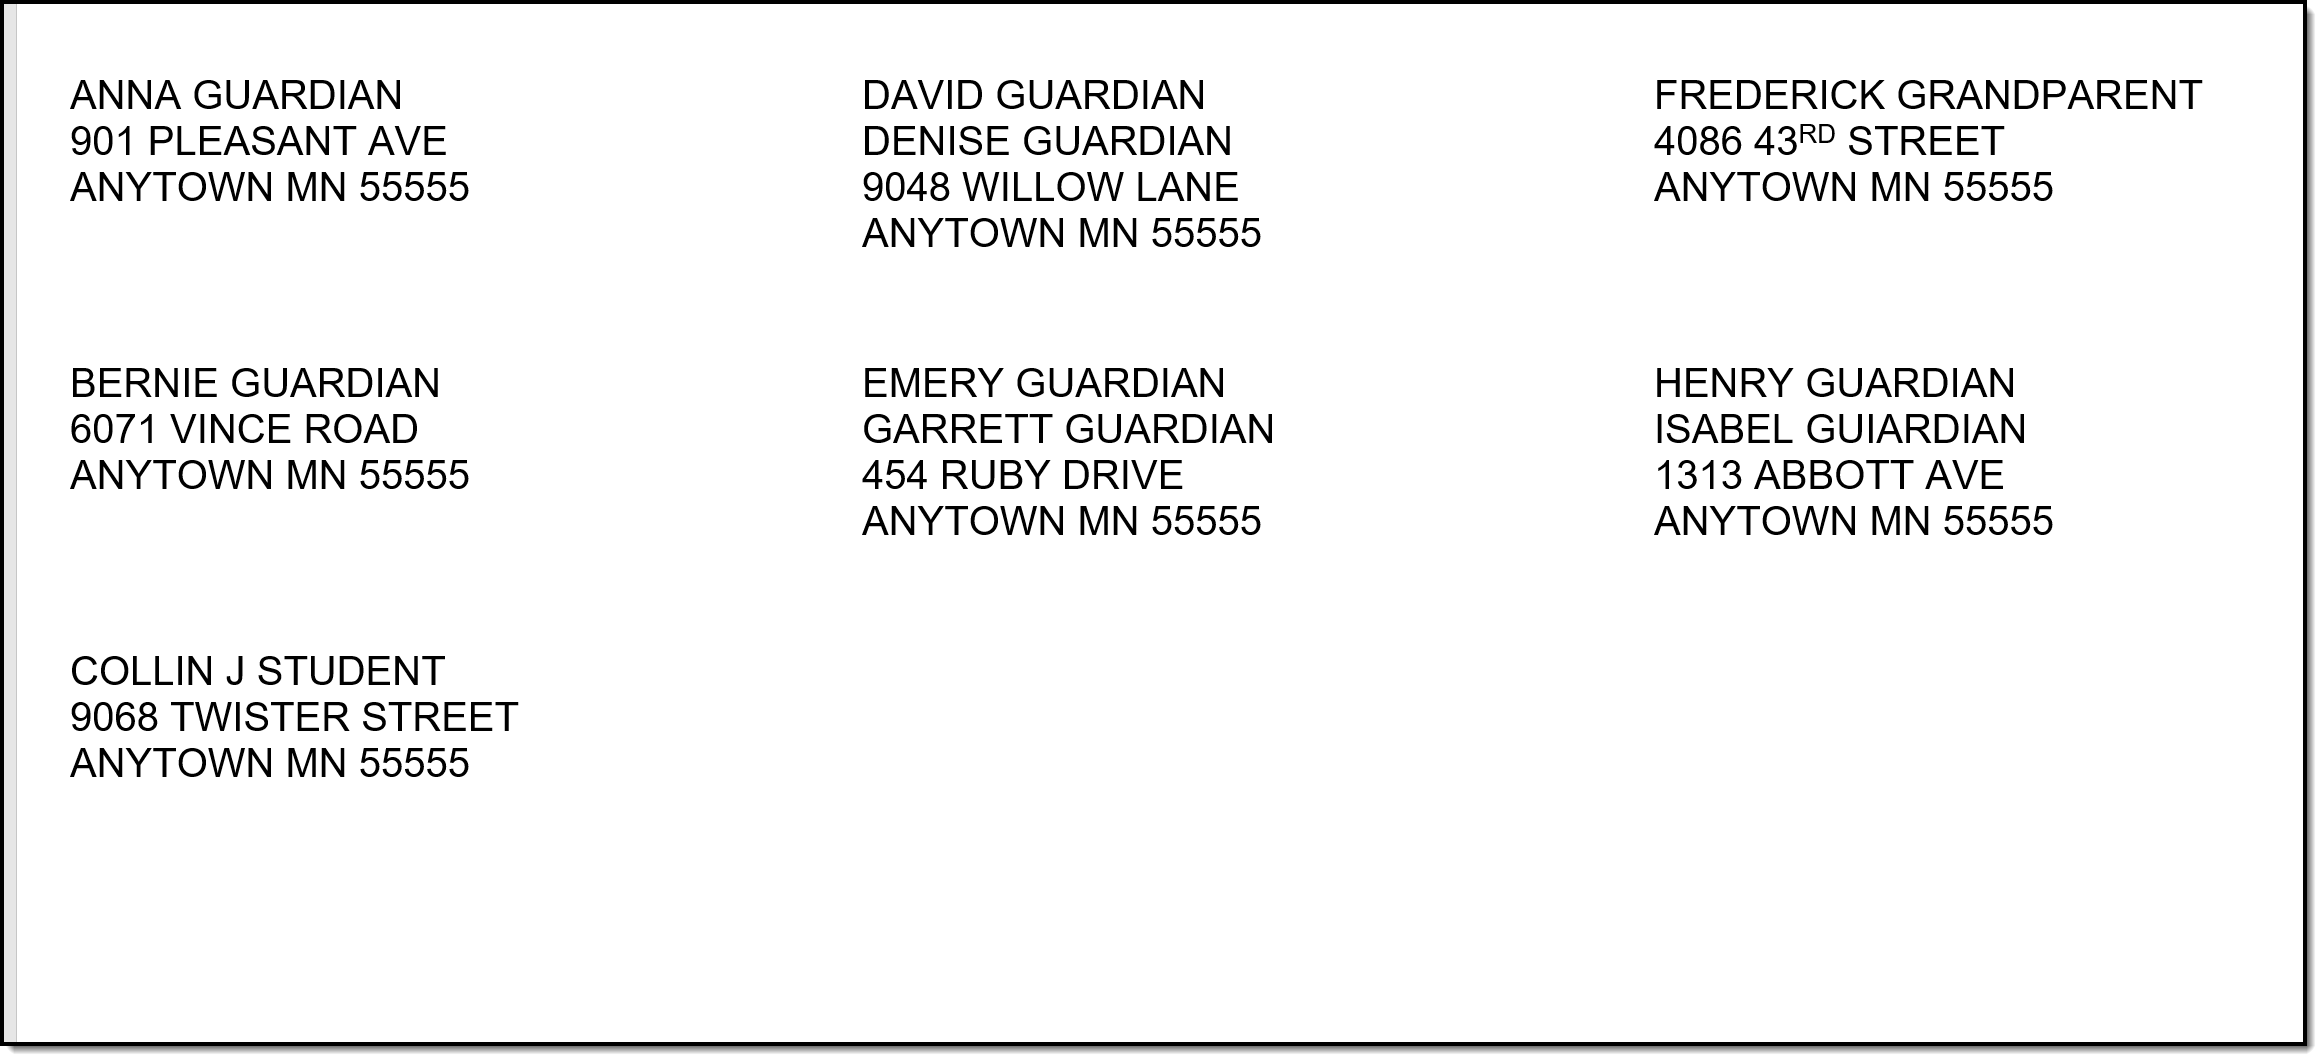
In the example below, notice that both guardians print for a household (David/Denise Guardian, Emery/Garrett Guardian), and a student's grandparent is marked as the guardian (Frederick Grandparent). Also notice that Collin Student is considered his own guardian (perhaps he's an emancipated student).
👁 Screenshot of the guardians mailing labels print view.
Guardian Mailing Labels Print
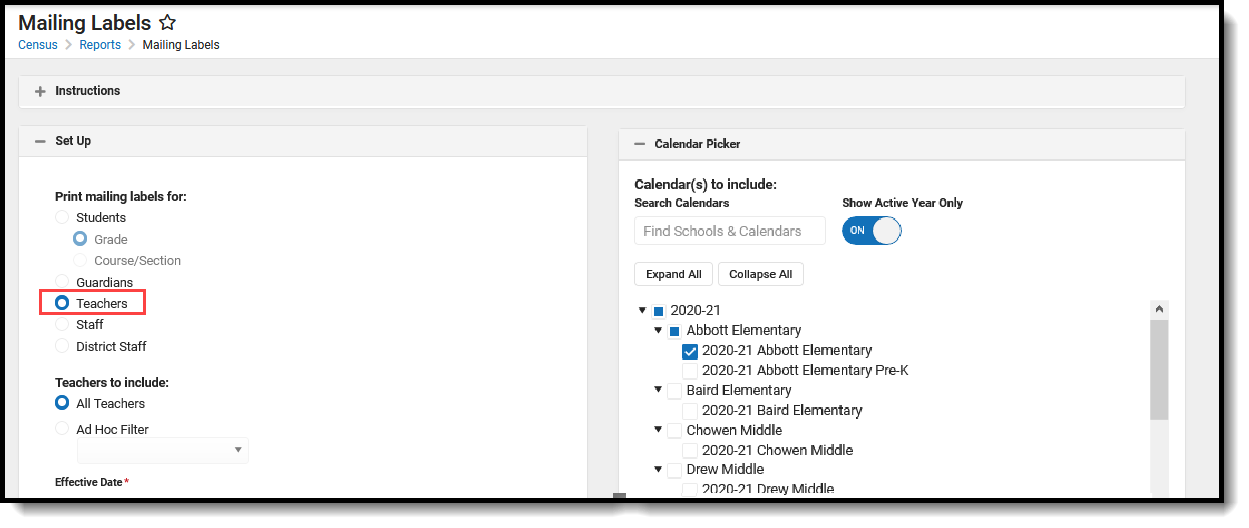
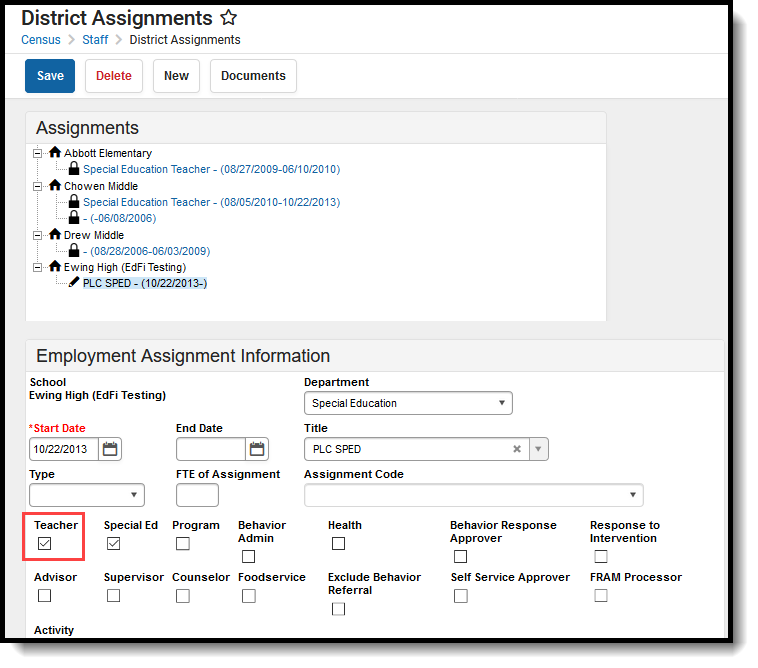
Teacher mailing labels print for all Teachers who have an active District Assignment record in the selected calendar with the Teacher checkbox marked on the active record. Teachers must have a household and at least one address for that household must be marked as Mailing.
👁 Screenshot of the Teachers mailing labels option.
Teacher Mailing Labels
The teacher's household address must be marked as mailing.
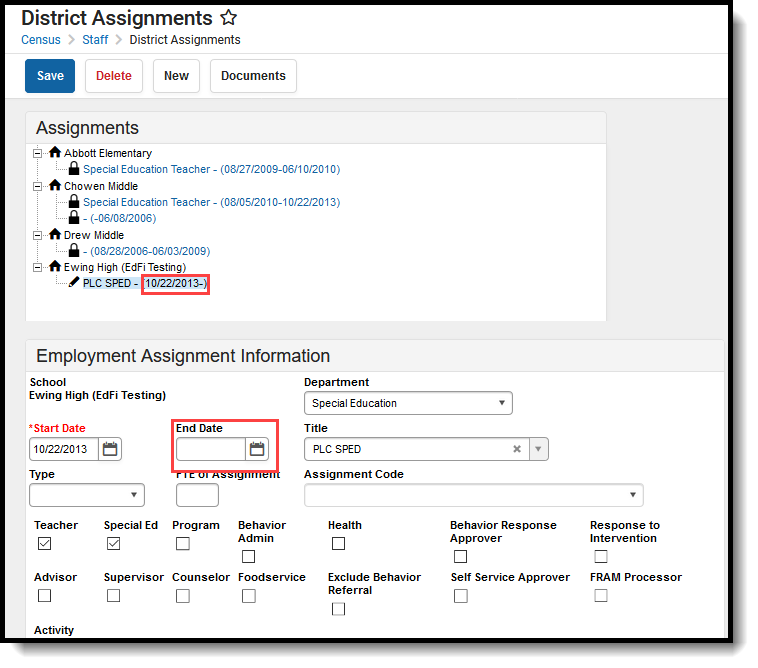
The teacher's District Assignment must be marked as Teacher.
👁 Screenshot of the teacher checkbox on the District Assignment tool.
Teacher District Assignment Selection
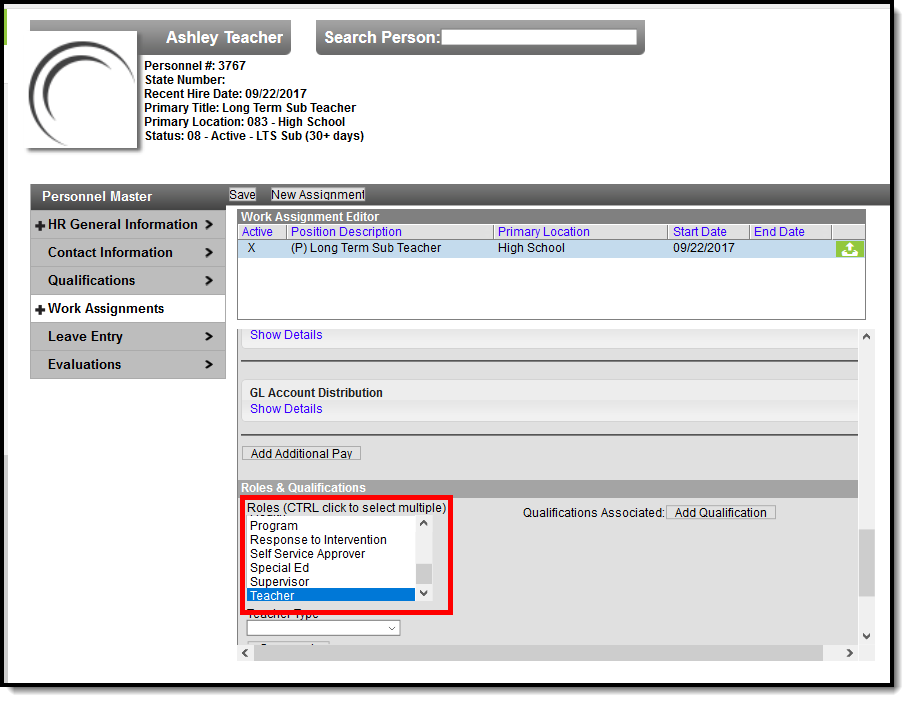
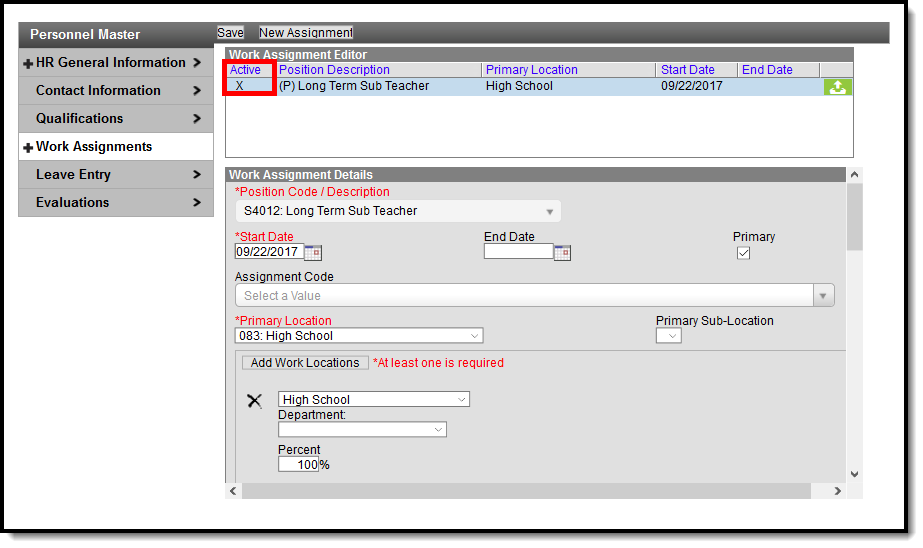
If your district uses Campus HR, the Teacher Role must be selected on the Work Assignment, and the HR Mailing checkbox must be marked under Contact Info.
| 👁 Screenshot of the Campus HR Work Assignment Teacher Role. Campus HR Work Assignment Teacher Role | 👁 Screenshot of the Campus HR Work Assignment Teacher Role. Campus HR Work Assignment Teacher Role |
| Field | Description |
|---|---|
| Set Up | |
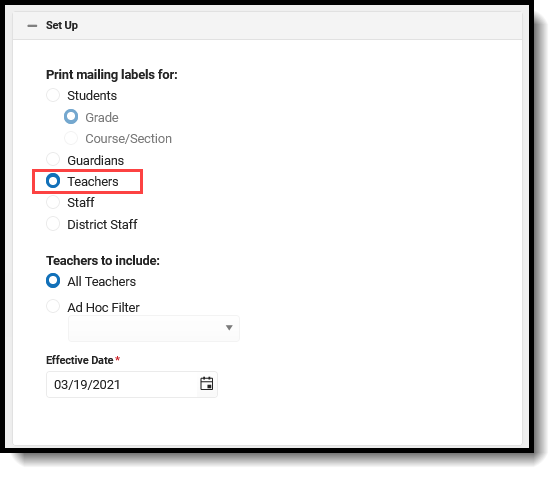
| Print Mailing Labels For | This selection determines which type of mailing label generated. Select the Teachers radio button. 👁 Screenshot of the Teachers radio button. |
| Teachers to Include | All Teachers prints a label for every teacher in the selected calendar, as long as the teacher's district assignment/work assignment, contact information and household address are entered properly (see logic mentioned above). Or, select an Ad hoc Filter. Generating the report this way applies the ad hoc filter to all selected calendars when the School dropdown list in the Campus toolbar is set to All Schools. If All Schools is not selected, the Ad hoc Filter only applies to the selected school in the Campus toolbar. Only Census/Staff Type filters are available for selection when generating the Teacher Labels. |
| Effective Date | The Effective Date is entered in mmddyy format and causes the report to only include teachers who have an active district assignment on that date. This means if a teacher's District Assignment record was ended BEFORE the entered date, a label does not generate. This field defaults to the current date. |
| Calendar Picker At least one calendar needs to be selected in order to generate the report. | |
| Search Calendars | Search for a calendar by typing in the name of that calendar. Matching results are filtered as the name is entered in the field. Only those calendars to which the calendar has rights are available for selection. |
| Show Active Year Only | When set to ON, only those calendars for the active school year. When set to OFF, all calendars from all school years are available for selection. |
| Expand All/Collapse All | Use the Expand All/Collapse All to open and close the list of available calendars. |
| It is recommended that not all calendars be selected at one time, as this increases the report generation time and could potentially cause server response issues. 👁 Screenshot of the calendar selection options. | |
| FormatOptions | |
| Include | The following print options are available for Teachers Mailing Labels:
Labels print vertically in the selected sort order, not horizontally. |
| Sort Order | The Mailing Labels Report can be sorted by either the teacher's name, the City and Name or the Zip code. The City and Name sort option first sort by the state associated with the address. Sorting by Zip code can be used for bulk mail rates. |
| Report Format | The report can be generated in PDF or DOCX format. |
See the Save Options and Apply Options for information on saving these selections as a template.
👁 Screenshot of the teacher Mailing Labels Print view.
Teacher Mailing Labels Print
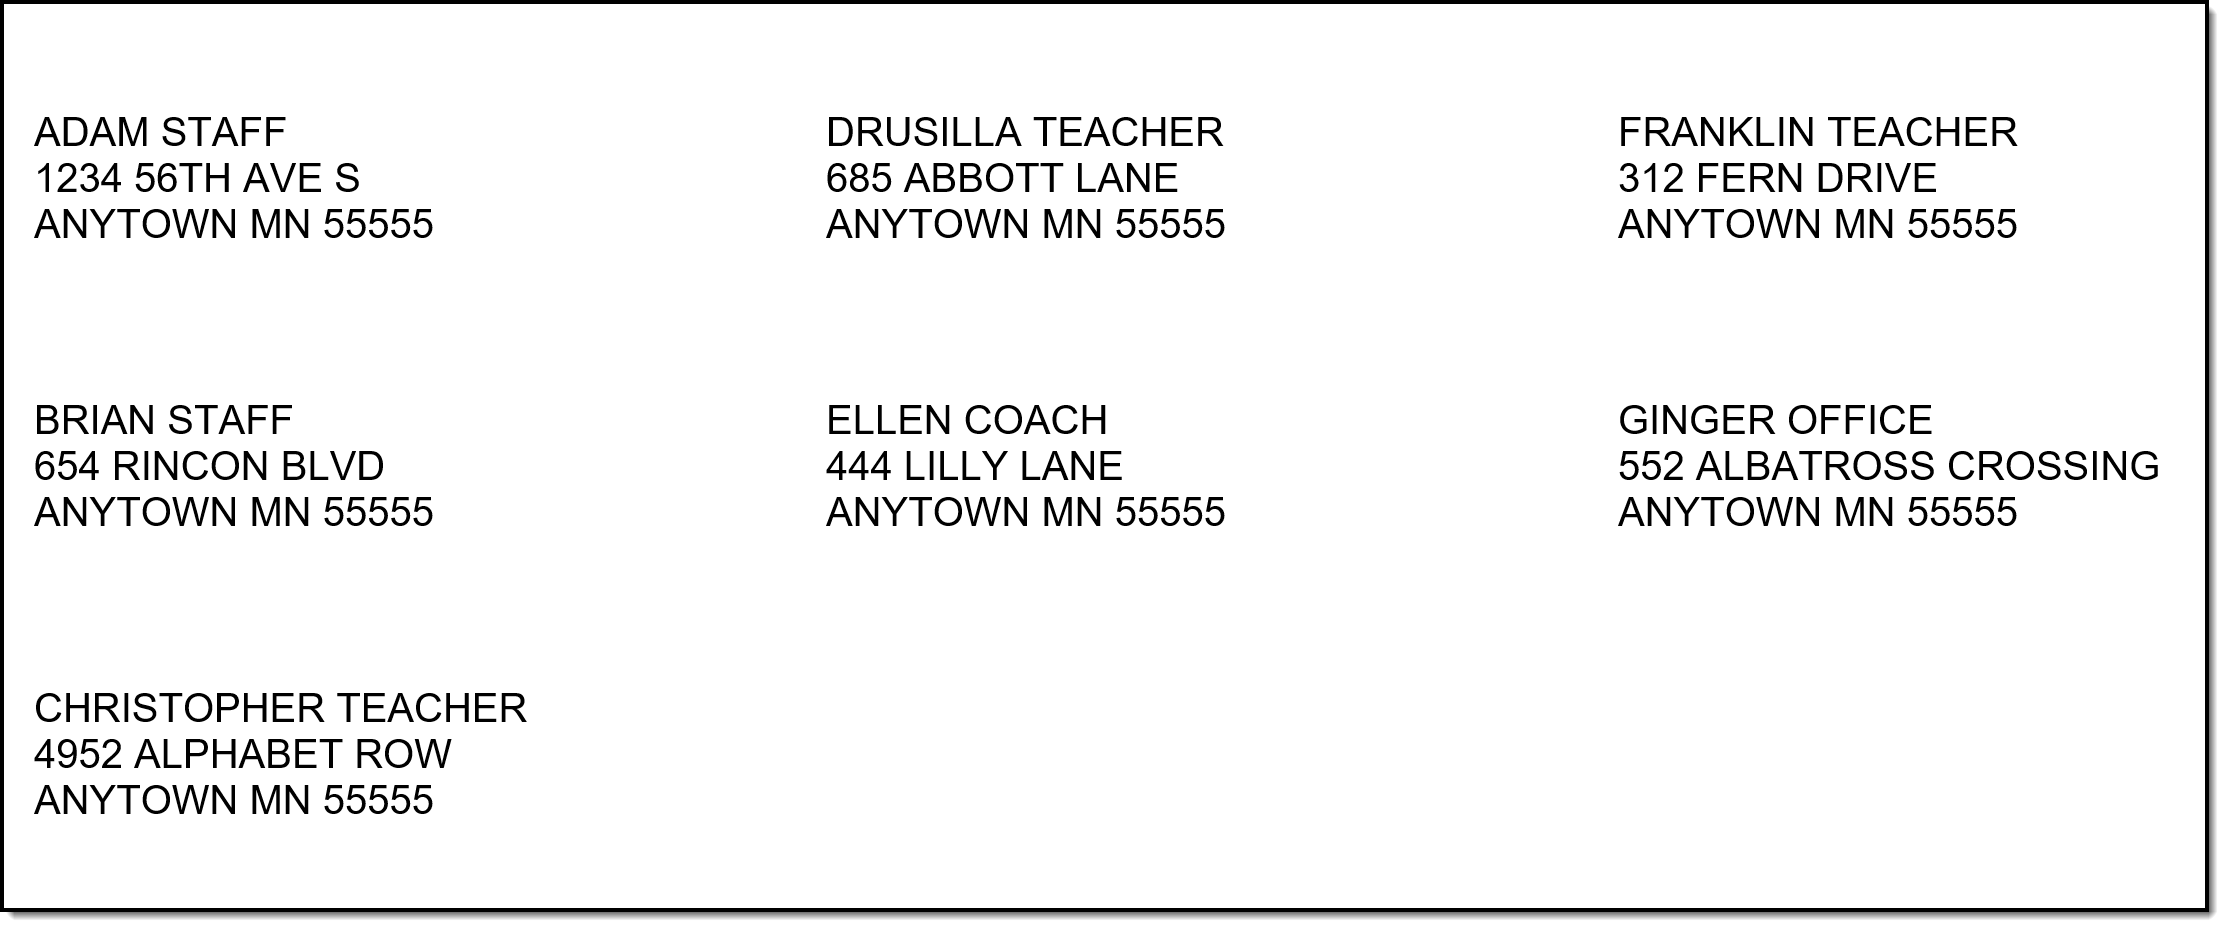
Staff mailing labels print for those staff who have an active District Assignment record in the selected calendar, or an active Work Assignment in the selected calendar.
👁 Screenshot of the staff radio button.
Staff Mailing Labels
The staff person must be a member of a household that has an address marked as mailing.
Labels print for staff who have an active District Assignment record or Work Assignment record (for Campus HR) in the selected calendar. Logic does not look at any specific district assignment checkbox or any specific role assignment.
| 👁 Screenshot of the District Assignments tool with an empty end date field. Active Employment Record | 👁 Screenshot of the Active Work Assignment. Active Work Assignment |
| Field | Description |
|---|---|
| Set Up | |
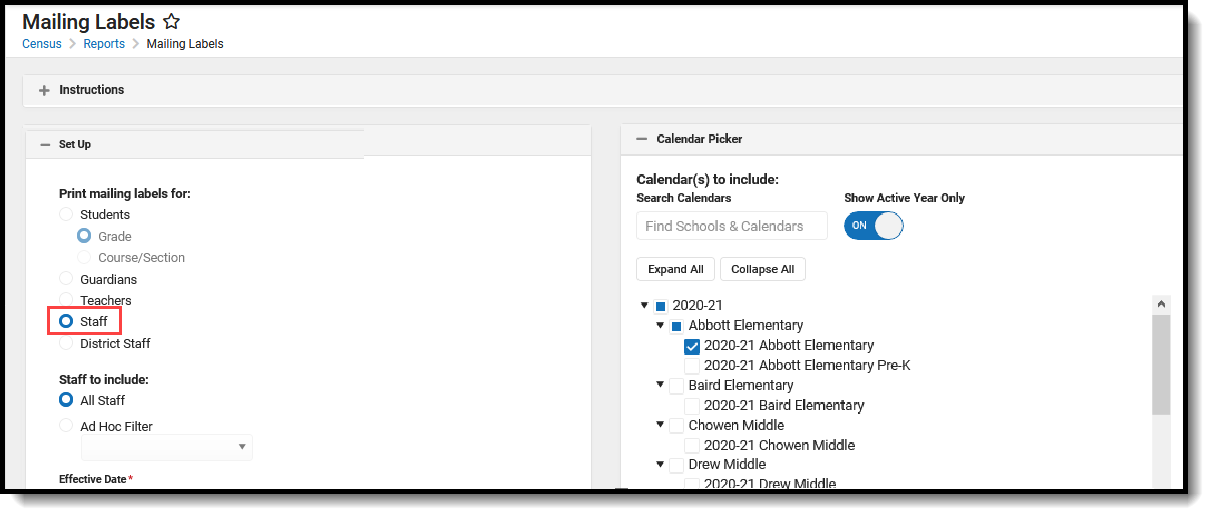
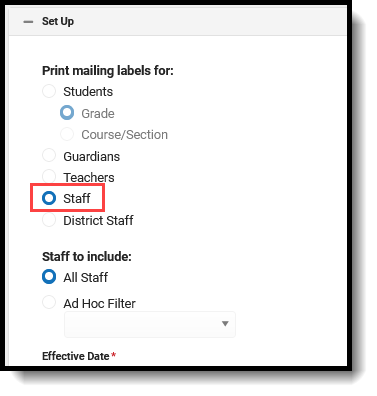
| Print Mailing Labels For | This selection determines which type of mailing label generated. Select the Teachers radio button. 👁 Screenshot of the staff radio button. |
| Staffto Include | All Staff prints a label for every staff person in the selected calendar, as long as the district assignment/work assignment, contact information and household address are entered properly (see logic mentioned above). Or, select an Ad hoc Filter. Generating the report this way applies the ad hoc filter to all selected calendars when the School dropdown list in the Campus toolbar is set to All Schools. If All Schools is not selected, the Ad hoc Filter only applies to the selected school in the Campus toolbar. Only Census/Staff Type filters are available for selection when generating the Staff Labels. |
| Effective Date | The Effective Date is entered in mmddyy format and causes the report to pull staff who have an active district assignment record on the entered date. This field defaults to the current date. |
| Calendar Picker At least one calendar needs to be selected in order to generate the report. | |
| Search Calendars | Search for a calendar by typing in the name of that calendar. Matching results are filtered as the name is entered in the field. Only those calendars to which the calendar has rights are available for selection. |
| Show Active Year Only | When set to ON, only those calendars for the active school year. When set to OFF, all calendars from all school years are available for selection. |
| Expand All/Collapse All | Use the Expand All/Collapse All to open and close the list of available calendars. |
| It is recommended that not all calendars be selected at one time, as this increases the report generation time and could potentially cause server response issues. 👁 Screenshot of the calendar selection options. | |
| FormatOptions | |
| Include | The following print options are available for Staff Mailing Labels:
Labels print vertically in the selected sort order, not horizontally. |
| Sort Order | The Mailing Labels Report can be sorted by either the staff person's name, the City and Name or the Zip code. The City and Name sort option first sort by the state associated with the address. Sorting by Zip code can be used for bulk mail rates. |
| Report Format | The report can be generated in PDF or DOCX format. |
See the Save Options and Apply Options for information on saving these selections as a template.
👁 Screenshot of the Staff Mailing Labels Print view.
Staff Mailing Labels Print
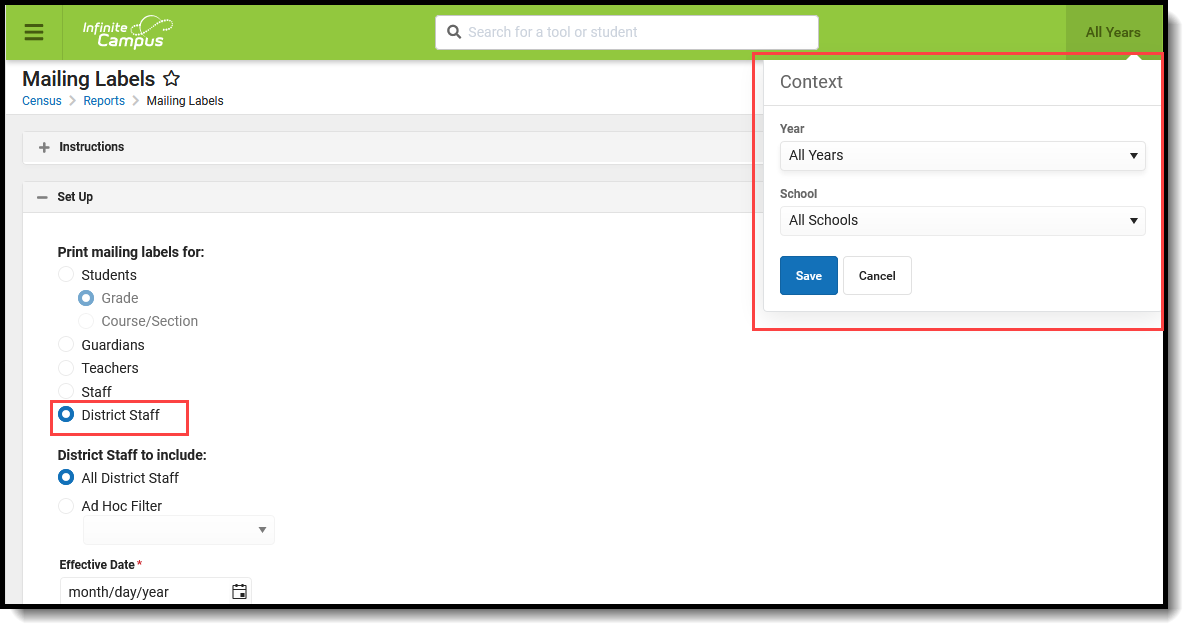
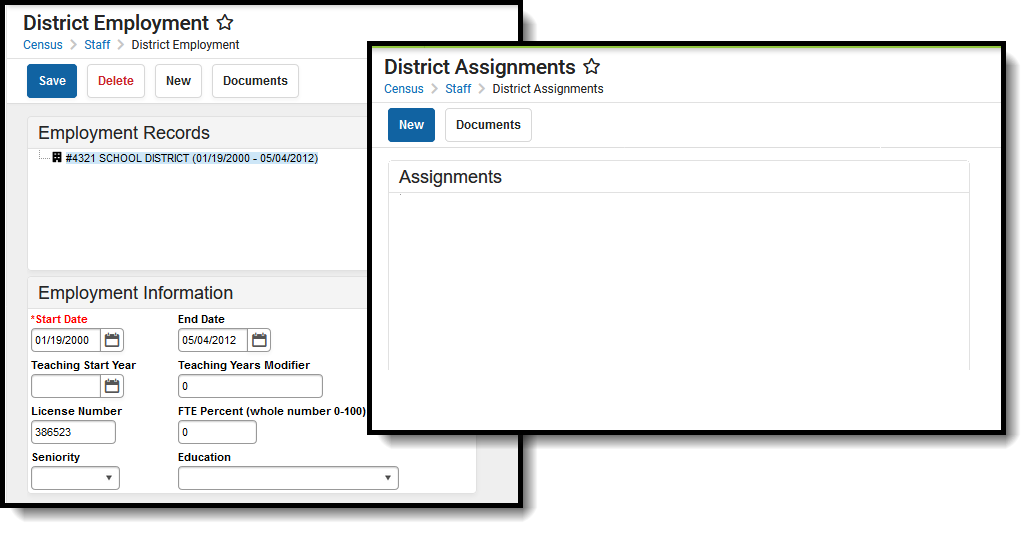
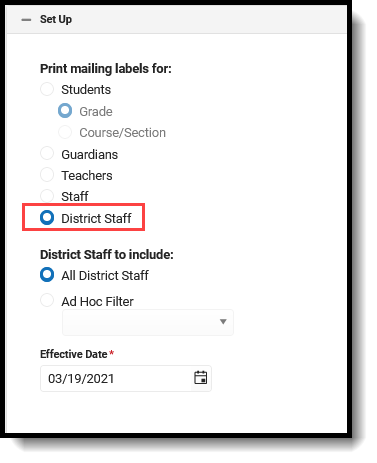
The District Staff labels option is available when the School and Calendar in the Campus toolbar is set to All Schools and looks for those individuals who only have a District Employment record (no District Assignment record). This option is for district office staff, like a Central Registrar or the Superintendent.
👁 Screenshot of the district staff mailing labels radio button.
District Staff Mailing Labels
District Staff must be in a household that has the Mailing checkbox marked on the Address. The district staff person must have an active District Employment record and no District Assignment record.
The person generating the labels must have calendar rights to All Years/All Schools/All Calendars.
👁 Screenshot of a district employment record but no district assignment.
District Employment Record, No District Assignment
| Field | Description |
|---|---|
| Set Up | |
| Print Mailing Labels For | This selection determines which type of mailing label generated. Select the District Staff radio button. 👁 Screenshot of the district staff mailing labels radio button. |
| District Staffto Include | All District Staff prints a label for every district staff person in the selected calendar, as long as the district employment, contact information and household address are entered properly (see logic mentioned above). Or, select an Ad hoc Filter. Generating the report this way applies the ad hoc filter to all selected calendars when the School dropdown list in the Campus toolbar is set to All Schools. If All Schools is not selected, the Ad hoc Filter only applies to the selected school in the Campus toolbar. Only Census/Staff Type filters are available for selection when generating the District Staff Labels. |
| Effective Date | The Effective Date is entered in mmddyy format and causes the report to pull employment records that are active on the entered date. This field defaults to the current date. |
| FormatOptions | |
| Include | The following print options are available for District Staff Mailing Labels:
Labels print vertically in the selected sort order, not horizontally. |
| Sort Order | The Mailing Labels Report can be sorted by either the district staff person's name, the City and Name or the Zip code. The City and Name sort option first sort by the state associated with the address. Sorting by Zip code can be used for bulk mail rates. |
| Report Format | The report can be generated in PDF or DOCX format. |
See the Save Options and Apply Options for information on saving these selections as a template.
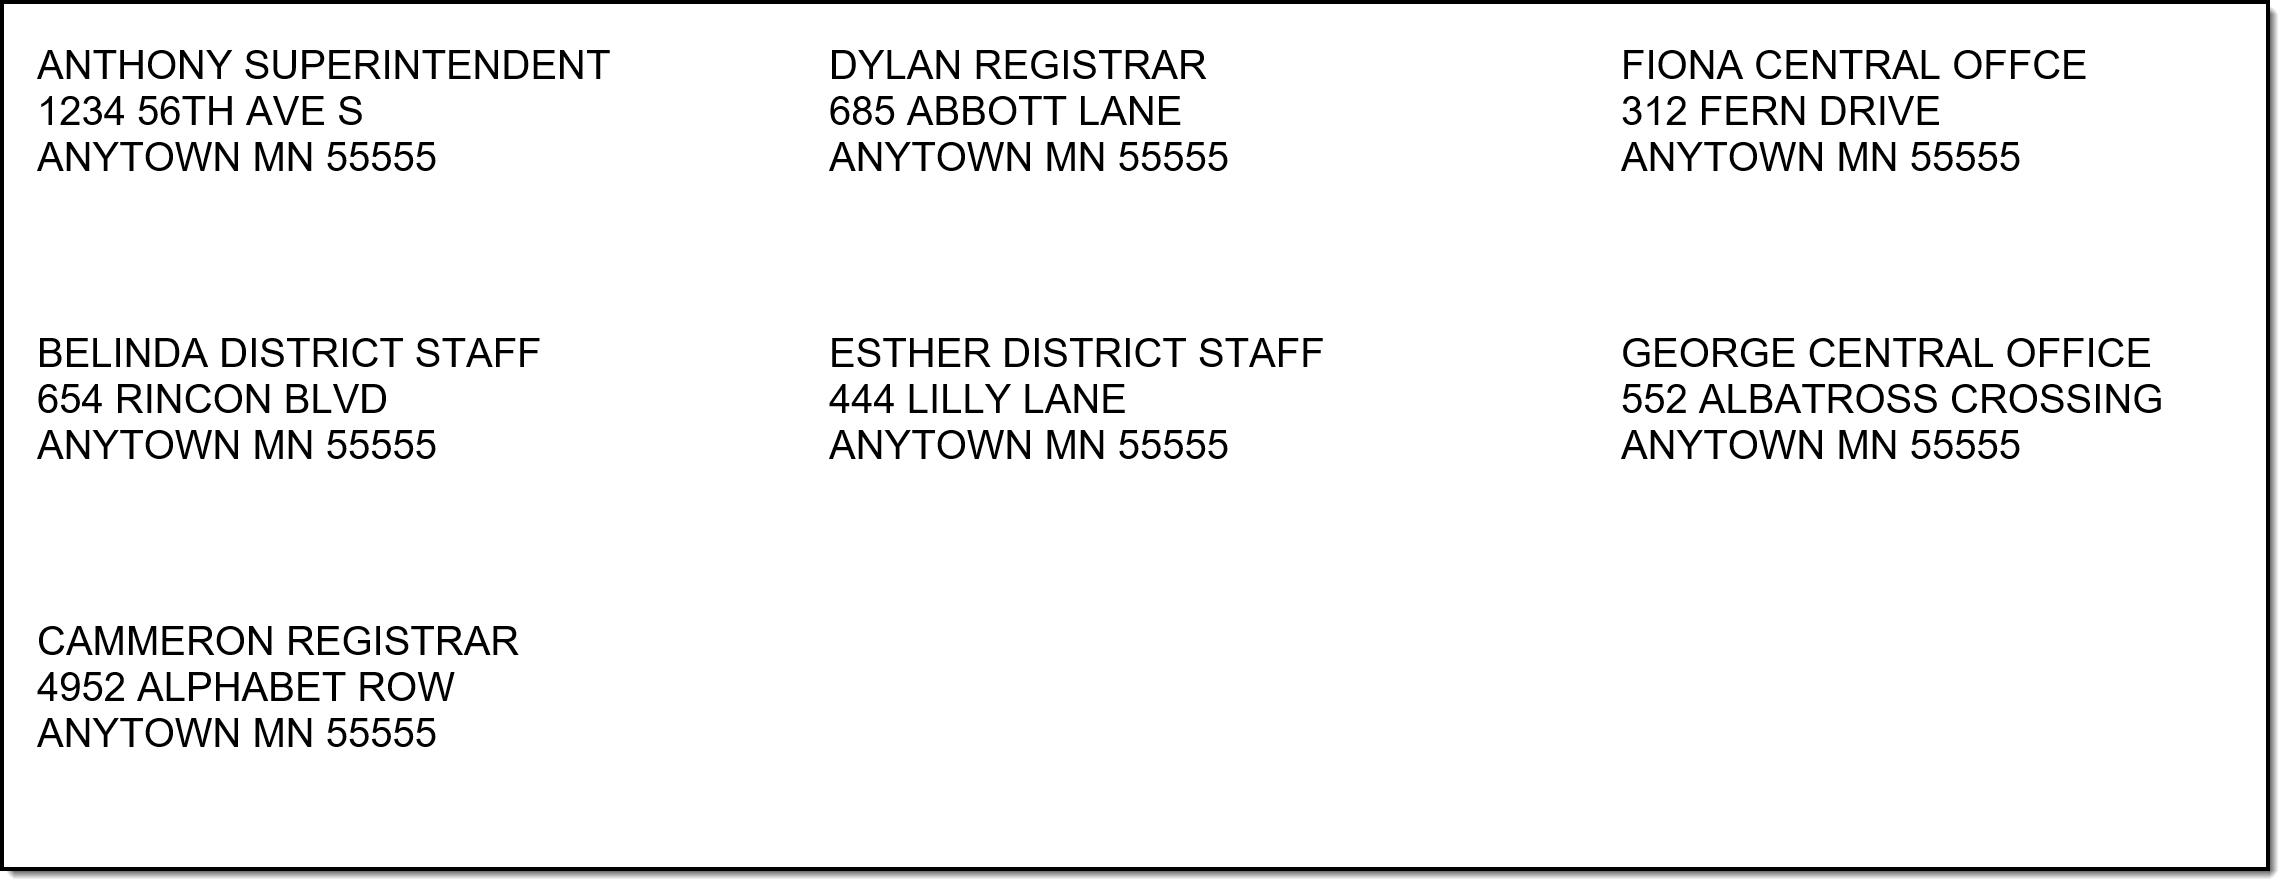
👁 Screenshot of the district staff mailing labels print view.
District Staff Mailing Labels Print
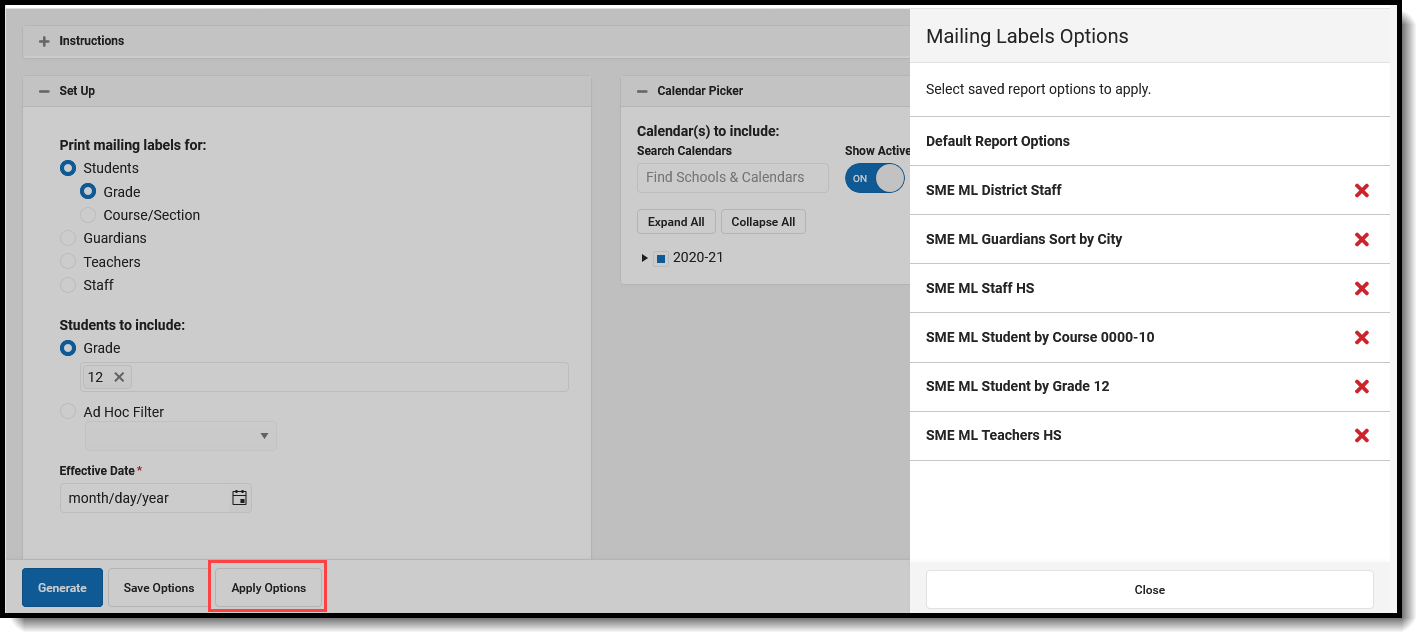
Options selected for Mailing Label reports can be saved as a template. This is similar to creating Report Preferences used for Report Cards or Transcripts, where selections are saved and can be generated at a later time.
For users who need a particular set of mailing labels, Student by Course/Section for an AP Course, or Guardians using a particular Ad hoc Filter, for example, saving the options as a template saves time when needing to generate the same list of labels again.
There is no limit to the number of templates that can be created, and each one can be saved with a descriptive name.
These reports cannot be shared with other users who also generate the Mailing Labels Report; these templates are only for the user who created them.
👁 Screenshot of the save options for report generation at a later time.
Save Options for Report Generation at a Later Time
Once a name has been entered for a template, it is available in the Apply Options side panel. Here, users can select one of their previously saved templates and generate the report. Or, select the Default Report Options, which displays the original report options without any special settings.
👁 Screenshot of the apply options.
Apply Options
Templates can be deleted by clicking the red X. Click the Close button on the side panel to return to the report options.
All fields that were selected in the report editor are saved on the template, except for the Effective Date.
If specific calendars have been selected for a report prior to choosing a saved template, the calendar selection is cleared and displays the calendars that were selected on the saved template.
When selecting a saved template for generation, the Effective Date must be entered (the current date is automatically populated) and desired Calendars need to be selected.
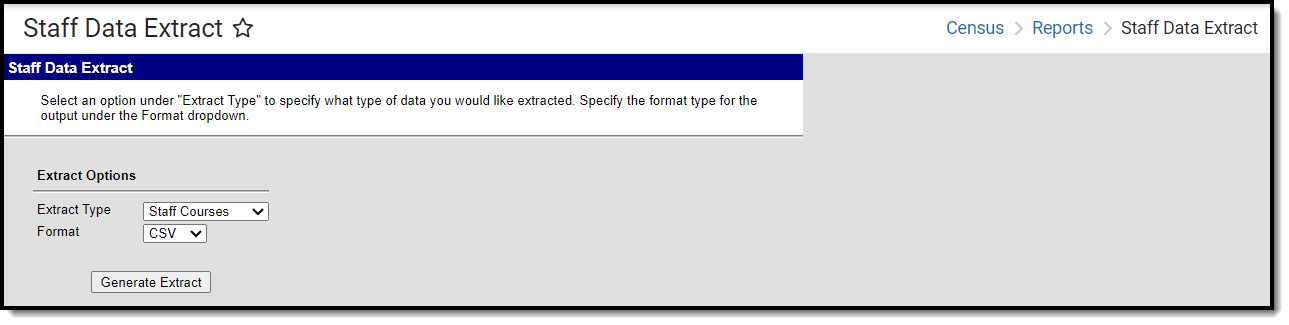
The Staff Data Extract provides users with a way to export existing staff information into CSV, XML or HTML format.
Tool Search: Staff Data Extract
The Staff Data Extract extract provides users with a way to export existing staff information into CSV, XML or HTML format.
This functionality may not be available to all users. Localized information is available for the following states:
👁 screenshot of the staff data extract
See the Census Reports Tool Rights article for information about rights needed to use this tool.
The available Extract Types vary for each state. Following is a list of Extract Types and which State Editions/District Editions apply to the selected types.
Extract Types | State |
|---|---|
Staff Courses | Kentucky (State Edition Only) |
Staff Credentials | Kentucky (State Edition Only) |
The following information provides instructions on importing a file and selecting the appropriate Work to Perform option.
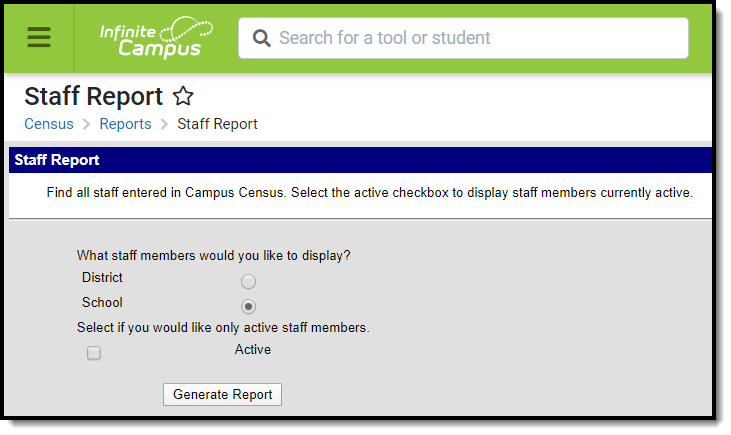
The Staff Report provides a list of all staff members (based on employment records) entered in Campus.
Tool Search: Staff Report
This Staff Report provides a list of all staff members (based on employment records) entered in Campus. This report looks at district employment and district assignment records in the Census module.
👁 Screenshot of the Staff Report tool, located at Census, Reports.
Staff Report Editor
See the Census Reports Tool Rights article for information about rights needed to use this tool.
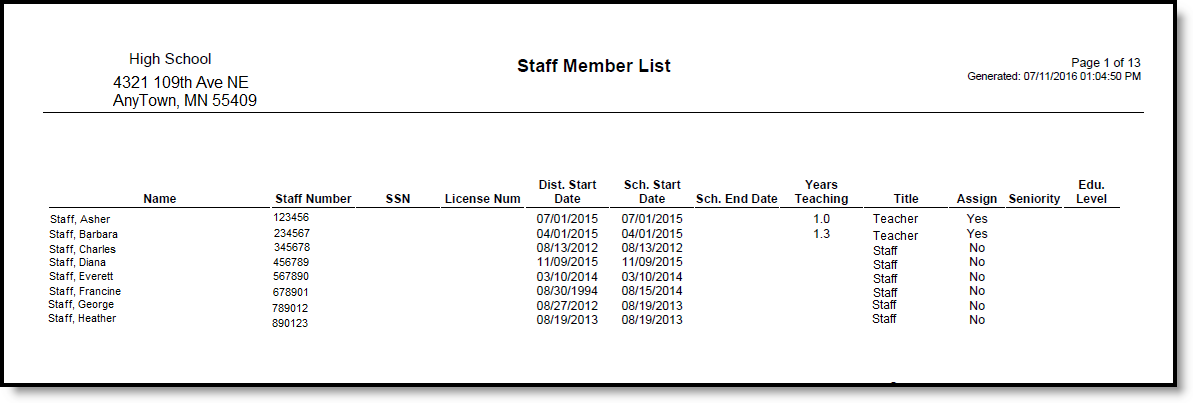
👁 Screenshot of the Staff Report in PDF Format
Staff Report Print - PDF
| Data Element | Description | Campus Interface Location |
|---|---|---|
| Name | Reports the Last Name, First Name, Middle Initial of the staff person in alphabetical order. | Census > People > Identities > Identity Information |
| Staff Number | Reports the locally assigned number of the staff person. | Census > People > Demographics > Person Identifiers > Local Staff Number |
| Social Security Number | Reports the Social Security number of the staff person. | Census > People > Identities > Identity Information > Soc Sec Num |
| License Number | Reports the license number of the staff person. | Census > People > District Employment > License Number |
| District Start Date | Reports the date the staff person first began employment at the district. | Census > People > District Employment > Start Date |
| School Start Date | Reports the date the staff person first began the assignment at a particular school. | Census > People > District Assignment > Start Date |
| School End Date | Reports the date the staff person ended the assignment at a particular school. | Census > People > District Assignment > End Date |
| Years Teaching | Reports the number of years the staff person has been teaching. This is a calculated value based on the staff person's school start date and the date on which the report was generated. | N/A |
| Title | Reports the assigned title of the staff person. | Census > People > District Assignment > Title |
| Assign | Reports a value of Yes or No, based on whether the staff person is marked as Teacher (Yes) or not (No). A value of Yes reports when the Teacher checkbox is marked on the District Assignment. A value of No reports when the Teacher checkbox is not marked. | Census > People > District Assignment > Teacher |
| Seniority | Reports the staff person's seniority level. | Census > District Employment > Seniority |
| Education Level | Reports the staff person's level of education. | Census > District Employment > Education |