 |
VOOZH | about |
|
VOOZH | about |
The Grading & Standards tools allow districts to configure the system for traditional grading as well as standards-based grading.
The Report Setup tool is used to create and save templates for report cards and transcripts. Reports can be generated using these templates through different tools in Campus.
Score groups are objective marks for traditional grading (e.g. 90% and above = A, 60% and below = F) that define the acceptable grades for a grading task. The key functions of score groups include filtering out invalid scores for posting and calculating GPA Values and Credits Earned for scores posted to a transcript.
Once created, score groups are aligned to grading tasks from the Grading Tasks tool.
Tool Search: Score Group
Score Groups and Rubrics are two different ways to determine the scores that make up the basis of grading. While very similar, Score Groups hold objective marks for traditional grading (98% = A, 60% or less = F for example) while Rubrics hold subjective marks for standards grading (Pass, Fail, etc.).
Score Groups and Rubrics are used by teachers to grade student work. Rubrics are aligned to standards in the Standards Bank. Score groups are linked to Grading Tasks. Score Groups and Rubrics cannot be removed if they are aligned to tasks or standards. Scores from Score Groups and Rubrics are not typically used in assignments, only in Grading Tasks and Standards, respectively.
Score Groups and Rubrics
The Score Groups and Rubrics editor can be sorted alphabetically by clicking Name or Type.
See the Grading Setup Tool Rights article to learn about rights needed to use this tool.
This table describes the fields associated with Score Groups and Rubrics. See the article for creating Score Groups and Rubrics for more information about how these fields should be used.
|
Field |
Description |
|---|---|
| Sequence |
The sequence determines the order in which the items will appear. This is the order that the scores appear in Post Grades and the Grade Book. If sequences are not entered, scores will appear in alphabetical order. Sequences must be entered for Rubric scores for Proficiency Estimates to work correctly in the Grade Book. |
|
Name |
The descriptive name of the item. |
|
Score |
This is the score that teachers will assign to assignments and term grades and which will be seen by students in the Portal. This is the value that appears in report cards and transcripts. This value must be unique. |
| State Score |
The State Score value that is mapped to score groups. This value is available for selection on the Transcript.
This field is only used in Minnesota, New Hampshire, North Dakota, and Tennessee. |
| Ed-Fi Grade Type |
Reports the completion status of a course in the Ed-Fi Grades resource. Users should only add the 'Final' Ed-Fi Grade Type value onto grading tasks that are truly the Final grade in a particular course.
This field is only used in Wisconsin districts. |
| Passing Score | This checkbox indicates that the list item is considered to be a passing score. This field determines the color-coded system used in the Grade Book to indicate which students are passing.
For Standards and Rubrics, the individual scores will be color-coded as passing or not. For Grading Tasks and Score Groups, the color-coding logic is applied to the In Progress grade. At least one score must be marked as passing in order to save the group or rubric. |
|
Credit Coefficient |
This value is used as a multiplier to determine if this score changes the number of credits earned for the course. |
|
Minimum Value |
The minimum percent needed to earn this score. This field is only used in conjunction with the Auto Grade Wizard.
To calculate a grade when a method of Mean or Decaying Average is selected, rubric scores are converted into numeric values using the Mean Value field on the rubric. Those values are then averaged and converted back into a rubric score using the Minimum and Mean values. |
| Rollup Value |
The numerical value assigned to each rubric score, which is used in generating a rollup calculation. This value only applies to calculation types of Mean and Weighted Mean.
For example, when calculating the rollup score using the calculation Type of Mean, the mean of the child standards is calculated using this numerical value and that number is then converted back into a rubric score based on the Minimum Value.
The Rollup Value for each score cannot be lower than that score's Minimum Value. |
| Mean Value | The numerical value assigned to each rubric score, which is used in calculating the Mean of scores received. To calculate a grade when a method of Mean or Decaying Average is selected, rubric scores are converted into numeric values using the Mean Value field on the rubric. Those values are then averaged and converted back into a rubric score using the Minimum and Mean values. |
|
GPA Value |
GPA values are usually used only for Score Groups. The weight of the score when calculating GPA. For example, in a Score Group, an A is commonly considered to calculate as a 4, a B as a 3, etc.
When a score should not affect the student's GPA, this field should be left blank. |
|
GPA Unweighted Value |
GPA values are usually used only for Score Groups. The unweighted GPA value of the score for calculating GPA.
When a score should not affect the student's GPA, this field should be left blank. |
|
GPA Bonus Points |
Indicates any bonus points for GPA calculation assigned to the score. |
| Bypass Composite Rule |
This checkbox refers to the System Preference to Require all scores for Composite Grading and only displays if it is set to Yes.
If this checkbox is marked for a score and that score is posted for a task that is part of a composite setup, that task is not included in the calculation of the composite grade.The composite grade is calculated based on the proportionate weights of the remaining posted grades, based on the same logic that calculates a composite grade if this system preference is not set and grades are not posted for all children tasks.
Example scenario: A course has a Final task that is a composite of two Semester tasks and a Final Exam task. However, if students gets an A in both semester tasks, they don't have to take the final exam. In the score group aligned to the tasks, the district includes an grade in the Score Group called Exempt that has this Bypass checkbox marked. Students who don't need to take the final exam receive this Exempt score as the posted grade for the Final Exam task. The composite task is calculated from the remaining posted grades. |
For Score Groups, it is recommended that users populate both GPA Value and Unweighted GPA Value, even if the values are the same. These values calculate independently of each other in students' Transcript Tab.
Score Groups and Rubrics can be displayed in Report Cards if the option is selected in Report Card Preferences.
Power law is a mathematical calculation that determines a student's proficiency on a standard based on the trend shown by the scores that student has earned. Power law trend values provide a guide for teachers in determining a student's overall proficiency in a standard. When given a series of proficiency estimates, teachers no longer have to guess at what those estimates mean together.
Campus calculates power law by converting rubric scores into numeric values and applying a standard power law formula to determine the trend of the student's proficiency. This calculation considers both the student's performance and rate of improvement, and the expected rate of improvement for the material. More recent scores are given a higher weight than older scores.
To set up a rubric to calculate power law, mark the checkbox next to the rubric Name to Show Power Law Fields. Three additional fields display for the rubric. These three fields implement established district grading policy, which should be discussed and finalized prior to use.
Please note, all rubric setup should be done based on district policy.
Similar to the formula for calculating slope (y = mx + b), the Power Law formula is also seeking to find a trend.
m and b are calculated using this formula, where ∑ indicates "sum of" and N indicates the number of assignments for a given standard.
The following steps describe the process of using power law to calculate In Progress grades:
Power Law in Instruction
Fields may vary by state:
Save
The Score Groups and Rubrics tool allows users to create score groups and rubrics, which are used to score grading tasks and standards. This video demonstrates how to create score groups.
Grading scales are used by the Campus Grade Book to convert numeric percentages to In Progress grades. The values entered here must match items defined in the Score Group in order to post grades.
Tool Search: Grading Scale Setup
Grading scales are used by the Campus grade book to convert numeric percentages to In Progress grades. Values entered in the Score column must match items defined in the Score Group in order to post grades. The grading scale should include all scores that can be auto-calculated by the Campus Grade Book.
Grading Scales are not dependent on the Year or School selected in the Campus toolbar.
👁 Screenshot of the grading scales setup tool, with a grading scale selected and items displayed.
Grading Scales express percentages as letter grades.
For example, a school that has grades of A through F with pluses and minuses would create one item for each grade on the grading scale. Report card grades such as I for incomplete or NC for no credit should not be automatically calculated by Grade book and should be left off of the grading scale. A tool exists in the instruction modules for teachers to create their own personal Grading Scales if district policy allows them to do so.
See the Grading Setup Tool Rights article to learn about rights needed to use this tool.
Grading Scales are created at the district level in System Administration or at the teacher level in the Grade Book. Grading Scales and Assignment Marks are used to score assignments and then converted using Score Groups and Rubrics into values reported on student transcripts.
Grading scales are selected for use in the Grade Book using the Grade Calculation Options.
The Grading Scales Setup tool allows administrators to create grading scales which can then be used to grade assignments in Campus Grade Book. This video demonstrates how to create grading scales.
Credit Groups define how credits earned by students are counted on transcripts and are used in tracking a student's progress toward graduation.
Tool Search: Credit Group Setup
Credit Groups define the type of credits earned by students. These credits are counted on transcripts and are used to track a student's progress toward graduation. A Credit Summary that shows the number of credits attempted and earned for each credit type defined in the credit group displays at the bottom of printed student Transcripts. The Credit Summary tool also displays the number of credits a student has earned for each credit type in a credit group.
See the Reference section for more information about Credit Groups and how they are used in Campus.
If you are using the Academic Planning functionality, see the Best Practices section.
👁 Screenshot of the Credit Group Setup tool.
Credit Group Setup
See the Grading Setup Tool Rights article to learn about rights needed to use this tool.
See the Credit Group Fields section for details about what each field in the editor represents.
State Edition customers may choose to create Credit Groups at the State level and publish them to districts.
Publishing edited credit types may impact existing Graduation and Academic Programs. For example, if a Credit Group is republished with a Credit Type removed that had been used in a program's criteria, that criteria will no longer be valid.
State Edition customers creating Credit Groups at the District level must align their credit types correctly to those in State level credit groups in order for state managed Academic and Graduation Programs to function properly.
👁 Diagram of the workflow how Credit Groups are created, used, and viewed in Campus.
Credit Groups and Credit Types in Campus
Credit Groups are buckets of credit types. They help organize the credit types. A Group might be high enough to be at the school level—High School, Middle School, etc. This setup would create a credit type for each area where students receive credit—History/Social Studies, English, Science, Mathematics, etc.
A Credit Group must be created before Credit Types can be added to it.
| Field | Description |
|---|---|
| Name | Displays the name of the credit group/type. |
| State Credit Type(State Edition only) | This droplist contains state credit types that have been published for districts to align to their own credit types. Districts must do this in order for Academic and Graduation Programs managed by the state to function properly when assigning credit types. |
| PESC Name | PESC Standards are used in the eTranscript process to validate transcript records. See the eTranscript article for more information.
If your district uses the eTranscript functionality, a value from this dropdown must be populated. |
| Subject Area | The general area of instruction addressed in the course. |
| Parent Group | The selection indicates the credit group associated with this new credit type.
Leave the Parent Group field blank when creating a group. This field is only populated when creating a type. |
| Credit Overflow Rollup | This section indicates where the student receives credit when the student has met the credit requirement of the designated credit type and where the additional credit should now be placed. For example, a student takes 4 years of Math, and only 3 years are required. The additional credit earned will overflow to Electives. Infinite Campus supports n-tiers of credit roll-ups, so Math can roll up to Academic Electives, which roll up to General Electives.
This should only be populated on Credit Types.
Logic exists to eliminate the possibility of users creating an infinite loop of credit overflow assignments. For example, History Course A overflows to Government and Government Course B overflows to History, a loop is created. To eliminate this, a validation exists when saving the entry to check for any potential loops that may occur. Users must change the selections that are causing the loops before saving.
See the Credit Overflow Rollup section for more information on how it relates to academic planning. |
| Comments | Enter any comments related to this new group or credit. |
If you are using Academic Planning functionality:
This is necessary if you are using Academic Planning.
The Credit Overflow Rollup field will redirect excess credits from the current credit type. Once the current credit type has met its credit requirements, any additional credits will be placed in the credit type designated by the Credit Overflow Rollup field value.
The Credit Overflow Override field is set for a single course Grading Task. It is used to roll credits when the current credit type has met its credit requirements. The credits from the course will first try to roll up to the override credit type. If that credit type has met its requirements, it will look at the overflow setup for the course's credit type.
Taking four years of math meets the state's credit requirement of three years. The extra credit is used to meet the elective credit requirement using the Credit Overflow Rollup field.
Campus supports n-tiers of credit rollups, so Math can roll up to Academic Electives, which roll up to General Electives. Campus also supports n-trees of credit rollups, so it is possible for Math to roll up to Academic Electives and then Physical Education to roll up to General Electives for two separate end buckets.
A particular course may be able to count towards more than one credit type. For example, a CTE course may fulfill a science or math credit. This course would be set up with its default credit type of Math and an override rollup credit type of Science.
If the student has completed their math requirement, this course would be counted as a science credit (only if a science credit was still needed). If both credit requirements were met, the default rollup would occur, likely going from math to elective credit.
👁 Screenshot of Course Grading Task Detail editor with a callout around the Credit Type and Credit Overflow Override fields.
Course Grading Task Detail - Credit Overflow
Some states may require Credit Groups to be entered a certain way. Always follow those procedures.
The School Standards Setup tool is used to determine which Credit Groups and Standards are used in grading for the selected school.
Tool Search: School Standard
The School Standard Setup tool determines which Credit Groups and Standards Banks are used for grading at the school selected in the Campus toolbar.
After selecting Credit Groups and Standards on the School Standards tool, they can be added to Courses and Course Masters. This tool simplifies using standards and credit groups at the school level so that individual schools do not have to review all the items in the district when aligning them to courses and masters.
👁 Screenshot of the School Standards Setup tool.
School Standards Tool
The Credit Groups and Standards also display when adding Transcript Credits to a student's Transcript.
See the Standards Setup Tool Rights article for information on tool rights for this and other Standards Setup tools.
Grading tasks are the items that teachers will use to post grades to report cards, transcripts, midterms and/or eligibility reports. Examples of grading tasks include mid-term grades, quarter grades, semester grades, etc.
Tool Search: Course Grading Tasks
The Grading Tasks tool lists the items the teachers grade as part of the grading process. These tasks include mid-term grades, quarter grades, semester grades, etc. These grading tasks are created in the Grading Tasks tool in the Grading and Standards area.
If you are using the Multiple Year Academic Planning functionality, see the Best Practices for more information.
See the Course Grading Tasks Tool Rights article for information about rights needed to use this tool.
Grading Tasks can also be managed at the Course Master level. Icons in the Grading Task List provide more information about each task:
| Icon | Text | Description |
| 👁 Screenshot of the lock icon. |
Locked to Course Master | Indicates that the task corresponds to a task at the Course Master level. These tasks are not editable in this tool. |
| 👁 Screenshot of the unlocked icon. |
Linked Course Catalog Unlocked | Indicates that tasks are unlocked for the whole Course Catalog. These tasks are editable in this tool. |
| 👁 Screenshot of the broken link icon. |
Course Master Unlinked | Indicates that the tasks is associated with a tasks at the Course Master level, but that the link with that task is broken.
To relink tasks:
|
| 👁 Screenshot of the course managed icon. |
Course Managed | Indicates that the task is managed at the Course level and does not have a corresponding record at the Course Master level. |
Visit the Course Status tool to view a list of all courses associated with a given course master, see the status of grading setup for each course, and relink courses as needed.
When using Academic Planning functionality:
For districts that have more than one high school and multi-year academic planning is used, it is recommended that Course Masters be created. This reduces the amount of individual course maintenance that needs to be performed.
Course Grading Task fields are available in the Query Wizard when using the Course/Section Data type in the Course > Course Information > Grading Task Credit folder.
👁 Screenshot highlighting the Grading Task fields in an Ad hoc query.
Grading Task Ad hoc Fields
Before assigning grading tasks to courses, verify the following:
The Grading Task Editor provides a summary of the grading task, including its name, assigned credit group and credit type (if listed), the score group, the credit value and the term GPA. It also indicates if that grading task is locked. The locked icon displays when the course is linked to a Course Master, and grading tasks are assigned at the Course Master level. Changes can only be made through the Course Master. Fields are marked as locked on the Course Catalog.
👁 Screenshot comparing locked and unlocked tasks indicated by the lock icon.
Grading Task Lock Display from Course Master
The Grading Task editor provides a list of grading tasks and a detail editor showing specific elements of the selected grading task. The following provides a description of the fields on the Course Grading Task editor.
|
Field |
Description |
Ad hoc Fields |
|---|---|---|
|
Score Group |
Determines the points and/or letter grades that is used when scoring the grading task. |
GradingTaskCredit.ScoreGroupName |
|
Term GPA |
Indicates the weight used when calculating the grade of the student. |
GradingTaskCredit.TermGPA |
|
Credit |
Indicates the amount of credit the student receives upon completion of the course or when the course is posted on a transcript. This value depends on the set up of courses - whole year courses or semester long courses. This is usually only populated on those tasks that are posted to transcripts. |
GradingTaskCredit.Credit |
|
Credit Type |
Indicates the group of credit the student receives when credit is given. This is used in Academic Planning when tracking the progress of the student towards graduation.
|
GradingTaskCredit.CreditType |
|
Credit Overflow Override |
This field is set for a single course Grading Task and is used to roll credits when the current credit type has met its credit requirements.
The credits from the course first try to roll up to the override credit type. If that credit type has met its requirements, it then looks at the overflow setup for the course's credit type.
A particular course may be able to count towards more than one credit type. For example a particular CTE course may fulfill a science credit or a math credit. This course would be set up with its default credit type of Math and an override rollup credit type of Science. If the student has completed their math requirement, this course would then be counted as a science credit (only if a science credit was still needed). If both credit requirements were met, then the default rollup would occur, likely going from math to elective credit. |
GradingTaskCredit.CreditOverflowName |
|
Term Mask |
Selection indicates when the task must be graded.
|
N/A |
| Post-only Grading Task |
Indicates a grading task cannot be aligned to assignments and categories in the teacher's Grade Book. Post-only Grading Tasks are for posting grades only, not for aligning student work. |
GradingTaskCredit.PostOnly
Reports a value of 1 if the checkbox is marked; reports a value of 0 if the checkbox is not mark. |
| Exclude from Ed-Fi
(WI only) |
Indicates the Grading task is not reported to Ed-Fi. |
|
Use the Copy icon to easily add the Grading Tasks associated with one course to another course (called the Source Course) to one or more other courses (called Destination Courses). The Copy icon displays when proper tool rights are assigned.
When copying a grading task from one course to another:
👁 Screenshot highlighting the copy button at the top of the screen and the copy modal that displays.
Copy Grading Tasks
If there are no grading tasks to copy, an alert displays indicating all selected grading tasks already exist in the destination course master.
Grading tasks are the items that appear on student report cards and transcripts. This video demonstrates how to use the Grading Tasks Setup tool to define the types of grades that will be posted.
Grading tasks are added to individual courses from the Course Grading Tasks tool.
Tool Search: Course Grading Tasks
The Grading Tasks tool lists the items the teachers grade as part of the grading process. These tasks include mid-term grades, quarter grades, semester grades, etc. These grading tasks are created in the Grading Tasks tool in the Grading and Standards area.
If you are using the Multiple Year Academic Planning functionality, see the Best Practices for more information.
See the Course Grading Tasks Tool Rights article for information about rights needed to use this tool.
Grading Tasks can also be managed at the Course Master level. Icons in the Grading Task List provide more information about each task:
| Icon | Text | Description |
| 👁 Screenshot of the lock icon. |
Locked to Course Master | Indicates that the task corresponds to a task at the Course Master level. These tasks are not editable in this tool. |
| 👁 Screenshot of the unlocked icon. |
Linked Course Catalog Unlocked | Indicates that tasks are unlocked for the whole Course Catalog. These tasks are editable in this tool. |
| 👁 Screenshot of the broken link icon. |
Course Master Unlinked | Indicates that the tasks is associated with a tasks at the Course Master level, but that the link with that task is broken.
To relink tasks:
|
| 👁 Screenshot of the course managed icon. |
Course Managed | Indicates that the task is managed at the Course level and does not have a corresponding record at the Course Master level. |
Visit the Course Status tool to view a list of all courses associated with a given course master, see the status of grading setup for each course, and relink courses as needed.
When using Academic Planning functionality:
For districts that have more than one high school and multi-year academic planning is used, it is recommended that Course Masters be created. This reduces the amount of individual course maintenance that needs to be performed.
Course Grading Task fields are available in the Query Wizard when using the Course/Section Data type in the Course > Course Information > Grading Task Credit folder.
👁 Screenshot highlighting the Grading Task fields in an Ad hoc query.
Grading Task Ad hoc Fields
Before assigning grading tasks to courses, verify the following:
The Grading Task Editor provides a summary of the grading task, including its name, assigned credit group and credit type (if listed), the score group, the credit value and the term GPA. It also indicates if that grading task is locked. The locked icon displays when the course is linked to a Course Master, and grading tasks are assigned at the Course Master level. Changes can only be made through the Course Master. Fields are marked as locked on the Course Catalog.
👁 Screenshot comparing locked and unlocked tasks indicated by the lock icon.
Grading Task Lock Display from Course Master
The Grading Task editor provides a list of grading tasks and a detail editor showing specific elements of the selected grading task. The following provides a description of the fields on the Course Grading Task editor.
|
Field |
Description |
Ad hoc Fields |
|---|---|---|
|
Score Group |
Determines the points and/or letter grades that is used when scoring the grading task. |
GradingTaskCredit.ScoreGroupName |
|
Term GPA |
Indicates the weight used when calculating the grade of the student. |
GradingTaskCredit.TermGPA |
|
Credit |
Indicates the amount of credit the student receives upon completion of the course or when the course is posted on a transcript. This value depends on the set up of courses - whole year courses or semester long courses. This is usually only populated on those tasks that are posted to transcripts. |
GradingTaskCredit.Credit |
|
Credit Type |
Indicates the group of credit the student receives when credit is given. This is used in Academic Planning when tracking the progress of the student towards graduation.
|
GradingTaskCredit.CreditType |
|
Credit Overflow Override |
This field is set for a single course Grading Task and is used to roll credits when the current credit type has met its credit requirements.
The credits from the course first try to roll up to the override credit type. If that credit type has met its requirements, it then looks at the overflow setup for the course's credit type.
A particular course may be able to count towards more than one credit type. For example a particular CTE course may fulfill a science credit or a math credit. This course would be set up with its default credit type of Math and an override rollup credit type of Science. If the student has completed their math requirement, this course would then be counted as a science credit (only if a science credit was still needed). If both credit requirements were met, then the default rollup would occur, likely going from math to elective credit. |
GradingTaskCredit.CreditOverflowName |
|
Term Mask |
Selection indicates when the task must be graded.
|
N/A |
| Post-only Grading Task |
Indicates a grading task cannot be aligned to assignments and categories in the teacher's Grade Book. Post-only Grading Tasks are for posting grades only, not for aligning student work. |
GradingTaskCredit.PostOnly
Reports a value of 1 if the checkbox is marked; reports a value of 0 if the checkbox is not mark. |
| Exclude from Ed-Fi
(WI only) |
Indicates the Grading task is not reported to Ed-Fi. |
|
Use the Copy icon to easily add the Grading Tasks associated with one course to another course (called the Source Course) to one or more other courses (called Destination Courses). The Copy icon displays when proper tool rights are assigned.
When copying a grading task from one course to another:
👁 Screenshot highlighting the copy button at the top of the screen and the copy modal that displays.
Copy Grading Tasks
If there are no grading tasks to copy, an alert displays indicating all selected grading tasks already exist in the destination course master.
Grading tasks can be defined for course masters, allowing districts to ensure consistency in how courses are graded across schools.
Tool Search: Grading Tasks
The Grading Tasks tool lists the items the teachers grade as part of the grading process. These tasks include mid-term grades, quarter grades, semester grades, etc. These grading tasks are created in the Grading Tasks tool in the Grading and Standards area.
Review the Course Masters Overview article for information on Course Masters best practices and a Course Master Workflow.
Visit the Course Status tool to view a list of all courses associated with a given course master, see the status of grading setup for each course, and relink courses as needed.
See the Grading Tasks Tool Rights article to learn about rights needed to use this tool.
Course Grading Task fields are available in the Query Wizard when using the Course/Section Data type in the Course > Course Information > Grading Task Credit folder.
👁 Screenshot highlighting the Grading Task fields in an Ad hoc query.
Grading Task Ad hoc Fields
Before assigning grading tasks to courses, verify the following:
The Grading Task editor provides a list of grading tasks and a detail editor showing specific elements of the selected grading task. The following provides a description of the fields on the Course Master Grading Task editor.
|
Field |
Description |
Ad hoc Fields |
|---|---|---|
|
Score Group |
Determines the points and/or letter grades that will be used when scoring the grading task. |
GradingTaskCredit.ScoreGroupName |
|
Term GPA |
Indicates the weight used when calculating the grade of the student. Refer to the GPA Calculations in Campus article for detailed explanations. |
GradingTaskCredit.TermGPA |
|
Credit |
Indicates the amount of credit the student receives upon completion of the course or when the course is posted on a transcript. This value depends on the setup of courses. This is usually only populated on those tasks that are posted to transcripts. |
GradingTaskCredit.Credit |
|
Credit Type |
Indicates the group of credit the student receives when credit is given. This is used in Academic Planning when tracking the progress of the student towards graduation. |
GradingTaskCredit.CreditType |
| Credit Overflow Override |
This field is set for a single course Grading Task and is used to roll credits when the current credit type has met its credit requirements.
The credits from the course will first try to roll up to the override credit type. If that credit type has met its requirements, it will then look at the overflow setup for the course's credit type.
A particular course may be able to count towards more than one credit type. For example a particular CTE course may fulfill a science credit or a math credit. This course would be set up with its default credit type of Math and an override rollup credit type of Science. If the student has completed their math requirement, this course would then be counted as a science credit (only if a science credit was still needed). If both credit requirements were met, then the default rollup would occur, likely going from math to elective credit. |
GradingTaskCredit.CreditOverflowName |
|
Term Mask |
Selection indicates when the task is graded. Term masks are always selected when the task is needing to be graded.
|
This field is not available in Ad hoc Reporting. |
| Post-only Grading Task |
Indicates a grading task cannot be aligned to assignments and categories in the teacher's Grade Book. Post-only Grading Tasks are for posting grades only, not for aligning student work. |
GradingTaskCredit.PostOnly
Reports a value of 1 if the checkbox is marked; reports a value of 0 if the checkbox is not mark. |
Any changes made to the Grading Tasks or any other Course Master tab require a push process to the courses. This option is available on the Course Master Info tab.
The entire Course Master can be copied from one school to another using the Copy button on the Course Master Info tab.
Use the Copy icon to easily add the Grading Tasks associated with one Course Master (called the Source Course Master) to one or more other Course Masters in the same Course Catalog (called Destination Course Masters). The Copy icon displays when proper tool rights are assigned.
When copying a grading task from one course master to another:
When the copy is complete, and the catalog is locked, an alert displays asking to which calendar years the information should be pushed. Select the school year from the dropdown and click OK.
A confirmation displays indicating the selected grading tasks from the Source Course Master have been copied to the Destination Course Masters. At this point, the grading tasks are copied and are displayed on the Course Master Grading Task tab of the Destination Course Master.
If there are no grading tasks to copy, an alert displays indicating all selected grading tasks already exist in the destination course master.
👁 Screenshot of the alert that displays when there are no tasks to copy.
Alert Indicating No Grading Tasks were Copied
To return to the main view of Course Master Grading Task, click the Grading Task List button.
Grade Calculation Options determine how In Progress grades for grading tasks and standards calculate in the Grade Book. Before setting grade calculation options, Grading Tasks and Standards must be assigned to the Course.
Tool Search: Grade Calc Options
Grade Calculation Options determine how In Progress Grades for grading tasks and standards calculate in the Grade Book.
Before setting grade calculation options, Grading Tasks and Standards must be assigned to the Course.
See the Course Grade Calc Options Tool Rights article for information about rights needed to use this tool.
Be aware that any updates made after school has started may affect student's current grades.
Updating the grade calc options for a course that is linked to a course master temporarily breaks the connection with the master - changes pushed from the course master level will not update this grade calc option. Click Reset to Default to restore the link to the course master.
Use the Course Audit Report to identify discrepancies between course and course master setup.
Grade Calc Options can be managed at the Course Master level. Icons next to each option provide more information:
| Icon | Text | Description |
| 👁 Screenshot of the lock icon. |
Locked to Course Master | Indicates that the option corresponds to a option at the Course Master level. These options are not editable in this tool. |
| 👁 Screenshot of the unlocked icon. |
Linked Course Catalog Unlocked | Indicates that options are unlocked for the whole Course Catalog. These options are editable in this tool. |
| 👁 Screenshot of the broken link icon. |
Course Master Unlinked | Indicates that the option is associated with a option at the Course Master level, but that the link with that option is broken. Options can be relinked using the Push All Course Masters tool, selecting a Push Mode of Overwrite and leaving Grade Calc Options marked in the Data to be Pushed section. |
| 👁 Screenshot of the course managed icon. |
Course Managed | Indicates that the option is managed at the Course level and does not have a corresponding record at the Course Master level. |
Grade Calc Options fields are available in the Query Wizard when using the Course/Section Data type in the Course > Course Information > Composite Grading folder.
To apply a specific grading setup to multiple tasks or standards, select Fill Options. From there, filter using the Type, Term, and Task dropdown lists and then select the Calculation Type and other options to apply to all standards or tasks that fit the filter criteria. For example, in the image below, I'm setting the Term Grade task to calculate the same way in all terms.
Additionally, the filter options are available in the main Grade Calc Options screen to filter the individual standards and tasks displayed.
Establish calculation preferences for multiple standards using the Fill options or for each Term/Standard combination individually.
The following table describes the Types for Standards:
| Option | Description |
|---|---|
| No Calculation |
Select this option to exclude the standard from calculation of students' In Progress proficiency estimate in the Grade Book. This option is pre-selected and cannot be modified when a standard is marked as Post-only on the Course Standards tab or the Course Masters Standards tab. No assignments or categories can be assigned to this standard. |
| In Progress Grade |
Select this option to calculate an In Progress grade for this standard using a Grading Scale. Use this option if scoring for the standard is done with Points or Marks. Additional options appear when this option is selected:
|
| Proficiency Estimate (Rubrics) |
Select this option if the standard is scored using a rubric. Rubrics are used to described quality of work, rather than a numerical score. Choose a Method to calculate grades:
In the grade book, hover over a student's proficiency estimate to see each of these values calculated. |
Establish calculation preferences for multiple tasks using the Fill options or for each Term/Task combination individually.
The following table describes the Types for Grading Tasks:
| Option | Description |
|---|---|
| No Calculation |
Select this option to exclude the task from calculation of students' In Progress grades in the Grade Book. |
| In Progress Grade |
Select this option to calculate an In Progress grade for this task. Additional options appear when this option is selected:
|
Post-only Tasks
Categories and assignments cannot be aligned to tasks marked as Post-only on the Course > Grading Tasks or Course Masters > Grading Tasks tabs. However, calculation options can be set up for these tasks to allow a Grade to be calculated in the Posted column when a Percent is entered for a student.
The following options are available for standards and tasks:
| Option | Description |
|---|---|
| Composite | A composite task or standard is a parent task that is grade based on the child tasks that make it up. For example, a semester task may be a composite of two quarter tasks. See the Composite Grading article for more information. |
| Rollup | A parent standard or task can be calculated by "rolling up" child tasks. See the Rollup Grade Calculations article for more information. |
| Limit Assignments to Last ___ | This option limits the grade calculation to only include the most recent x number of assignments. For example, proficiency in a standard may be calculated as the mode of the most recent 5 assignments. |
| Cumulative Grading Starting in | This option allows teachers to set a starting term for calculating grading across multiple terms. See the Cumulative Grading article for more information. |
For grading tasks that are calculated together with other grading tasks to have a composite grade (like a Semester Grade or End of Year Grade), mark the Composite checkbox. This displays a Child Task/Standard editor within the grading task window where the Grading Tasks and Standards can be set to properly calculate the composite grade.
If Composite Grading is locked at the Couse level, teachers cannot edit Composite grading setup at the course level.
In the example below, the Final Grade is marked as Composite and combines the student's Quarter 1 and Quarter 2 grades together. Each of the quarter grades are worth 50% of the Final grade.
Note the following:
Rollup calculations allow users to grade a parent standard based on the scores a student has received for child standards, rather than having to manually estimate the grade. Alternately, child standards can be selected to rollup to a grading task, with the rubric scores converted to numeric values and then into items in the score group selected for the task.
These calculations display in the Grade Book and Post Grades tool. Rollup calculation preferences are set up on this tab or in the Grade Calc Options tool in Course Masters.
When rolling up from standard to standard, all standards must be graded using the same rubric. In the Progress Monitor, rollup grading setup is represented visually by displaying child alignments nested under the parent, unless the section has more than 50 standard/task alignments.
| Type | Description |
|---|---|
| Manual | Provides no rollup calculation. |
| Mean | Rollup calculation is the average of the grade for each child standard, based on the Rollup Values entered on the Rubric. When the parent is a task, numeric rubric values are converted based on the selected Score Group. Rollup value, Minimum Value, and Mean Value should be populated for the rubric. |
| Weighted Mean | When this type is selected, a weight field displays for each child standard, with an Effective % value calculating as weights are entered. Rollup calculation is the average of the grade for each child standard, based on the Rollup Values entered on the Rubric, weighted based on the values entered for each child. Similar to Composite Grading, weight values can be entered as percentages (such as 25%, 25%, and 50%) or as proportions (such as 1, 1, 2). Rollup value, Minimum Value, and Mean Value should be populated for the rubric. |
| Median | Rollup calculation displays as the grade at the middle of the grade distribution. For example, if the child standards have grades of U, U, P, P, HP, the median value is P. |
| Mode |
Rollup calculation displays as the most common grade received across child standards. For example, if the child standards have grades of U, P, P, P, HP, the mode is P. If there is no mode in the entered scores, a rollup value is not reported. |
| Highest | Rollup calculation displays the highest grade achieved. |
Use the Copy icon to easily add Grade Calculation Options associated with one Course (called the Source Course) to one or more other Courses (called Destination Course Masters). The Copy icon displays when proper tool rights are assigned.
When copying grade calc options from one course to another:
When the copy is completed, an alert displays indicating the copy has been saved.
Save
Save
Grade Calculation Options determine how In Progress grades for grading tasks and standards calculate in the Grade Book. Before setting grade calculation options, Grading Tasks and Standards must be assigned to the Course Master.
Tool Search: Grade Calc Options
Grade Calculation Options determine how In Progress Grades for Grading Tasks and Standards calculate in the Grade Book.
Before setting Grade Calculation Options, Grading Tasks and Standards must be assigned to the Course Master.
👁 Screenshot of the Grade Calc Options tool showing the calculation options selected for standards/tasks by term.
Grade Calc Options determine how grades are calculated for standards and tasks aligned to a course master.
Review the Course Masters Overview article for information on Course Masters best practices and a Course Master Workflow.
See the Grade Calc Options Tool Rights article to learn about the rights needed to use this tool.
To apply a specific grading setup to multiple tasks or standards, select Fill Options. From there, filter using the Type, Term, and Task dropdown lists and then select the Calculation Type and other options to apply to all standards or tasks that fit the filter criteria. For example, in the image below, I'm setting the Term Grade task to calculate the same way in all terms.
👁 Screenshot highlighting the Fill Options button and the fill options side panel.
Use the Fill and Filter options to apply grade calculation options to multiple standards or tasks.
Additionally, the filter options are available in the main Grade Calc Options screen to filter the individual standards and tasks displayed.
Establish calculation preferences for multiple standards using the Fill options or for each Term/Standard combination individually.
👁 Screenshot of the Method dropdown list showing the options for calculating grades for Standards.
Select calculation options for standards
The following table describes the Types for Standards:
| Option | Description |
|---|---|
| No Calculation | Select this option to exclude the standard from calculation of students' In Progress proficiency estimate in the Grade Book. This option is pre-selected and cannot be modified when a standard is marked as Post-only on the Course Standards tool or the Course Masters Standards tab. No assignments or categories can be assigned to this standard. |
| In Progress Grade | Select this option to calculate an In Progress grade for this standard using a Grading Scale. Use this option if scoring for the standard is done with Points or Marks. Additional options appear when this option is selected:
|
| Proficiency Estimate (Rubrics) | Select this option if the standard is scored using a rubric. Rubrics are used to described quality of work, rather than a numerical score. Choose a Method to calculate grades:
In the grade book, hover over a student's proficiency estimate to see each of these values calculated. |
Establish calculation preferences for multiple tasks using the Fill options or for each Term/Task combination individually.
👁 Screenshot of the options for calculating grades for grading tasks.
Select calculation options for tasks
The following table describes the Types for Grading Tasks:
| Option | Description |
|---|---|
| No Calculation | Select this option to exclude the task from calculation of students' In Progress grades in the Grade Book. |
| In Progress Grade | Select this option to calculate an In Progress grade for this task. Additional options appear when this option is selected:
|
Post-only Tasks
Categories and assignments cannot be aligned to tasks marked as Post-only on the Course > Grading Tasks or Course Masters > Grading Tasks tabs. However, calculation options can be set up for these tasks to allow a Grade to be calculated in the Posted column when a Percent is entered for a student.
The following options are available for standards and tasks:
| Option | Description |
|---|---|
| Composite | A composite task or standard is a parent task that is grade based on the child tasks that make it up. For example, a semester task may be a composite of two quarter tasks. See the Composite Grading article for more information. |
| Rollup | A parent standard or task can be calculated by "rolling up" child tasks. See the Rollup Grade Calculations article for more information. |
| Limit Assignments to Last ___ | This option limits the grade calculation to only include the most recent x number of assignments. For example, proficiency in a standard may be calculated as the mode of the most recent 5 assignments. |
| Cumulative Grading Starting in | This option allows teachers to set a starting term for calculating grading across multiple terms. See the Cumulative Grading article for more information. |
For Grading Tasks that are calculated together with other Grading Tasks to have a composite grade (like a Semester Grade or End of Year Grade), mark the Composite checkbox. This displays a Child Task/Standard editor within the grading task window where the Grading Tasks and Standards can be set to properly calculate the composite grade.
In the example below, the Final Grade is marked as Composite and combines the student's Term 3 and Term 4 grades together. Each of the term grades are worth 50% of the Final grade.
👁 Screenshot highlighting a task with composite grading setup, the Composite checkbox marked and child tasks with weights entered.
Mark the Composite checkbox to display the Child Task/Standard dropdown lists.
Note the following:
Rollup calculations allow users to grade a parent standard based on the scores a student has received for child standards, rather than having to manually estimate the grade. Alternately, child standards can be selected to rollup to a grading task, with the rubric scores converted to numeric values and then into items in the score group selected for the task.
These calculations display in the Grade Book and Post Grades tool. Rollup calculation preferences are set up on this tool or in the Grade Calc Options tool for Courses.
Standards can only be selected to contribute to a rollup calculation if they are graded using the same rubric. In the Progress Monitor, rollup grading setup is represented visually by displaying child alignments nested under the parent, unless the section has more than 50 standard/task alignments.
Rollup Grade Calculation
| Type | Description |
|---|---|
| Manual | Provides no rollup calculation. |
| Mean | Rollup calculation is the average of the grade for each child standard, based on the Rollup % Values entered on the Rubric. When the parent is a task, numeric rubric values are converted based on the selected Score Group. Rollup value, Minimum Value, and Mean Value should be populated for the rubric. |
| Weighted Mean | When this type is selected, a weight field displays for each child standard, with an Effective % value calculating as weights are entered. Rollup calculation is the average of the grade for each child standard, based on the Rollup % Values entered on the Rubric, weighted based on the values entered for each child. Similar to Composite Grading, weight values can be entered as percentages (such as 25%, 25%, and 50%) or as proportions (such as 1, 1, 2). Rollup value, Minimum Value, and Mean Value should be populated for the rubric. |
| Median | Rollup calculation displays as the grade at the middle of the grade distribution. For example, if the child standards have grades of U, U, P, P, HP, the median value is P. |
| Mode | Rollup calculation displays as the most common grade received across child standards. For example, if the child standards have grades of U, P, P, P, HP, the mode is P. If there is no mode in the entered scores, a rollup value is not reported. |
| Highest | Rollup calculation displays the highest grade achieved. |
The entire Course Master can be copied from one school to another using the Copy button on the Course Master Info tab.
Use the Copy icon to easily add Grade Calculation Options associated with one Course Master (called the Source Course Master) to one or more other Course Masters in the same Course Catalog (called Destination Course Masters). The Copy icon displays when proper tool rights are assigned.
When copying grading calc options from one course master to another:
👁 Screenshot highlighting the copy button at the top of the screen and the copy modal that displays.
Copy Grade Calc Options
When the copy is completed, an alert displays indicating the copy has been saved.
Save
Categories are used in Campus Instruction to sort assignments into groups. Categories need to be created before assignments can be created.
Tool Search: Course Categories
Categories are used in Campus Instruction to sort assignments into groups. Categories must be created before assignments can be created.
See the Course Categories Tool Rights article for information about rights needed to use this tool.
When Categories are assigned at the Course level, every teacher who teaches the course can use same Categories. This ensures all assignments in a category have the same weight and calculations are all done the same way. Teachers can use these categories if they choose, or create their own categories (if they have proper tool rights assigned).
Use the Push to Sections option to push categories from the course level to sections, or push categories for a group of courses using the Push All Courses tool
Categories can also be managed at the Course Master level. Icons in the Category List provide more information about each category:
| Icon | Text | Description |
|---|---|---|
| 👁 Screenshot of the lock icon. |
Locked to Course Master | Indicates that the category corresponds to a category at the Course Master level. These categories are not editable in this tool. |
| 👁 Screenshot of the unlocked icon. |
Linked Course Catalog Unlocked | Indicates that categories are unlocked for the whole Course Catalog. These categories are editable in this tool. |
| 👁 Screenshot of the broken link icon. |
Course Master Unlinked | Indicates that the category is associated with a category at the Course Master level, but that the link with that category is broken. Categories can be relinked using the Push All Course Masters tool, selecting a Push Mode of Overwrite and leaving Categories marked in the Data to be Pushed section. |
| 👁 Screenshot of the course managed icon. |
Course Managed | Indicates that the category is managed at the Course level and does not have a corresponding record at the Course Master level. |
The best time to implement district-level Categories is at the beginning of the school year.
Categories can be set up at the Course Master level when courses are linked to the Course Master. This provides the district the ability to lock Categories, if desired.
When the Course Catalog is marked to lock the editing of Categories, Course Categories display with a lock icon, indicating changes to those cannot be made.
If teachers have tool rights to Categories, they can create their own categories and edit categories pushed from the course. If a course is linked to a course master, the Categories field must also be unlocked on the Course Catalog for teachers to edit pushed categories.
Users with proper tool rights have the ability to modify Categories at the Course level. Edits can be made to the entered Categories by selecting it from the Category List, making the necessary changes and saving the changes. Categories can also be deleted completely by selecting the category and clicking the Delete button. This removes the category completely from the Course.
If a category that has been pushed to sections is deleted, instances of the category that have assignments will be converted to section-owned categories. These categories function the same as any created by the teacher and are no longer tied to a category at the course level.
Category additions and modifications should be made at the beginning of the year.
The Drop Lowest Score feature marks as dropped the lowest scored assignment (by percentage) for a category for each student.
The dropped score is determined through a series of steps:
First, the feature creates a list of possible scores to drop for each student based on the following characteristics:
Next, the feature assigns a percentage value to each acceptable score based on the following logic:
Assignments scored as M (Missing) or Ch (Cheating) will be assigned a percentage of 0. Scores flagged as missing or cheated using the Context Menu will not be considered in the calculation because the score is Null. Keep this in mind when using this feature. For example, if the score of a "cheated" assignment should not be among those considered to be dropped, mark it using the checkboxes in the context menu rather than the "ch" keyboard shortcut.
Finally, the feature marks the score with the lowest percentage value as "dropped" and removes the dropped flag from any other score for that student. As long as the Drop Lowest Score checkbox is marked, this calculation will run each time an assignment score is changed.
In the event of a tie between multiple assignments, the score with the highest points possible is dropped.
Use the Copy button to easily add the Categories associated with one Course (called the Source Course) to one or more other Courses (called Destination Course). The Copy button displays when proper tool rights are assigned.
When copying categories from one course to another:
👁 Two-part screenshot highlighting the copy button and showing the copy tool that displays.
Copy Categories
When the copy is completed, an alert displays indicating the copy has been saved. If there are no categories to copy, an alert displays indicating all selected categories already exist in the destination course.
Save
Rubrics are lists of available Proficiency Estimates and GPA Values that can be used to assess student work (e.g. 4 = Satisfactory, 1 = Unsatisfactory). Once created, rubrics are aligned to standards in the Standards Bank.
Tool Search: Score Group
Score Groups and Rubrics are two different ways to determine the scores that make up the basis of grading. While very similar, Score Groups hold objective marks for traditional grading (98% = A, 60% or less = F for example) while Rubrics hold subjective marks for standards grading (Pass, Fail, etc.).
Score Groups and Rubrics are used by teachers to grade student work. Rubrics are aligned to standards in the Standards Bank. Score groups are linked to Grading Tasks. Score Groups and Rubrics cannot be removed if they are aligned to tasks or standards. Scores from Score Groups and Rubrics are not typically used in assignments, only in Grading Tasks and Standards, respectively.
Score Groups and Rubrics
The Score Groups and Rubrics editor can be sorted alphabetically by clicking Name or Type.
See the Grading Setup Tool Rights article to learn about rights needed to use this tool.
This table describes the fields associated with Score Groups and Rubrics. See the article for creating Score Groups and Rubrics for more information about how these fields should be used.
|
Field |
Description |
|---|---|
| Sequence |
The sequence determines the order in which the items will appear. This is the order that the scores appear in Post Grades and the Grade Book. If sequences are not entered, scores will appear in alphabetical order. Sequences must be entered for Rubric scores for Proficiency Estimates to work correctly in the Grade Book. |
|
Name |
The descriptive name of the item. |
|
Score |
This is the score that teachers will assign to assignments and term grades and which will be seen by students in the Portal. This is the value that appears in report cards and transcripts. This value must be unique. |
| State Score |
The State Score value that is mapped to score groups. This value is available for selection on the Transcript.
This field is only used in Minnesota, New Hampshire, North Dakota, and Tennessee. |
| Ed-Fi Grade Type |
Reports the completion status of a course in the Ed-Fi Grades resource. Users should only add the 'Final' Ed-Fi Grade Type value onto grading tasks that are truly the Final grade in a particular course.
This field is only used in Wisconsin districts. |
| Passing Score | This checkbox indicates that the list item is considered to be a passing score. This field determines the color-coded system used in the Grade Book to indicate which students are passing.
For Standards and Rubrics, the individual scores will be color-coded as passing or not. For Grading Tasks and Score Groups, the color-coding logic is applied to the In Progress grade. At least one score must be marked as passing in order to save the group or rubric. |
|
Credit Coefficient |
This value is used as a multiplier to determine if this score changes the number of credits earned for the course. |
|
Minimum Value |
The minimum percent needed to earn this score. This field is only used in conjunction with the Auto Grade Wizard.
To calculate a grade when a method of Mean or Decaying Average is selected, rubric scores are converted into numeric values using the Mean Value field on the rubric. Those values are then averaged and converted back into a rubric score using the Minimum and Mean values. |
| Rollup Value |
The numerical value assigned to each rubric score, which is used in generating a rollup calculation. This value only applies to calculation types of Mean and Weighted Mean.
For example, when calculating the rollup score using the calculation Type of Mean, the mean of the child standards is calculated using this numerical value and that number is then converted back into a rubric score based on the Minimum Value.
The Rollup Value for each score cannot be lower than that score's Minimum Value. |
| Mean Value | The numerical value assigned to each rubric score, which is used in calculating the Mean of scores received. To calculate a grade when a method of Mean or Decaying Average is selected, rubric scores are converted into numeric values using the Mean Value field on the rubric. Those values are then averaged and converted back into a rubric score using the Minimum and Mean values. |
|
GPA Value |
GPA values are usually used only for Score Groups. The weight of the score when calculating GPA. For example, in a Score Group, an A is commonly considered to calculate as a 4, a B as a 3, etc.
When a score should not affect the student's GPA, this field should be left blank. |
|
GPA Unweighted Value |
GPA values are usually used only for Score Groups. The unweighted GPA value of the score for calculating GPA.
When a score should not affect the student's GPA, this field should be left blank. |
|
GPA Bonus Points |
Indicates any bonus points for GPA calculation assigned to the score. |
| Bypass Composite Rule |
This checkbox refers to the System Preference to Require all scores for Composite Grading and only displays if it is set to Yes.
If this checkbox is marked for a score and that score is posted for a task that is part of a composite setup, that task is not included in the calculation of the composite grade.The composite grade is calculated based on the proportionate weights of the remaining posted grades, based on the same logic that calculates a composite grade if this system preference is not set and grades are not posted for all children tasks.
Example scenario: A course has a Final task that is a composite of two Semester tasks and a Final Exam task. However, if students gets an A in both semester tasks, they don't have to take the final exam. In the score group aligned to the tasks, the district includes an grade in the Score Group called Exempt that has this Bypass checkbox marked. Students who don't need to take the final exam receive this Exempt score as the posted grade for the Final Exam task. The composite task is calculated from the remaining posted grades. |
For Score Groups, it is recommended that users populate both GPA Value and Unweighted GPA Value, even if the values are the same. These values calculate independently of each other in students' Transcript Tab.
Score Groups and Rubrics can be displayed in Report Cards if the option is selected in Report Card Preferences.
Power law is a mathematical calculation that determines a student's proficiency on a standard based on the trend shown by the scores that student has earned. Power law trend values provide a guide for teachers in determining a student's overall proficiency in a standard. When given a series of proficiency estimates, teachers no longer have to guess at what those estimates mean together.
Campus calculates power law by converting rubric scores into numeric values and applying a standard power law formula to determine the trend of the student's proficiency. This calculation considers both the student's performance and rate of improvement, and the expected rate of improvement for the material. More recent scores are given a higher weight than older scores.
To set up a rubric to calculate power law, mark the checkbox next to the rubric Name to Show Power Law Fields. Three additional fields display for the rubric. These three fields implement established district grading policy, which should be discussed and finalized prior to use.
Please note, all rubric setup should be done based on district policy.
Similar to the formula for calculating slope (y = mx + b), the Power Law formula is also seeking to find a trend.
m and b are calculated using this formula, where ∑ indicates "sum of" and N indicates the number of assignments for a given standard.
The following steps describe the process of using power law to calculate In Progress grades:
Power Law in Instruction
Fields may vary by state:
Save
Rubrics are used as a tool to determine subjective marks for standards that make up the basis of grading. This video demonstrates how to create a rubric.
The Standards Bank is used to organize the standards that will be aligned with courses. Rubrics that have been created using the Score Groups & Rubrics tool can be aligned to standards from here.
Tool Search: Standards Bank
A Standards Bank is used to create and organize state, district, and local standards and provides an organizational structure for all standards in the district. The bank is made up of groups, which are organization units, and standards, which represent abilities and skills assessed by teachers or others to determine student proficiency. Groups are not scored; standards appear in teachers' grading tools and can be aligned to assignments and then scored.
See the Standards Setup for an overview of standards processes.
The Import Standards article provides more information about the import process.
👁 Screenshot of the Standards Bank with current and archived groups expanded.
The Standards Bank collects all standards in the district.
See the Standards Setup Tool Rights article for information on tool rights for this and other Standards Setup tools.
This article includes information on the following topics:
Campus recommends the following:
The standards bank list all standards for the district, sorted into groups. Search within the tree or Filter the list by School or by Setting.
| Groups | |
| Standards | |
| Archived Groups | |
| Archived Standards | |
| Imported Groups | |
| Imported Standards |
Standards and groups that fit CASE specifications can be imported using the Standards Import wizard. These frameworks are usually approved and provided by state departments of education.
The following list includes the differences between items that have been imported using this wizard, in comparison to items created in Campus.
Buttons to create new items are at the bottom of the screen.
|
Option |
Description |
|---|---|
|
A group is used to organize the Standards Bank and can contain other groups and standards. Enter information based on the descriptions in the Group Detail section below. | |
|
Standards can be assessed multiple times to track student achievement. Standards must be located within a group. Enter information based on the descriptions in the Standard Detail section below. | |
|
One-Time Standards can only be assessed once per student per Course. Enter information based on the descriptions in the Standard Detail section below. One-Time Standards cannot be associated with assignments in the Grade Book. | |
| Districts in states that have published standards that meet the CASE specification have the option of importing standards. See the Import Standards article for more information. |
Groups and standards can also be created within a group or standard using the 👁 Screenshot of the Add button.
button under Child Standards or Child Groups.
Click a group or standard to view details and make edits. Access groups and standards from the standards bank, or anywhere a name displays as a hyperlink, including and item's Parent, Child Standards, or Child Groups
In the Report Card, Parent groups appear capitalized, bolded, centered, and with a gray-shaded background. See example below.
|
Field |
Description |
|---|---|
| Type | Hard-coded identifier of Standard Group. For imported standards, this value is determined by the provider. |
|
Group Name |
The name that displays for the group. 40 character limit. |
| Date Last Imported | The date on which this item was last imported. Only displays for items imported using the Import Wizard. |
| CF Identifiers | The identification number tied to each item imported using the Import Wizard. |
|
Rubric |
The rubric used when scoring standards in this group. Rubrics are created in the Score Groups & Rubrics tool. The rubric chosen applies to all child standards. Groups themselves are not scored, nor are they visible in the teacher's Grade Book. |
|
Sequence |
The placement of the Group within the Standards Bank and report card. Child groups can be sequenced from the parent by clicking and dragging groups within the Child Groups list. Ordering groups in this way automatically updates the entered sequence number beginning with 1, overwriting the exiting sequence. |
|
Credit Overflow |
This checkbox can only be marked for one child group at a time. It indicates that if additional credits are earned in another credit group, they can be applied to this credit group within the same Academic Program. |
| Archived |
Archived groups are not removed where they are in use, but they cannot be used in the future. Displays with an 👁 Image of the archived groups icon. |
| Include in Report Card | Indicates if the group should be available for inclusion in report cards. |
|
Parent |
Lists any parent group/s. Click 👁 Screenshot of the Edit button. |
|
Comments |
Any comments related to the group. |
|
Description |
Additional information about the group. |
|
Field |
Description |
|---|---|
| Type | Hard-coded identifier of Standard. For imported standards, this value is determined by the provider. |
| Date Last Imported | The date on which this item was last imported. Only displays for items imported using the Import Wizard. |
| CF Identifiers | The identification number tied to each item imported using the Import Wizard. |
|
Display Name |
The name of the Standard. It is recommended that this name be a shortened version of the Full Standard/Description that can be easily viewed in the Standards Bank, Report Card, Campus Parent, and Campus Student. 500 character limit. |
|
Full Standard/Description |
The long description of the standard. The length of this field is not limited. It is recommended that standards which exceed the 500 characters allowed for the Display Name be entered in this field. This description only appears here in the Standards Bank. |
|
Abbreviation |
An abbreviation used to identify the standard. This prefix is visible on the Course Standards tool and the Course Master Standards tool as well as in Assignments and the Grade Book. 40 character limit. |
|
Number |
The alphanumeric identification number of the standard. This number can be used to indicate grade level. |
|
Code |
A user-defined field that can be used in custom reports. |
|
Sequence |
The sequence number of the standard, which determines the order the standard displays in the Standards Bank and report cards. Standards under the same parent with duplicate numbers are sorted alphabetically. Standards can also be sequenced within a group by clicking and dragging standards in the Child Standards section. Ordering standards in this way automatically updates the sequence number beginning with 1, overwriting the existing sequence. |
|
Post to Transcript |
Indicates if the results of this Standard can be included in students' transcripts. |
|
Power Standard |
Indicates that this standard is included in the Course Standards Report, given the option to only include Power Standards is selected. |
|
State Reported |
Indicates if the results of this Standard can be included in state reports. |
| External LMS Exclude | If a district is sharing Campus data with an external learning management system, this checkbox can be used to exclude specific records from being shared. |
| Include in Report Card | Indicates if the standard should be available for inclusion in report cards. |
| Include in Portal | Indicates if the standard is visible on the Campus Student and Campus Parent Portals. Note that if an assignment is aligned to only standards/tasks that are hidden from the Portals, that assignments and its score will not display for students and parents. |
| Archived |
Archived standards are not removed where they are in use, but they cannot be used in the future. Displays with an 👁 Image of the archived standards icon. |
|
Parent |
The parent group or standard. Click 👁 Screenshot of the Edit button. |
|
Comments |
Any comments related to the standard. |
|
Child Standards |
Any standards nested below this standard. |
|
Aligned Assessments |
Lists any assessments that have been aligned to the standard. This list populates based on the Test Setup created in System Administration. |
| Standard Associations |
Associations can be used to connect related standards. These associations are not currently used outside the Standards Bank, but future standards enhancements may use them.
|
The groups and standards nested below a group or standard are listed at the bottom of the editor. Any changes made in this area are reflected in the standard/group editor for the item.
Add a new standard or group by clicking Add and entering basic data for the item. To add an existing standard or group as a child, navigate to the desired item in the standards bank and select a Parent.
Copy a group or standard by clicking the white arrow next to the Save button and selecting Save & Copy. Copied items are appended with the words "Copy of" to differentiate from the original.
If copying a group or parent standard, indicate if children should be copied as well or only the parent.
When an imported item is copied, the copy and any children are not marked as Imported and an Association is created between the original and the copy of Exact Match.
Groups that have been imported can be converted to standards if desired. Groups with child groups cannot be converted, since a group cannot be a child of a standard.
Click 👁 Screenshot of the Convert to Standard button.
and then Convert in the confirmation message that displays. Note: converting groups to standards is NOT reversible.
👁 Screenshot highlighting the Convert to Standard button on the Standard Group Editor.
Convert imported groups into standards for use in grading.
The following image indicates how groups and standards appear in Report Cards:
👁 Screenshot highlighting how groups and standards display in a report card.
A sample report card, with placeholder group and standard names to illustrate how these names display.
Fields may vary by state:
The standards bank is used to create and organize state and district standards. This lesson explains how to create and manage standards in the standards bank.
The School Standards Setup tool is used to determine which Credit Groups and Standards are used in grading for the selected school.
Tool Search: School Standard
The School Standard Setup tool determines which Credit Groups and Standards Banks are used for grading at the school selected in the Campus toolbar.
After selecting Credit Groups and Standards on the School Standards tool, they can be added to Courses and Course Masters. This tool simplifies using standards and credit groups at the school level so that individual schools do not have to review all the items in the district when aligning them to courses and masters.
👁 Screenshot of the School Standards Setup tool.
School Standards Tool
The Credit Groups and Standards also display when adding Transcript Credits to a student's Transcript.
See the Standards Setup Tool Rights article for information on tool rights for this and other Standards Setup tools.
The Standards tab lists the standards that the teacher needs to administer and/or grade for the selected course. Before standards can be added to a course, they must be created in the Standards Bank. To review how to create standards, visit the 'Create Standards' topic in this study guide.
Tool Search: Course Standards
The Standards Alignment Editor lists the standards that the teacher needs to administer and/or grade for the selected course. To add standards to a course, they must be created first in the Standards Bank. When standards are added to the Standards Bank, rubrics are assigned there. There is no need to modify the rubric on the course. If the rubric is incorrect, it should be modified in the Standards Bank.
See the Course Standards Tool Rights article for information about rights needed to use this tool.
When the course linked to a Course Master, and editing of standards and standards is locked on the Course Catalog, a lock icon displays. This lock indicates the linking to the course master, and changes can only be made to the standard through the Course Master.
Standards can also be managed at the Course Master level. Icons in the Standards List provide more information about each standard:
| Icon | Text | Description |
| 👁 Screenshot of the lock icon. | Locked to Course Master | Indicates that the standard corresponds to a standard record at the Course Master level. These standards are not editable in this tool. |
| 👁 Screenshot of the unlocked icon. | Linked Course Catalog Unlocked | Indicates that standards are unlocked for the whole Course Catalog. These standards are editable in this tool. |
| 👁 Screenshot of the broken link icon. | Course Master Unlinked | Indicates that the standard is associated with a standard record at the Course Master level, but that the link with that standard is broken. Standards can be relinked using the Push All Course Masters tool, selecting a Push Mode of Overwrite and leaving Standards marked in the Data to be Pushed section. |
| 👁 Screenshot of the course managed icon. | Course Managed | Indicates that the standard is managed at the Course level and does not have a corresponding record at the Course Master level. |
Course Standard fields are available in the Query Wizard when using the Course/Section Data type in the Course > Course Information > Standards folder.
👁 Screenshot highlighting the Standards fields in an Ad hoc query.
Course Standard Ad hoc Fields
Select Add from the Action Bar. A Standard Detail window appears with a Search field and the expanded list of Standards. The search engine searches based on Abbreviation and standard Display Name.
Only standards attached to the selected school in School Standards are listed for selection.
👁 Screenshot highlighting the Add button, which opens the standard search bar.
Search for a Standard
The results window lists the full Standards Bank in expanded form. Users can manually scroll through this list if desired. Standards are listed as follows: Abbreviation: Display Name (Location). After selecting a standard, a blue checkmark icon displays next to the name of the standard in the search results and the standard is added to the Aligned Standards section.
Multiple standards can be added to a course within one save action. A checkmark icon displays next to each selected Standard in the search list. Users can then mark the appropriate Term Masks. Term masks indicate in what term the standard is graded.
Users can also mark the Post-only Standard checkbox. This checkbox indicates teachers cannot align assignments or categories to the standard. Post-only standards are only used for posting scores, not for tracking student progress. When the checkbox is marked, an X displays in the Standards Alignment table in the Post-only column.
It is recommended that users add standards to courses by term in order to utilize en masse updating options on Term Mask.
👁 Screenshot of standards details, with selected standards in the search results indicated by a blue check mark and listed in the Aligned Standards section.
Standard Details
To remove a selected standard, click the standard in the Aligned list or in the search results.
Click Save to add the selected standard(s) to the course.
If a school has not added the standard in School Standards, a message appears when a user attempts to add a standard to a course.
When searching for standards, all standards and groups that match the entered text are returned, including those standards that do not have a display name entered.
Users cannot delete a standard if scores have been entered for it.
Use the Copy icon to easily add the standards associated with one course to another course (called the Source Course) to one or more other courses (called Destination Courses). The Copy icon displays when proper tool rights are assigned.
When copying a standard from one course to another:
👁 Screenshot highlighting the copy button at the top of the screen and the copy modal that displays.
Copy Standards to Another Course
If there are no standards to copy, an alert displays indicating all selected standards already exist in the destination course.
Grade Calculation Options determine how In Progress grades for grading tasks and standards calculate in the Grade Book. Before setting grade calculation options, Grading Tasks and Standards must be assigned to the Course.
Tool Search: Grade Calc Options
Grade Calculation Options determine how In Progress Grades for grading tasks and standards calculate in the Grade Book.
Before setting grade calculation options, Grading Tasks and Standards must be assigned to the Course.
See the Course Grade Calc Options Tool Rights article for information about rights needed to use this tool.
Be aware that any updates made after school has started may affect student's current grades.
Updating the grade calc options for a course that is linked to a course master temporarily breaks the connection with the master - changes pushed from the course master level will not update this grade calc option. Click Reset to Default to restore the link to the course master.
Use the Course Audit Report to identify discrepancies between course and course master setup.
Grade Calc Options can be managed at the Course Master level. Icons next to each option provide more information:
| Icon | Text | Description |
| 👁 Screenshot of the lock icon. |
Locked to Course Master | Indicates that the option corresponds to a option at the Course Master level. These options are not editable in this tool. |
| 👁 Screenshot of the unlocked icon. |
Linked Course Catalog Unlocked | Indicates that options are unlocked for the whole Course Catalog. These options are editable in this tool. |
| 👁 Screenshot of the broken link icon. |
Course Master Unlinked | Indicates that the option is associated with a option at the Course Master level, but that the link with that option is broken. Options can be relinked using the Push All Course Masters tool, selecting a Push Mode of Overwrite and leaving Grade Calc Options marked in the Data to be Pushed section. |
| 👁 Screenshot of the course managed icon. |
Course Managed | Indicates that the option is managed at the Course level and does not have a corresponding record at the Course Master level. |
Grade Calc Options fields are available in the Query Wizard when using the Course/Section Data type in the Course > Course Information > Composite Grading folder.
To apply a specific grading setup to multiple tasks or standards, select Fill Options. From there, filter using the Type, Term, and Task dropdown lists and then select the Calculation Type and other options to apply to all standards or tasks that fit the filter criteria. For example, in the image below, I'm setting the Term Grade task to calculate the same way in all terms.
Additionally, the filter options are available in the main Grade Calc Options screen to filter the individual standards and tasks displayed.
Establish calculation preferences for multiple standards using the Fill options or for each Term/Standard combination individually.
The following table describes the Types for Standards:
| Option | Description |
|---|---|
| No Calculation |
Select this option to exclude the standard from calculation of students' In Progress proficiency estimate in the Grade Book. This option is pre-selected and cannot be modified when a standard is marked as Post-only on the Course Standards tab or the Course Masters Standards tab. No assignments or categories can be assigned to this standard. |
| In Progress Grade |
Select this option to calculate an In Progress grade for this standard using a Grading Scale. Use this option if scoring for the standard is done with Points or Marks. Additional options appear when this option is selected:
|
| Proficiency Estimate (Rubrics) |
Select this option if the standard is scored using a rubric. Rubrics are used to described quality of work, rather than a numerical score. Choose a Method to calculate grades:
In the grade book, hover over a student's proficiency estimate to see each of these values calculated. |
Establish calculation preferences for multiple tasks using the Fill options or for each Term/Task combination individually.
The following table describes the Types for Grading Tasks:
| Option | Description |
|---|---|
| No Calculation |
Select this option to exclude the task from calculation of students' In Progress grades in the Grade Book. |
| In Progress Grade |
Select this option to calculate an In Progress grade for this task. Additional options appear when this option is selected:
|
Post-only Tasks
Categories and assignments cannot be aligned to tasks marked as Post-only on the Course > Grading Tasks or Course Masters > Grading Tasks tabs. However, calculation options can be set up for these tasks to allow a Grade to be calculated in the Posted column when a Percent is entered for a student.
The following options are available for standards and tasks:
| Option | Description |
|---|---|
| Composite | A composite task or standard is a parent task that is grade based on the child tasks that make it up. For example, a semester task may be a composite of two quarter tasks. See the Composite Grading article for more information. |
| Rollup | A parent standard or task can be calculated by "rolling up" child tasks. See the Rollup Grade Calculations article for more information. |
| Limit Assignments to Last ___ | This option limits the grade calculation to only include the most recent x number of assignments. For example, proficiency in a standard may be calculated as the mode of the most recent 5 assignments. |
| Cumulative Grading Starting in | This option allows teachers to set a starting term for calculating grading across multiple terms. See the Cumulative Grading article for more information. |
For grading tasks that are calculated together with other grading tasks to have a composite grade (like a Semester Grade or End of Year Grade), mark the Composite checkbox. This displays a Child Task/Standard editor within the grading task window where the Grading Tasks and Standards can be set to properly calculate the composite grade.
If Composite Grading is locked at the Couse level, teachers cannot edit Composite grading setup at the course level.
In the example below, the Final Grade is marked as Composite and combines the student's Quarter 1 and Quarter 2 grades together. Each of the quarter grades are worth 50% of the Final grade.
Note the following:
Rollup calculations allow users to grade a parent standard based on the scores a student has received for child standards, rather than having to manually estimate the grade. Alternately, child standards can be selected to rollup to a grading task, with the rubric scores converted to numeric values and then into items in the score group selected for the task.
These calculations display in the Grade Book and Post Grades tool. Rollup calculation preferences are set up on this tab or in the Grade Calc Options tool in Course Masters.
When rolling up from standard to standard, all standards must be graded using the same rubric. In the Progress Monitor, rollup grading setup is represented visually by displaying child alignments nested under the parent, unless the section has more than 50 standard/task alignments.
| Type | Description |
|---|---|
| Manual | Provides no rollup calculation. |
| Mean | Rollup calculation is the average of the grade for each child standard, based on the Rollup Values entered on the Rubric. When the parent is a task, numeric rubric values are converted based on the selected Score Group. Rollup value, Minimum Value, and Mean Value should be populated for the rubric. |
| Weighted Mean | When this type is selected, a weight field displays for each child standard, with an Effective % value calculating as weights are entered. Rollup calculation is the average of the grade for each child standard, based on the Rollup Values entered on the Rubric, weighted based on the values entered for each child. Similar to Composite Grading, weight values can be entered as percentages (such as 25%, 25%, and 50%) or as proportions (such as 1, 1, 2). Rollup value, Minimum Value, and Mean Value should be populated for the rubric. |
| Median | Rollup calculation displays as the grade at the middle of the grade distribution. For example, if the child standards have grades of U, U, P, P, HP, the median value is P. |
| Mode |
Rollup calculation displays as the most common grade received across child standards. For example, if the child standards have grades of U, P, P, P, HP, the mode is P. If there is no mode in the entered scores, a rollup value is not reported. |
| Highest | Rollup calculation displays the highest grade achieved. |
Use the Copy icon to easily add Grade Calculation Options associated with one Course (called the Source Course) to one or more other Courses (called Destination Course Masters). The Copy icon displays when proper tool rights are assigned.
When copying grade calc options from one course to another:
When the copy is completed, an alert displays indicating the copy has been saved.
Save
Save
Grade Calculation Options determine how In Progress grades for grading tasks and standards calculate in the Grade Book. Before setting grade calculation options, Grading Tasks and Standards must be assigned to the Course Master.
Tool Search: Grade Calc Options
Grade Calculation Options determine how In Progress Grades for Grading Tasks and Standards calculate in the Grade Book.
Before setting Grade Calculation Options, Grading Tasks and Standards must be assigned to the Course Master.
👁 Screenshot of the Grade Calc Options tool showing the calculation options selected for standards/tasks by term.
Grade Calc Options determine how grades are calculated for standards and tasks aligned to a course master.
Review the Course Masters Overview article for information on Course Masters best practices and a Course Master Workflow.
See the Grade Calc Options Tool Rights article to learn about the rights needed to use this tool.
To apply a specific grading setup to multiple tasks or standards, select Fill Options. From there, filter using the Type, Term, and Task dropdown lists and then select the Calculation Type and other options to apply to all standards or tasks that fit the filter criteria. For example, in the image below, I'm setting the Term Grade task to calculate the same way in all terms.
👁 Screenshot highlighting the Fill Options button and the fill options side panel.
Use the Fill and Filter options to apply grade calculation options to multiple standards or tasks.
Additionally, the filter options are available in the main Grade Calc Options screen to filter the individual standards and tasks displayed.
Establish calculation preferences for multiple standards using the Fill options or for each Term/Standard combination individually.
👁 Screenshot of the Method dropdown list showing the options for calculating grades for Standards.
Select calculation options for standards
The following table describes the Types for Standards:
| Option | Description |
|---|---|
| No Calculation | Select this option to exclude the standard from calculation of students' In Progress proficiency estimate in the Grade Book. This option is pre-selected and cannot be modified when a standard is marked as Post-only on the Course Standards tool or the Course Masters Standards tab. No assignments or categories can be assigned to this standard. |
| In Progress Grade | Select this option to calculate an In Progress grade for this standard using a Grading Scale. Use this option if scoring for the standard is done with Points or Marks. Additional options appear when this option is selected:
|
| Proficiency Estimate (Rubrics) | Select this option if the standard is scored using a rubric. Rubrics are used to described quality of work, rather than a numerical score. Choose a Method to calculate grades:
In the grade book, hover over a student's proficiency estimate to see each of these values calculated. |
Establish calculation preferences for multiple tasks using the Fill options or for each Term/Task combination individually.
👁 Screenshot of the options for calculating grades for grading tasks.
Select calculation options for tasks
The following table describes the Types for Grading Tasks:
| Option | Description |
|---|---|
| No Calculation | Select this option to exclude the task from calculation of students' In Progress grades in the Grade Book. |
| In Progress Grade | Select this option to calculate an In Progress grade for this task. Additional options appear when this option is selected:
|
Post-only Tasks
Categories and assignments cannot be aligned to tasks marked as Post-only on the Course > Grading Tasks or Course Masters > Grading Tasks tabs. However, calculation options can be set up for these tasks to allow a Grade to be calculated in the Posted column when a Percent is entered for a student.
The following options are available for standards and tasks:
| Option | Description |
|---|---|
| Composite | A composite task or standard is a parent task that is grade based on the child tasks that make it up. For example, a semester task may be a composite of two quarter tasks. See the Composite Grading article for more information. |
| Rollup | A parent standard or task can be calculated by "rolling up" child tasks. See the Rollup Grade Calculations article for more information. |
| Limit Assignments to Last ___ | This option limits the grade calculation to only include the most recent x number of assignments. For example, proficiency in a standard may be calculated as the mode of the most recent 5 assignments. |
| Cumulative Grading Starting in | This option allows teachers to set a starting term for calculating grading across multiple terms. See the Cumulative Grading article for more information. |
For Grading Tasks that are calculated together with other Grading Tasks to have a composite grade (like a Semester Grade or End of Year Grade), mark the Composite checkbox. This displays a Child Task/Standard editor within the grading task window where the Grading Tasks and Standards can be set to properly calculate the composite grade.
In the example below, the Final Grade is marked as Composite and combines the student's Term 3 and Term 4 grades together. Each of the term grades are worth 50% of the Final grade.
👁 Screenshot highlighting a task with composite grading setup, the Composite checkbox marked and child tasks with weights entered.
Mark the Composite checkbox to display the Child Task/Standard dropdown lists.
Note the following:
Rollup calculations allow users to grade a parent standard based on the scores a student has received for child standards, rather than having to manually estimate the grade. Alternately, child standards can be selected to rollup to a grading task, with the rubric scores converted to numeric values and then into items in the score group selected for the task.
These calculations display in the Grade Book and Post Grades tool. Rollup calculation preferences are set up on this tool or in the Grade Calc Options tool for Courses.
Standards can only be selected to contribute to a rollup calculation if they are graded using the same rubric. In the Progress Monitor, rollup grading setup is represented visually by displaying child alignments nested under the parent, unless the section has more than 50 standard/task alignments.
Rollup Grade Calculation
| Type | Description |
|---|---|
| Manual | Provides no rollup calculation. |
| Mean | Rollup calculation is the average of the grade for each child standard, based on the Rollup % Values entered on the Rubric. When the parent is a task, numeric rubric values are converted based on the selected Score Group. Rollup value, Minimum Value, and Mean Value should be populated for the rubric. |
| Weighted Mean | When this type is selected, a weight field displays for each child standard, with an Effective % value calculating as weights are entered. Rollup calculation is the average of the grade for each child standard, based on the Rollup % Values entered on the Rubric, weighted based on the values entered for each child. Similar to Composite Grading, weight values can be entered as percentages (such as 25%, 25%, and 50%) or as proportions (such as 1, 1, 2). Rollup value, Minimum Value, and Mean Value should be populated for the rubric. |
| Median | Rollup calculation displays as the grade at the middle of the grade distribution. For example, if the child standards have grades of U, U, P, P, HP, the median value is P. |
| Mode | Rollup calculation displays as the most common grade received across child standards. For example, if the child standards have grades of U, P, P, P, HP, the mode is P. If there is no mode in the entered scores, a rollup value is not reported. |
| Highest | Rollup calculation displays the highest grade achieved. |
The entire Course Master can be copied from one school to another using the Copy button on the Course Master Info tab.
Use the Copy icon to easily add Grade Calculation Options associated with one Course Master (called the Source Course Master) to one or more other Course Masters in the same Course Catalog (called Destination Course Masters). The Copy icon displays when proper tool rights are assigned.
When copying grading calc options from one course master to another:
👁 Screenshot highlighting the copy button at the top of the screen and the copy modal that displays.
Copy Grade Calc Options
When the copy is completed, an alert displays indicating the copy has been saved.
Save
Categories are used in Campus Instruction to sort assignments into groups. Categories need to be created before assignments can be created.
Tool Search: Course Categories
Categories are used in Campus Instruction to sort assignments into groups. Categories must be created before assignments can be created.
See the Course Categories Tool Rights article for information about rights needed to use this tool.
When Categories are assigned at the Course level, every teacher who teaches the course can use same Categories. This ensures all assignments in a category have the same weight and calculations are all done the same way. Teachers can use these categories if they choose, or create their own categories (if they have proper tool rights assigned).
Use the Push to Sections option to push categories from the course level to sections, or push categories for a group of courses using the Push All Courses tool
Categories can also be managed at the Course Master level. Icons in the Category List provide more information about each category:
| Icon | Text | Description |
|---|---|---|
| 👁 Screenshot of the lock icon. |
Locked to Course Master | Indicates that the category corresponds to a category at the Course Master level. These categories are not editable in this tool. |
| 👁 Screenshot of the unlocked icon. |
Linked Course Catalog Unlocked | Indicates that categories are unlocked for the whole Course Catalog. These categories are editable in this tool. |
| 👁 Screenshot of the broken link icon. |
Course Master Unlinked | Indicates that the category is associated with a category at the Course Master level, but that the link with that category is broken. Categories can be relinked using the Push All Course Masters tool, selecting a Push Mode of Overwrite and leaving Categories marked in the Data to be Pushed section. |
| 👁 Screenshot of the course managed icon. |
Course Managed | Indicates that the category is managed at the Course level and does not have a corresponding record at the Course Master level. |
The best time to implement district-level Categories is at the beginning of the school year.
Categories can be set up at the Course Master level when courses are linked to the Course Master. This provides the district the ability to lock Categories, if desired.
When the Course Catalog is marked to lock the editing of Categories, Course Categories display with a lock icon, indicating changes to those cannot be made.
If teachers have tool rights to Categories, they can create their own categories and edit categories pushed from the course. If a course is linked to a course master, the Categories field must also be unlocked on the Course Catalog for teachers to edit pushed categories.
Users with proper tool rights have the ability to modify Categories at the Course level. Edits can be made to the entered Categories by selecting it from the Category List, making the necessary changes and saving the changes. Categories can also be deleted completely by selecting the category and clicking the Delete button. This removes the category completely from the Course.
If a category that has been pushed to sections is deleted, instances of the category that have assignments will be converted to section-owned categories. These categories function the same as any created by the teacher and are no longer tied to a category at the course level.
Category additions and modifications should be made at the beginning of the year.
The Drop Lowest Score feature marks as dropped the lowest scored assignment (by percentage) for a category for each student.
The dropped score is determined through a series of steps:
First, the feature creates a list of possible scores to drop for each student based on the following characteristics:
Next, the feature assigns a percentage value to each acceptable score based on the following logic:
Assignments scored as M (Missing) or Ch (Cheating) will be assigned a percentage of 0. Scores flagged as missing or cheated using the Context Menu will not be considered in the calculation because the score is Null. Keep this in mind when using this feature. For example, if the score of a "cheated" assignment should not be among those considered to be dropped, mark it using the checkboxes in the context menu rather than the "ch" keyboard shortcut.
Finally, the feature marks the score with the lowest percentage value as "dropped" and removes the dropped flag from any other score for that student. As long as the Drop Lowest Score checkbox is marked, this calculation will run each time an assignment score is changed.
In the event of a tie between multiple assignments, the score with the highest points possible is dropped.
Use the Copy button to easily add the Categories associated with one Course (called the Source Course) to one or more other Courses (called Destination Course). The Copy button displays when proper tool rights are assigned.
When copying categories from one course to another:
👁 Two-part screenshot highlighting the copy button and showing the copy tool that displays.
Copy Categories
When the copy is completed, an alert displays indicating the copy has been saved. If there are no categories to copy, an alert displays indicating all selected categories already exist in the destination course.
Save
The Standards Replacement Wizard can be used to modify the standards aligned to courses and course masters en masse or to update whether standards display in the Campus Student and Campus Parent Portals. Grading tasks can also be updated using this wizard.
The Standards Replacement Wizard can be used to modify the standards aligned to courses and course masters en masse or to update whether standards display in the Campus Student and Campus Parent Portals. Grading Tasks can also be updated using this wizard.
Use the Standards Replacement Wizard to update standards en masse.
See the Standards Setup Tool Rights article for information on tool rights for this and other Standards Setup tools.
Use the wizard to:
These actions can also be performed on Grading Tasks.
Archiving, removing, or replacing standards should be done with care and only by authorized school personnel.
Considerations:
The Standards Replacement Wizard can be used to modify the standards aligned to Courses and Course Masters en masse. This video demonstrates how to modify course standards from the Standards Replacement Wizard.
The Standards Alignment Wizard allows users to align standards to courses or course masters en masse, greatly decreasing the time needed to align standards. This tool may also be used for grading tasks.
Tool Search: Standards Alignment Wizard
The Standards Alignment Wizard allows users to align standards to courses or course masters en masse.
This wizard greatly decreases the time needed to align standards. Rather than accessing each course/master and aligning standards there, it is possible to align various standards to courses and course masters at the same time. The wizard also makes it easy to align standards to all courses/masters, such as a citizenship standard assessed by all teachers.
Use the Standards Alignment Wizard to align standards en masse.
These actions can also be performed on Grading Tasks.
Aligning standards should be done with care and only by authorized school personnel.
See the Standards Setup Tool Rights article for information on tool rights for this and other Standards Setup tools.
Navigate through the wizard using the Next and Previous buttons or using the workflow at the top of the screen.
If aligning course masters, click 👁 Screenshot of the Select Course Masters button.
to view a list of all masters in the selected catalog. Select the desired masters (or toggle on the All option) and indicate whether the standards should be Post-only and which Terms they should be aligned to, which sets the Term Mask on the Standards tab. Additional options display when aligning grading tasks.
If aligning courses, click 👁 Screenshot of the Select Courses button.
to view a list of all courses in the selected calendar. Select the desired courses (or toggle on the All option) and indicate whether the standards should be Post-only and which Terms they should be aligned to, which sets the Term Mask on the Standards tab. Additional options display when aligning grading tasks.
The Standards Alignment Wizard allows users to align standards to courses or course masters en masse. In this video, new personal/social standards need to be aligned with homeroom courses in an elementary school.
Standards can be imported into the Standards Bank from a certified competency framework provider. They are imported using the Import wizard found in the Standards Bank.
Location: Standards Bank > click Import button
Standards can be imported into the Standards Bank from a certified competency framework provider. A certified competency framework is one which meets the CASE (Competencies and Academic Standards Exchange) specification created by 1EdTech.
Standards are imported using the Import tool found in the Standards Bank.
👁 Screenshot of the Import Standards wizard.
Frameworks are imported using the URL of a verified provider.
Access to Import Standards is granted via a subright to the Standards Bank.
CASE, or the Competencies and Academic Standards Exchange, is a specification produced by 1EdTech that facilitates sharing proficiency standards. Central to CASE is the CF Item ID, which is the unique identifier assigned to each standard and group. This identifier stays with the standard, even if details of the standard are modified by the district, maintaining a connection between the standard and provider.
Potential future applications of this identifier include:
CASE frameworks are provided by state departments of education through CASE servers. Not all states are currently providing CASE servers. In addition to state providers, standards can be imported for some states from the Case Network provided by 1EdTech to districts who are members of IMS, although these standards may be in a draft or partial state. Follow state guidelines when importing standards. Click here to create an account with 1EdTech.
Before you import a framework, keep the following information in mind:
Navigate through the standards import using the Next and Previous buttons or using the workflow at the top of the screen.
NOTE: This import is not reversible. Imported standards and groups cannot be deleted from the Standards Bank, although they can be archived.
|
👁 Screenshot of step 1 of the import, where the source of the framework is chosen. |
| |
| 👁 Screenshot of step 2 of the import, where users select which frameworks to import. |
|
Two tasks are completed in step 3: mapping item types to Campus options and selecting Grading Rubrics for each standard group. Complete these tasks for each framework you're importing. Instructions display at the top of the screen.
The first framework is expanded to begin. An icon in the top left corner of each framework indicates the status of the tasks for that framework.
|
👁 Screenshot of the Item Types section of step 3, highlighting how items are mapped by default and the edit buttons. | |
| 👁 Screenshot of the Default Rubric and standards hierarchy section of step 3. |
| |
| ||
The final screen of the import provides a list of the standards frameworks that have been queued.
Click Select Another Framework to return to the beginning of the process and import another framework, with the URL auto-populated, from the same provider. Additional frameworks can be imported while previous imports are still in progress.
Imported standards display in the Standards Bank along with district-created standards. Imported standards and groups are differentiated with separate icons. The Type field is populated based on data from the framework; Campus only differentiates between Standards and Groups.
Imported standards and groups can be modified, but if frameworks are re-imported, modifications made in the Standards Bank are overwritten.
Once imported, standards are not yet aligned to courses or course masters, giving districts the opportunity to become familiar with the standards prior to implementing imported standards in grading. The Standards Alignment Tool can be used to align imported standards to courses and course masters en masse.
Imported standards can be used for grading and report cards in the same way that district-entered standards are. If used in courses, make sure to review reports and report cards before distributing - imported standards may include special characters not currently supported by Campus. Associations that exist in the framework between items imported into Campus as standards are included in the import and display in Campus.
Once a framework has been imported into the Standards Bank, the state may make changes to items in it. To capture these changes to the imported items, re-import the framework.
Changes to items that prompt an update include wording and association changes. Changes to the hierarchical structure of items are not included in the update.
| Changes to these fields cause standards to be listed in Step 3 of the Import: | These changes cannot be declined: | These changes to the framework are NOT reflected in Campus: |
|---|---|---|
|
|
|
Note: CASE Network 2 has been renamed Satchel Rosetta Exchange. The platform remains available for accessing U.S. K–12 standards, with no immediate changes or impact.
The Standards Import tool allows users to upload standards and standard groups from a competency framework into your Standards Bank. In this video, the Standards Import tool is used to upload standards.
Standards-Based Report Cards list the grade report by the grading task/standard name.
Tool Search: Report Setup
A report card summarizes a student’s progress throughout a school year. Schools can generate report cards for each term within their calendar. Campus provides a standard report card format that will print, or schools can create a report card with the available options. This saved report card is available for selection from the Report Card Batch Report and from the student's Grades tab.
A Standards-Based Report Card lists the grade report by the Standards of Learning and/or Grading Tasks. Report cards can also be generated by Grading Tasks. See the Conventional Report Card article for more information.
The following options are available for a Standards-Based Report Card, and assume the Report Type chosen is Standards-Based Report Card.
| Option | Description |
|---|---|
| Report Display Name | Text entered in this field displays below the name of the school in the upper left corner. It can be used to identify a specific grading term (e.g., Quarter 2 Report Card) instead of the default text of Report Card. Use this field to indicate that the report card contains in-progress term grades rather than final term grades. 👁 Screenshot of Report Display Name The default text of Report Card displays when no text is entered into this field. |
Display Grades At least one option must be selected, or BOTH options can be selected. | |
| Posted Grades | When marked, posted scores to the selected grading tasks print. When only choosing Posted Grades, In-Progress scores DO NOT print. |
| In-Progress Grades | When marked, a student's current score as of the current date prints. This grade has not been posted to any grading tasks. In-progress grades (scores) print with an asterisk. When only choosing In-Progress Grades, posted grades, and GPA selections DO NOT print. |
👁 Screenshot of In-Progress Grades | |
Standards Display Options Selection determines how the selected standards report associated scores. | |
| Grades for Selected Terms | Only scores for the selected terms print on the report card. Mark the Schedule Structure and Term, and then mark the desired Term checkboxes (Term Q1, Term Q2, etc.). The name of the first checkbox depends on the name of the calendar Schedule Structure and Term Schedules. This could be Main - Terms, Main - Grading Periods, or another name schools use for terms. At least one term must be selected in order to have the report display in the dropdown list for selection on the student Grades tab.
👁 Screenshot of Grades for Selected Terms |
| Best Score Only | Only the best score for each selected grading task or standard prints on the report card. This looks at the selected grading tasks/standards across all terms. If a student is graded on a standard in the first term and the third term and receives a higher score for the standard in the third term, that score prints. 👁 Screenshot of Best Score Only |
| Most Recent Score Only | Only the most recent score for each selected grading task or standard prints on the report card. This score is usually from the last reporting period, or the last time the standard was scored. 👁 Screenshot of Most Recent Score Only |
Tasks to Display Selections determine which grading tasks and standards print for the selected terms | |
| All Standards and Tasks | Prints the selected standards and grading tasks assigned to the courses into which the student is scheduled. Only some of the standards and grading tasks may have scores. Notice in the example to the right, there are standards included that do not have scores, in addition to standards that do have scores. 👁 Screenshot of All Standards and Tasks |
| Graded Standards and Tasks Only | Prints the selected standards and grading tasks assigned to the courses into which the student is scheduled that have scores. Grading tasks and standards that are not scored do not print. Notice in the example to the right, only standards that have been scored are printed. 👁 Screenshot of Graded Standards and Tasks Only |
| Placement and Signature Options Selections determine what placement or signature lines display at the end of the report card. All of these are manual entries. | |
| Next Year Placement Line | Provides a line for users to manually write in the student's placement for the next year. |
| Teacher Signature Line | Places a teacher signature line at the bottom of the report card. |
| Principal Signature Line | Places a principal signature line at the bottom of the report card. |
| Parent Signature Line | Places a parent signature line at the bottom of the report card. |
👁 Screenshot of Parent Signature Line | |
| Page Layout | |
| Portrait | Prints on 8.5 x 11 inch paper (letter), with the following margins: .
|
| Landscape | Prints on 11 x 8.5-inch paper (letter), with the following margins:
|
| Additional space for terms | If a calendar has more than 5 terms included on the report card, mark this checkbox. This adjusts the PDF layout for readability. When all terms or standards/grading tasks are included in a report card, it prints on multiple pages. Print on both sides to save paper. |
| Prepare report for full duplex printing | When marked, all of the report cards in the selection are formatted to print on both the front and back side of the paper. This also applies when a student or parent prints the report card from the Campus Portal. |
Header Options Selections indicate which student identifiers print at the beginning of the report card. The header also includes identifying information, such as the student's name, grade level, and the name of the report card. | |
| Student ID | Prints the student's local identification number found on the Demographics tab. |
| State ID | Prints the student's state identification number found on the Demographicstab. |
| Student Counselor | Prints the student's school-assigned Counselor as listed on the student's Team Members (Counseling) tab. |
| Homeroom Teacher | When marked, the student's homeroom teacher prints on the report card.
Homeroom Teacher The Teacher's name prints when the Homeroom checkbox is marked on the Course Editor or the Section editor.
|
| Date/Time Stamp | Prints the date and time of when the report was generated. |
👁 Screenshot of Date/Time Stamp | |
| Display Options | |
Attendance Summary Selections indicate how the attendance information displays on the report card. To include Attendance information, first mark the Attendance Summary checkbox, then mark the terms to include. When only one term is selected, no Total column of attendance events prints; a total column only prints when more than one term is selected. The Daily Exact Attendance Summary does not respect this logic as it uses a legacy custom template that was already in place Attendance entered for non-instructional periods and courses not marked for attendance do NOT appear on the report card. Information in the letter sub-reports uses data stored in the AttendanceDayAggregation table. This means that attendance data for the current date is accurate as of the previous night's attendance calculation, or the last time the Attendance Aggregation Refresh was run. If needed, the Attendance Aggregation Refresh tool can be run to force an attendance recalculation to pull in the current day's data. | |
| Select Terms | Select the terms for which to print attendance. If only one term is selected (first image), the report card does not print a total column. If more than one term is selected, a Total column prints, in addition to the selected terms. |
| Period | Lists the attendance information by period, looking at the total number of periods in which the student was marked absent or tardy. 👁 Screenshot of Period Kentucky Users: Periods and setup may vary from the example image. |
| Course | Lists the absences by the course. Course attendance looks at the total number of periods missed for a specific course section. 👁 Screenshot of Course |
| Daily Exact Term | Uses the standard day-minute information entered on the Calendar Grade Levels tab. If no minute information is entered, minute information on the Days tab is used. Uses the calculation of Number of minutes absent divided by Student Day Minutes. 👁 Screenshot of Daily Exact Term |
| Daily (Half/Whole Day) Term | Uses the standard day-minute information entered on the Calendar Grade Levels tab. If no minute information is entered, minute information on the Days tab is used.
👁 Screenshot of Daily (Half/Whole Day) Term |
Cumulative GPA Cumulative GPA is based on the student's historical grades (grades posted to the Transcript). See the GPA Calculations article for detailed information on the calculations used to find GPA. | |
| GPA Calculation | Allows selection of either the Campus Cumulative GPA (most districts use this) or a Custom GPA Calculation (where a special stored procedure or course weighting is used). Using the Campus Cumulative GPA option allows the selection of a Calculation Type. Using a custom GPA calculation does not allow selection of a calculation type. |
| GPA Calculation Type | When using the Campus Cumulative GPA option is selection, a Calculation Type must be chosen. See the GPA Calculations in Campus article for explanations on weighted vs. unweighted. |
👁 Screenshot of GPA Calculation Type | |
| Class Rank | |
| Class Rank | Class Rank is the student’s placement in the class and is based on transcript scores. |
| with Bonus Points | Printing the class rank with bonus points changes the student's ranking in the grade level. Bonus points are awarded at the score/mark level of a particular course. Students receive bonus points based on the score earned (e.g., an “A” may receive a bonus point, whereas a “C” may not). See the Using Bonus Points section of the GPA Calculations article for more information. When bonus points are marked to print with the GPA, the Class Rank should also include bonus points. |
| If the student is not included in class rank calculations or if the settings of the report card do not allow the class rank calculation to occur, the printed report card reads Excludedinstead of a ranking (a rank appears as 5 of 250, where the student is rank as number 5 in a class of 250 other students included in the class rank calculation). If the class rank option is not selected, the column for Class Rank does not appear. | |
| Period | |
This selection adds the period number or name before the list of courses in which the student is enrolled, much like schedule information prints. Because course information doesn't display on Standards Based Report Cards, this option does not apply. | |
Score Comments A teacher has the ability to enter grades for the grading task and scores for the standards, as well as comments related to that grade/score or to the student’s behavior, etc. This option displays the comment on the report card for the selected terms. Mark the option to print Score Comments and then select the terms for which to print the comments. If no terms are selected, no comments print. | |
| One Term | Displaying comments for one term only prints the comments for the selected term. |
| Multiple Terms | Displaying comments for multiple terms prints the comments in term order (Term 1 comments, Term 2 comments, etc.). 👁 Screenshot of multiple term comments |
| Show Report Comments | |
| Displays any report comments established for the student in the Report Comments tab. 👁 Screenshot of report comments | |
| Legal Name | |
| When selected, the student's legal first name, legal middle name, legal last name and legal suffix print if entered in the Protected Identity information and if the user has tool rights to Protected Identity Information (users need at least Read rights to Protected Identity Information). The Effective Date on the Identity Record is not considered when printing the Protected Identity information on a report card. If the protected identity fields are populated on the current Identity record, the legal first/last/middle/suffix values print. When the legal first name or legal last name is not populated or if the user does not have tool rights to this information, the student's first name and last name reports from the First Name and Last Name fields on the student's current Identity record. 👁 Screenshot of legal name When the Portal - Active checkbox is marked on the Report Detail editor AND the Legal Name option is marked, the Report Card prints the student's Legal Name on the report card that is generated from Campus Student or Campus Parent. | |
Term GPA This number reflects the grades given for the term and does not use transcript information to calculate. This can also be displayed with bonus points. See the GPA Calculations article for detailed information on the calculations used to find GPA. | |
| Weighted, Unweighted | This value is the student's average of scores within a specified term. 👁 Screenshot of term gpa |
| with Bonus Points | Printing the Term GPA with Bonus Points changes the student's GPA. Bonus points are awarded at the score/mark level of a particular course. Students receive bonus points based on the score earned (e.g., an “A” may receive a bonus point, whereas a “C” may not). See the Using Bonus Points section of the GPA Calculations article for more information. 👁 Screenshot of gpa with bonus points |
Mailing Label Options Report cards can be printed for mailing or printed for handing out in class. They can also be printed with or without being addressed to the student's parent/guardian. | |
| Student's Primary Household Only | Prints report cards for the student's primary household. Any individual in that household or related to that household who is marked for mailing on the relationship receives a report card. Household addresses can be primary or secondary. |
| No Mailing Label | Prints the report card without an address. This can be used to hand out report cards in class. This should not be marked if the other mailing label options are marked. |
| Recipient Names | Prints the actual names of the individuals receiving the report card, instead of To the parent/guardian of. Names print in the first two lines of the address with first and last names. |
👁 Screenshot of recipient names | |
School Comment (printed on all) An entry here displays on ALL report cards generated in bold. Users can indicate the date of parent/teacher conferences, after school activities or anything the user feels the parent should know. | |
| Print at Beginning | School comments print on the first page, before grade information. 👁 Screenshot of school comment |
| Print at End | School comments print after grade information on the last page of the report card. 👁 Screenshot of school comment at end |
Grading Tasks and Standards All items on which the student is graded display in the Grading Tasks list, whether they are Grading Tasks or Standards. | |
| Grading Tasks and Standards are assigned to Courses and are used to assign students a grade in the appropriate Course Section. Grading Tasks are usually term based and are posted at the end of a term (Quarter, Semester, etc.). Schools could also have Process Grades or Weekly grades. All of these tasks can be selected to display on the report card. Depending on the needs of the school, there may be one report card per grading term. Or, there could be a report card for the end of the semester and which only lists the semester grades. Standards are skills the student must learn throughout the course of the year and determine the student's success in the given course and/or grade level. Skills like reading at grade level or comprehends written material are considered standards and vary from district to district. Standards and grading tasks are assigned a Term Mask at the Course Level, indicating when that standard is graded. If a grading task or standard is not marked for a certain term (for example, the standard is only graded for Terms 2 and 4), the printed report card displays those term boxes in shaded gray coloring, indicating the standard is not scored during that term. See the last image in this article for more information. When the Report Card does NOT have ALL TERMS selected in the Grades for Selected Terms in the Standards Display Options AND there is a Standard Group where none of the child standards are assigned a Term Mask for the selected term, the Standard Group DOES NOT display on the Report Card. For example, a report card is set to display for Term 1 that includes a Standard Group with child standards A, B, C, and D. A, B, and C have the Term Mask set to Term 4, while D has the Term Mask set to Term 3. In this situation, the whole Standard Group does not print in that report card. When the report card is set to display for Term 3, however, the Standard Group does display, with the boxes for A, B, and C grayed out. When printing, standards that have long names are formatted to wrap to the next line in the column and are formatted to stay within the same column (so the entirety of the standard name stays together). When a standard is associated and graded with more than one course, the name of the course and course section in which the student met the standard prints with that standard. Grading tasks only print when they are associated to a Credit Group and Credit Type. | |
| Select all grading tasks | This option prints each grading tasks/standard to the report card that is assigned to a course in which the student is enrolled. If there is no score given to the student for the standard, the fields are blank. Standards display on the report card in Standard Group Name order. See the Standards Bank article for information on organizing and maintaining standards. |
| Score Groups/Rubrics | |
| Select the score groups and rubrics to print on the report card. This option prints what letter grade is associated with what point value or percentage. Options are also available to print the GPA values associated with the scores. Multiple score groups and rubrics can be selected. 👁 Screenshot of score groups/rubrics | |
The following images provide examples of Standards Based Report Cards. Included are examples from elementary schools, middle schools and high schools, with a variety of options.
👁 Screenshot of Elementary Standards Based Report Card
Elementary Standards Based Report Card
👁 Screenshot of Middle School Standards Based Report Card
Middle School Standards Based Report Card
👁 Screenshot of High School Standards Based Report Card
High School Standards Based Report Card
👁 Screenshot of Shaded Entries for Non-Scored Terms
Shaded Entries for Non-Scored Terms
If posted grades are not displaying in report cards as desired, verify that the following steps have been completed:
Note: If using Standards Based Report Cards, Grading Tasks only display if they have a credit group linked to them at the course level.
Conventional Report Cards list the grade report by course number and grading tasks for each selected term.
Tool Search: Report Setup
A report card summarizes a student’s progress throughout a school year. Schools can generate report cards for each term within their calendar. Campus provides a standard report card format that prints, or schools can create a report card with the available options. This saved report card is available for selection from the Report Card Batch Report and the student's Grades tool.
A Conventional Report Card lists the grade report by course number and grading tasks for each selected term. Report cards can also be standards-based. See the Standards-Based Report Card article for more information.
👁 Screenshot of report setup - report cards
Report Setup - Report Cards
The following options are available for a Conventional Report Card and assumes the Report Type chosen is Conventional Report Card.
| Option | Description |
|---|---|
| Report Display Name | Text entered in this field displays below the student's name in the upper right corner. It can be used to identify a specific grading term (e.g., Quarter 1 Report Card) instead of the default text of Report Card. 👁 Screenshot of the report display name Use this field to indicate the report card contains in-progress term grades rather than final term grades. The default text of the Report Card text displays when no text is entered into this field. 👁 Screenshot of default text in the report display name field |
Display Grades At least one option must be selected, or BOTH options can be selected. This selection determines which calculated grade to print.
| |
| Posted Grades | When marked, posted scores to the selected grading tasks print. When only choosing Posted Grades, In-Progress scores DO NOT print. |
| In-Progress Grades | When marked, a student's score prints as of the current date. This grade has not been posted to any grading tasks. In-progress grades (scores) are printed with an asterisk. This option prints the last calculated grade, even if this has a posted grade. The in-progress grade could be different than the posted grade. If this is the only Display Grades option selected, the header on the printed report card reads In-Progress Grades Report. In the first example to the left, the header reads Grades Report because both Posted Grades and In-Progress Grades are selected. The second example to the left only included In-Progress Grades. When only choosing In-Progress Grades, posted grades and GPA selections DO NOT print. This image shows both In-Progress and Posted Grades. 👁 Screenshot of In-Progress and Posted Grades This image to the right shows ONLY In-Progress Grades. |
Report on Terms | |
| Main - Term Schedule | Mark this and the desired Term checkboxes (Term Q1, Term Q2, etc.). At least one term must be selected to have the report display in the dropdown list for selection on the Student Grades tool. Mark the Schedule Structure and Term, then mark the desired Term checkboxes (Term Q1, Term Q2, etc.). The name of the first checkbox depends on the name of the calendar Schedule Structure and Term Schedules. This could be Main - Terms, Main - Grading Periods, or another name schools use for terms. At least one term must be selected to have the report display in the dropdown list for selection on the Student Grades tool.
|
| Tasks to Display | |
| All Standards and Tasks | Prints the selected standards and grading tasks assigned to the courses into which the student is scheduled. Only some of the standards and grading tasks may have scores. In this example, there are grading tasks included that do not have scores, in addition to standards that do have scores. |
| Graded Standards and Tasks Only | Prints the selected standards and grading tasks assigned to the courses into which the student is scheduled that have scores. Grading tasks and standards that are not scored do not print. In this example, only grading tasks that have been scored are printed. 👁 Screenshot of only grading tasks that have been scored are printed |
Placement and Signature Options Selections determine what placement or signature lines display at the end of the report card. All of these are manual entries. | |
| Next Year Placement Line | Provides a line for users to manually write in the student's next year placement. |
| Teacher Signature Line | Places a teacher signature line at the bottom of the report card. |
| Principal Signature Line | Places a principal signature line at the bottom of the report card. |
| Parent Signature Line | Places a parent signature line at the bottom of the report card. |
| 👁 Screenshot of Placement and signature options | |
| Page Layout | |
| Portrait | Prints on 8.5 x 11-inch paper (letter), with the following margin settings:
|
| Landscape | Prints on 11 x 8.5 inch paper, with the following margin settings:
|
| Additional space for terms | If a calendar has more than five terms that are being included on the report card, mark this checkbox. This adjusts the PDF layout for readability. When all terms or standards/grading tasks are included in a report card, it prints on multiple pages. Print on both sides to save paper. |
| Prepare report for full duplex printing | When marked, all of the report cards in the selection are formatted to print on both the front and back sides of the paper. This also applies when a student or parent prints the report card from the Campus Portal. |
Header Options Selections indicate which student identifiers print at the beginning of the report card. Also included in the Header is identifying information, like the student's name, grade level and the name of the report card. | |
| Student ID | Student's local identification number populated on the Demographics tool. |
| State ID | Student's state identification number populated on the Demographics tool. |
| Student Counselor | Student's school-assigned Counselor as listed on the student's Team Members (Counseling) tool. |
| Homeroom Teacher | When marked, the student's homeroom teacher prints on the report card.
Homeroom Teacher The Teacher's name prints when the Homeroom checkbox is marked on the Course Editor or the Section editor.
|
| Date/Time Stamp | Prints the date and time when the report was generated. |
👁 Screenshot of date & time stamp | |
| Display Options | |
Attendance Summary Selections indicate how the attendance information displays on the report card. To include Attendance information, mark the Attendance Summary checkbox first, then mark the terms to include. When only one term is selected, no Total column of attendance events prints; a total column only prints when more than one term is selected. Attendance entered for non-instructional periods and courses not marked for attendance do NOT appear on the report card. The information in the letter sub-reports uses data stored in the AttendanceDayAggregation table. This means that attendance data for the current date is accurate as of the previous night's attendance calculation or the last time the Attendance Aggregation Refresh was run. If needed, the Attendance Aggregation Refresh tool can be run to force an attendance recalculation to pull in the current day's data. | |
| Select Terms | Select the terms for which to print attendance. Mark the Schedule Structure and Term, then mark the desired Term checkboxes (Term Q1, Term Q2, etc.). The report card does not print a total column if only one term is selected (first image). If more than one term is selected, a Total column prints, in addition to the selected terms (second image). |
Cumulative GPA Cumulative GPA is based on students’ historical grades, or grades posted on the student's Transcript. Options are available for displaying normal GPA and unweighted GPA, and either can display bonus points. See the GPA Calculations article for detailed information on the calculations used to find GPA. | |
| GPA Calculation | Allows selection of either the Campus Cumulative GPA (most districts use this) or a Custom GPA Calculation (where a special stored procedure or course weighting is used). Using the Campus Cumulative GPA option allows the selection of a Calculation Type. Using a custom GPA calculation does not allow selection of a calculation type. |
| GPA Calculation Type | When using the Campus Cumulative GPA option is selection, a Calculation Type must be chosen. See the GPA Calculations in Campus article for explanations on weighted vs. unweighted. |
Class Rank | |
| Class Rank | Class Rank is the student’s placement in the class and is based on transcript scores. |
| with Bonus Points | Printing the class rank with bonus points changes the student's ranking in the grade level. Bonus points are awarded at the score/mark level of a particular course. Students receive bonus points based on the score earned (e.g., an “A” may receive a bonus point, whereas a “C” may not). See the Using Bonus Points section of the GPA Calculations article for more information. 👁 screenshot of Class Rank with bonus points When bonus points are marked to print with the GPA, the Class Rank should also include bonus points. |
If the student is not included in class rank calculations or if the settings of the report card do not allow the class rank calculation to occur, the printed report card reads Excluded instead of a ranking (a rank appears as 5 of 250, where the student is ranked as number 5 in a class of 250 other students included in the class rank calculation). If the class rank option is not selected, the column for Class Rank does not display. | |
| Period | |
This selection adds the period number or name before the Course Section name. | |
Score Comments A teacher can enter grades for the grading task as well as comments related to that score, the student’s behavior, etc. This mark displays the comment on the report card for the selected terms. When more than one term is selected, an indication of that term displays on the report card. Mark the option to print Score Comments and then select the terms for which to print the comments. If no terms are selected, no comments print. | |
| One Term | Displaying comments for one term only prints the comments for the selected term. |
| Multiple Terms | Displaying comments for multiple terms prints the comments in term order (Term 1 comments, Term 2 comments, etc.). |
| 👁 Screenshot of multiple terms | |
| Show Score Percentage | |
| This preference shows the score and prints the student's percentage (up to four decimal places) for that score in parentheses. When those preferences are also chosen, the percentage can be printed for both posted and in-progress scores. | |
| Show Report Comments | |
Displays any report comments established for the student in the Report Comments tool. | |
| Legal Name | |
| When selected, the student's legal first name, legal middle name, legal last name and legal suffix print if entered in the Protected Identity information and if the user has tool rights to Protected Identity Information (users need at least Read rights to Protected Identity Information). The Effective Date on the Identity Record is not considered when printing the Protected Identity information on a report card. As long as those protected identity fields are populated on the current Identity record, the legal first/last/middle/suffix values print. When the legal first name or legal last name is not populated or if the user does not have tool rights to this information, the student's first name and last name report from the First Name and Last Name fields on the student's current Identity record. 👁 Screenshot of first and last name on a report When the Portal - Active checkbox is marked on the Report Detail editor AND the Legal Name option is marked, the Report Card prints the student's Legal Name on the report card generated from Campus Student or Campus Parent. | |
Term GPA This number reflects the grades given for the term and does not use transcript information to calculate. This can also be displayed with bonus points. See the GPA Calculations article for detailed information on the calculations used to find GPA. | |
Weighted, Unweighted | This value is the student's average of scores within a specified term. |
| with Bonus Points | Prints the Term GPA with Bonus Points changes the student's GPA. Bonus points are awarded at a particular course's score/mark level. Students receive bonus points based on the score earned (e.g., an “A” may receive a bonus point, whereas a “C” may not). See the Using Bonus Points section of the GPA Calculations article for more information. |
| 👁 Screenshot of gpa for multiple terms | |
Mailing Label Options Report cards can be printed for mailing or handing out in class. They can also be printed with or without an address to the student's parent/guardian. | |
| Student's Primary Household Only | Print report cards for the student's primary household. Any individual in that household or related to that household who is marked for mailing on the relationship receives a report card. Household addresses can be primary or secondary. |
| No Mailing Label | Prints the report card without an address. This can be used to hand out report cards in class. This should not be marked if the other mailing label options are marked. |
| Recipient Names | Prints the names of the individuals receiving the report card instead of 'To the parent/guardian of'. Names print on the first two lines of the address with first and last names. |
| 👁 Screenshot of recipient names | |
School Comment (printed on all) | |
An entry here displays in bold on ALL report cards generated. Users can indicate the date of parent/teacher conferences, after-school activities, or anything else the user feels the parent should know. This prints at the end of the report card. | |
Grading Tasks and Standards All items on which the student is graded display in the Grading Tasks list, whether they are Grading Tasks or Standards. | |
Grading Tasks and Standards are assigned to Courses and are used to assign students a grade in the appropriate Course Section. Grading Tasks are usually term-based and are posted at the end of a Quarter or Semester. Schools could also have Process Grades or Weekly grades. All of these tasks can be selected to display on the report card. Depending on the school's needs, there may be one report card per grading term. Or, there could be a report card for the end of the semester that only lists the semester grades. Standards are skills the student must learn throughout the course of the year and determine the student's success in the given course and/or grade level. Skills like "Reading at grade level" or "Comprehends written material" are considered standards and vary from district to district. | |
| Select all grading tasks | This option prints each grading task/standard on the report card assigned to a course in which the student is enrolled. If no score is given to the student for the standard, the fields are blank. Standards display on the report card in Standard Group Name order. See the Standards Bank article for information on organizing and maintaining standards. Depending on how grading tasks and standards are set up at the district, there may be one-time tasks/standards (items that are assessed only once during the student's career at the school). These can also be selected to print on the report card. |
| Score Groups/Rubrics | |
Select the score groups and rubrics to print on the report card. This option prints the letter grade associated with each point value or percentage. The GPA values associated with the scores can also be printed. Multiple score groups and rubrics can be selected. | |
The following images provide examples of Conventional Report Cards. They include examples from elementary schools, middle schools, and high schools, with a variety of options.
Be aware there is limited header space (six lines) when printing the report card. Only choose the absolutely necessary options to include on a report card.
When all Header Options are selected, when student names are long and wrap to a second line, when counselor names are long and wrap to a second line, when the report card is sorted in a specific way, information included in the header of the report card (the information that includes the student name and other preferences) may not display all chosen information.
👁 Screenshot of Conventional Report Card Elementary Example
Conventional Report Card Elementary Example
👁 Screenshot of Conventional Report Card Middle School Example
Conventional Report Card Middle School Example
👁 Screenshot of Conventional Report Card High School Example
Conventional Report Card High School Example
If posted grades are not displaying in report cards as desired, verify that the following steps have been completed:
The Report Comments tool allows districts to add customized text that will appear on printed report cards and/or transcripts. Report Comments that are marked as active may be selected for a student on their Report Comments tab.
Tool Search: Report Comment Setup
The Report Comment Setup tool allows districts to add customized text to printed student report cards, transcripts, and e-transcripts. These comments can be school-, district-, or state-specific. Any number of comments can be created and selected/deselected as needed.
See the System Preference Tool Rights article for information on tool rights.
Report Comment Editor Field | Definition |
|---|---|
Active | When the checkbox is marked, the comment is considered active and can be selected on the student's Report Comments page. When not marked, the comment does not appear for selection. |
Type | Indicates where the comment displays on the report - either at the Top of the transcript, the Bottom of the transcript, or the eTranscript. For eTranscripts, the comment ONLY displays at the end of the eTranscript XML report. |
| Module | Indicates on which report the comment displays - Transcripts or Report Cards. |
Name | Lists the name of the report comment. Note: Users cannot see comment details; only the names. For this reason, administrators and personnel responsible for creating the report comments should name the comments so it is easy to determine which comment should be included. |
Sequence | Determines the order in which the comments display on the Report Comments tab and on the student's transcript and eTranscript. The sequence is based on the type of comment. For example, a sequence number of "1" can be applied to a report comment appearing at the top of the transcript and applied to a comment appearing at the bottom of the transcript. |
Comment | Lists the text that appears on the student's transcript. This comment can be no more than 255 characters. |
Once a report comment is saved and marked as active, it appears for selection on the student's Report Comments page.
There is no limit to the number of comments that can be created and added to the student's Report Comments tool. However, it is recommended to keep the total number of comments to a minimum, as excessive comments can affect the layout of the transcript and/or report card PDF and increase the size of the eTranscript XML file.
Report comments can be inactivated by deselecting the Active checkbox. Only active report comments can be chosen on the student's Report Comments page. Inactive report comments appear in text that is not bold; active comments appear in bold text.
| 1. Navigate to the Report Preferences and mark the Report Comments field on a report. System Settings > System Preferences > Report Setup | |
| 👁 Screenshot of the transcript display options highlighting Report Comments. Transcript | |
| 2. Navigate to the student's Report Comments page and select the comments to display. If a report comment is marked active for a student's transcript, it is also active on the student's eTranscript. There is no separate option for adding a comment to an eTranscript report. | 👁 Screenshot of the report comments tool with the comment detail highlighted. Student Report Comments Tool |
| 3. Use the Report Comments Batch Wizard to apply report comments to groups of students. | 👁 Screenshot of the Report Comments Batch Wizard Report Comments Batch Wizard |
Transcripts provide a historical record of a student's performance in courses. Using the Report Preferences tool, districts can determine which information to include on printed transcripts, including which grade levels, credit groups, standards, and GPA calculations.
Tool Search: Report Setup
Transcripts provide a historical record of a student’s performance in courses. Districts can determine which grade levels to include on the report and choose which credit groups to include, which standards to print, and which GPA calculation(s) to use. Transcript Report Preferences allow users to determine what and how data is reported on printed transcripts.
Transcripts are generated for printing on a standard 8.5 in X 11in sheet of paper. The following table describes the default margin size for transcripts:
Margin |
Size |
|---|---|
Top |
0.5 inches |
Bottom |
0.5 inches |
Left |
|
Right |
|
The following sections describe all report options. Many of these options can be set to display only those options associated with a specific school by selecting the 'Filter to selected school' checkbox. This filters the standard groups, credit groups, and related information to only show those categories associated with the school selected in the Campus toolbar. See the Transcriptsarticle for more information on how data populates a printed transcript report.
The 'Enable Default Transcript' option can be set under System Preferences. When set to Yes, the Campus-provided Default transcript report is available for generation. When set to No, this option is not available.
| Option | Description | Default Report Options |
|---|---|---|
| Group Options | Users can group course information by Grade, Term, or Year.
If standards are used in the Course Display, they are also displayed by grade, term, or year.
School Year Sort Logic with School Name/School Number Grouping
|
Grade |
| School Year Options | The School Year Options field allows users to designate the last school year from which to report transcript data. For example, if 2018-19 is selected and the student has earlier transcript records from the reporting school, all course grade data from these enrollment records through the 2018-19 report. Any transcript records from school years after 2018-19 are not reported. | N/A |
Grade Level Options |
The Exclude grades flagged as "Exclude from GPA/Class Rank" checkbox allows users to exclude all GPA-excluded grade levels from factoring into the student's reported GPA/Class Rank. Only grade levels with the Exclude from cumulative GPA/Rank calculations checkbox marked on the Grade Levelsare excluded.
When all transcript course records for a school are from a grade level marked as Exclude from GPA/Class Rank, the school name does not print. This logic applies to all of the Group by options. |
N/A |
GPA/Class Rank Calculation Options |
Class Rank is a mathematical summary of a student's academic record compared to other students in the class.
GPA/Class Rank Calculation Options determine how GPA and class rank data is displayed on the Transcript. For each option, the Class Rank and Bonus Points can be selected. When a Weighted GPA or Unweighted GPA option is selected, the Bonus Points and Class Rank checkboxes are available for selection.
Selection can be made for Cumulative GPA. When the calendar includes custom GPA calculations, Custom GPA/Class Rank Calculation Options can be selected. These display as User Defined and display the Custom GPA name on the Transcript.
See the GPA Calculations in Campus article for detailed information on GPA options. The following options are available:
All GPA/Class Rank Calculation options can be selected if desired.
To NOT calculate class rank for students, see the following settings:
Other settings that may affect student Class Rank:
|
Cumulative GPA
Weighted GPA
Class Rank Percentile (Number of students with a lower rank over the total number of students.) |
| Custom GPA/Class Rank Calculation Options | If a school or district uses custom GPA calculations, student data based on these calculations can be selected and reported at the top of the transcript in the Transcript Statistics section. For California districts, see the California GPA Calculations article. |
N/A |
Course Display Options |
Course Display options allow users to select the Course records that display on the transcript based on Credit Groups and Standard Groups. Mark the Filter to selected school checkbox to list only those credit or standard groups associated with the school selected in the Campus toolbar.
Choose the desired Credit Groups or Standard Groups to determine which courses to print on the transcript. If a student has any transcript items not assigned to a credit type, those credit types are considered Unassigned Credits. If the Unassigned Credits option is not marked, that course does not print. |
All Credit Groups
All Standard Groups |
Credit Summary Display Options |
Credit Summary Display Options determine which credit groups/standard groups report. Users may display both Attempted and Earned Credits for the student's Academic Program or selected Credit Groups.
Credit Groups and credit types are established in the Credit Group tool and then assigned to schools using the School Standards tool.
If a student has any transcript items not assigned to a credit type, those credit type totals appear as Unassigned Credits and print on the transcript report in a No Credit Name Assigned section. This section will not be displayed if the Unassigned Credits option is not marked.
Academic Program Credit Summary When the Academic Program Credit Summary is selected, the Credit Types only include those items from the Credit Group required in the Academic Program or those with a Display Sequence value. This option also allows the display of Required, Remaining, and Overflow credits for the Academic Program. Checking the "Include Credit Type overflow logic" option displays information on credits that overflow from one type into another when the requirement for the first credit type is met.
The Credit Groups options cannot be selected if this option is selected. Things to note:
When using the Academic Program display, be aware that any in-progress credits and planned credits based on the student's Academic Plan are NOT included in the earned credit count and ARE included in the Remaining Credits total. When the Group by Term or Group by School Year option is used and Credit Type overflow is checked, the calculation of Remaining Credits includes overflow credits, but due to space constraints, the overflow credits column does not display on the report. When a student has earned credits that overflow from one credit type into another, those credits display as positive credits in the Overflow column. They are used in the calculation of Remaining Credits for the credit type into which they overflow. This occurs whether the overflow is set on the Credit Type or on the Credit Rollup Overflow Override of the Transcript Credit record. When Credit Groups are selected, credit types are sorted alphabetically by Credit Group (if more than one is selected). These display only when the student has earned credits in that type.
Choose to display the grand total for all Credit Groups, or not display the grand total for all Credit Groups. When the choice is not to display the grand total, the Total Credits row is not displayed, but each Credit Group includes a total.
The Academic Program options cannot be selected if this option is selected. |
Earned Credits
Attempted Credits
All Credit Groups (Grand Total)
All Standard Groups |
| Standards Summary Display Options |
Standards Summary Display Options determine how standards data is reported on the transcript. Select which standard scores to display (see definitions following) and then select the standards groups to display. These groups originate from the Standards Bank and are displayed below the Credit Groups section on printed transcripts.
Standards display alphabetically by parent name. |
N/A |
| Standardized Testing Display Options | Standardized Testing options allow users to determine what types of tests are displayed on printed transcripts and how Standard Group data is laid out on the transcript.
|
All Assessment Options |
| Report Display Options | These options can make the transcript more readable but may also increase its length.
You can select as many options as you desire from the Report Contents, Report Header and Format, Student Information, and Records Transfer Settings.
See the Display Options table below for descriptions of these options. |
Enrollment History |
| School Comment | The School Comments field allows users to include a comment that appears at the top of all printed transcripts. School comments can be modified anytime and apply to those receiving the transcript. |
N/A |
| Option | Description |
|---|---|
| Report Contents | |
Course Display |
Selection determines how courses are displayed on the transcript. Information displays based on entered data in the Courses editor. Options are:
|
Enrollment History |
Lists all enrollments for the student. This option displays at the top of the first page of the transcript. |
| No Show | Indicates all students with the No Show checkbox marked on the Enrollment tab. This option can only be selected if Enrollment History is also selected. |
| Attendance | Displays the student's attendance. When selected, choose one of the following:
Attendance prints on the transcript when the Calendar is assigned a Type of I: Instructional or NULL. This is set on the Calendar. |
| In-Progress Courses | In-Progress Courses are courses with no posted scores for grading tasks and/or grading standards. A course is “in progress” until midnight of the entered end date. This could be the end of the term or the date the student leaves the course. If a student withdraws from the course on September 19, they will remain actively enrolled (on the roster) until midnight on that same day. At 12:01 a.m. on September 20, the student is no longer actively enrolled in the course. The Term Mask checkbox on the Course Grading Task/ Grading Standard Detail also helps determine if a course is designated as In-Progress and/or is considered a “Future” course. Example A course is four terms long, and it is currently Term 2. Scores have been posted to the transcript for Term 1. A credit is earned for each term (if passing scores are achieved). One credit is listed on the student's transcript for the Term 1 score.
A course is considered In-Progress until the last day of the last term for that grading task. In-Progress is always a sum of posted credits and In-Progress credits until that course is completed. |
| Exclude Previous Years | Displays when the In-Progress Courses checkbox is marked. In-Progress scores from previous school years are not listed on the printed transcript when this option is selected.
When a course number or course name is changed on the Course/Course Master editor, but the student has an entry on their transcript using the previous course number/course name, manually entered transcript entries may print as In-Progress. To prevent this, mark this preference. |
| Include Future Courses |
Displays when the In-Progress Courses checkbox is marked. Future courses are those that:
Courses for future school years do not display. A school may have a standard school year calendar that begins August 31 and ends June 15 and a separate calendar for Summer School from June 18 through August 15. When this preference is marked, courses for students enrolled in the Summer School calendar are included on the transcript. |
| Report CTE Program | Displays data for an Academic Program with a Program Type of CTE and a Student Status of Concentrator, Participant, or other CTE Student Status options for the particular district or state. A student may have more than one CTE Academic Program. |
| Student Status | Droplist appears when the 'Report CTE Program' option (above) is selected. This supports the ability for users to report a CTE Academic Program on transcripts. |
Activity Courses |
Lists the activities in which the student is involved, as identified by courses that have a value in the Activity field on the Course editor. |
Immunization |
Lists the student's immunization records. This appears as a separate page of the transcript. |
| Report Comments | Displays any report comments established for the student in the Report Comments tab. |
Standard Rubric |
Displays the rubric tied to standards reported on the transcript. |
Docufide Compatible |
When selected, the District Number, School Code, and State ID labels display as DCODE, BCODE, and UIC, respectively. |
| Certification | When selected, Academic certification data is included. The status of a student's certification is documented under the Academic Program - Certifications Fields section of the Programs (Academic Planning) tool. |
Report Header and Format | |
No Shading |
No shading appears on the printed transcript. This feature is only available in the Group by Grade format. |
| Accreditation | Lists the Accreditation Status of the school. This is entered on the School Information editor. |
| District Name | Indicates the name of the district above the school name in the header. |
| District Number | Reports the district number within which the school generating the transcript exists. District Numbers are reported from the State District Number field on the District Information tool. |
Blank Header |
Displays no information at the top of the report. The Official Transcript and the District Name fields cannot be selected when this is selected. |
| School CEEB Code | This code is entered on the School Editor and stands for College Entrance Examination Board. It is a national identifier for high schools. |
| GPA Max | Marks courses with a GPA Max Value greater than the entered GPA value in the display preferences. |
Official Transcript |
Prints a notice that this report is the official documentation of the student's school records. This is often required for college admissions. |
| School Code | The state assigns this code to a school for identification purposes. It is entered on the School Editor as the State School Number. |
Official Signature |
Prints a line where the principal or superintendent can sign the student's transcript on the bottom of each page. |
Student's Phone |
Prints the phone number assigned to the student's household. |
Student Information Student picture, Race/Ethnicity, Place of Birth, and Guardian options are only available when in the Group by Term or Group by School Year format, not for the Group by Grade format. | |
Student Picture |
Prints the student's picture, which is uploaded and viewable on the Summary tab. |
| State ID | Prints the state ID number assigned to the student. This number may be different from the student number. |
| NCES Grade | Prints the Federal NCES Grade for a course. |
Race/Ethnicity |
Reports the student's race/ethnicity as entered on the Demographics (or Identities) tab. |
| Counselor | Prints the name of the counselor assigned to the student via the Team Members tool.. |
| Diploma Date | If populated, the Diploma Date entered on the student's Graduation record reports. |
| Guardian | Lists the designated parents or guardians as noted on the student's Relationships tab. |
Place of Birth |
Prints the Birth Country from the Demographics tab. In most areas, this is an optional entry for demographic data, and only prints on the transcript if there is demographic data to print. |
SSN |
Reports the student's complete Social Security number (XXX-XX-XXXX).
Tool rights are necessary for this field to print. |
Diploma Type |
If populated, the Diploma Type entered on the student's Graduation record reports. |
| State Seals | State seal information is added to the student's Graduation record and displayed on the transcript when selected.
This option is only available for those states where State Seal functionality is available. |
| Legal Name |
When selected, the student's legal first name, legal middle name, and legal last name print if entered in the Protected Identity information and if the user has tool rights to Protected Identity Information
If the legal first name or last name is not populated or the user does not have tool rights to this information, the student's first name and last name report from the First Name and Last Name fields on the student's current Identity record. Tool rights are ignored when viewing the Transcript on Campus Student/Campus Parent. |
| Gender | When selected, prints either the student's entered Gender Identity or the Legal Gender assigned in the Protected Identity information and if the user has tool rights to Protected Identity Information.
If the legal gender is not populated or if the user does not have tool rights to this information, the student's gender reports from the Gender field on the student's current Identity record. Gender does not report on the Immunization page. Tool rights are ignored when viewing the Transcript on Campus Student/Campus Parent. |
| Principal | When selected, prints the school principal's name as entered on the School Information editor. |
| Expected Graduation Year | When selected, prints the student's expected graduation year when a Diploma Date is not entered on the student's Graduation record. This mostly applies to students in grades 9-11. The Date First Entered the 9th Grade value (from the Graduation record) plus four years displays. That value can be modified to indicate a different year than originally expected based on the 9th-grade entry date. When both the Diploma Date and Expected Graduation Year options are selected, the Diploma Date displays preferentially. That means that when a student has both a Diploma Date and a cohortYearNGA value, only the Diploma Date displays (this would generally be 12th graders). When both are selected, the Expected Graduation Year prints in place of the Diploma Date, even if the student does not have a Diploma Date. |
| Records Transfer Settings | |
| Default for Transfer | When marked, this indicates the transcript is the default transcript sent when performing a records transfer via the National Records Exchange or Student Records Transfer. Only one transcript report per school can be marked as Default for Transfer. |
The Report Card Batch tool will print report cards en masse, one page per student, suitable for handing out. A saved report card format can be used, or a single-use template may be created using a list of display option preferences.
Tool Search: Report Card
The Report Card Batch Report prints student report cards based on the options selected in the editor for multiple students en masse. A saved report card can be printed or the user may select from a list of Display Option Preferences.
👁 Image
Report Card Batch Editor
See the Grading & Standards Reports Tool Rights article for the tool right needed to generate this report.
For students with multiple enrollments:
When the student has multiple enrollments in the same school year, Report Cards print for each school in which the student was enrolled.
Information in the letter sub-reports uses data stored in the AttendanceDayAggregation table. This means that attendance data for the current date is accurate as of the previous night's attendance calculation, or the last time the Attendance Aggregation Refresh was run. If needed, the Attendance Aggregation Refresh tool can be run to force an attendance recalculation to pull in the current day's data.
Field | Description |
|---|---|
Report Options | Select a report that has already been created in Report Preferences. If the Schedule Structure dropdown in the Campus tool bar is set to All, all reports cards for all schedule structures are listed for select. If a specific schedule structure is selected, only report cards for that structure are listed. The selected report card prints grades and attendance related to the selected schedule structure. |
Display Options | If there is no report card available in the Report Options dropdown list, or existing report cards do not meet the needs, choose the items to display from the Display Options list. In order to see the Display Options and make selections, users must have tool rights to Report Setup. |
Ad hoc Filter or Grade | Select the students to include in the report from an existing ad hoc filter. Only those students included in the filter will have a report card generated for them (if they meet the requirements of the report card). Or, select students by a grade level. All students in the school can be selected at one time, but it is recommended to limit the number of students included in each batch. |
Active Only | Marking this checkbox includes only those students who are actively enrolled as of the entered Effective Date. |
Effective Date | The entered date reflects the date by which students are actively enrolled. If all students regardless of active enrollment should be included in the report, remove the mark from the Active Only checkbox; this disables the Effective Date field. This field displays the current date but can be modified by typing in mmddyy format or using the calendar icon to select a date. |
Sort Options | The Report Cards can be sorted in the following ways:
|
Teacher Sort Options | When the Teacher Sort option is selected, options for selecting the Calendar of enrollment, the Effective Date and the Period of the day appear. If a student does not have a teacher for the selected period in the calendar for the effective date chosen, the student's report card prints first and the teacher's name is blank. |
Batch Queue Options | Generating report cards can sometimes be a long process. Submitting reports to Batch Queue allows the batch report to generate in the background while the user is free to use other parts of the product. Users can use the batch queue option to schedule reports to be processed at a later time and keep a record of reports that have been processed. To submit a Report Card Batch Report to the batch queue, select Submit to Batch after entering the appropriate fields in the report editor. A Batch Queue Reporting Options detail window displays. |
👁 Screenshot of an example report card.
Report Card Print
The following table describes the default margin size for portrait and landscape report cards:
Report Type | Portrait | Landscape |
|---|---|---|
Conventional | Paper Size: Letter (8.5in X 11in) | Paper Size: A4 (210mm X 297mm) |
Standards Based | Page Size: Letter (8.5in X 11in) | Page Size: Letter (8.5in X 11in) |
The Report Card Batch report is used to batch print report cards. This video demonstrates how to batch print report cards.
The Transcript Batch report allows users to generate transcript records for multiple students at one time. A saved transcript report format can be used, or a single-use transcript template may be created using a list of display option preferences.
Tool Search: Transcript Batch Report
The Transcript Batch Report allows users to simultaneously generate transcript records for multiple students. This report allows users to select a saved transcript report with pre-selected transcript options set in the Report Preferences tool or design a transcript using Display Options instead of selecting an existing transcript report.
👁 Screenshot of the Transcript Batch editor.
Transcript Batch Report Editor
See the Grading & Standards Reports Tool Rights article for the tool right needed to generate this report.
| Options | Description |
|---|---|
| Report Options or Display Options | Indicates which Transcript Report, created in the Report Setup area, generates. If there is no existing Transcript Report to generate, use the Display Options. These are the same options that are selected in the Report Setup area. |
| Which students would you like to include in the report? | Students can be selected by either the Grade Level or an Ad hoc filter.
|
| Sort Options | Transcripts can be printed (sorted) in the following ways:
A transcript is printed for each of the student's households with a guardian where the Mailing checkbox is marked. Only one transcript prints if all of the student's guardians are in the same household. If guardians are in more than one household, the number of households in which the guardians reside determines how many transcripts are printed. |
| Report Format | The Transcript Batch can be generated in either PDF or DOCX format. |
| Report Generation | Two buttons are available for report generation:
|
👁 Screenshot of an example of the Transcript Batch Report using report options.
Transcript Batch Report Display
Depending on the options selected, the transcript may print more than one page.
👁 Screenshot of an example of the Transcript Batch Report using display options.
Transcript Batch - Report Display Options
The transcript batch report is used to batch print student transcripts. This video demonstrates how to batch print transcripts.
From a student's Grades tab, users may select a report card to print from a list of report card templates. These templates have been created using the Report Preferences tool. To learn about report card templates, visit the 'Create Report Card Templates' section of this study guide.
Tool Search: Grades
The Grades tool displays a student’s academic performance by enrollment and course. It shows In‑Progress grades, Posted grades, and calculated GPAs. Grade data is read-only and reflects information entered elsewhere in Campus.
GPA and Grade data are populated in this tool from different areas of Infinite Campus. The data be modified via this tool.
👁 Screenshot of the Grades tool, withposted grades for Art and English courses Quarters 1-4.
Student Grades Tool
Watch the video below to learn more about Grades.
This section explains the system behavior behind grade calculations. Because grade and GPA data originate in other Campus tools, the Grades tool functions strictly as a read-only display.
Custom GPAs must be enabled using the Calendar GPA Calculation Setup tool. When Custom GPAs are enabled, Rolling Cumulative GPAs do not display. See the GPA Calculations in Campus article for more information about how GPAs are calculated.
The Grades tool lists the student's Posted and In-Progress grades by course. By default, all terms display.
👁 Screenshot of the grades tool highlighting the term filter and page view expand features.
Use the Settings menu to control what information appears on the Grades screen.
👁 Screenshot of the Settings menu expanded.
Users with the Student Information > Grades > Grade Book tool right have additional access to grade details.
👁 Screenshot of the categories and assignments listed for a course.
Section Grade Details
Printed report cards include grades and attendance aligned to the selected schedule structure.
Student Grades information is available in the Query Wizard for Student data types in the Student > Grading > Term GPA and Student > Grading > Grading Detail folders.
👁 Screenshot highlighting the Grading fields in the Ad hoc Query Wizard.
Student Grade Fields in Ad hoc
From a student's Transcript tab, users may select a transcript to generate from a list of transcript reports. These reports have been created using the Report Preferences tool. To learn about transcript report templates, visit the 'Create Transcript Templates' section of this study guide.
Tool Search: Transcripts
A transcript is a historical record of a student's performance in a course. The information listed on the transcript can vary from district to district, depending on district preferences. Each district records the grade information that students receive on transcripts and report cards. Grade information is connected to a student's course schedule.
See the Transcript Information for Cross-Site Students for information on recording and posting transcripts when Cross-Site Enrollment is used at the district.
👁 Image of an example student transcript.
Student Transcript
See the Transcripts Tool Rights article for information about rights needed to use this tool.
| Field Descriptions | Example |
|---|---|
| Year when the course was taken, school, grade level | 22-23 Campus High School - Grade 11 |
| Course Number | 2564 |
| Course Name | Pre-Calculus |
| Whether the course was repeated (Yes/No) | No |
| Score the student received in the course | C+ |
| Weighted value of the score earned in the course (if applicable). Some schools adjust this value to account for a course's difficulty. It is often calculated on a 5.0 scale (instead of the standard 4.0). Refer to the GPA Calculations in Campus article for more information. | 2.33 |
| Unweighted value of the score calculated on a standard 4.0 scale, treating all classes equally, regardless of whether they are AP, Honors, or standard. Refer to the GPA Calculations in Campus article for more information. | 2.33 |
| Weight assigned to the course. Some schools/districts assign higher weights to more rigorous courses, such as Honors, Advanced Placement (AP), or International Baccalaureate (IB) classes. | 1 |
| Number of credits earned for completion of the course. | 1 |
| Number of credits attempted by enrolling in the course. | 1 |
| Credit type associated with the course. | Mathematics |
| Actual term in which a course was completed. | 2 |
| Terms long to indicate how many terms the course covers. | 2 |
| Comment about the specific course entry on the transcript. | This grade was adjusted due to an administrative error. |
All transcript records for every school year and calendar are listed on the home screen. Click anywhere on the transcript record to modify additional details for the selected record. Alternatively, use the Edit button to quickly add or modify a record. Clicking anywhere on a transcript record opens the Detail view for that record; using the Edit button allows quick editing of the entire transcript. Only the two most recent groups of transcript records are listed in Edit mode. Click the Show All Records button to display all transcript records for the student.
| Feature | Image |
|---|---|
Get a quick view of the student's transcript by school year (automatic sort option). See the Column Grouping section for more information. Sorting happens within each grouping.
When records are grouped, you can sort them by clicking the dragged value in the header to ascend or descend. The records within those groups are sorted by clicking the table headers.
In the first image to the right, the Course Number column is sorted in ascending order (A-Z), and an up arrow indicates the sort has been changed. In the second image, the Course Number column is sorted descending (Z-A), and includes a down arrow. |
|
Group the column headings using click-and-drag technology. This resorts the transcript entries by the selected groupings.
The default sort option is Year. This is the school year in which the student took that course, and the score received was posted on the transcript. All transcript records are displayed in year order, with the most recent year first. You can remove this (click the X next to Year) or click and drag additional columns into the header.
The graphic to the right shows the Course Name added to the header. Now, the transcript records are sorted by Year and then by Course Name.
Each time a new column heading is added to the header, transcript data is sorted accordingly. Column headings can be moved to sort by, for example, Course Name and then by Year.
See the Column Grouping section for additional information. |
|
Collapse the group on the left side to display only the records for the desired year.
The image to the right displays transcript data for the 2017-18 school year, with the data for other school years collapsed. |
|
Click Edit to modify existing records quickly. Once opened, you can change current records and add new ones (by clicking Add Rows).
Use the Add Rows option like the Batch Add option on the original Transcript. An Add Rows pop-up displays where the number of rows can be entered. The number of Rows, School Year, School Name (may also be Transfer School Name), and Grade level are required. When you are finished, click Save to save the changes and return to the Main screen. Click Cancel to return to the Main screen.
|
|
| Once in Edit mode, only the two most recent groups of transcript records display. These groups can be records from the last two school years or the same school year, but from different calendars.
When there are more records to show, a note of Additional Records is hidden at the end of the two groups. Mark Show All Records to display more transcript entries. When all records are displayed, a note of End of Records displays. |
👁 Image 👁 Image |
| Use the New Details button to add a new record. When finished, click the arrow next to the Save button, then choose either Save to save the record and return to the Main screen, or Save & New to save the record and add another. | 👁 Image |
| Add transcript-related documents using the Documents option. See the Documents section for more information. | 👁 Image |
| Print the student's transcript from the Main screen by clicking the Reports button. See the Reports section for more information. | 👁 Image |
On the Detail screen, transcript information is organized into cards - School Information, Course Information, Scoring Information, Transcript Credit Information, and Additional Information.
Localized fields and district-defined fields are displayed on the Additional Information card, which is collapsible. |
|
| When viewing the details of an existing record, navigate to the next record by clicking the name of the next course record in the lower right-hand corner, or view the previous transcript record by clicking the name of the previous course record. | |
Inactive courses are displayed in the field dropdown lists with an INACTIVE label in both the Main and Detail screens.
When printing the Transcript, the INACTIVE label does NOT print. |
|
| Scores are organized into Score Groups and Rubrics. When GPA Values and/or GPA Unweighted Values are added to a Score Group, they are displayed in parentheses behind the score name.
Score groups and rubrics associated with the selected course for the record are displayed first in the dropdown list. Identical Score Group/Rubrics When identically named Score Groups and Rubrics exist, the group type is appended to the group name. For example, a Score Group named Habits of Engaged Learner and a Rubric named Habits of Engaged Learner would be listed in the score dropdown as Habits of Engaged Learner—Score Group and Habits of Engaged Learner—Rubric (see the second image for an example). When identically named Score Groups or Rubrics have the same name and scores, only one entry is listed for the group, and the scores display as duplicates (see the third image for an example). When there are two identical Score Groups and an identically named Rubric, one entry is listed for the Rubric, and one entry is listed for the duplicate Score Groups; the scores of the Score Group are duplicated (see the fourth image for an example). |
|
Modified By information displays at the end of the transcript record as part of the Additional Information card. It indicates the last user to change the transcript and when (date and time). This does not display for transferred records or converted district data. |
|
Add a new detail record by manually populating the cards with the appropriate information. When ready to save, click the Save icon or click the down arrow next to the Save icon to save the entry or save the entry and add a new entry (Save & New). |
|
| Use the Auto-fill Course Fields Based on Course Number Selection preference to automatically populate other course-related fields. This is available when adding a new Detail record, adding new Rows, and editing existing records. Removing the checkbox turns it off (other course fields will not auto-fill).
These fields are auto-filled:
|
👁 Image 👁 Image |
| When adding a new record, enter part of a course name or number (at least one character - symbols, letters, or numbers). Matching results display in the dropdown list for easy selection.
Course Names and Numbers are populated from the following:
When selecting a course number, the appropriate fields, including SCED and Online Learning, are auto-populated when adding a new record from either the Detail or the Main screen. GPA Weight, Credits Attempted, Credit Type, Terms Long, and Credit Overflow Override are also updated as Course Numbers are entered. Editing an existing record does not automatically update those values. The Free Form Entry sub-right applies to the Course Number, Course Name, School Number, and School Name fields. When assigned, any value can be entered into these four fields. An Original Value label is displayed next to the original values populated for the Course Number and Course Name (see the second image to the right). Re-selecting the original value does not populate the additional fields from the Course. |
|
| Error messages display when a field exceeds the maximum character limit, noting the correct field length. Records cannot be saved until the correct field length is entered. | 👁 Image |
Refer to Grade Level Setup for additional information.
If the exact same course name and number are available in multiple course catalogs, all instances of that course name/course number populate the dropdown lists. Users can select the calendar/course catalog that best matches the Transcript record.
Course Name and Number values return as follows:
When adding or modifying a transcript record, the Course Catalog name appears after the course name or number.
👁 Image
Course Number with Course Catalog Name
Transcript records are sorted by Course Number in ascending alphanumeric order, starting with 0, 1, 2, 3, A, B, C, then by Course Name in alphanumeric order, then by Actual Term number, numeric ascending (12 is after 2), then by the transcript ID. For example:
Credit types are sorted in the following order.
When entering transcript records by typing in the School field (not selecting options from a dropdown list), Credit Groups and Standards display as if a School is selected on the Transcript record.
Transcript entries are grouped by Year, School Name, and Grade Level. Each column can be re-sorted by clicking on the column header. In addition to those options, you can group the transcript by clicking and dragging the column headers into the top row to suit your preferences.
Click the column header you wish to add to the group option and drag it to the group row. The transcript is sorted by the headers listed. Refreshing the browser restores the grouping to the default, where records are grouped by Year, School Name, and Grade Level.
👁 Image
Click and Drag Grouping
When grouped, records can be sorted by clicking the dragged value in the header to sort in ascending or descending order. The records within those groups are sorted by clicking the table headers.
When editing a Course Name or Course Number, enter at least one character to return a list of matching values.
Two options exist for editing existing records:
Hover over the row that needs to be modified. Click anywhere in that row to view or edit the record. This opens the record in the Detail Screen, where updates can be made to any available field.
👁 Image
Click Transcript Record to Edit the Details
Click the Edit button. This changes the read-only view of the transcript record to an editable format. Update the fields as needed. Use the tab key to move through the fields and rows.
Click Save when finished.
👁 Image
Choose Edit to modify all rows of the Transcript
From this view, additional rows can be added for a quick batch add of transcript data. See the section below for more information.
When in Edit mode, where every existing row is editable, an option exists to add rows to the transcript. This feature can be used to add multiple transcript records simultaneously, which is particularly useful when entering basic transcript information for a new transfer student.
Repeat these steps as needed. There is no limit to the number of rows that can be added.
Note the following when modifying information in the Add Rows pop-up:
Add as many rows as needed. Only those that are populated are saved. Any rows that do not have the fields populated are removed when saving the record. Any new records with an existing group (School Year, School Name, Grade Level) are merged with others in that group upon saving.
👁 Image
Add Rows
A new row or a new record cannot be saved until all required fields are populated. Field popups appear when required fields are missing data.
👁 Image
Required Entry Message Display on Main Screen
👁 Image
Required Entry Message Display on Detail Screen
From the Main screen, click the New Details button. This opens the Detail screen, where a new transcript record can be entered. See the Detail Screen Card Descriptions section for information on the available cards and fields.
When you're finished adding the record, click Save to save it and return to the Main screen. Then, click the arrow next to the Save button for Save & New, which saves the entered information and opens a new Details record to add another record. Alternatively, click Cancel to not save any information. Using the Save & New option carries overall school information from this record to a new record.
👁 Image
Add a New Details Record
When a record needs to be permanently removed, select (click) the record's row on the Main screen. The Transcripts Detail Screen loads when the Delete button is selectable. Acknowledge the pop-up that indicates the record will be permanently removed after deletion. To avoid deleting the record, click Cancel.
👁 Image
Delete Transcript Record
Expand the items below to see descriptions of the fields available on the transcript.
School Information fields provide information on where the student was enrolled when the selected course was taken.
👁 Image of the school information section of the transcript.
School Information Fields
| Field | Description | Auto-Fill Behavior | Ad hoc Field Name |
|---|---|---|---|
| School Year | Identifies the year the student received the score for the selected courses. School years are sorted in descending order (i.e., 2017-18, 2016-17, etc.). | This field auto-fills with the current year value. | transcriptDetail.startYear, transcriptDetail.endYear
Returns the start and end year in which the student took the course in YYYY format. |
| School Name / Transfer School Name |
Identifies the name of the school where the student took the course.
This state-designated name populates from the selected school/calendar when the score is posted to the transcript. School names are sorted alphabetically. The Free Form Entry sub-right applies to this field. When assigned, any value can be entered here. See the School Name Attribute section below for more information. |
This field auto-fills on the School Number value. | transcriptDetail.schoolName |
| School Number | Identifies the state-assigned school number where the student took the course.
This populates from the selected school/calendar when the score is posted to the transcript. School numbers are sorted in numeric (ascending) order. The Free Form Entry sub-right applies to this field. When assigned, any value can be entered here. |
This field auto-fills on the School Name value. | transcriptDetail.schoolNumber |
| District Number | Identifies the district where the student took the course. When the score is posted to the transcript, this field populates from the selected school/calendar. | This field auto-fills with the School Name value. | dist.number |
Grade |
Indicates the grade level at which the student enrolled when they received the score for the course. Grade levels are sorted by the assigned sequence. | This field auto-fills on the student's current grade level value. | transcriptDetail.grade |
| NCES Grade | Indicates the NCES (National Center for Education Statistics) grade level when the score was received.
The NCES Grade Level mapping is set using the Grade Level Definitions tool. NCES grades are sorted by the sequence assigned to the grade level. This field is required to send transcripts using the eTranscript tool. |
N/A | enrollmentHistory.ncesGrade |
When necessary, users can modify options for certain transcript fields in the Core Attribute/Dictionary. The district maintains dictionary values entered in the Attribute/Dictionary. Note that when users are assigned the Free Form Entry sub-right, any value can be entered for the School Name (as well as School Number, Course Name, and Course Number).
👁 Image
Transcript Course Attributes
The Data Type selection determines the behavior of the School Name attribute.
When TranscriptCourse.schoolName has a Data Type of textfield, the School Name and School Number lists in the Transcript Editor are populated from the Schools editor list. A Data Type of textfield is the default option.
When TranscriptCourse.schoolName has a Data Type of drop-down list, the School Name and School Number lists on the Transcript Editor populate with the Name (School Name) and Code (School Number) from the associated dictionary (first image) of the attribute, plus the School Name and Number on the School editor (second image).
👁 Image School Name Dictionary Items
|
👁 Image School Editor
|
The list of available school names on the Transcript editor is sorted into groups for Transfer and District. Values from the attribute dictionary are included in the Transfer group, and values from the Schools editor are included in the District group.
👁 Image
School Name Attribute Groups
Course Information fields provide details about the course. Course information auto-fills when the Auto-fill Course Fields Based on Course Number Selection preference is marked.
👁 Image
Course Information Fields
Note the following information about the Auto-fill Course Fields Based on Course Number Selection Preference:
| Field | Description | Auto-Fill Behavior | Ad hoc Field Name |
|---|---|---|---|
| Course Number | Identifies the district-defined or school-defined number of the course. Course numbers are sorted in numeric ascending order.
The Free Form Entry sub-right applies to this field. When assigned, any value can be entered here. |
This field auto-fills when the auto-fill preference is enabled for the Course Name, State Code, GPA Weight, Terms Long, Credits Attempted, Credit Type, Credit Overflow Override, Online Learning, SCED Subject Area, and SCED Course Identifier fields. |
transcriptDetail.courseNumber |
| Course Name | Identifies the district-defined or school-defined name of the course. Courses are sorted in numeric order by course number.
The Free Form Entry sub-right applies to this field. When assigned, any value can be entered here. |
N/A | transcriptDetail.courseName |
| State Code | Displays the course's state-designated identification number.
Changes made to the Course Number field ALWAYS change this field. |
This field auto-fills on the Course Number and Course Name values. | transcriptDetail.stateCode |
| Date | Displays the month, day, and year the score was posted in the Grade Book or the date the score was manually added to the student's transcript. | This field auto-fills on the date the record is created. | transcriptDetail.date
Returns the entered date in MM/DD/YYYY format. |
| Actual Term | Indicates the term in which the student took the course. | N/A | transcriptDetail.actualTerm |
| Terms Long | Identifies the number of terms the course met for this transcript entry. | This field auto-fills on the Course Number values. | transcriptDetail.termsLong |
| Calendar Terms | Displays the total number of terms in the calendar. | N/A | transcriptDetail.termsLong |
| Start Term | Indicates the term number representing the first term the course met for this transcript entry (e.g... 1 = first term = Q1 or S1, 2 = second term = Q2 or S2, etc.). This is displayed as the first number in the Term column of the student's Transcript main view. |
N/A | transcriptDetail.startTerm |
| Start Date | Identifies the date on which the transcript course term starts. | N/A | transcriptDetail.termstartDate |
| End Term | Displays the term number representing the last term the course met for this transcript entry. | N/A | transcriptDetail.endTerm |
| End Date | Identifies the date on which the transcript course term ends. | N/A | transcriptDetail.termEndDate |
Scoring Information fields detail the scores and GPA information the student received for the selected course.
👁 Image
Scoring Information Fields
| Field | Description | Auto-Fill Behavior | Ad hoc Field Names |
|---|---|---|---|
| Score | Displays the score the student received for the transcript entry. This field also displays the GPA Value and the Unweighted Value in the dropdown list.
When a course is selected, the score group assigned to the course appears first in the list of all score groups/rubrics.
If a course number does not match the school's list of course numbers (e.g., a transferred course), all score groups used by the district are listed.
When a score is changed, ALL GPA fields are updated. |
This field auto-fills GPA Value, GPA Max, Unweighted GPA. | transcriptDetail.score
Returns either the letter grade or the numeric value, depending on the score group assigned to the course. |
| Weighted GPA Value | Displays the GPA value of this score based on the grading scale for the district or school. This is used for Weighted GPA calculations and Unweighted GPA calculations when the transcript record does not have an Unweighted GPA Value. This field accepts up to four decimal points (XXX.XXXX). |
This field auto-fills on the Score value. | transcriptDetail.gpaValue |
| Percent | Indicates the percentage value represented by the score received on this entry.
This field accepts up to four decimal points (XXX.XXX). |
N/A | transcriptDetail.percent |
| GPA Max | Identifies the maximum GPA value achievable for this course and score. This field accepts up to four decimal points (XXX.XXXX). |
This field auto-fills on the Score value. | transcriptDetail.gpaMax |
| GPA Weight | Identifies the GPA weighting for this entry up to four decimal places.
If the GPA Weight on a Transcript Course Record is blank/null, the GPA Value for that Course is not included in any Weighted or Unweighted GPA calculations on the transcript.
This field accepts up to four decimal points (XX.XXXX). |
This field auto-fills on the Course Number value. | transcriptDetail.gpaWeight |
| Unweighted GPA Value | Indicates the Unweighted GPA value of this score based on the grading scale for the district or school. This is used for Unweighted GPA calculations. This field accepts up to four decimal points (XXX.XXXX). |
This field auto-fills on the Score value. | transcriptDetail.unweightedGPAValue |
Transcript Credit Information displays the number of credits the student earned and attempted for the course record, and to which credit category (type) it applies. Note that values for Credits Attempted, Credit Type, and Credit Rollup Overflow auto-fill on the populated Course Number Information.
When adding a new transcript record, a blank row of credit-related fields displays. This allows users to add the appropriate credit values without first adding a row.
👁 Image
Transcript Credit Information Fields
The Transcript Post tool posts the Credit Type assigned to the Grading Task of the course. If additional Credit Types are needed, they must be added to the course transcript record manually.
👁 Image
Two Credit Types for One Course
The Credit Earned and Credits Attempted can be adjusted for each Credit Type on the Transcript Credit Information screen.
👁 Image
Detail View for Two Credit Types
| Field | Description | Auto-Fill Behavior | Ad hoc Field Name |
|---|---|---|---|
| Credits Earned | Stores the actual credit value earned for the associated transcript entry. | N/A | transcriptDetail.creditsEarned |
| Credits Attempted | Stores the maximum possible credit available for the associated transcript entry. | This field auto-fills on the Course Number value. | transcriptDetail.creditsAttempted |
| Credit Type | Displays all standard/credit groups and categories.
Standards are displayed in the Credit Name field based on the first parent group to which the standard is associated.
See the Things to Know section for more information on Credit Types.
A NOT IN USE label displays if the Credit Group is not selected in the School Standards tool. |
This field auto-fills on the Course Number value. | transcriptDetail.standardName1
transcriptDetail.standardName2 |
| Credit Overflow Override | This field is set for a single course Grading Task and is used to roll credits when the current credit type has met its credit requirements. The credits from the course apply to the credit type. If that credit type has met its requirements, it then looks at the overflow setup for the course's original credit type.
Choices in this field are limited to the siblings of the credit type selected in the Credit Name field.
A NOT IN USE label displays if the Credit Group is not selected in the School Standards tool. |
This field auto-fills on the Course Number value. | transcriptDetail.secondaryCredit
Returns the code associated with the credit type. |
| Add and Remove | Use the Add button to add a new row for transcript credit information to the current course record.
Use the Remove button to eliminate the existing transcript credit information for the current course record. |
N/A | N/A |
The Additional Information fields provide further details on the transcript entry and include localized fields (used for state reports) and district-defined fields (created by the district). This section is collapsible or expandable by clicking the minus/plus sign on the right-hand side.
Localized and district-defined fields are not included in this article. Instead, see your state's articles for more information on Transcript procedures for your state.
👁 Image
Additional Information Fields
| Field | Description | Auto-Fill Behavior | Ad hoc Field Name |
|---|---|---|---|
| Transcript ID | A unique identifier for the transcript entry. The ID is used in state reports and allows users to easily identify which transcript record relates to the record on the report. | N/A | transcriptDetail.transcriptID |
| Bonus Points | GPA bonus points associated with this entry.
This field accepts values less than 100 and up to four decimal points (XX.XXXXX). |
N/A | transcriptDetail.bonusPoints |
| Status | Status of course, such as R (required) or E (elective), etc. | N/A | transcriptDetail.status |
| Task Code | The code associated with the transcript entry.
This field should be populated with either the Grading Task Code (entered on the Grading Task Detail) or the Standard Number Code (entered on the Standard Detail editor) |
N/A | N/A |
| Standard Number | State- or district-defined number for this standard. This field populates with the Standard Number (entered on the Standard Detail editor). | This field auto-fills on the Standard Name value. | transcriptDetail.standardNumber |
| Standard Name | State- or district-defined standard name for this course. | This field auto-fills on the Standard Number value. | transcriptDetail.standardName |
| Repeat Course | Indicates the student has previously taken this course. | N/A | transcriptDetail.repeatCourse
Returns a value of 0 if the checkbox is not marked, or a value of 1 if the checkbox is marked. |
| Technology | Indicates whether the transcript entry meets technology reporting requirements. | N/A | transcriptDetail.technology
Returns a value of 0 if the checkbox is not marked, or a value of 1 if the checkbox is marked. |
| Comments | Lists any general notes on the transcript entry.
This field is also displayed on the Main Detail view. The entire comment displays in the pop-up text when the user hovers over this field on the Main screen. |
N/A | transcriptDetail.comments |
Upload previous student transcript reports from other schools of enrollment for a particular student. This uses the Digital Repository features. There is no limit to the number of documents you can upload here, but be aware that your district may have set a maximum file size.
Only documents uploaded from the Transcript tool are displayed here. To view other types of uploaded documents, use the Person Documents tool.
Mark the Consent statement (files cannot be saved unless this is marked), then click the Select File button to locate and upload documents. File names must be unique. Click the Save button when finished. A successful upload displays a Done checkmark next to the Select Files button. Close the side panel by clicking the Cancel button.
👁 Image
Transcripts Document Upload
Uploaded files can be sorted by Newest (most recently uploaded) or Oldest. Click the red X next to the file name to remove an uploaded document.
For more information on document upload, see the Managing Document Attachments article.
👁 Image
Document Upload Delete
Click the Reports button on the main screen to print the student's transcript. This opens a side panel with all available Transcript Reports. The Default Report contains the standard transcript elements and can be printed without creating a transcript report in Report Preferences. The other reports listed here were created in Report Preferences.
Choosing any report from the side panel opens in a new browser window. Reports are in PDF format.
Control whether the Default Transcript Report displays as a print option by setting the Enable Default Transcript System Preferences.
👁 Image
Print Transcript Record
All transcript courses are displayed on the printed transcript regardless of how a student is scored and what transcript preference options were selected for credits and standards. This selection affects the credit/standard groups displayed in the Credit Summary and Standards Summary.
Note that In-Progress grades and planned courses are not counted in the Credit Summary.
A transcript is printed for each student's household with a guardian whose Mailing checkbox is marked. Only one transcript prints if all of the student's guardians are in the same household. If guardians reside in more than one household, the number of households they reside in determines how many transcripts are printed.
Transcript information is available in the Query Wizard for Student data types in the Student > Learner Portfolio > Transcript Detail folder.
👁 Image
Transcript Ad hoc Fields
Fields may vary by state:
|
This video shows how to add and edit transcript entries for an individual student.
Thank you!
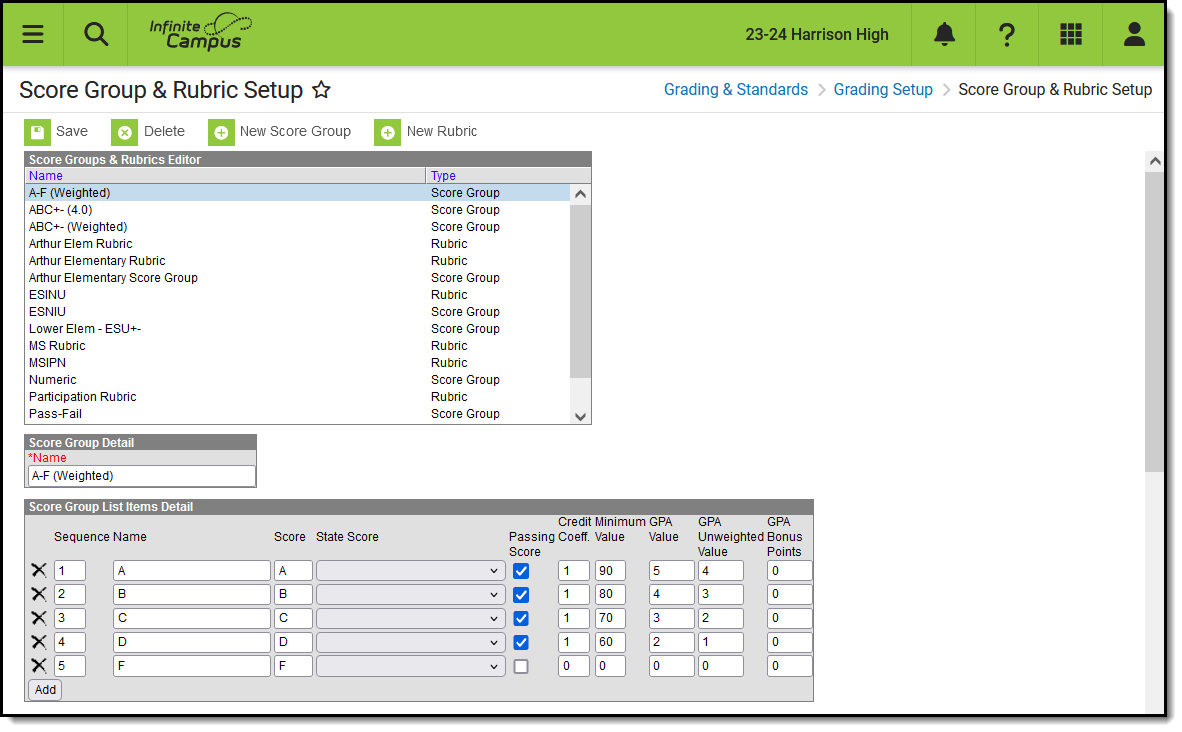
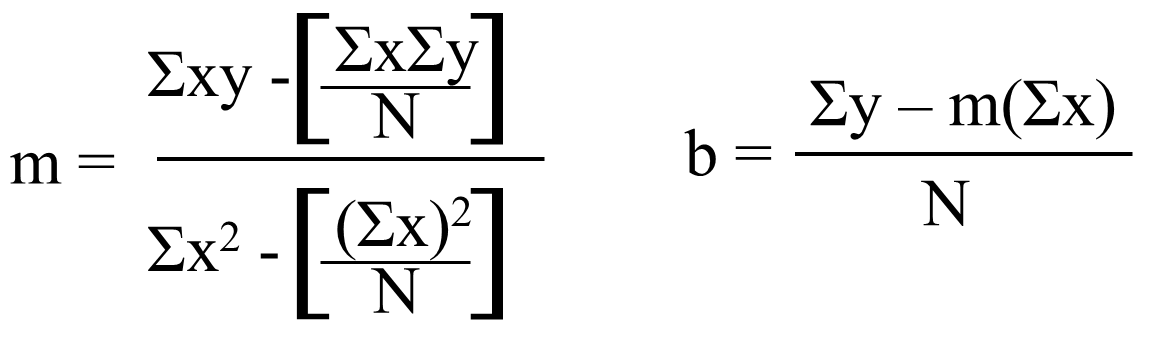
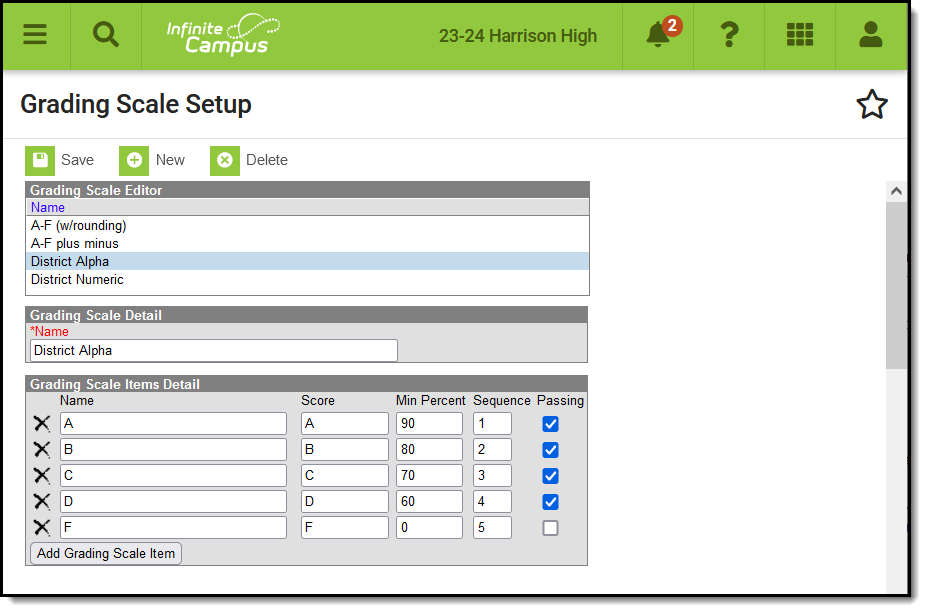
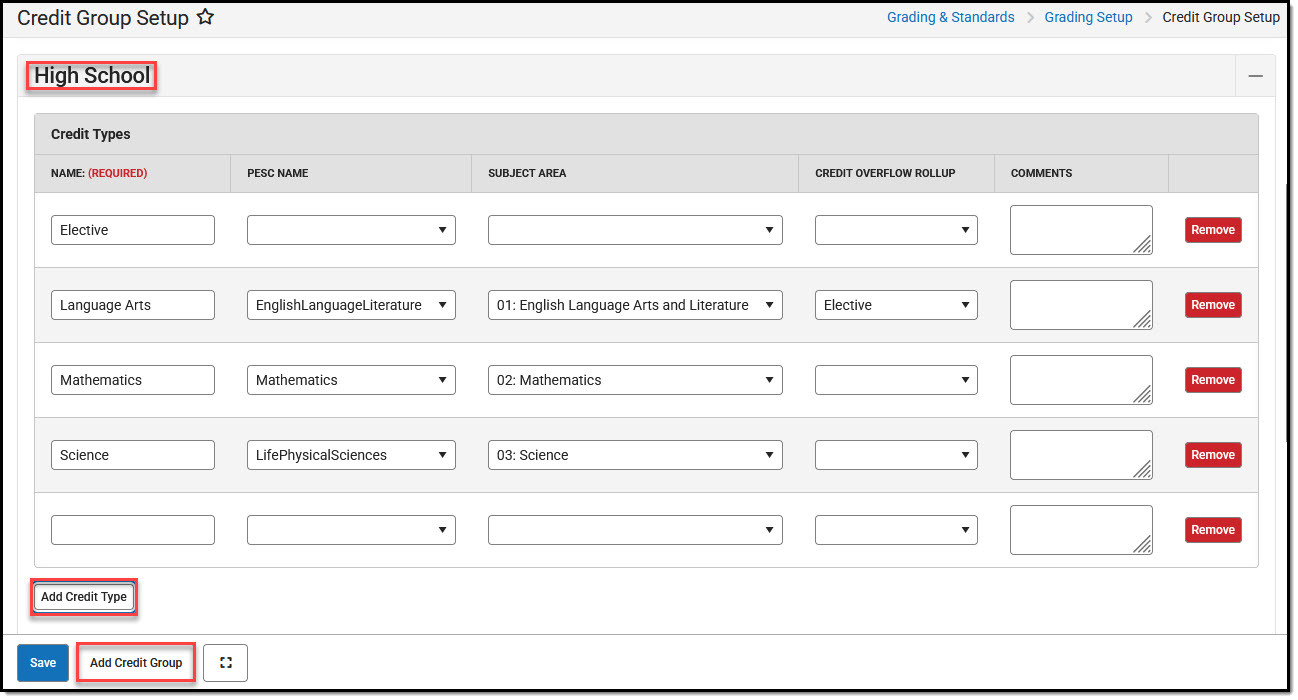
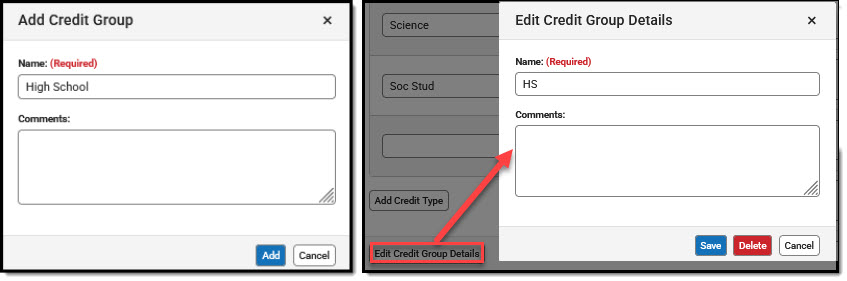
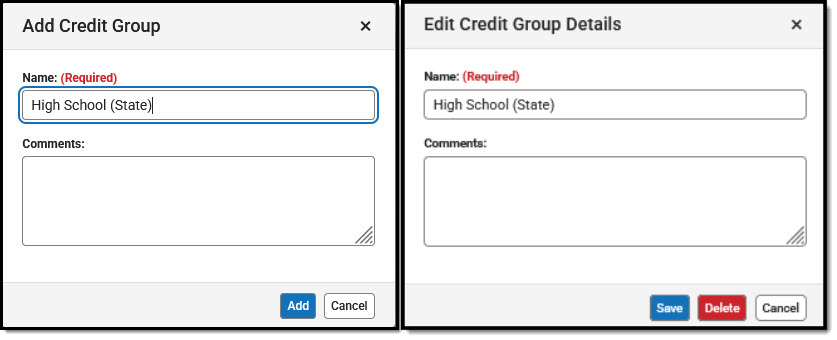
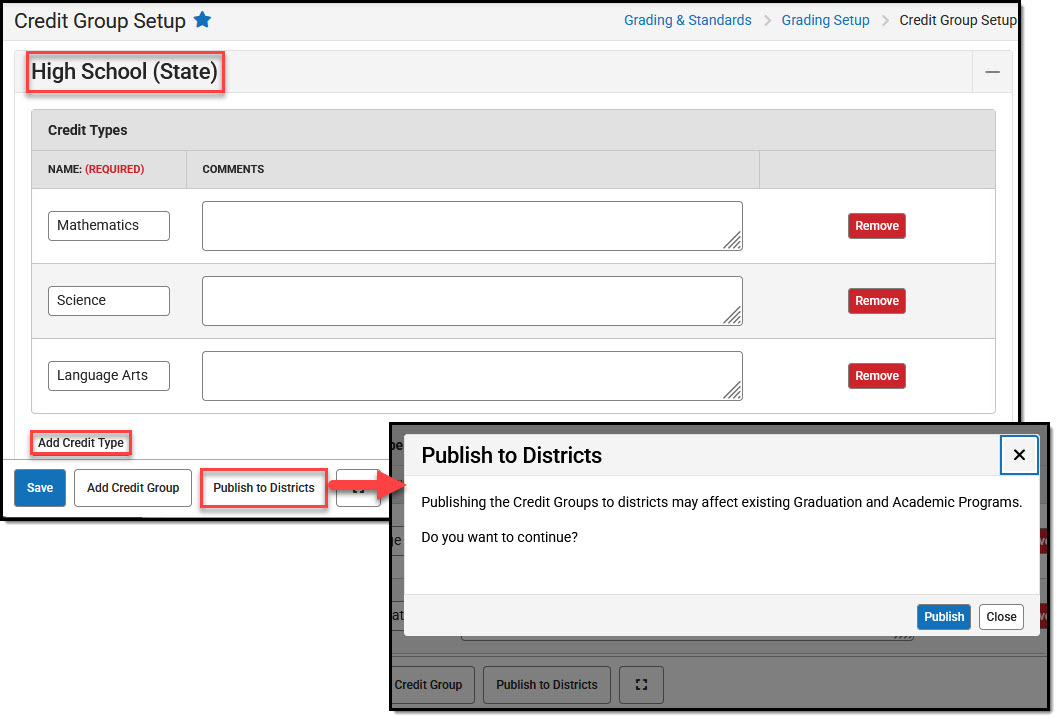
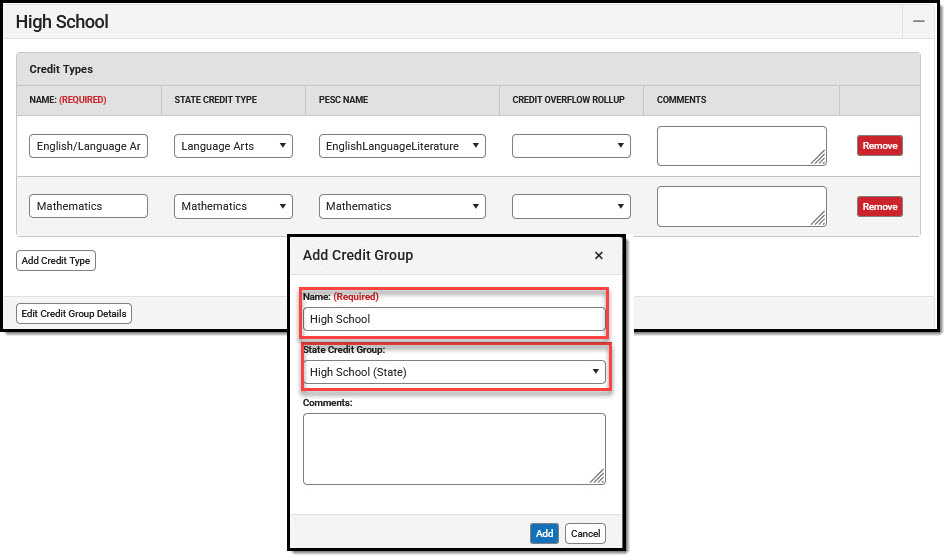
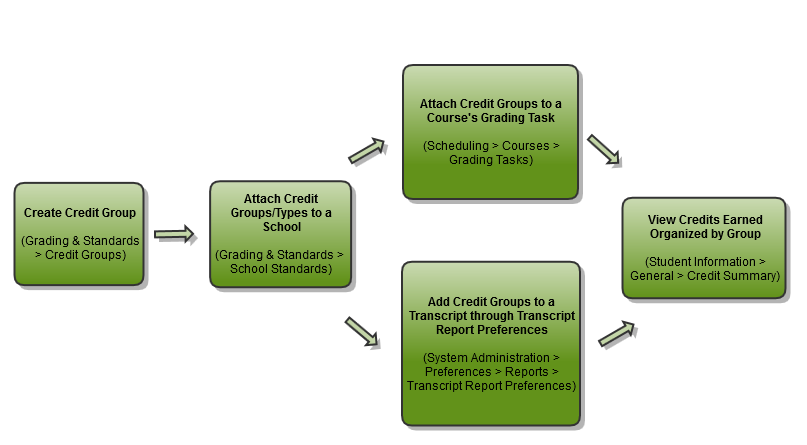
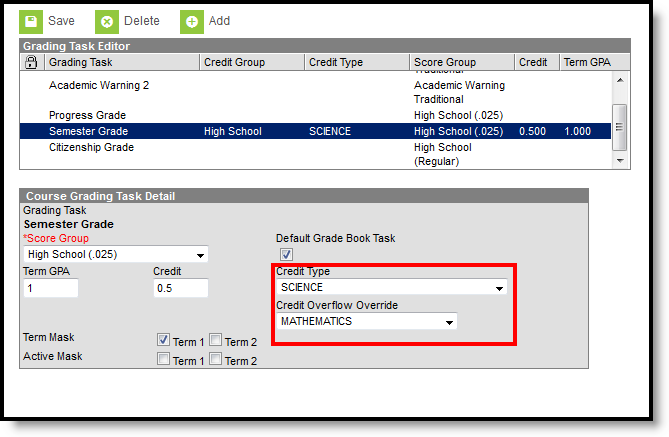
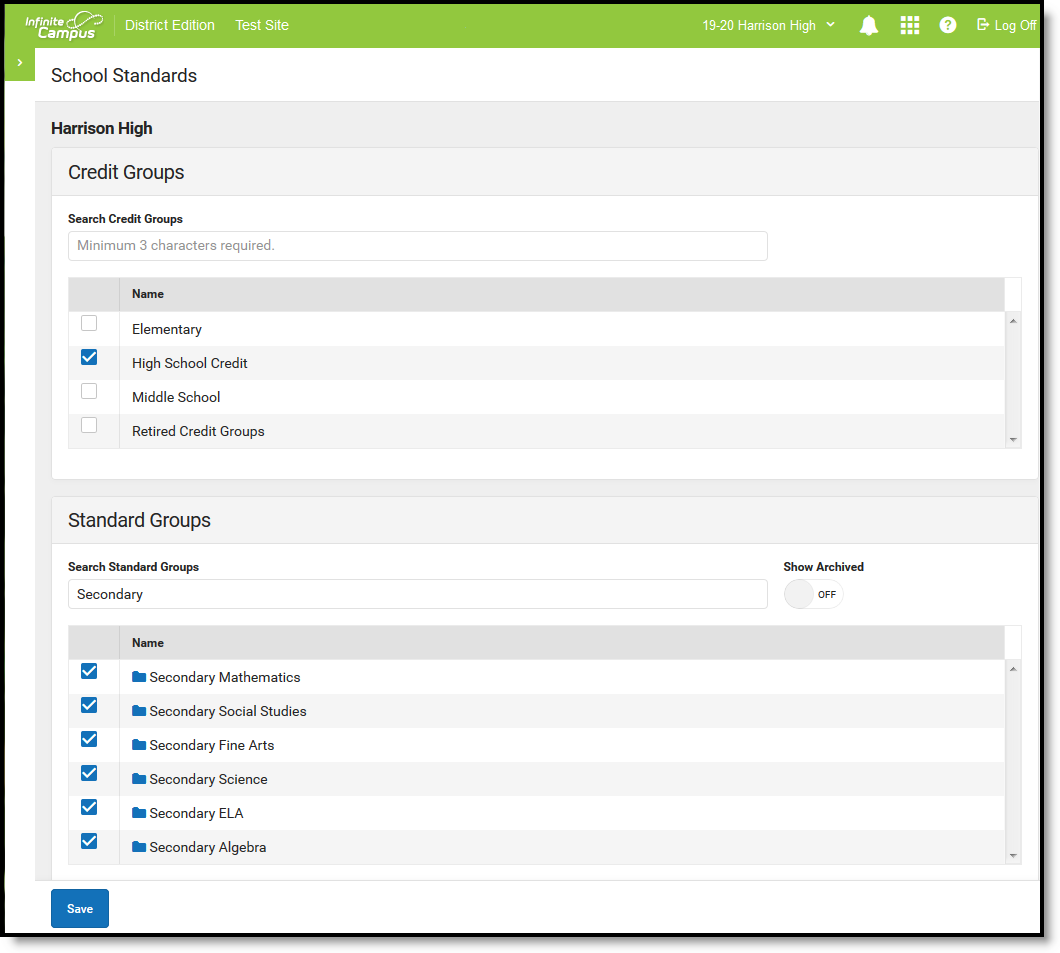
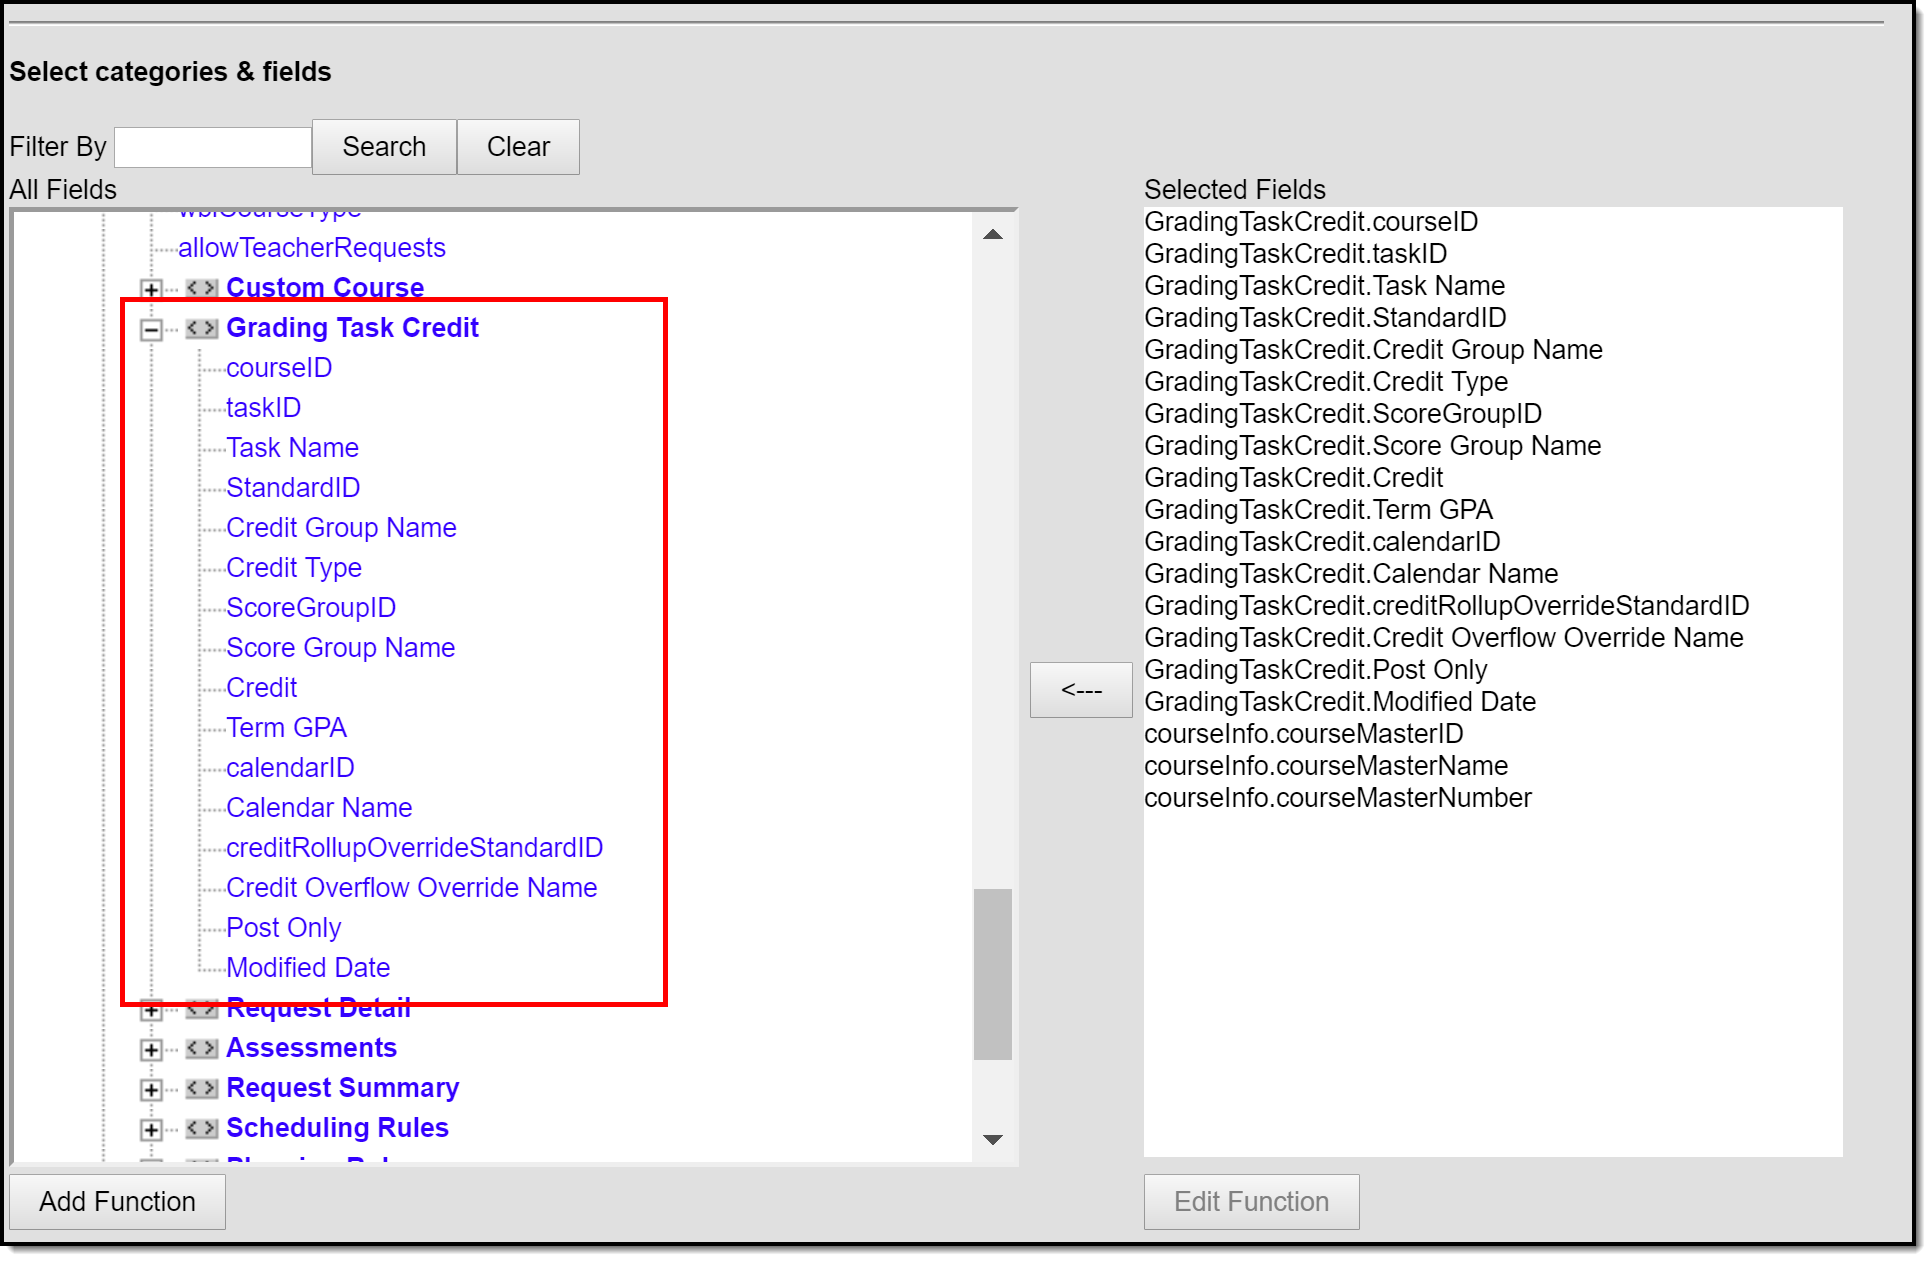
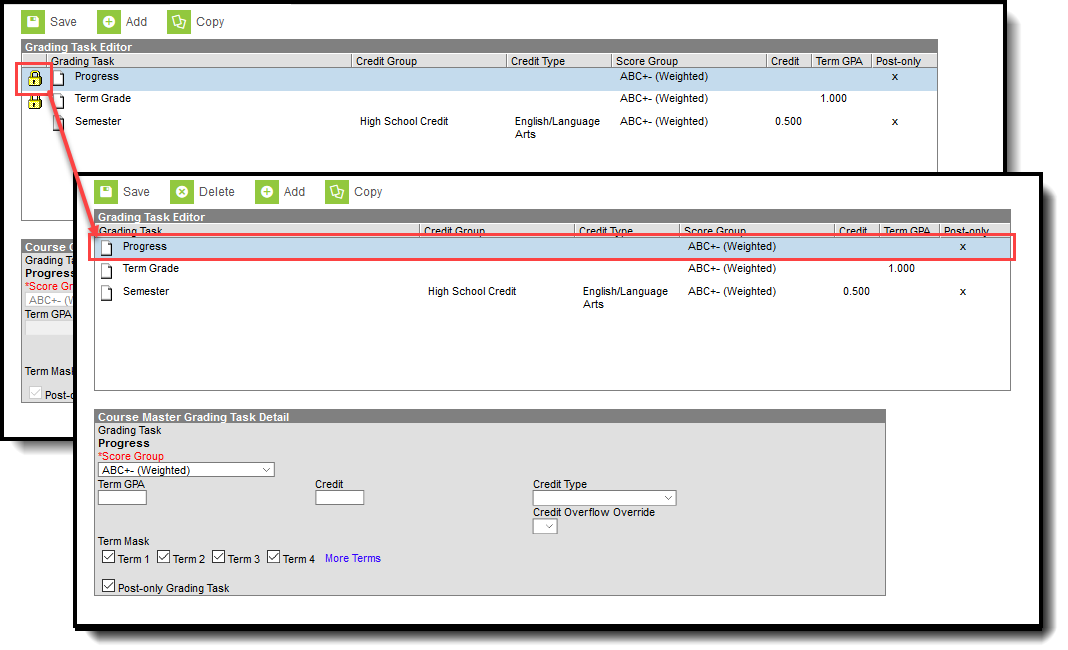
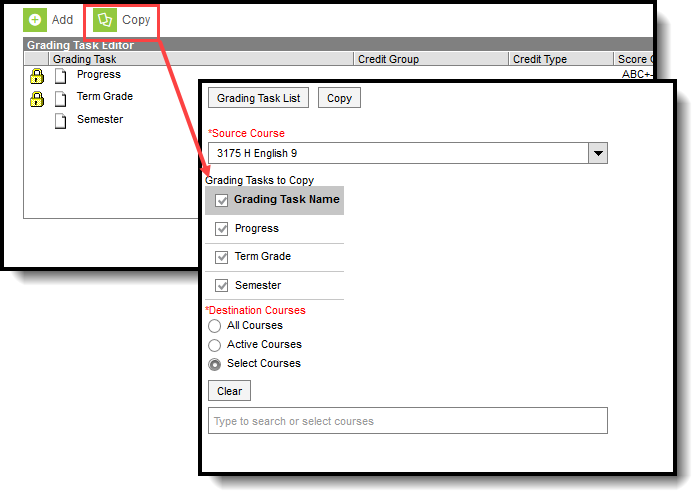
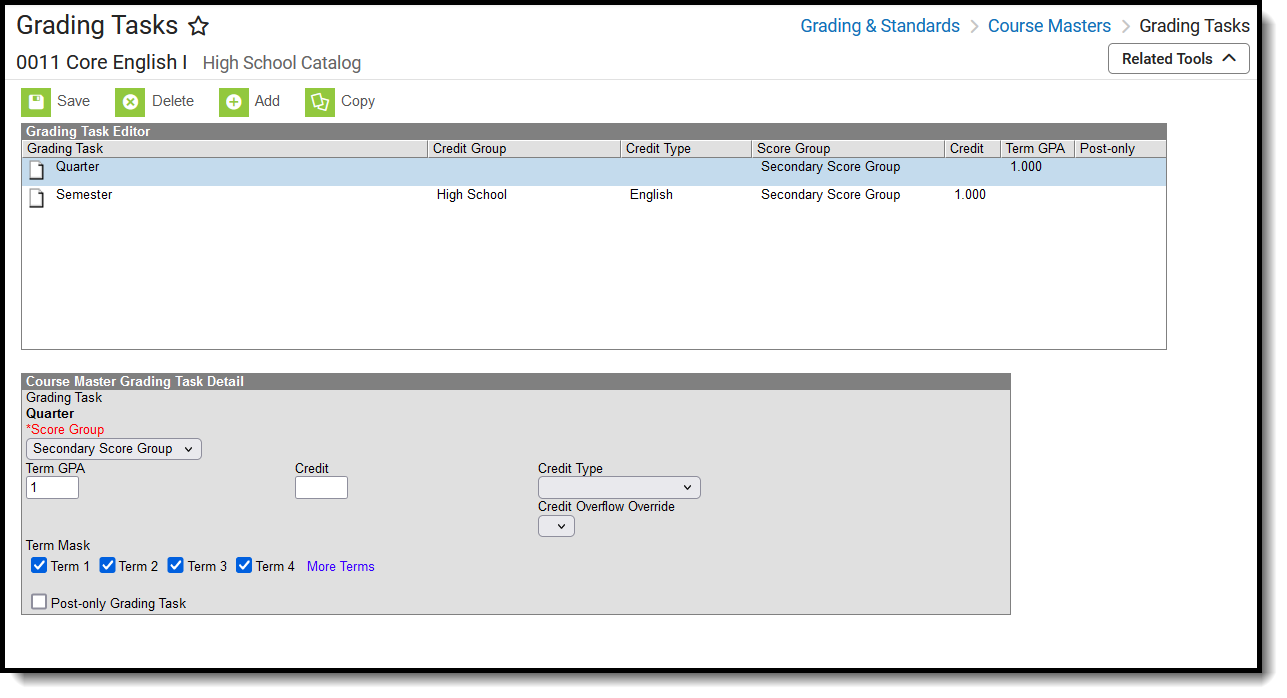
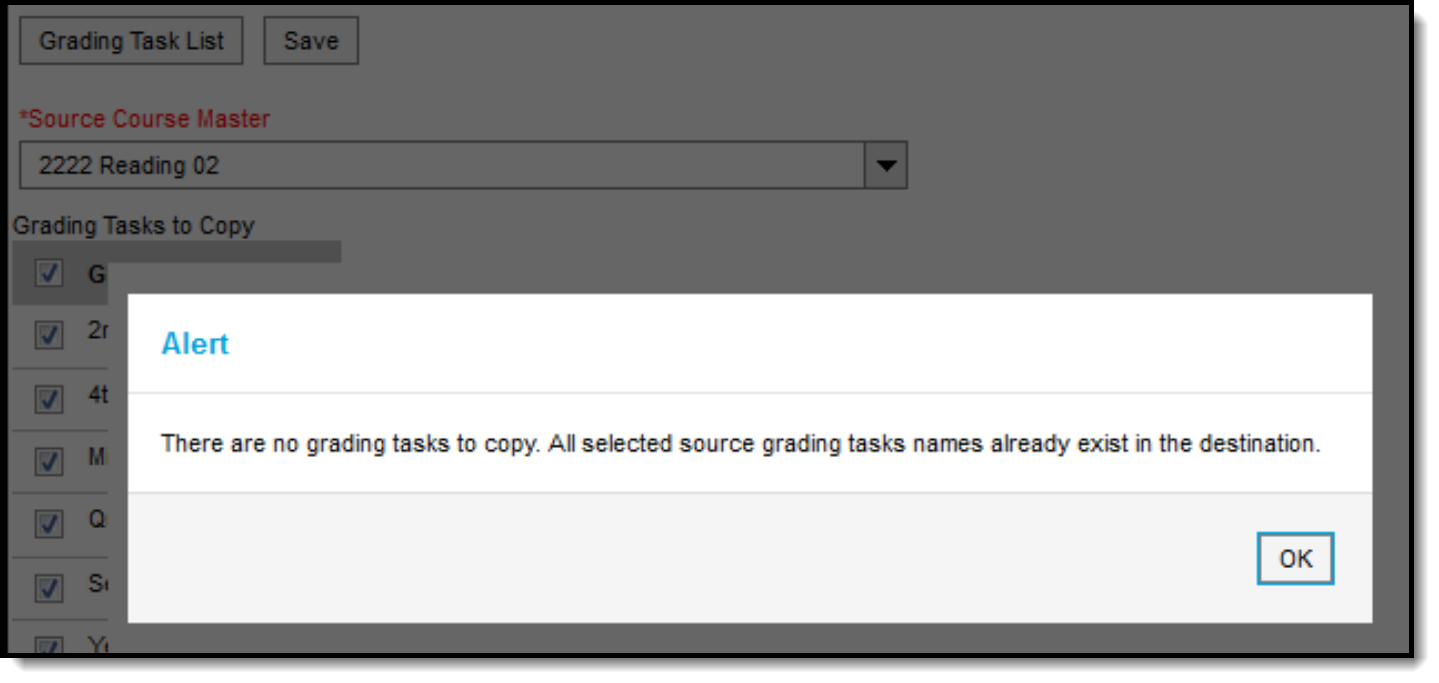
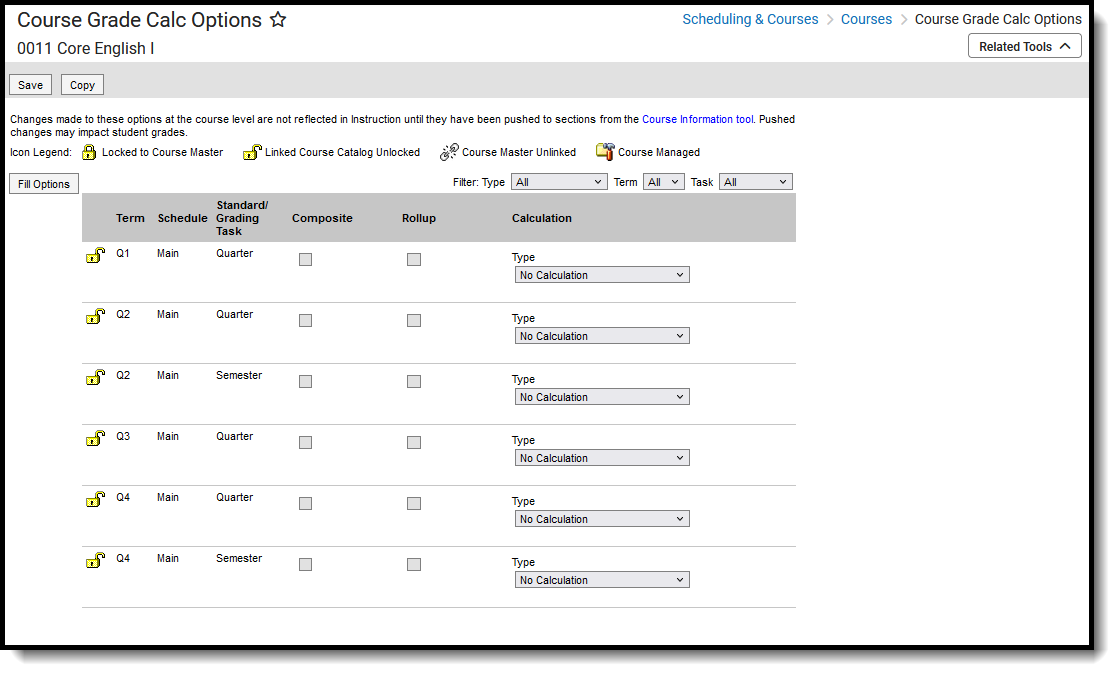
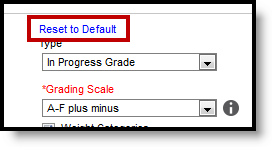
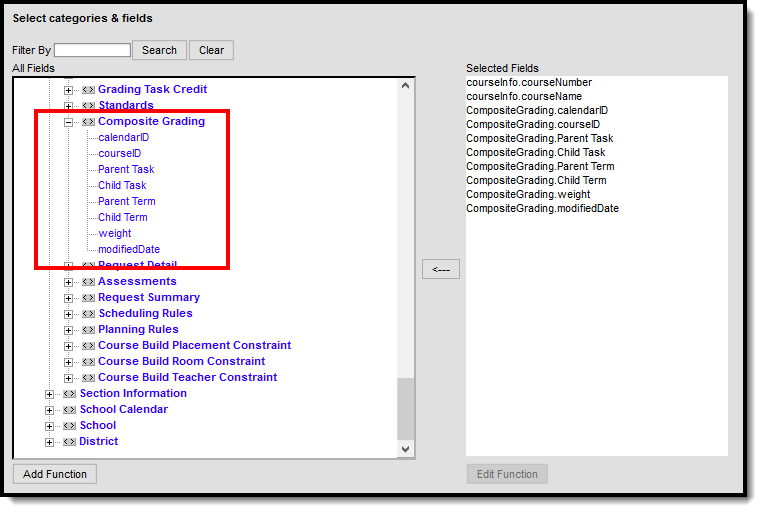
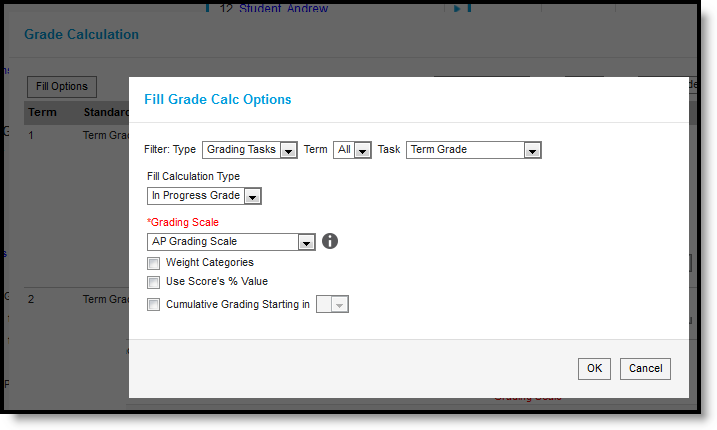
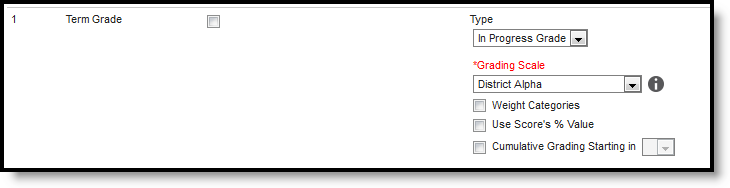
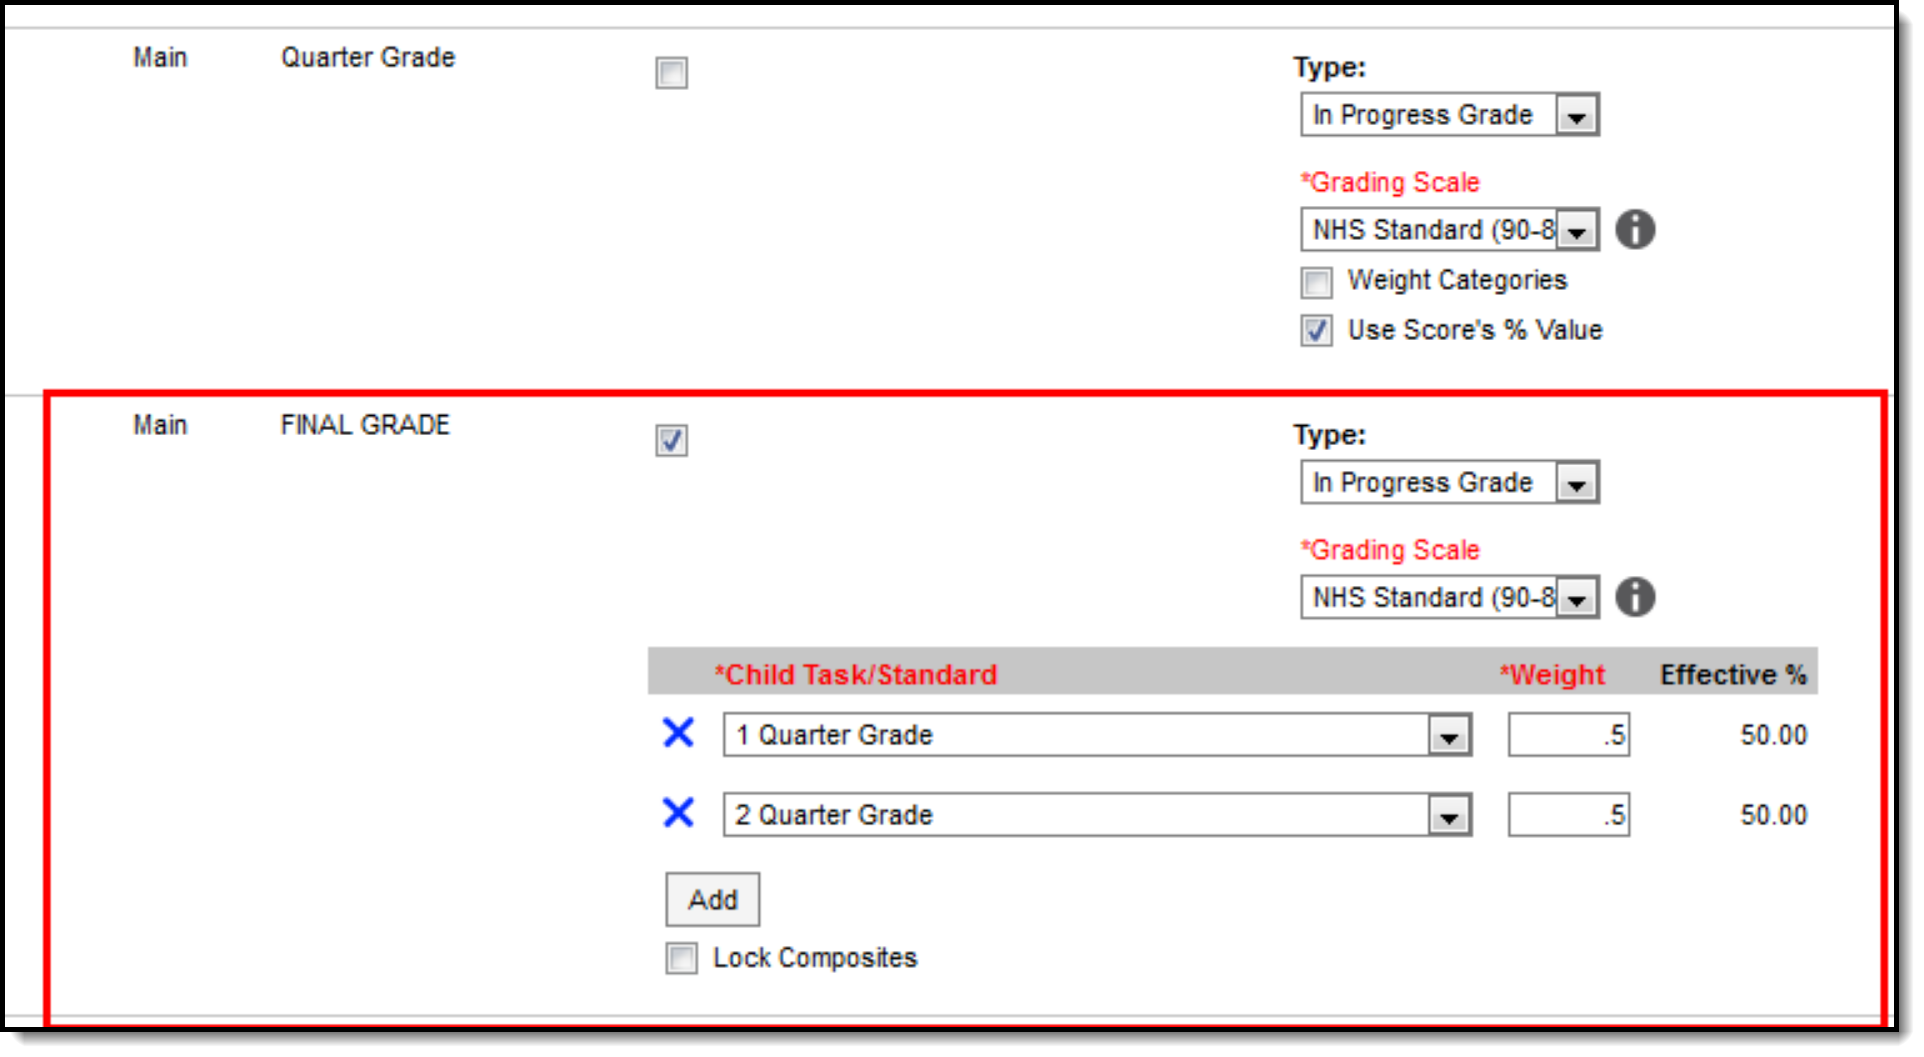
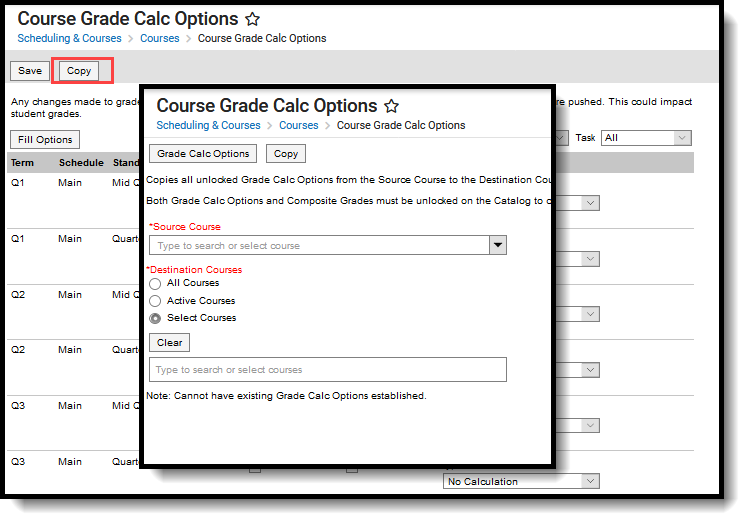
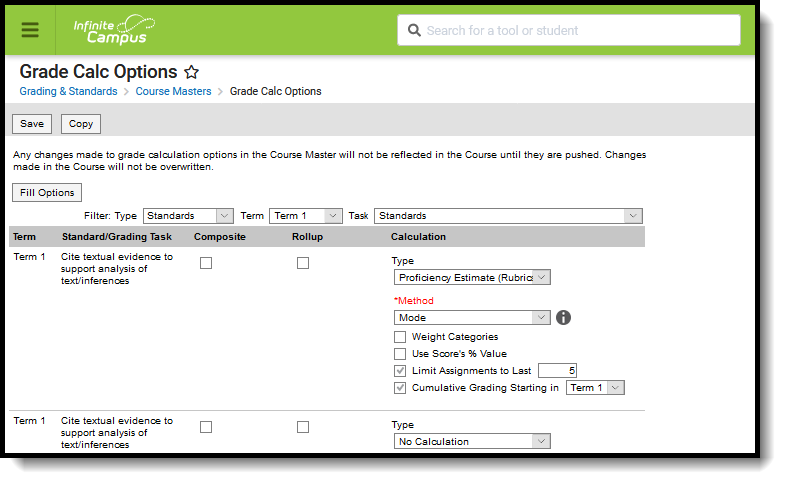
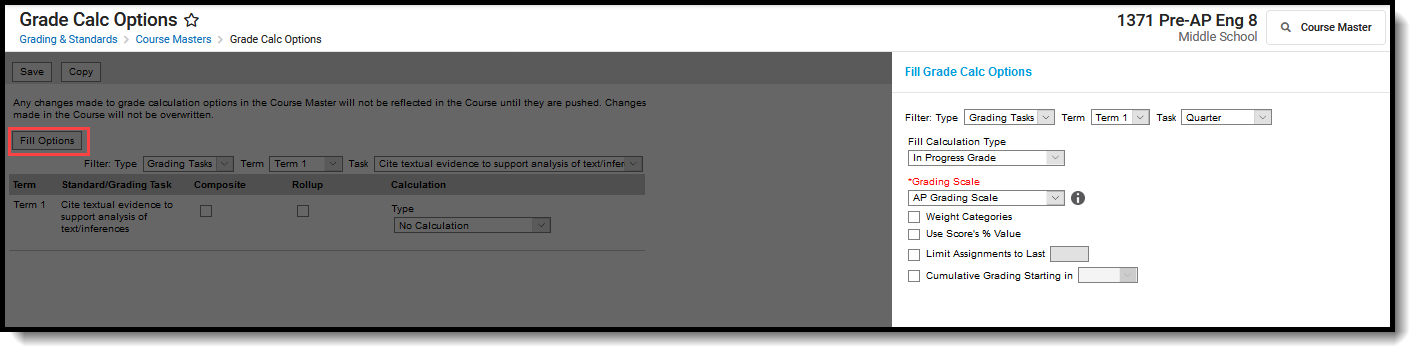
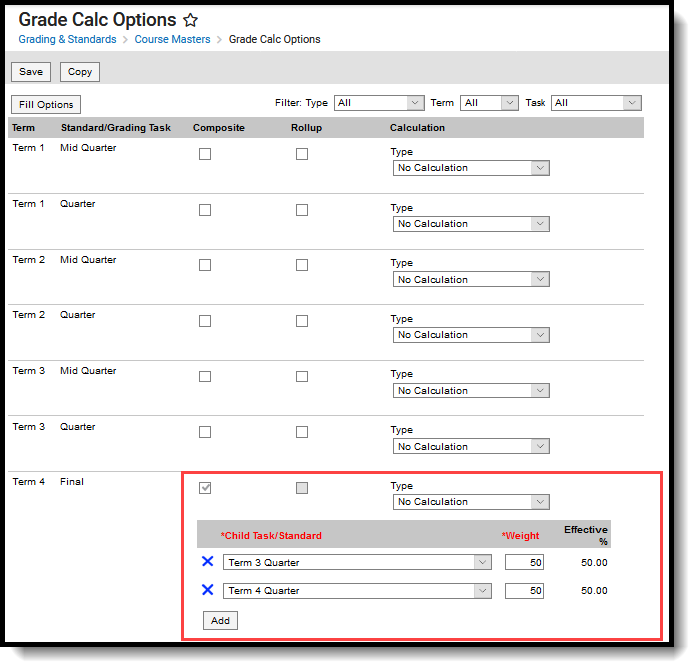
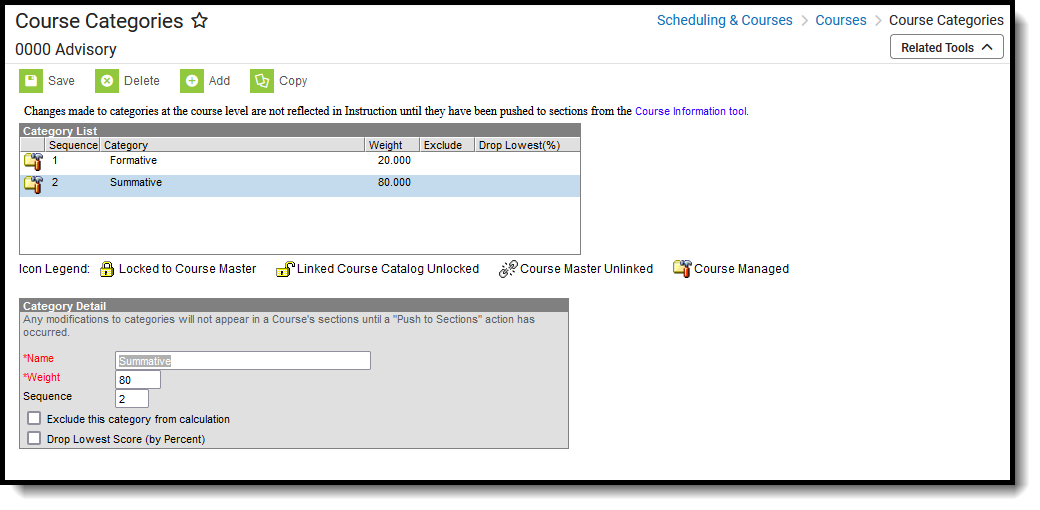
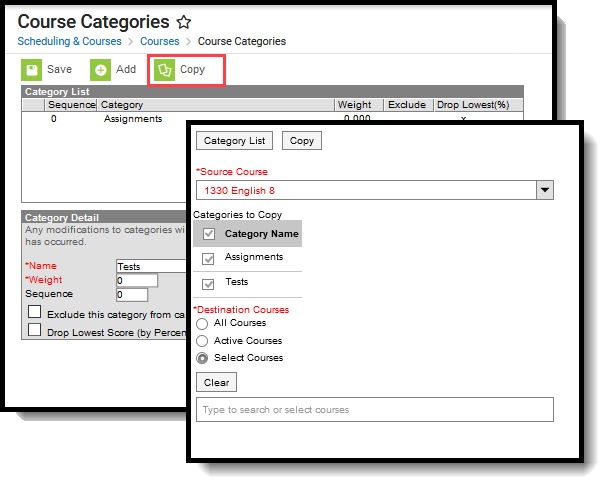
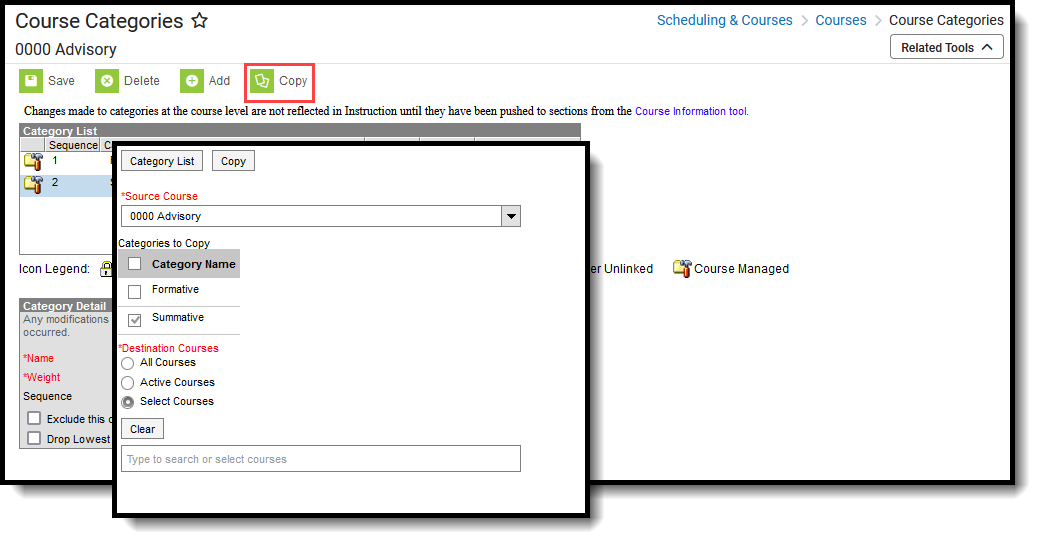
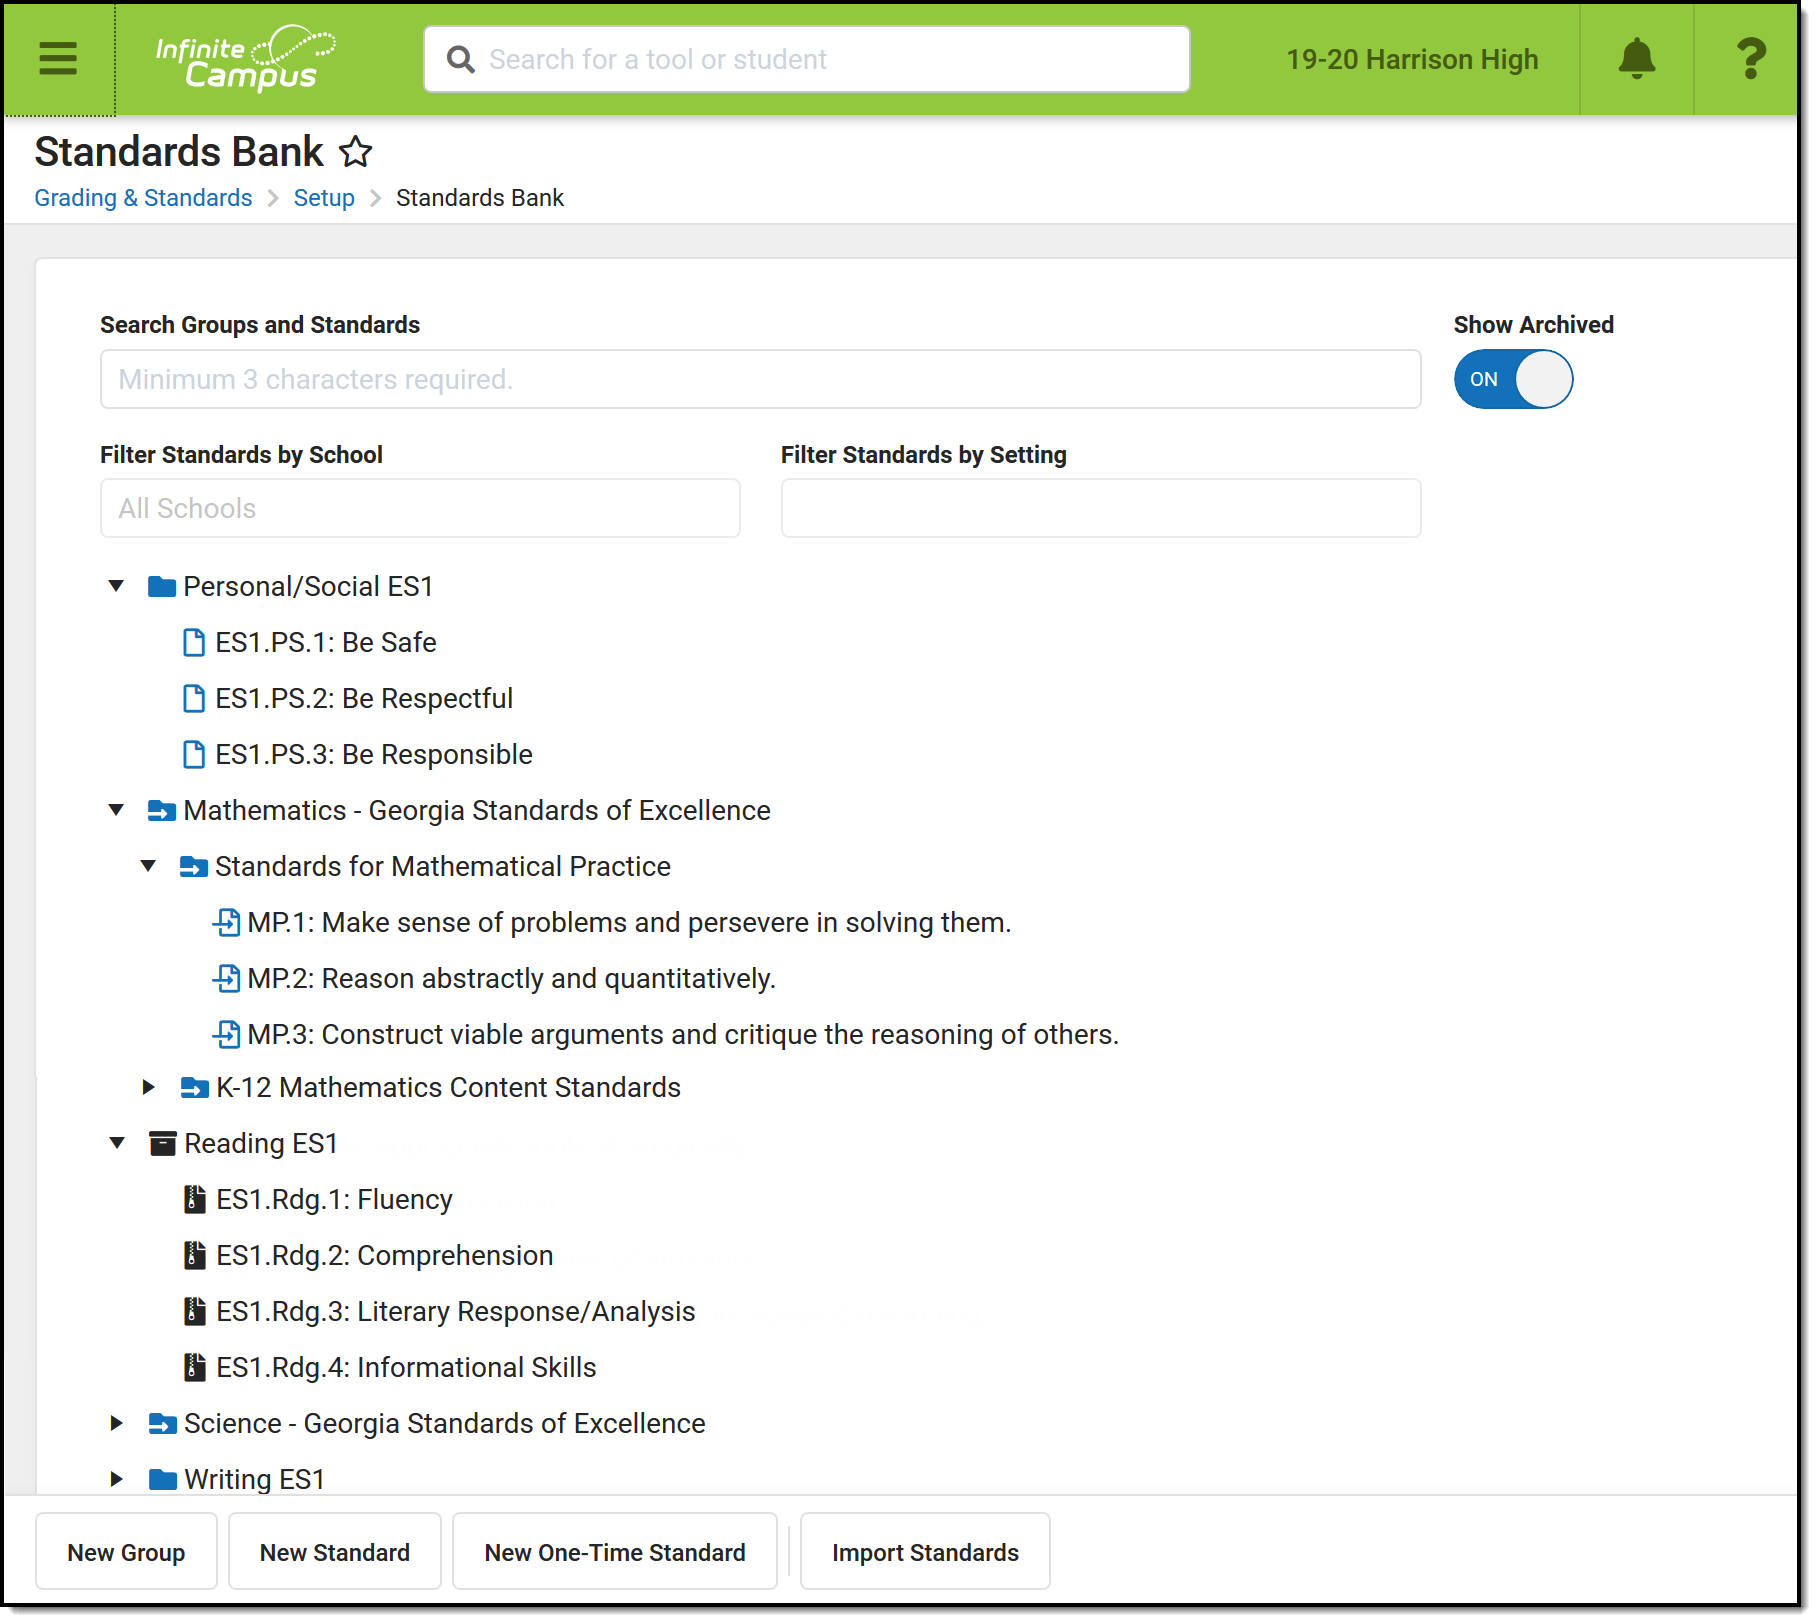
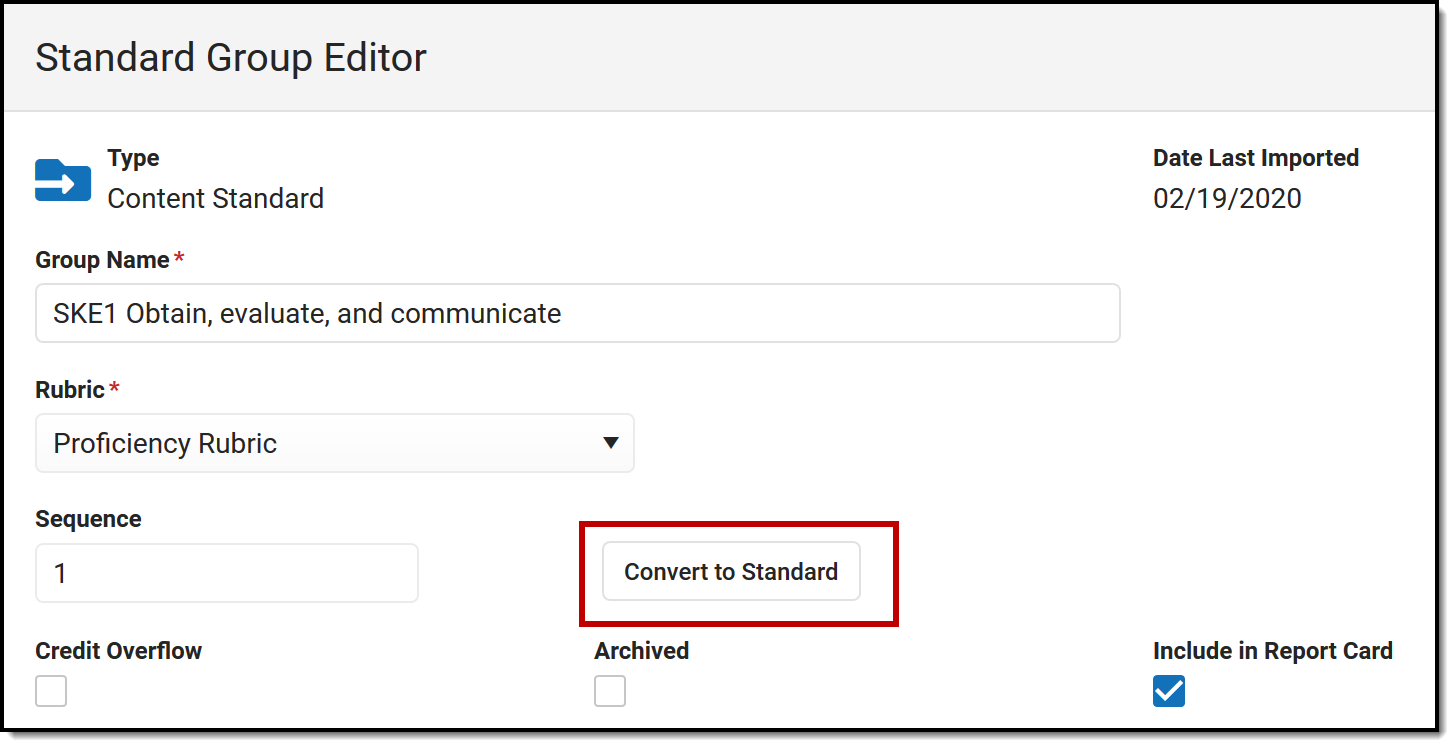
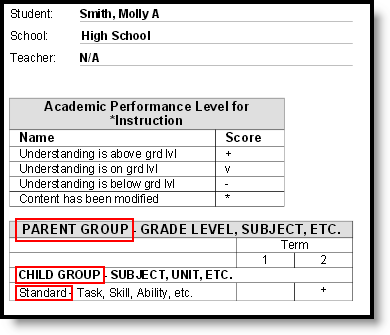
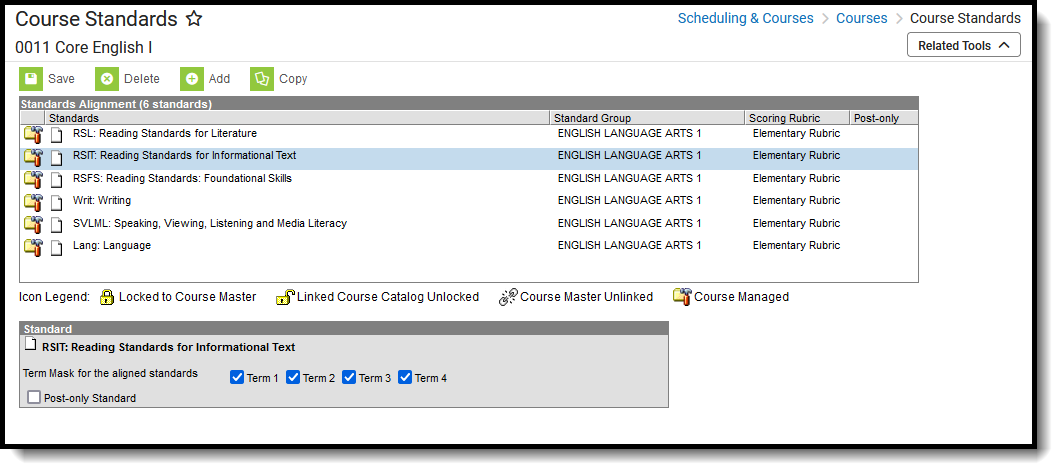
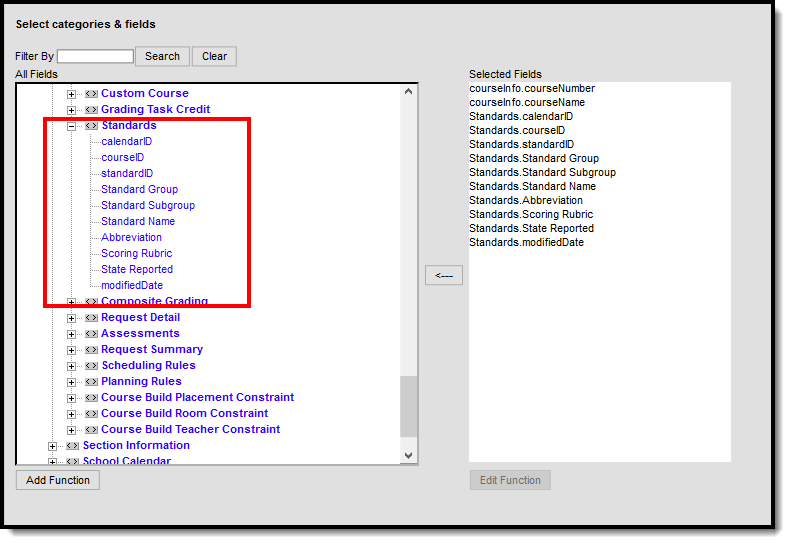
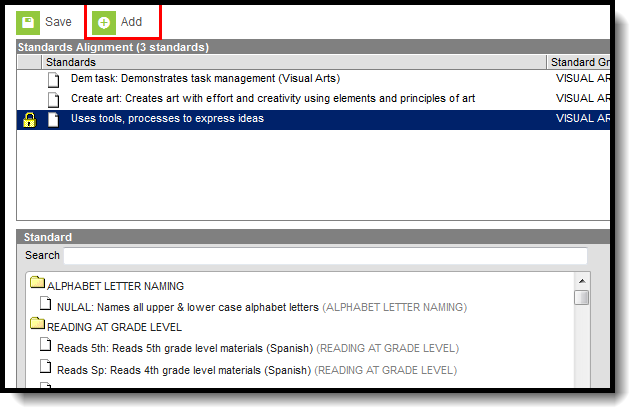
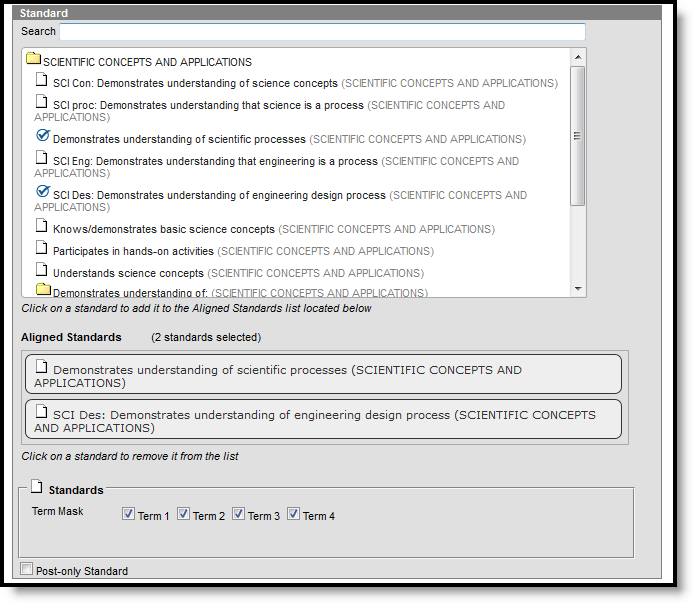
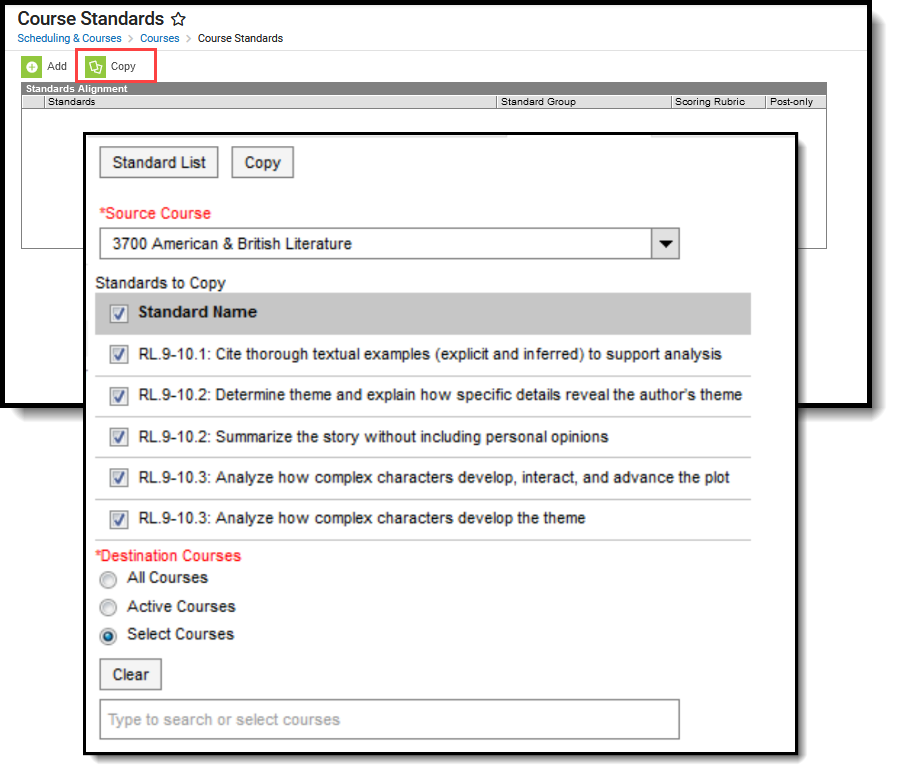
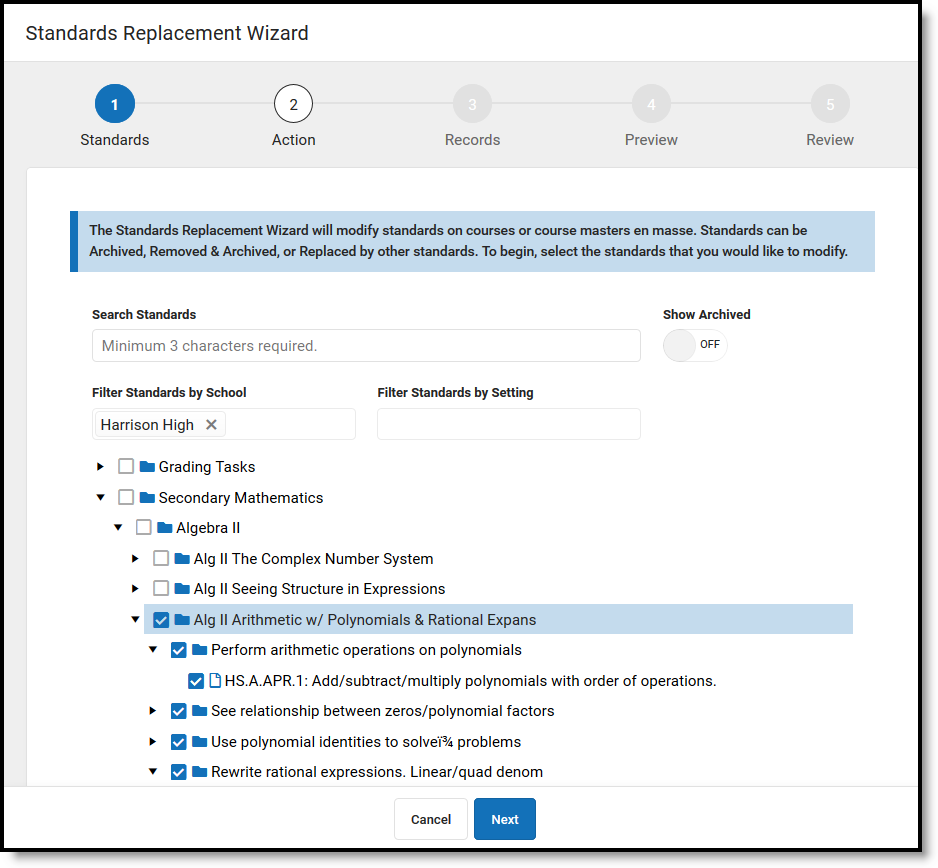
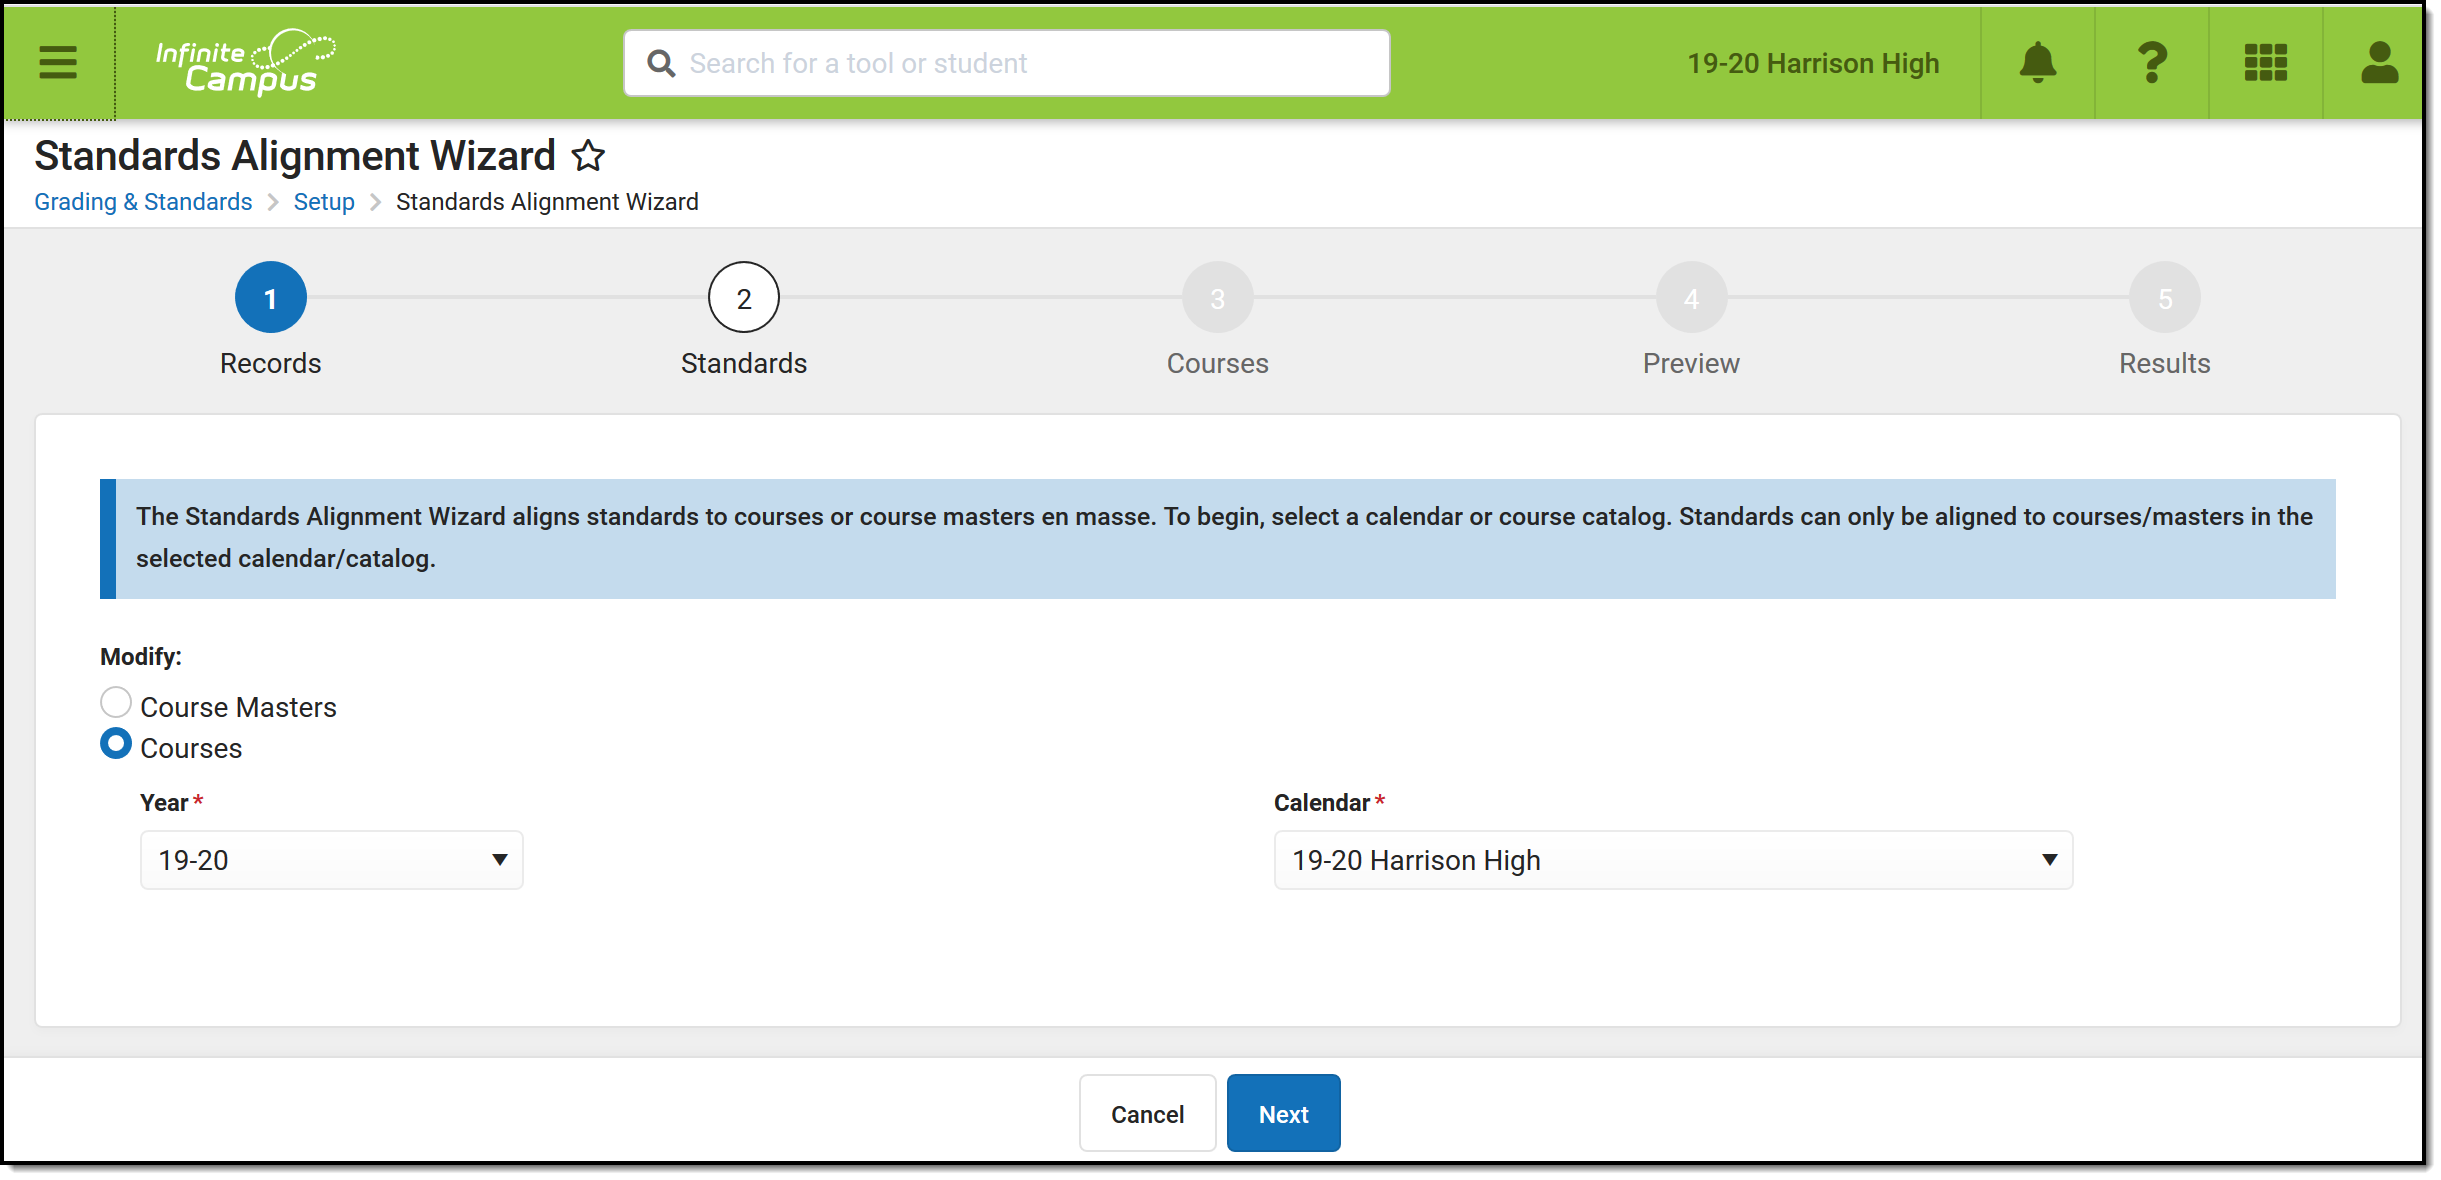
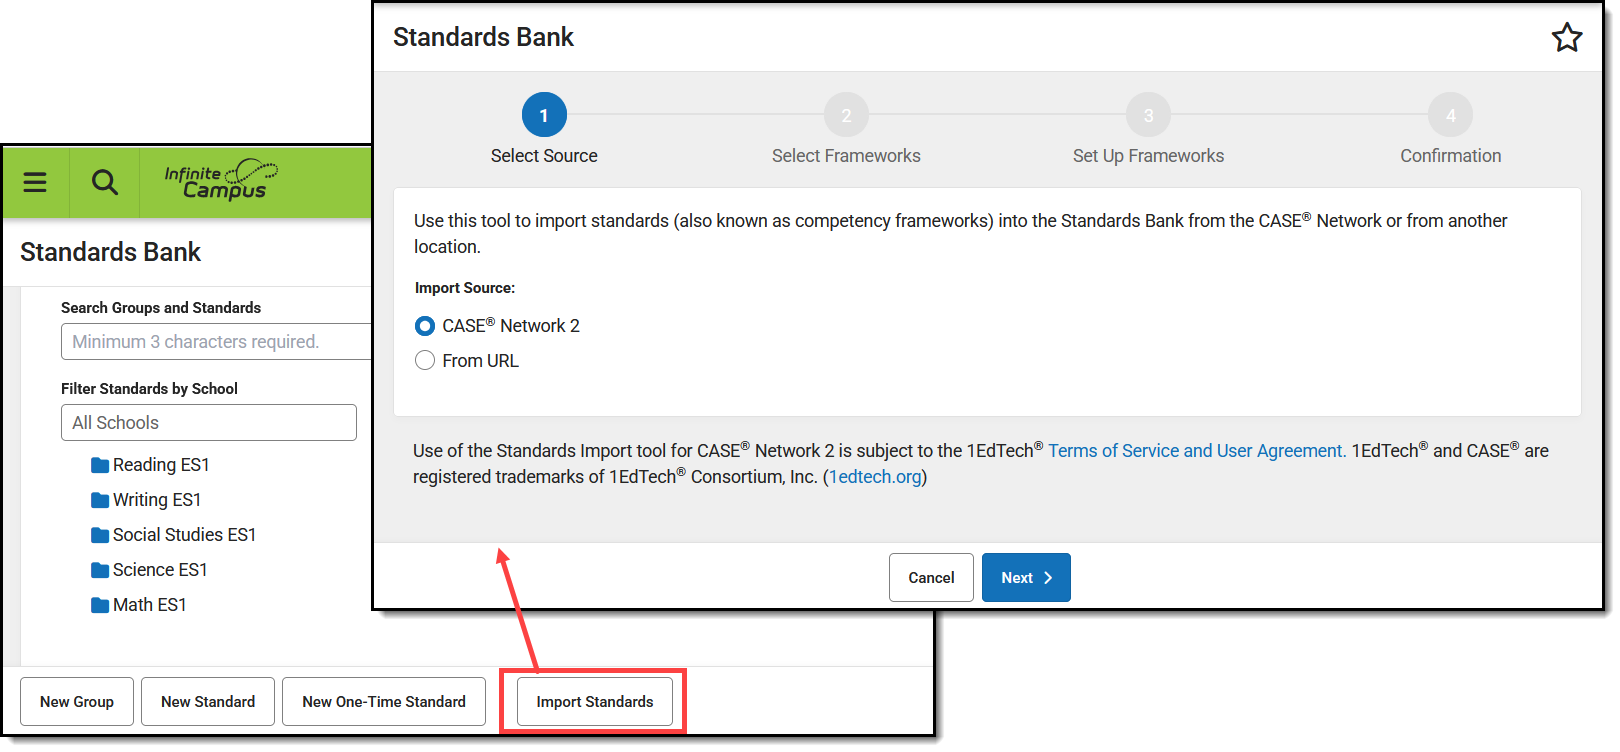
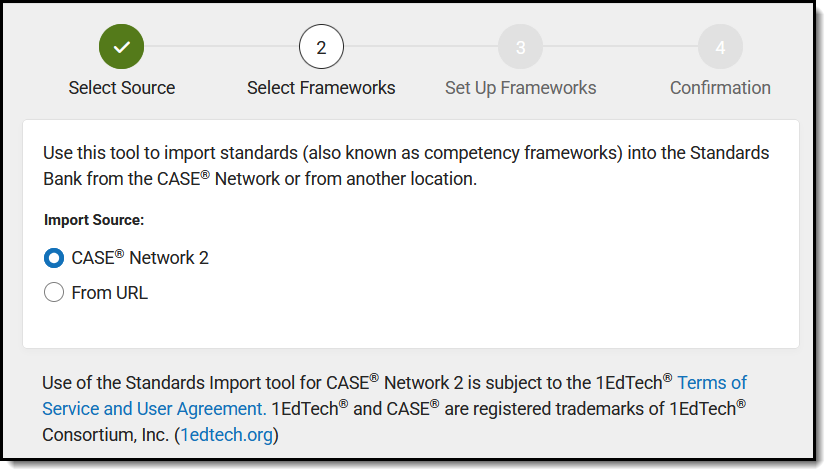
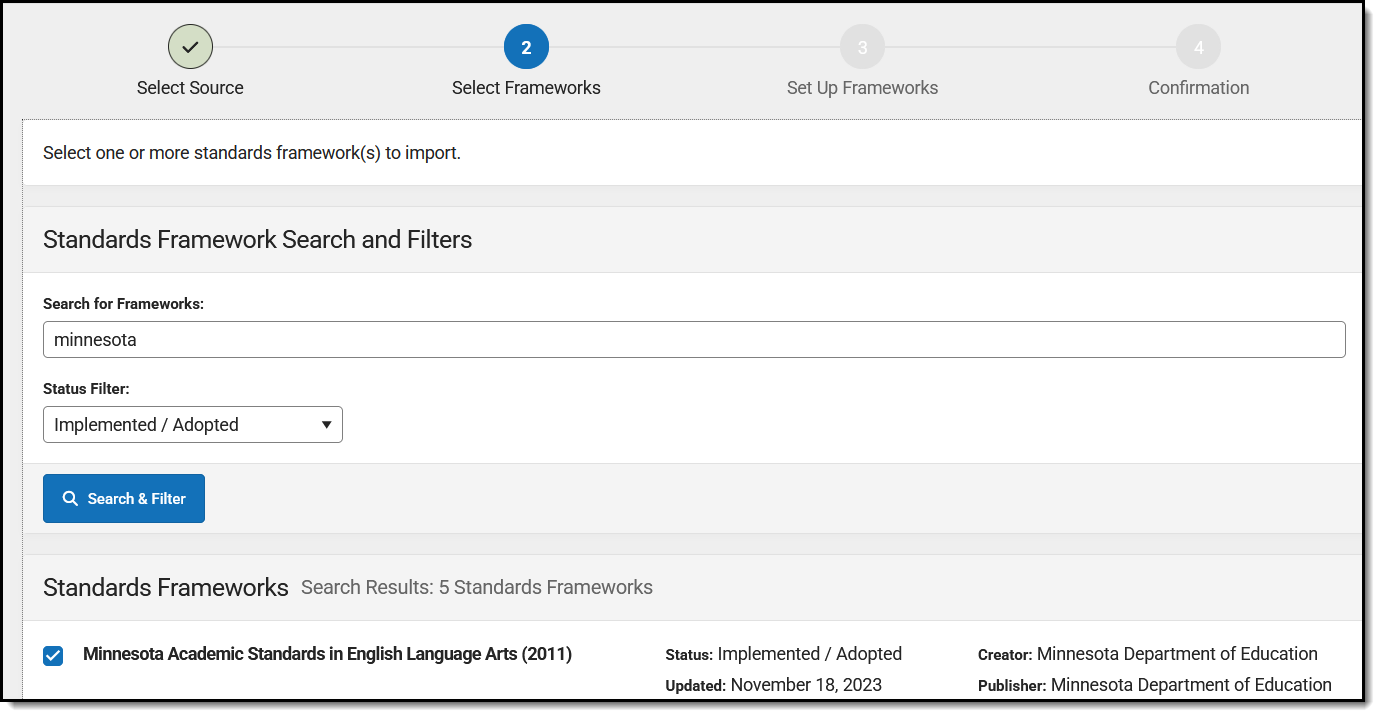
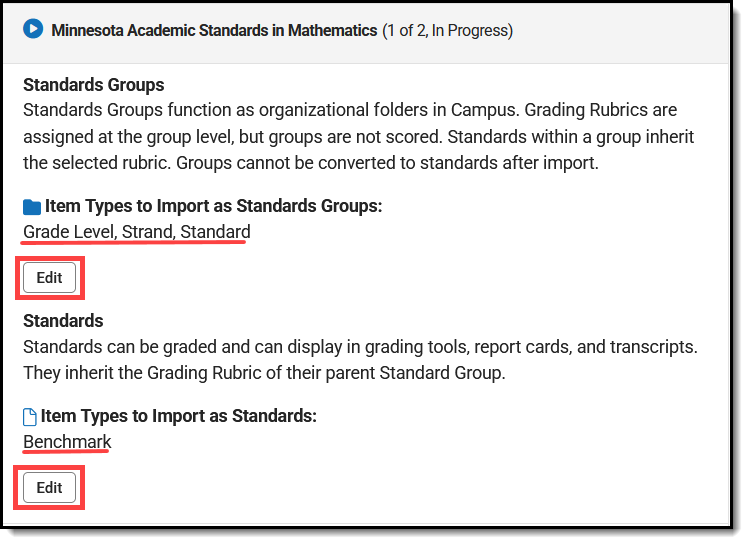
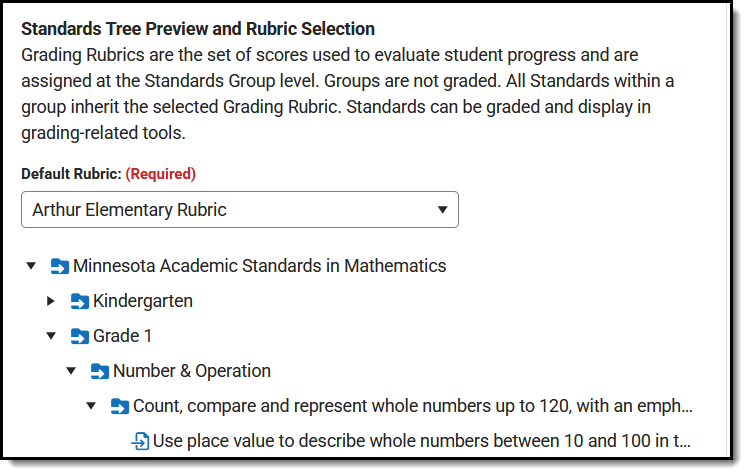
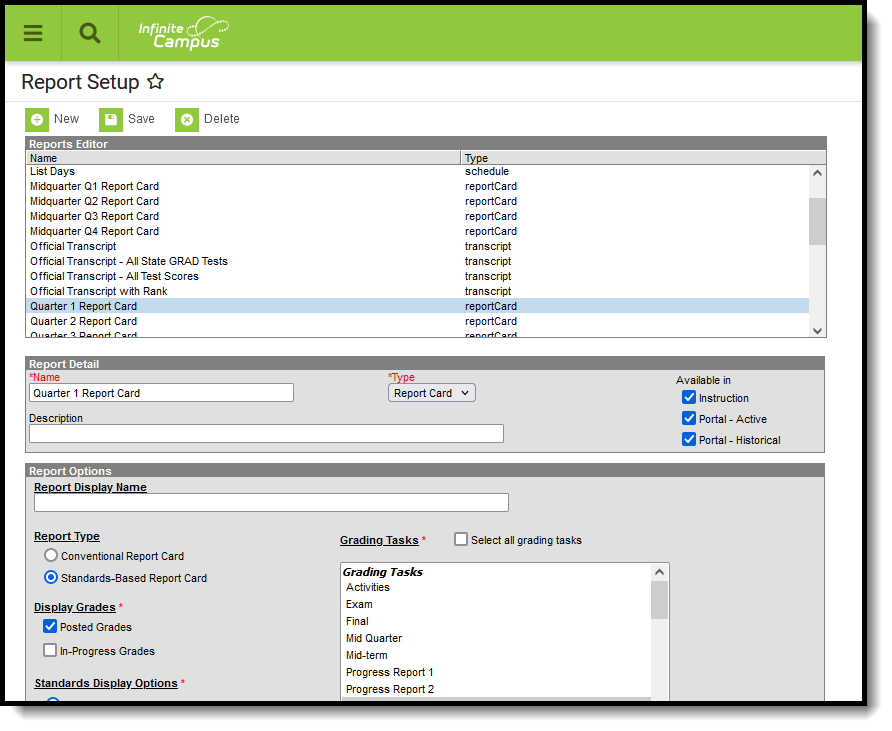
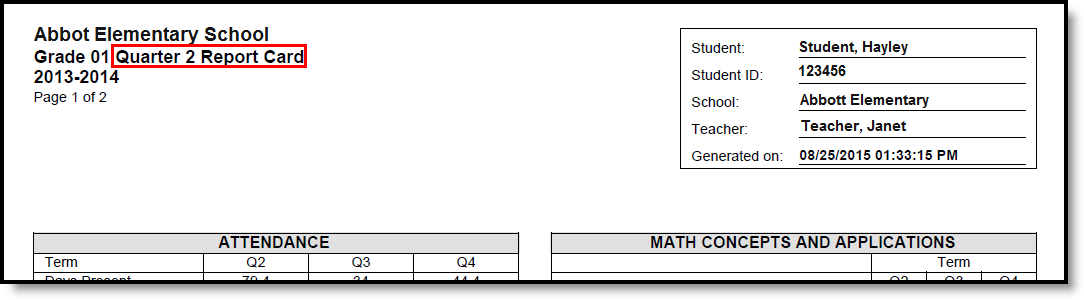
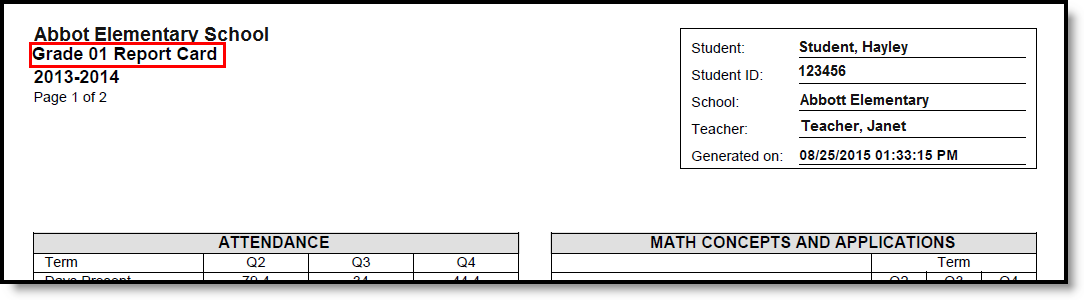
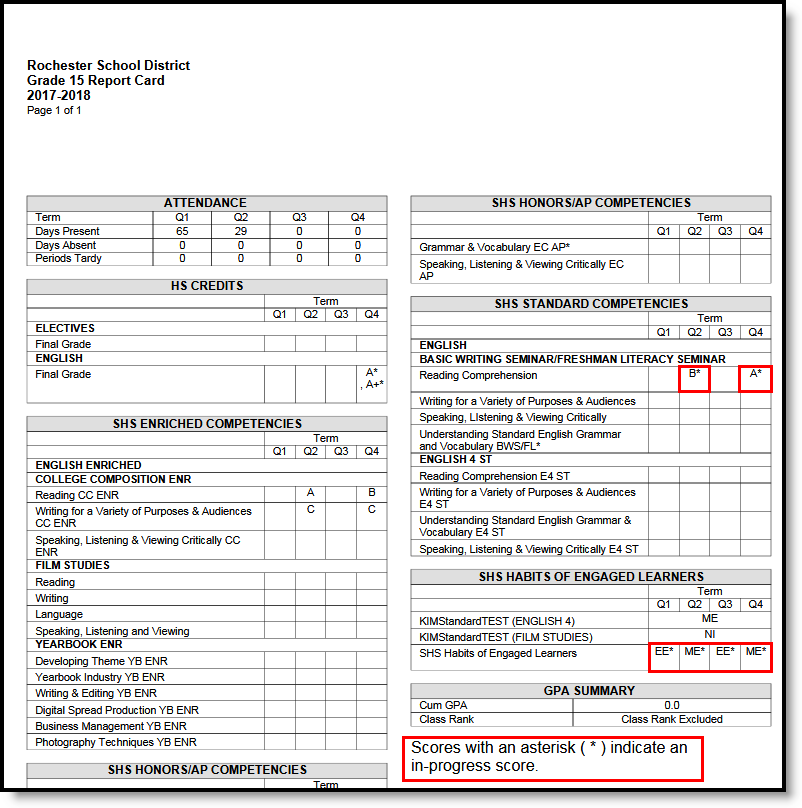
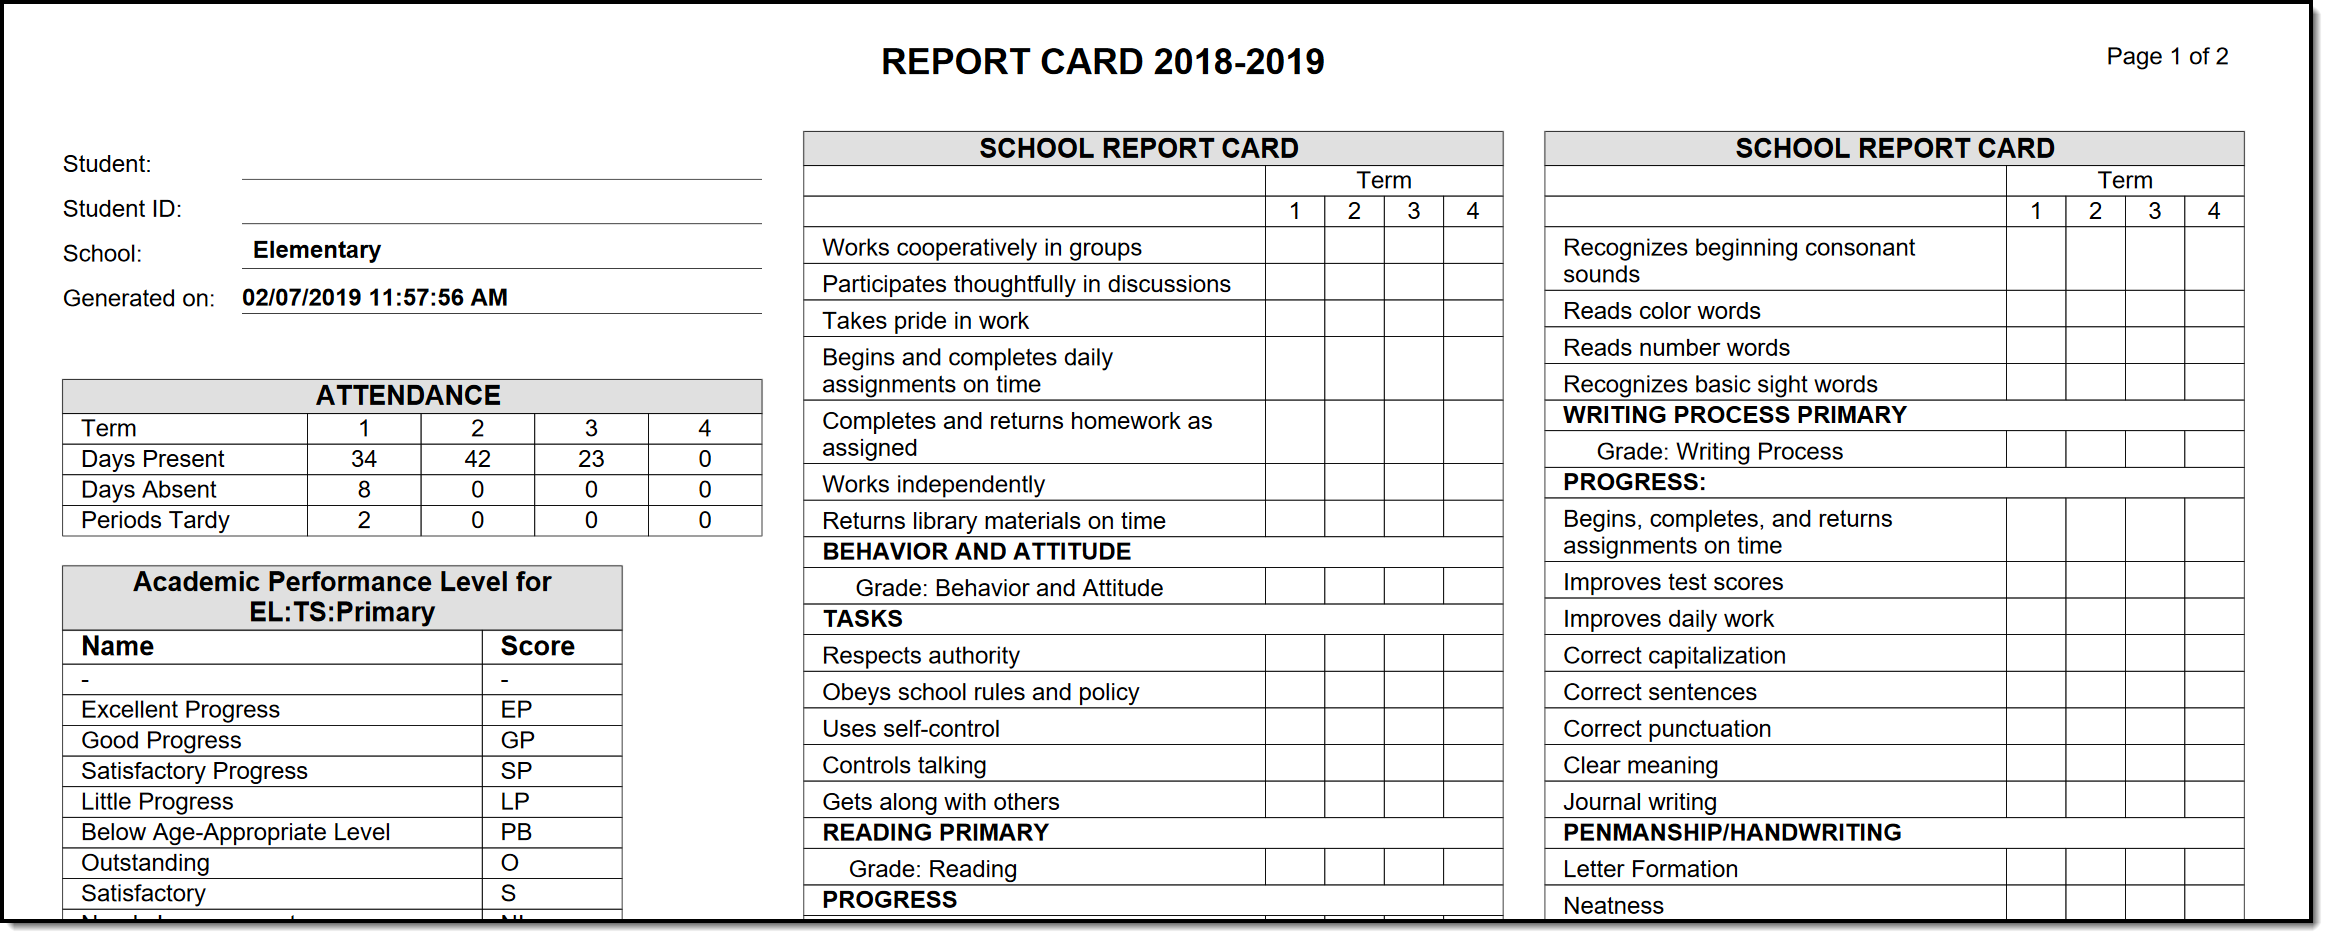
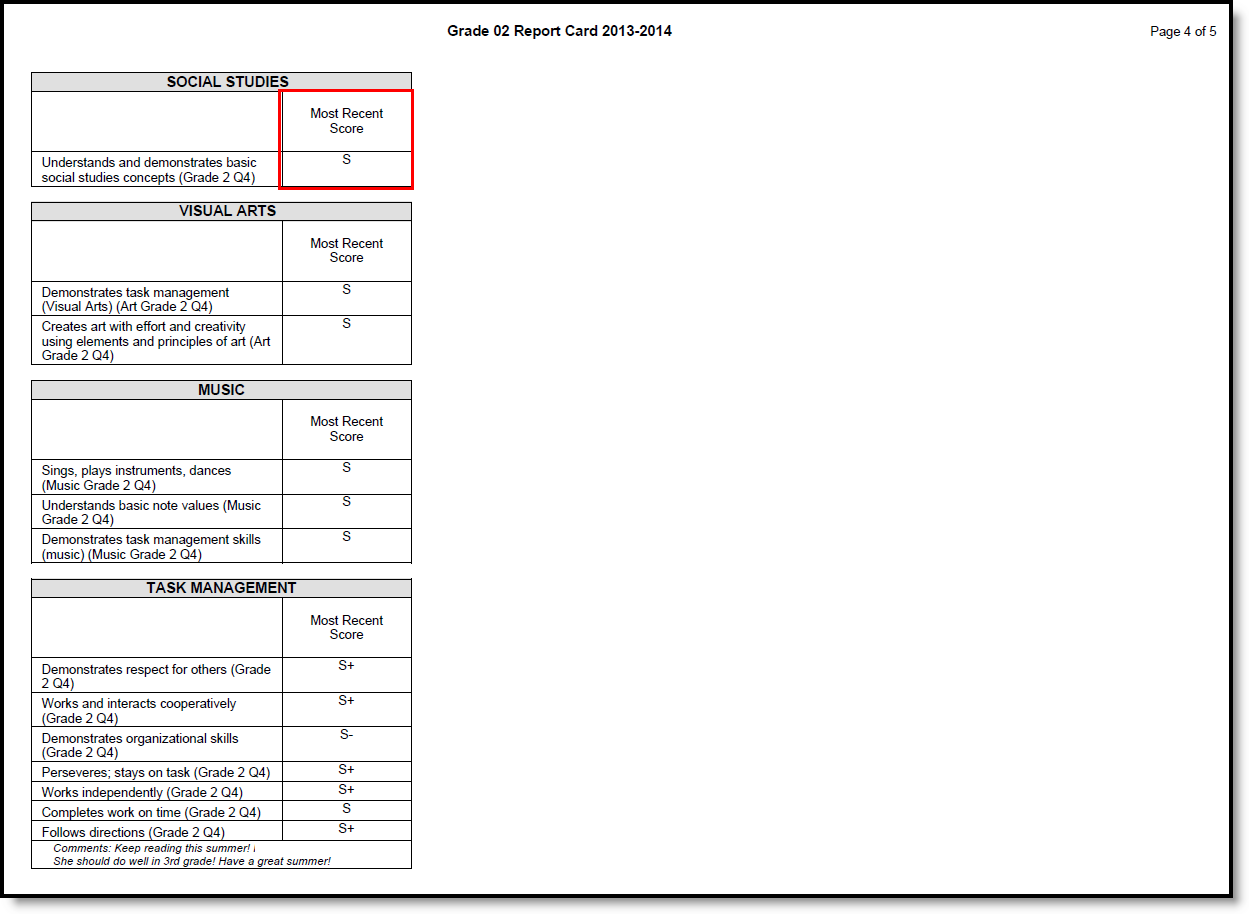
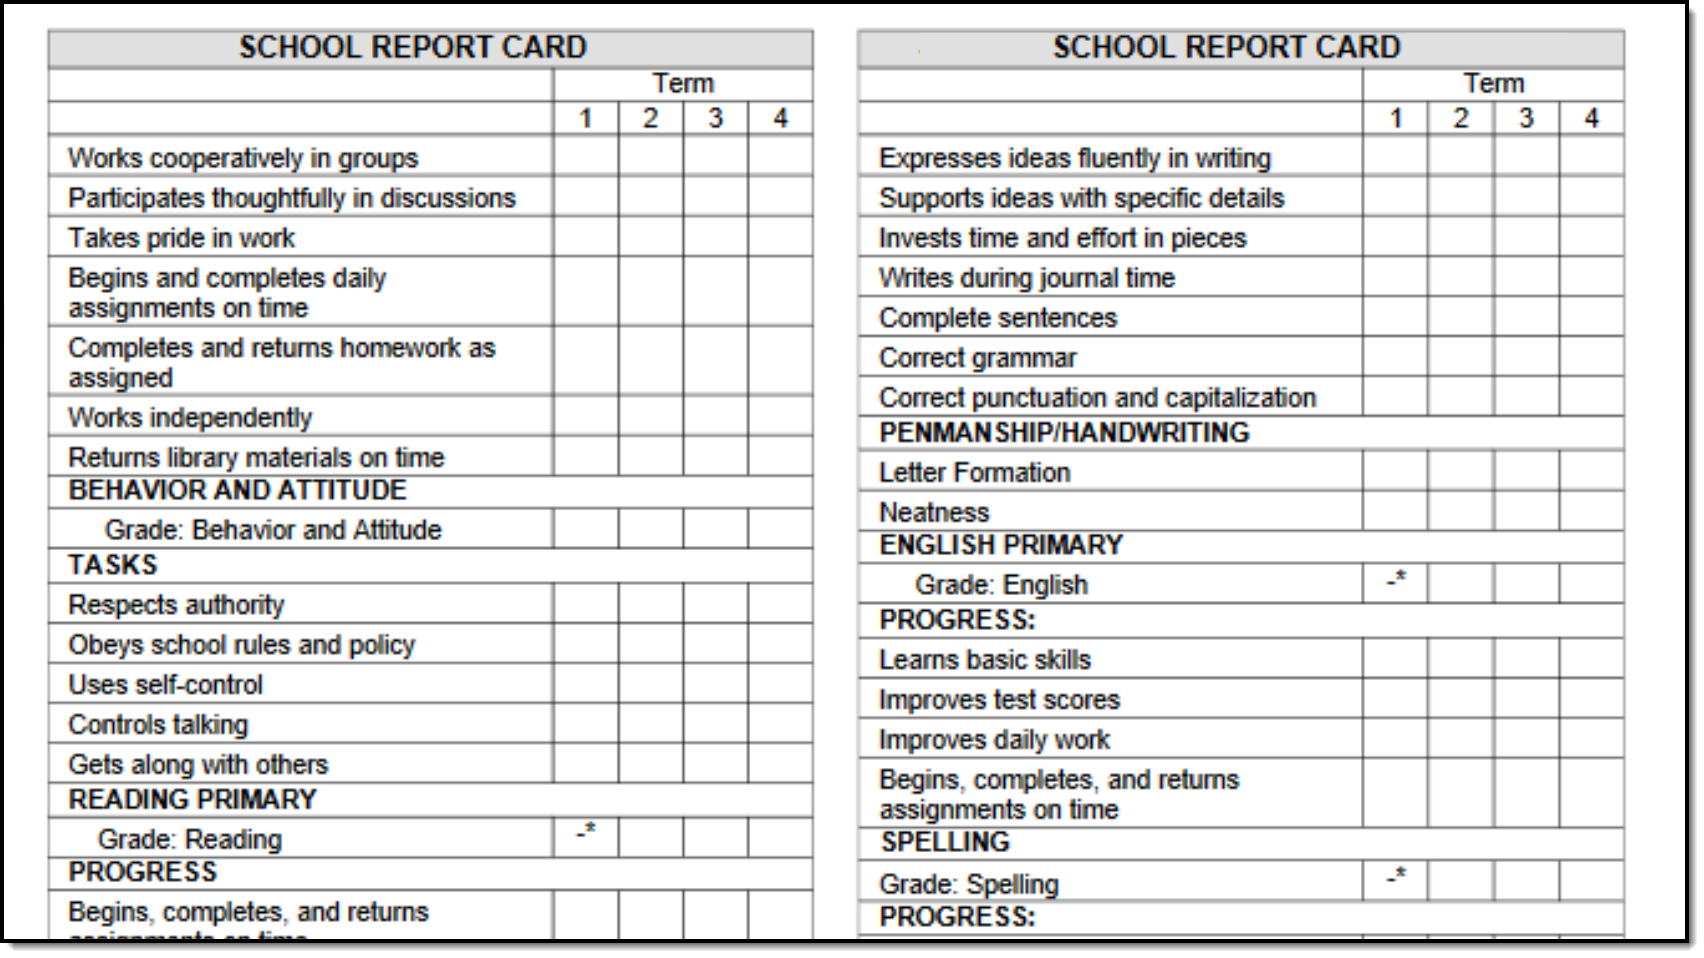
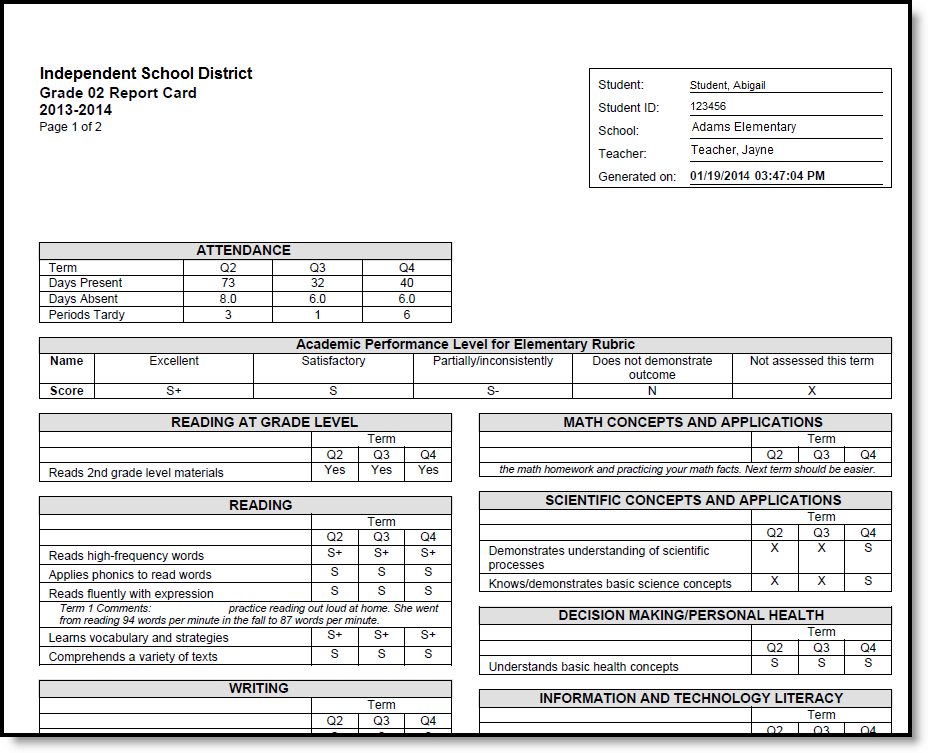
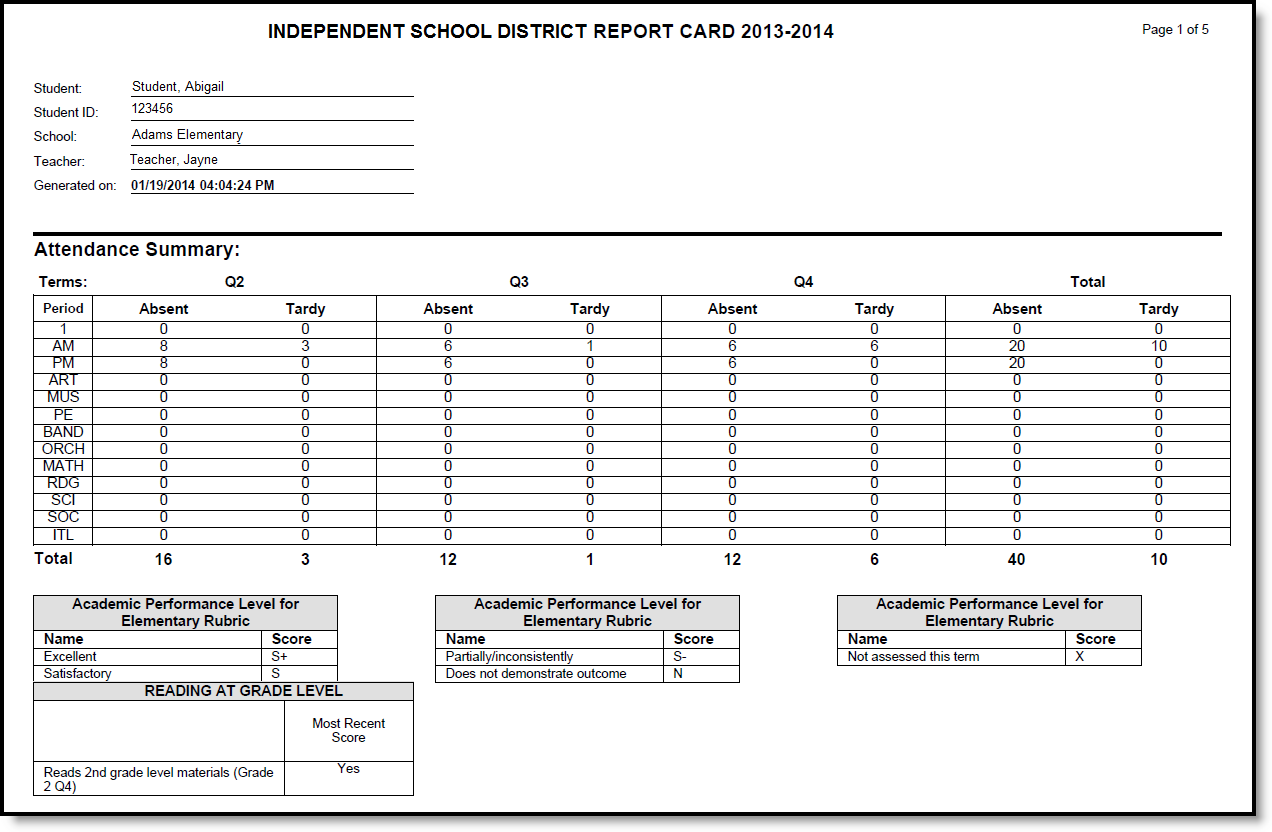
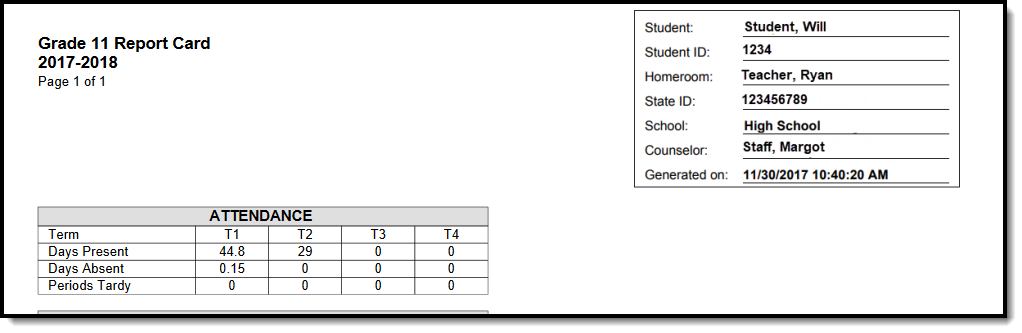
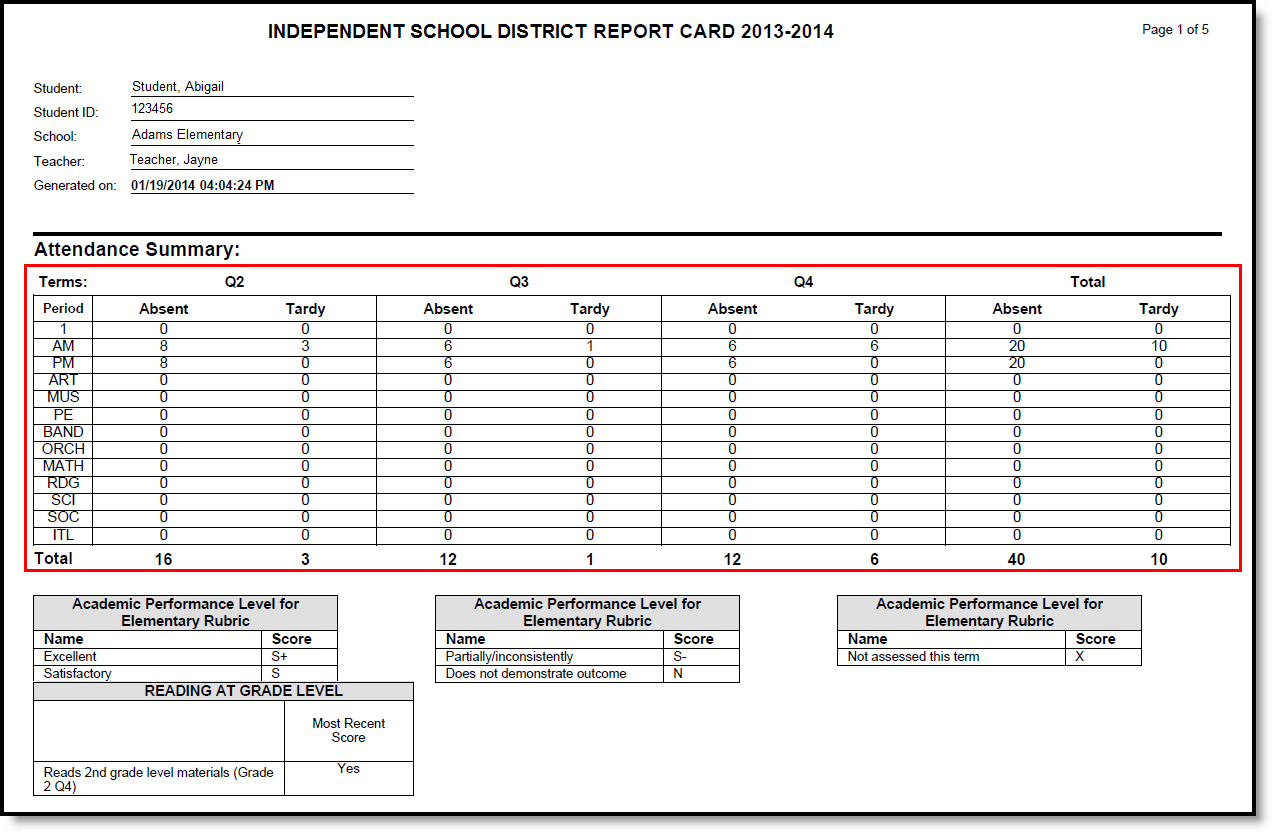
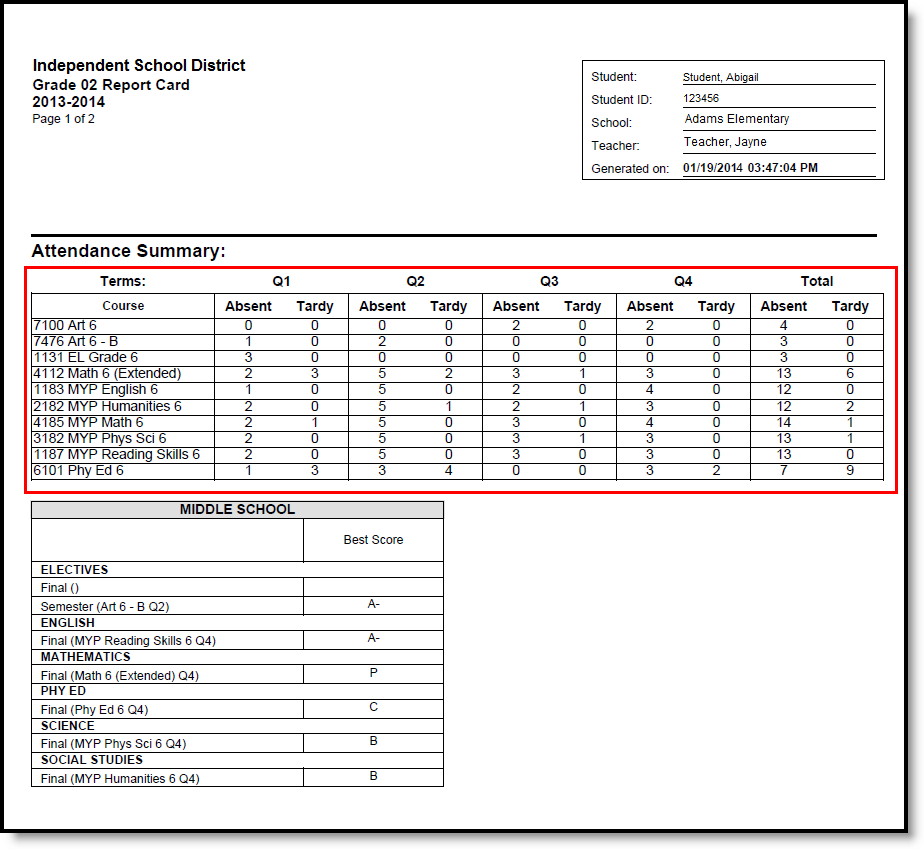
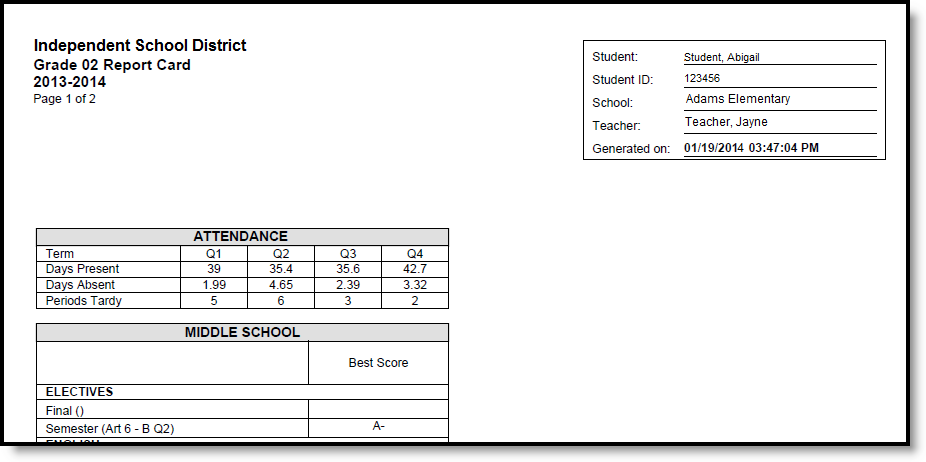
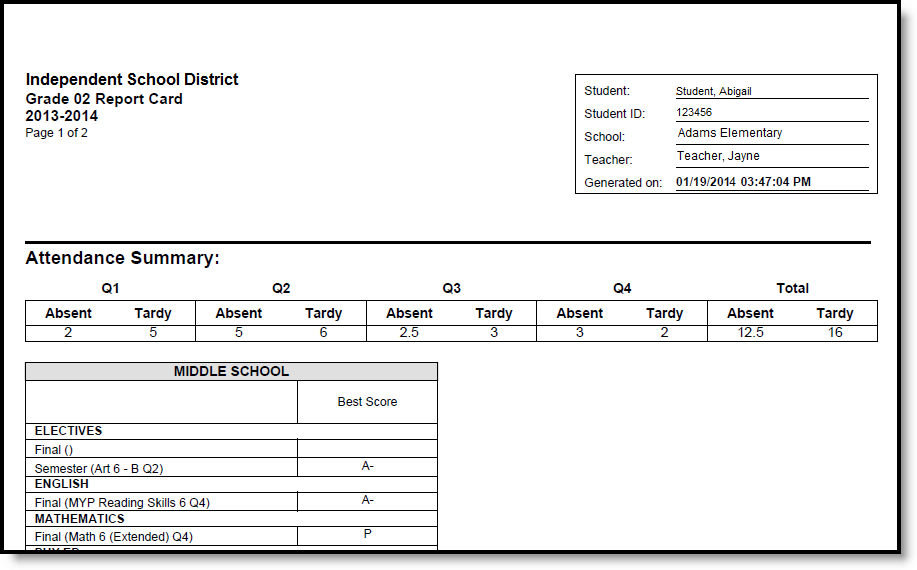
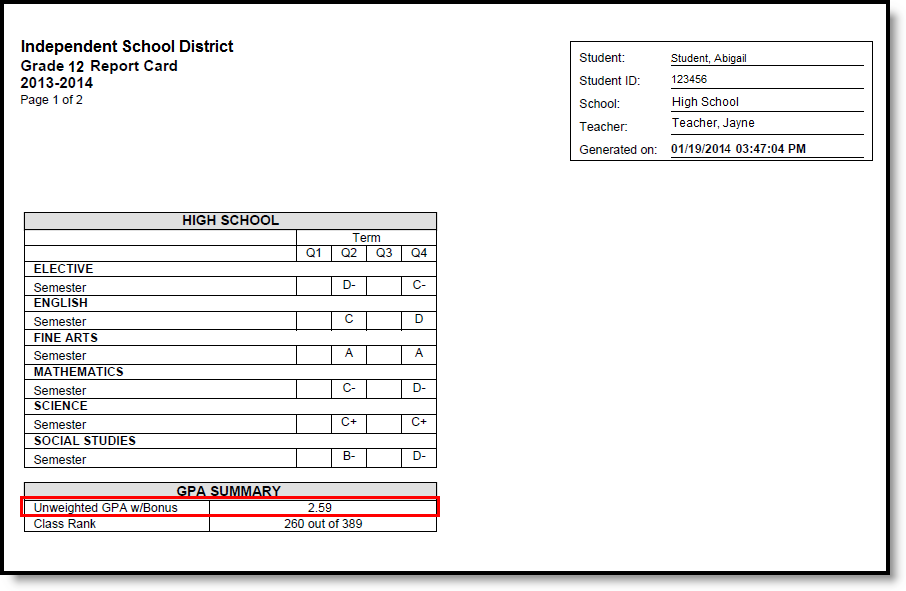
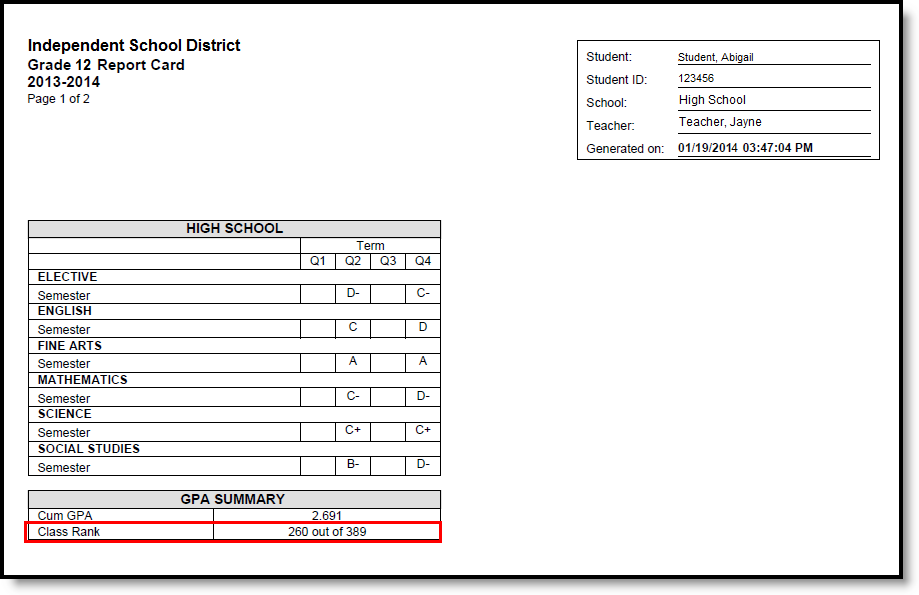
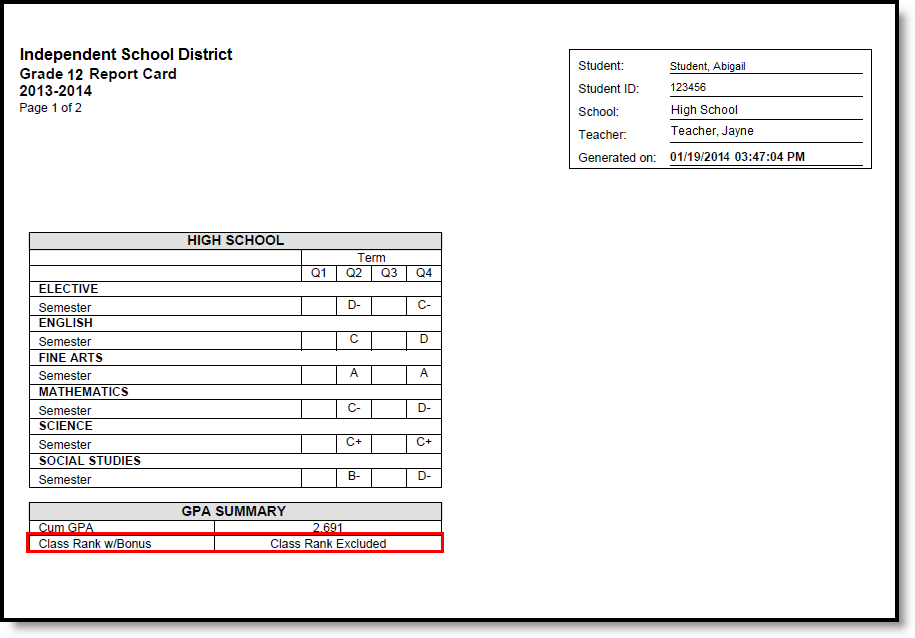
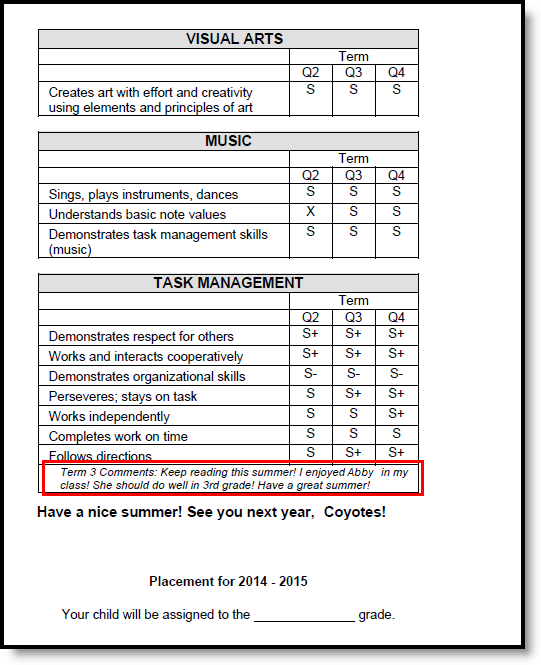
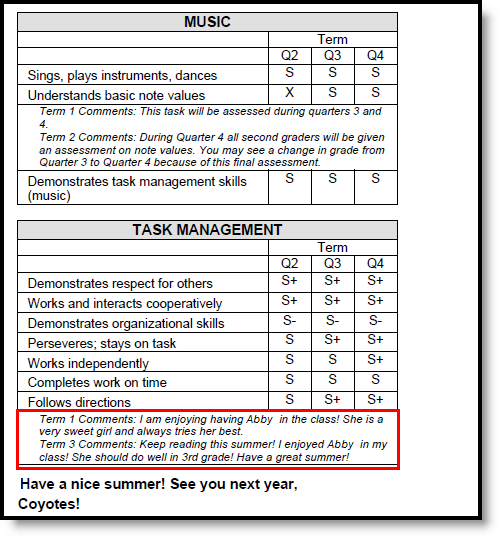
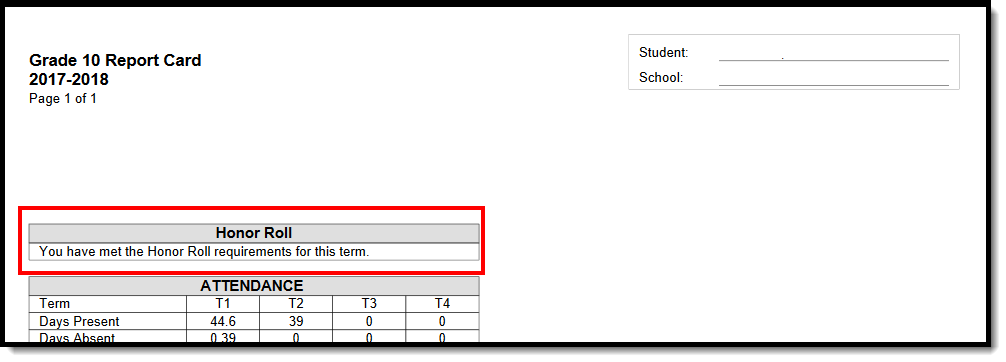
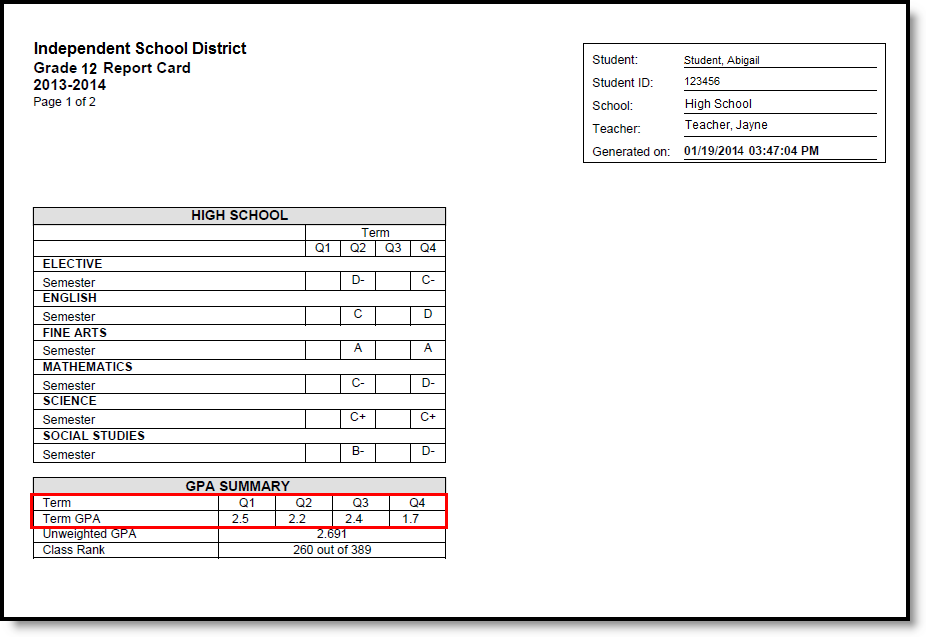
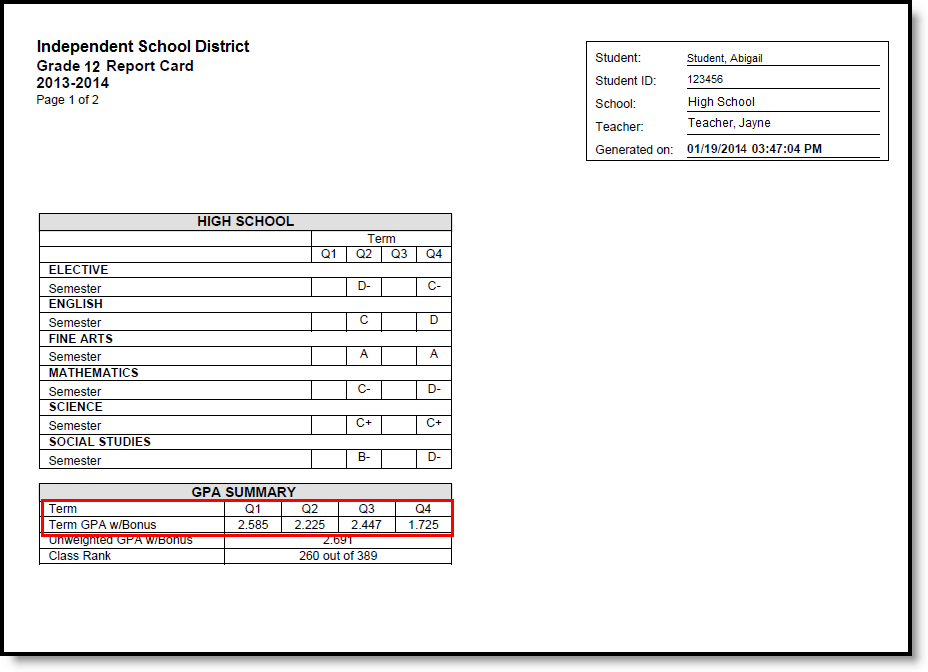
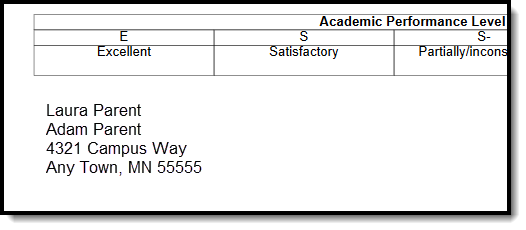
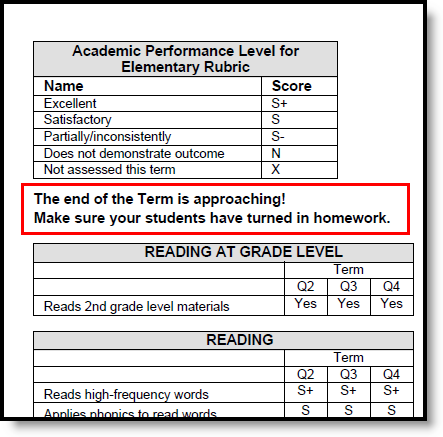
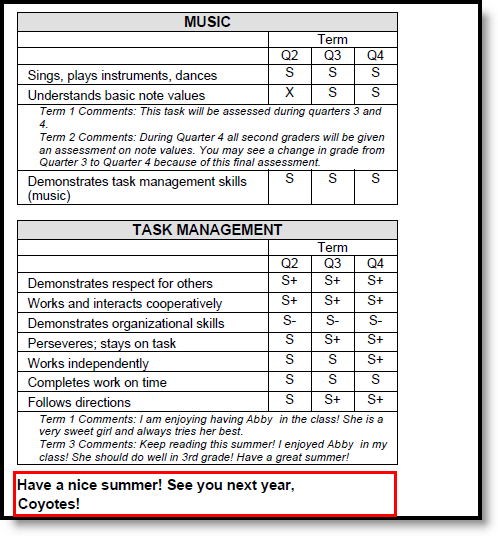
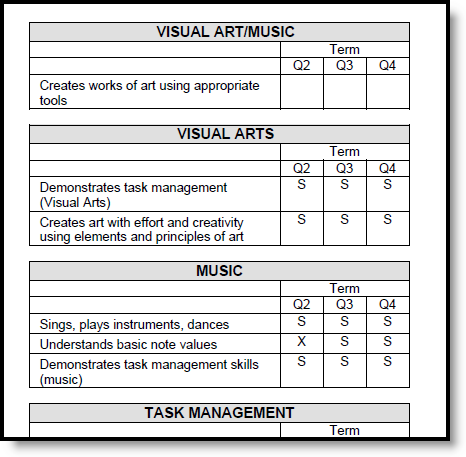
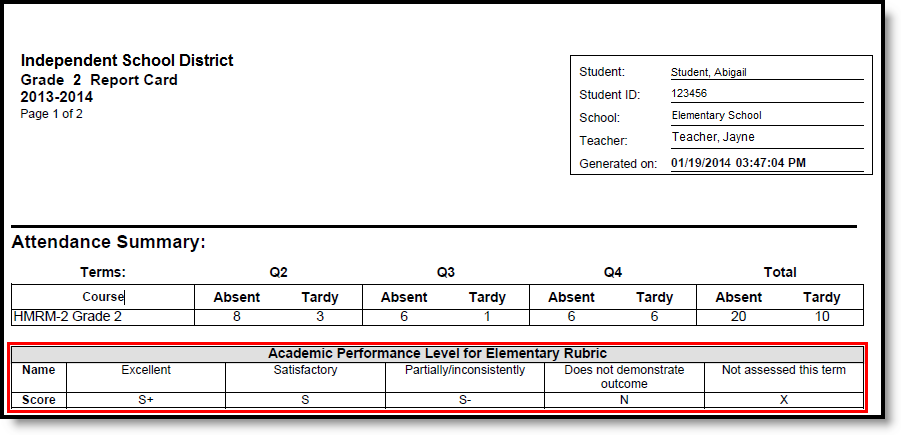
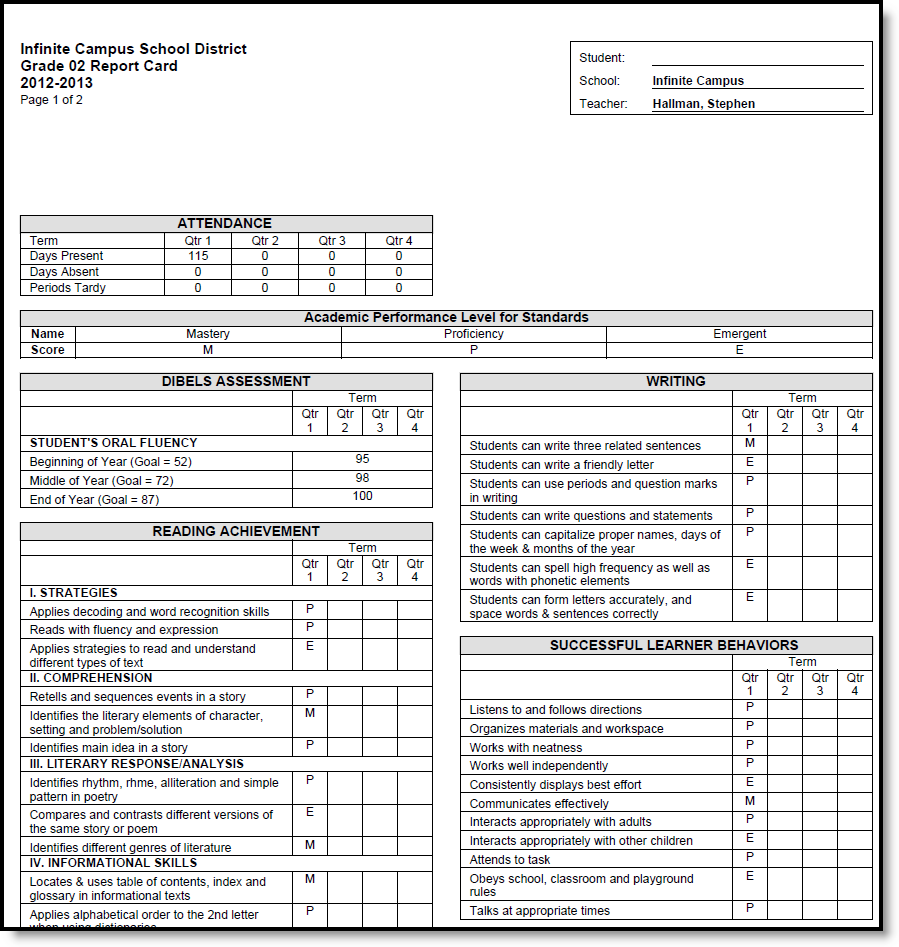
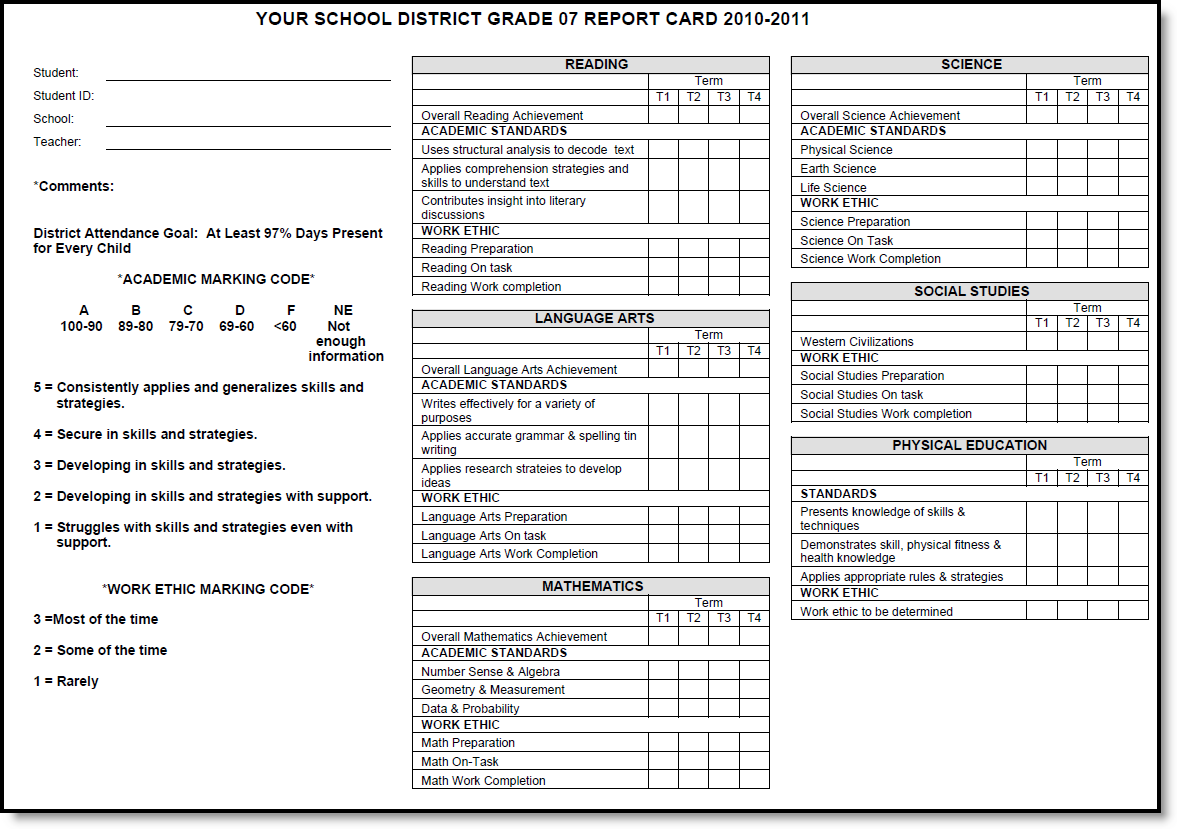
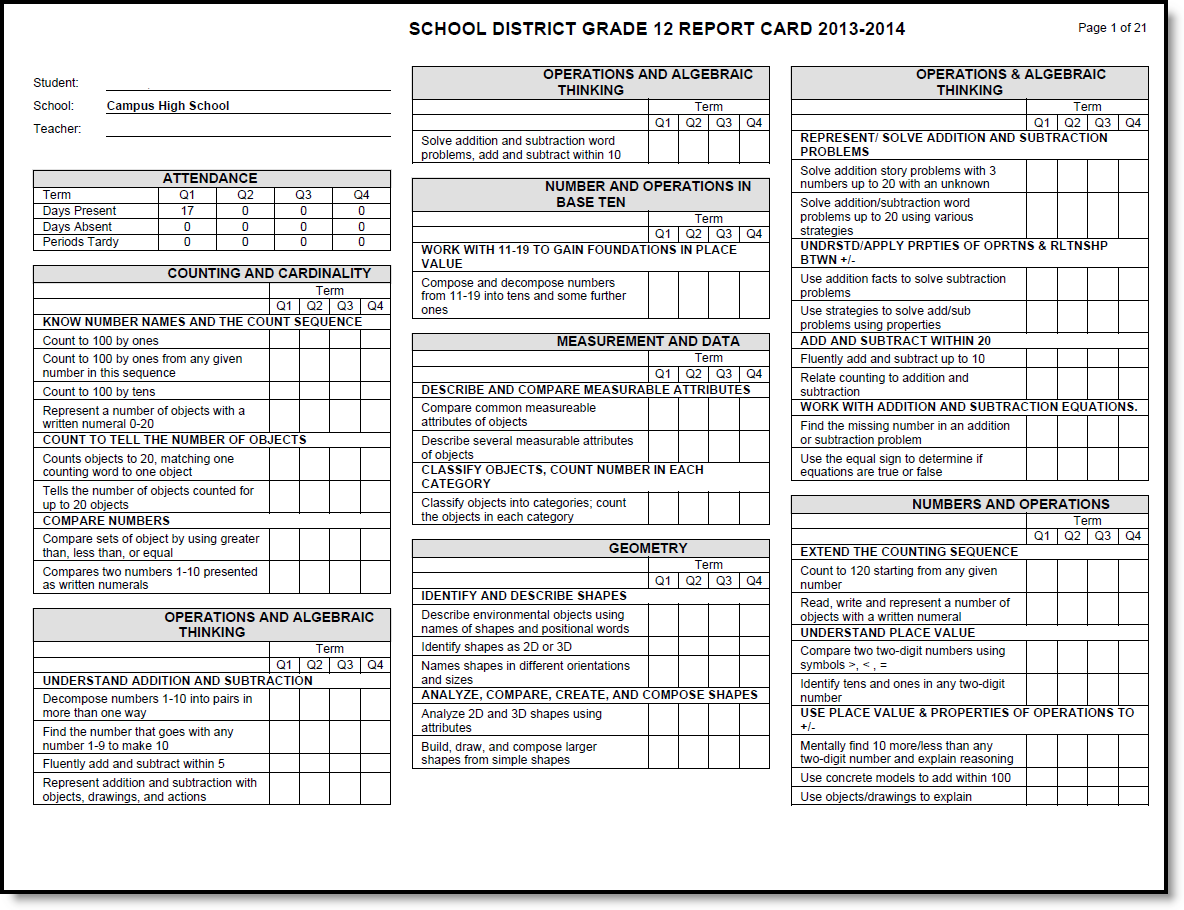
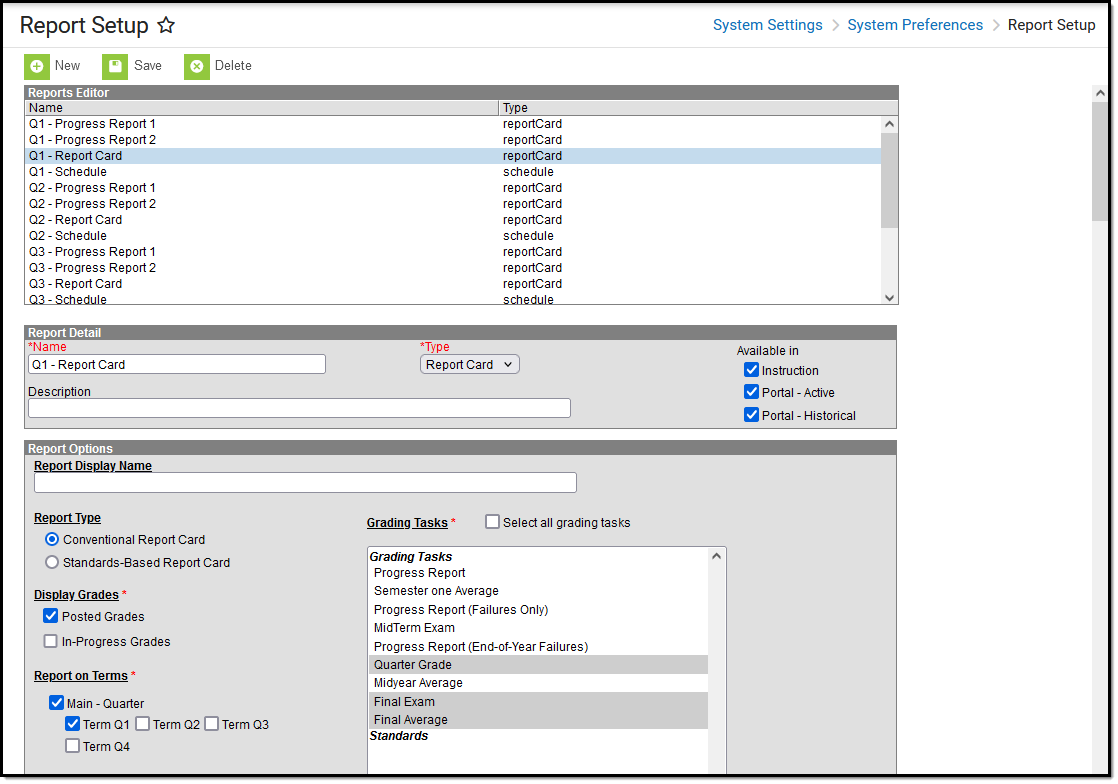
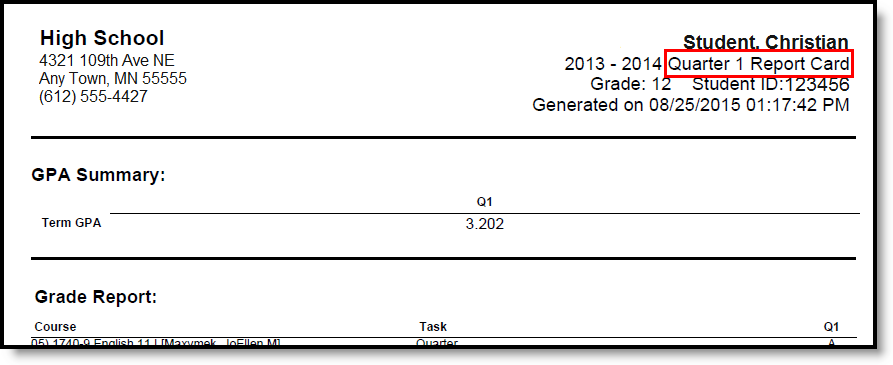
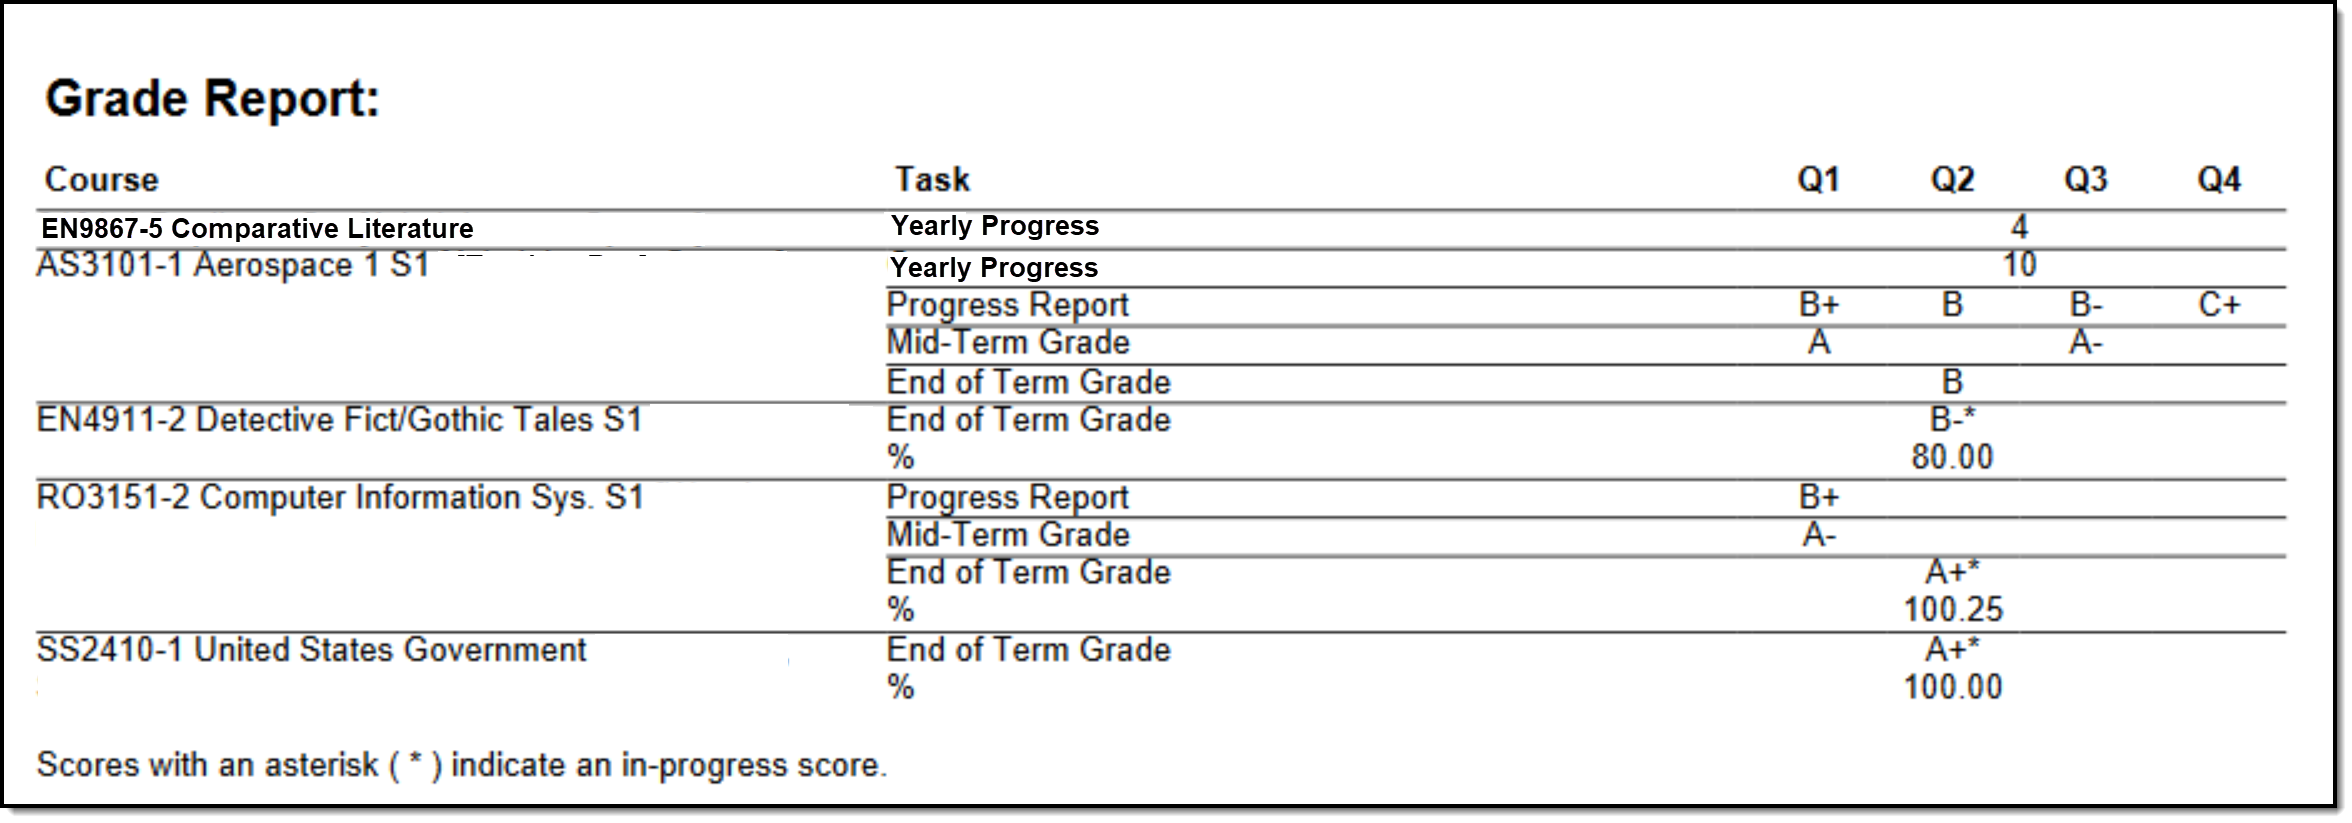
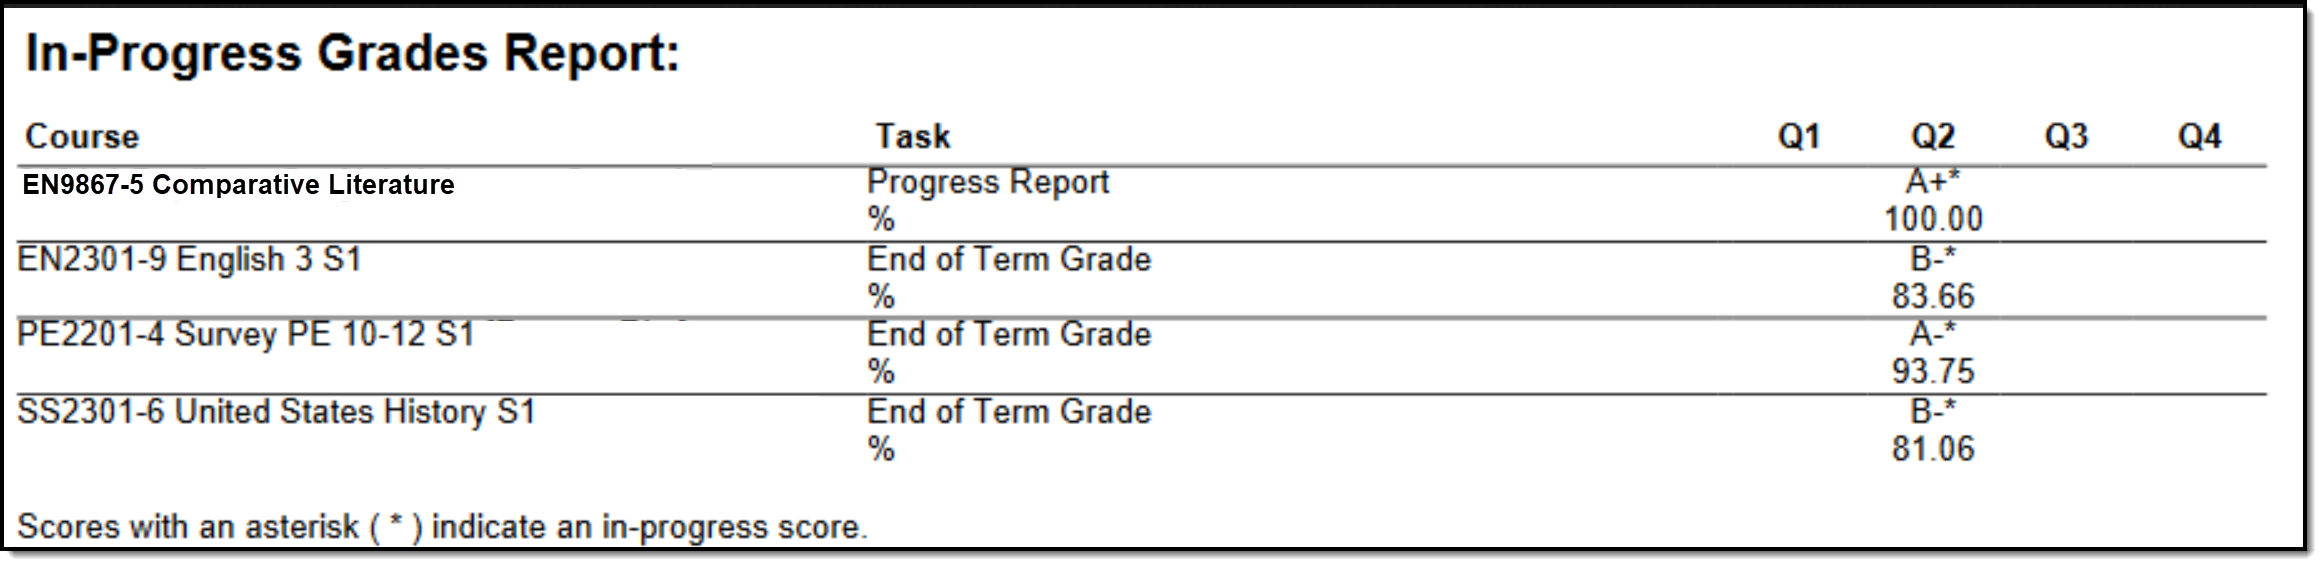
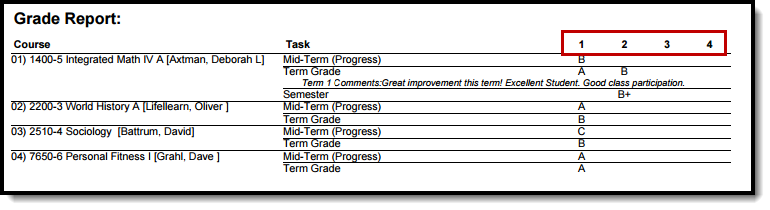
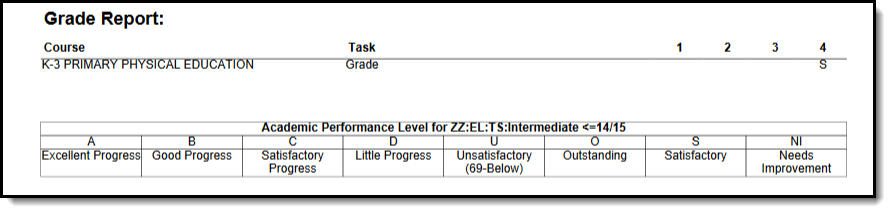
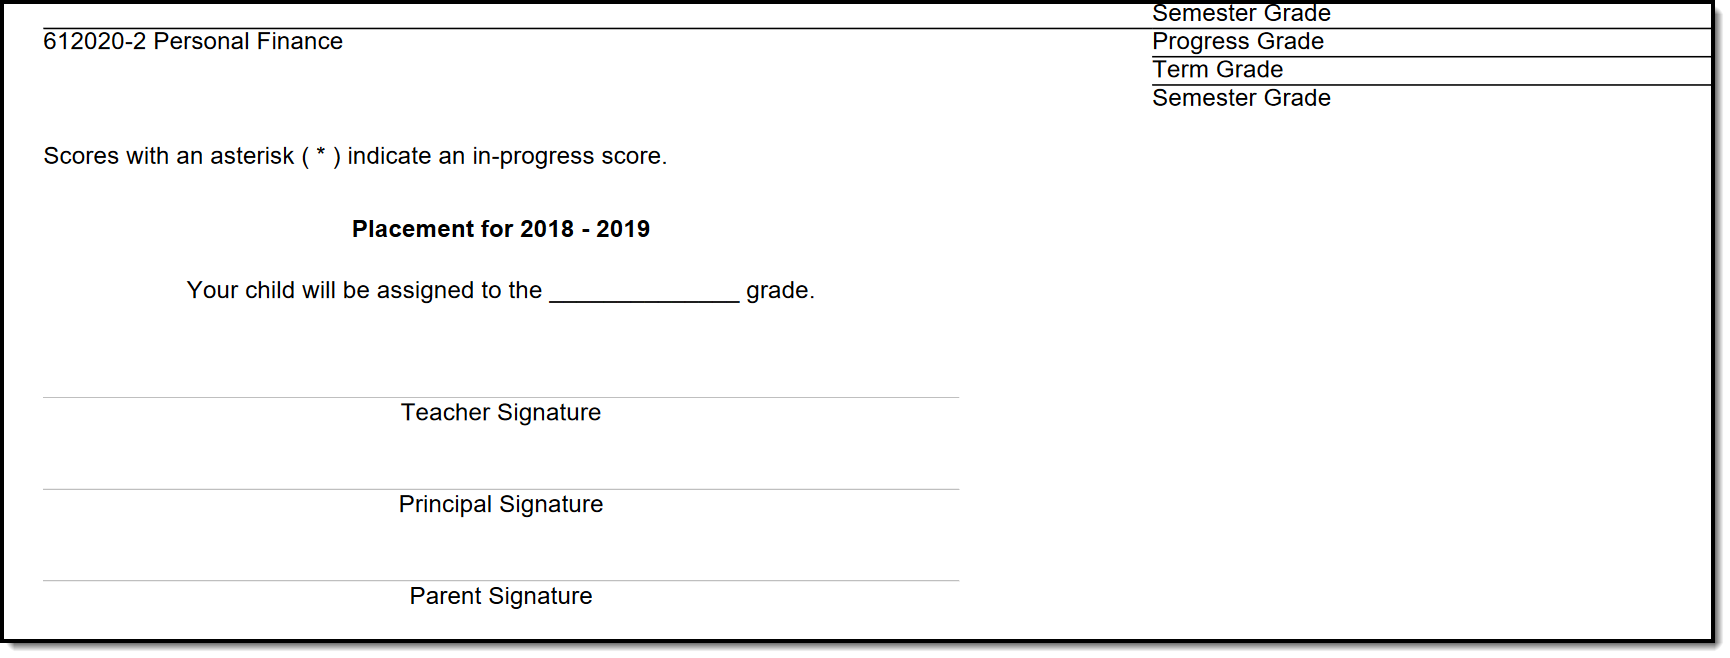
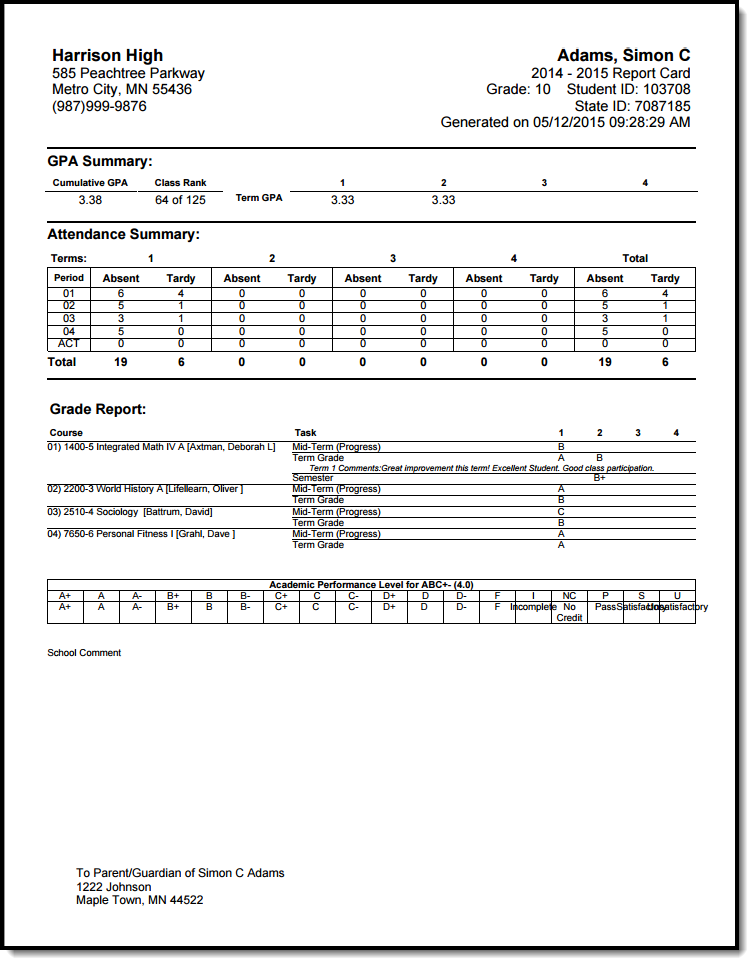
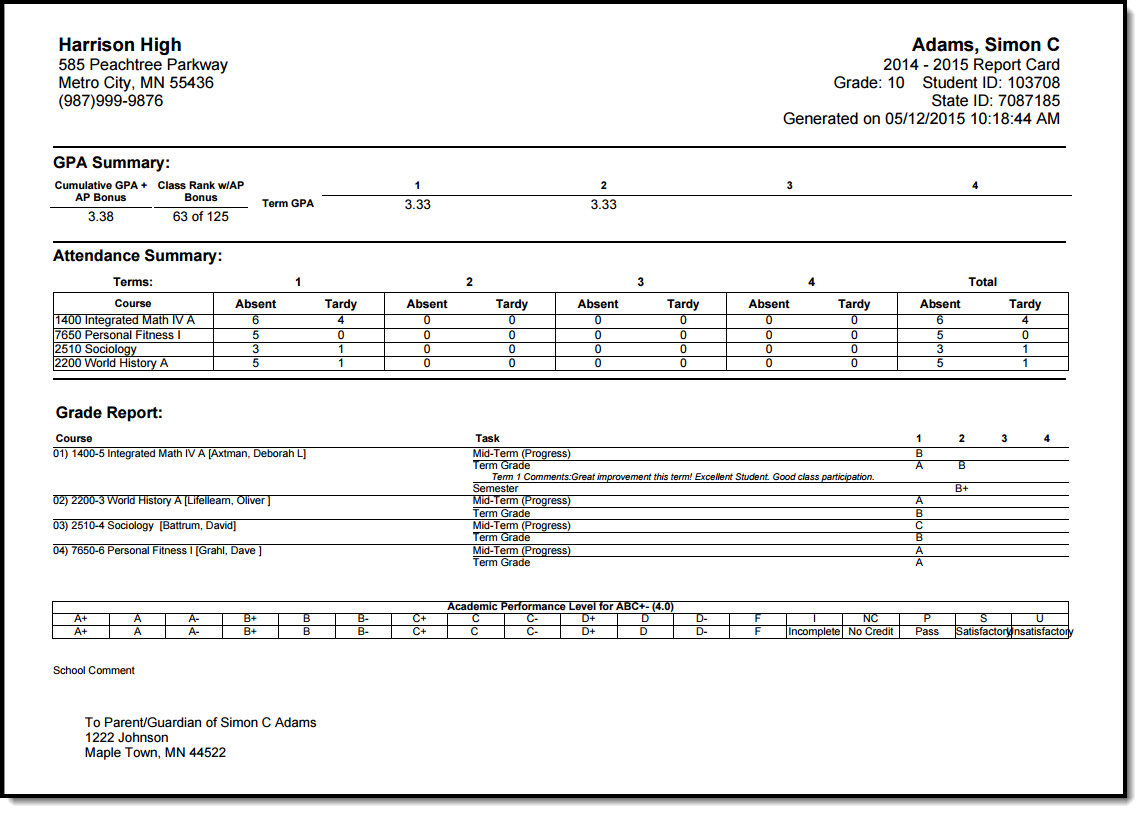
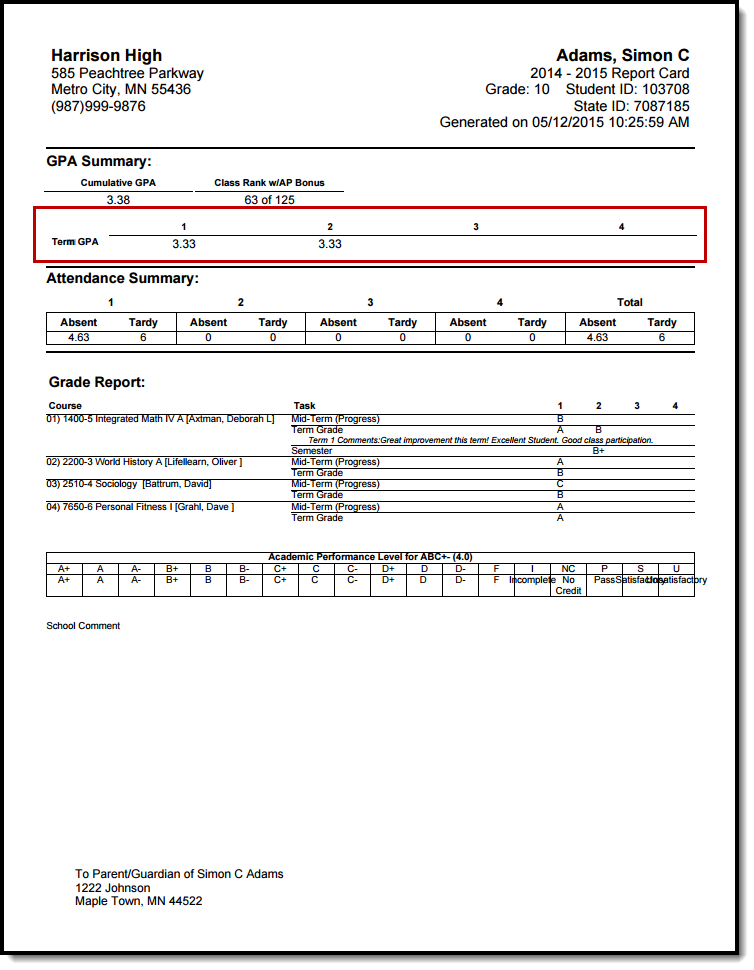
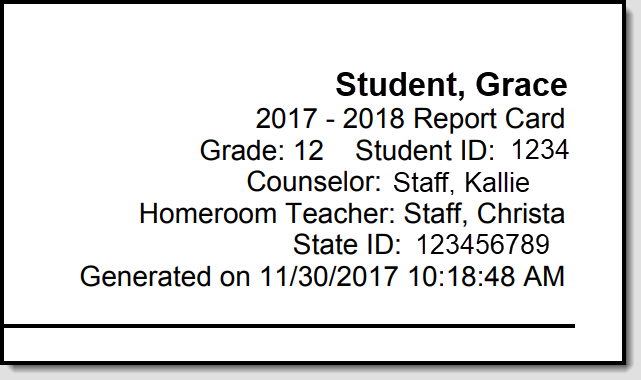
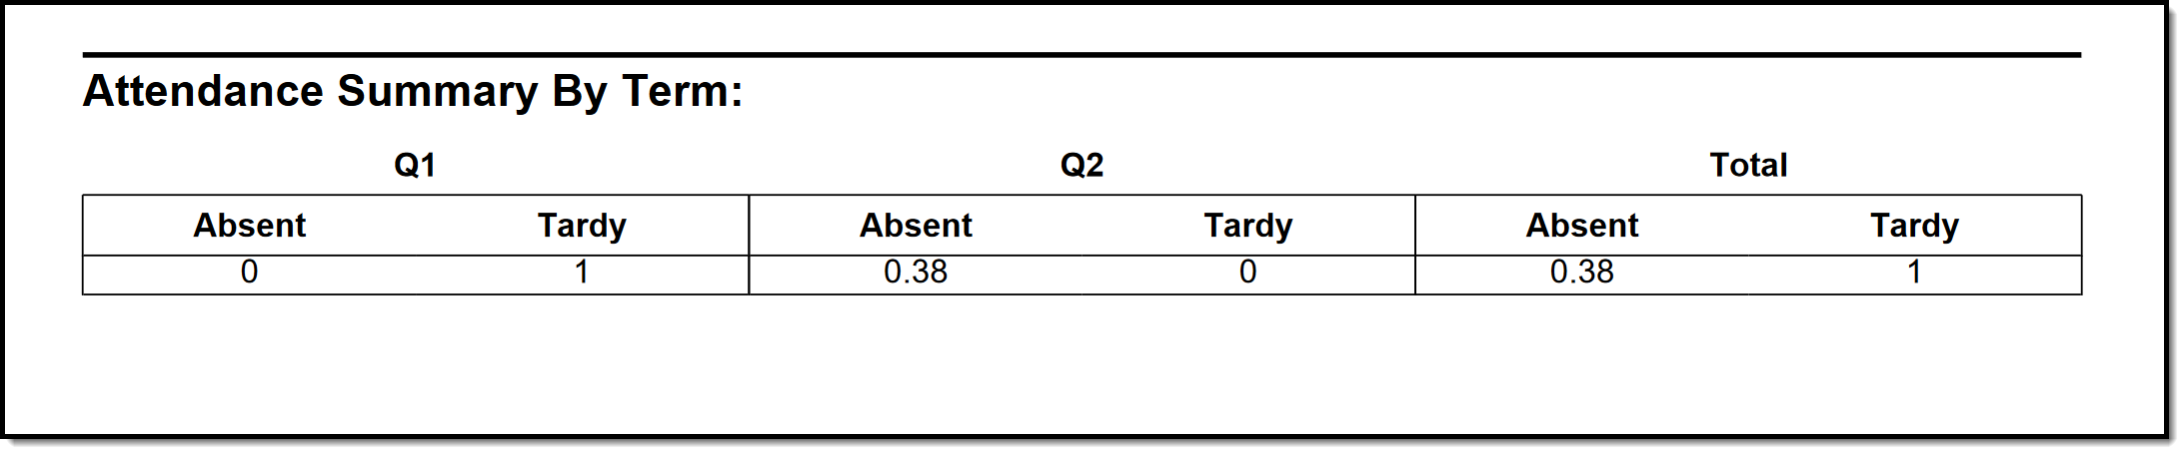
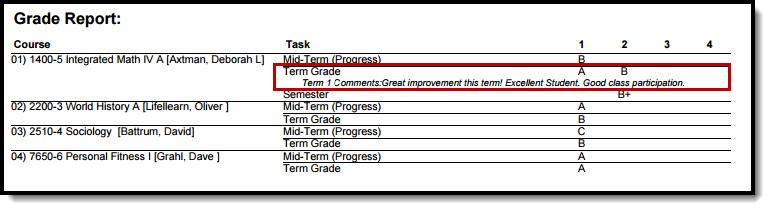
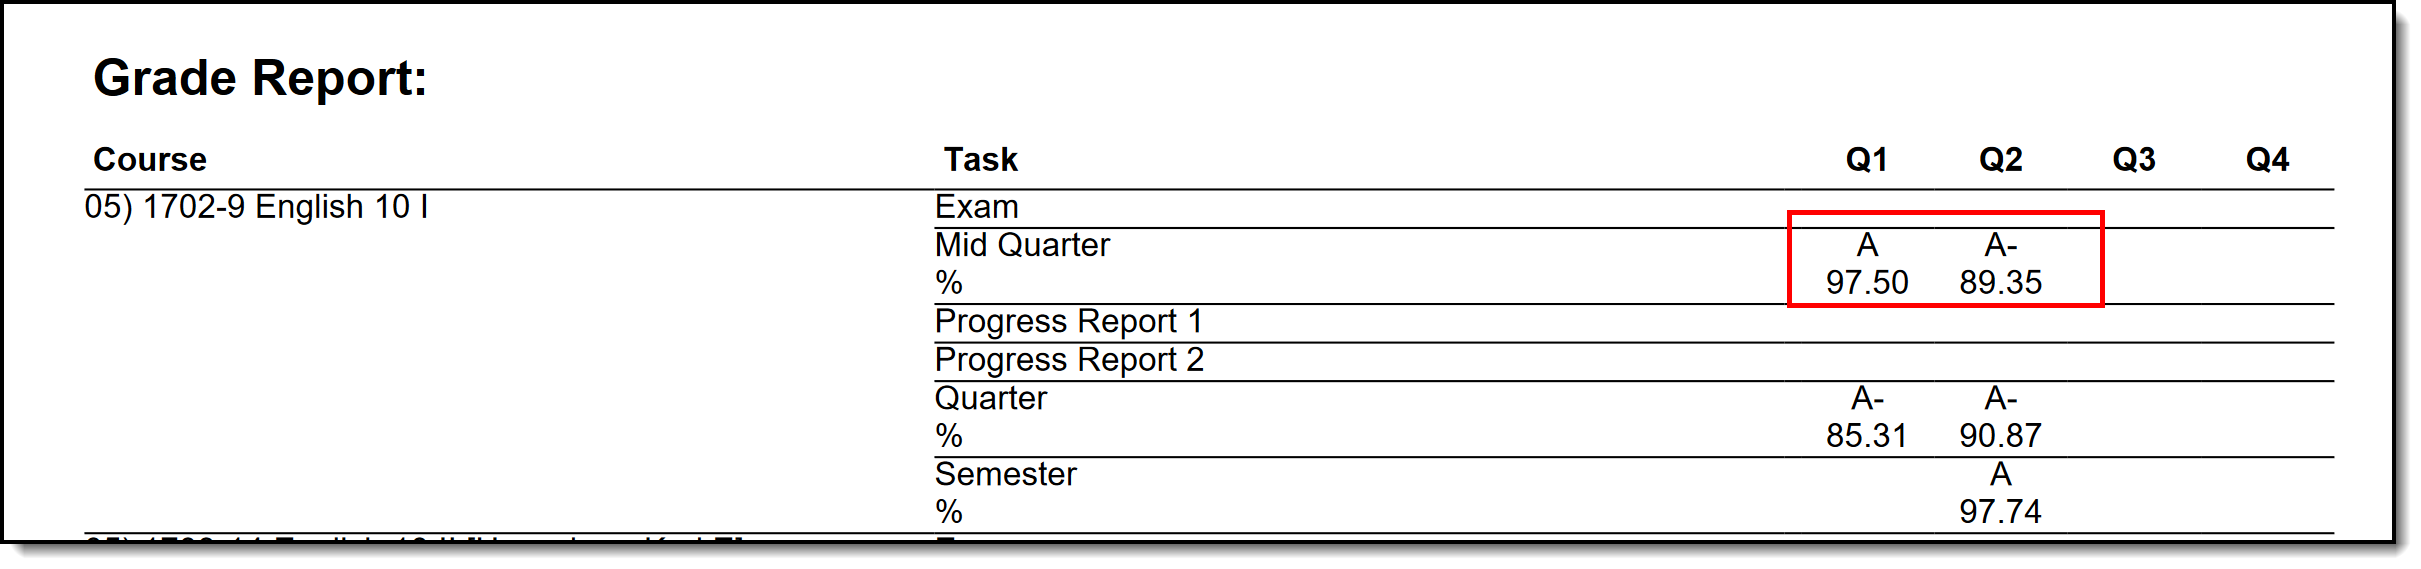
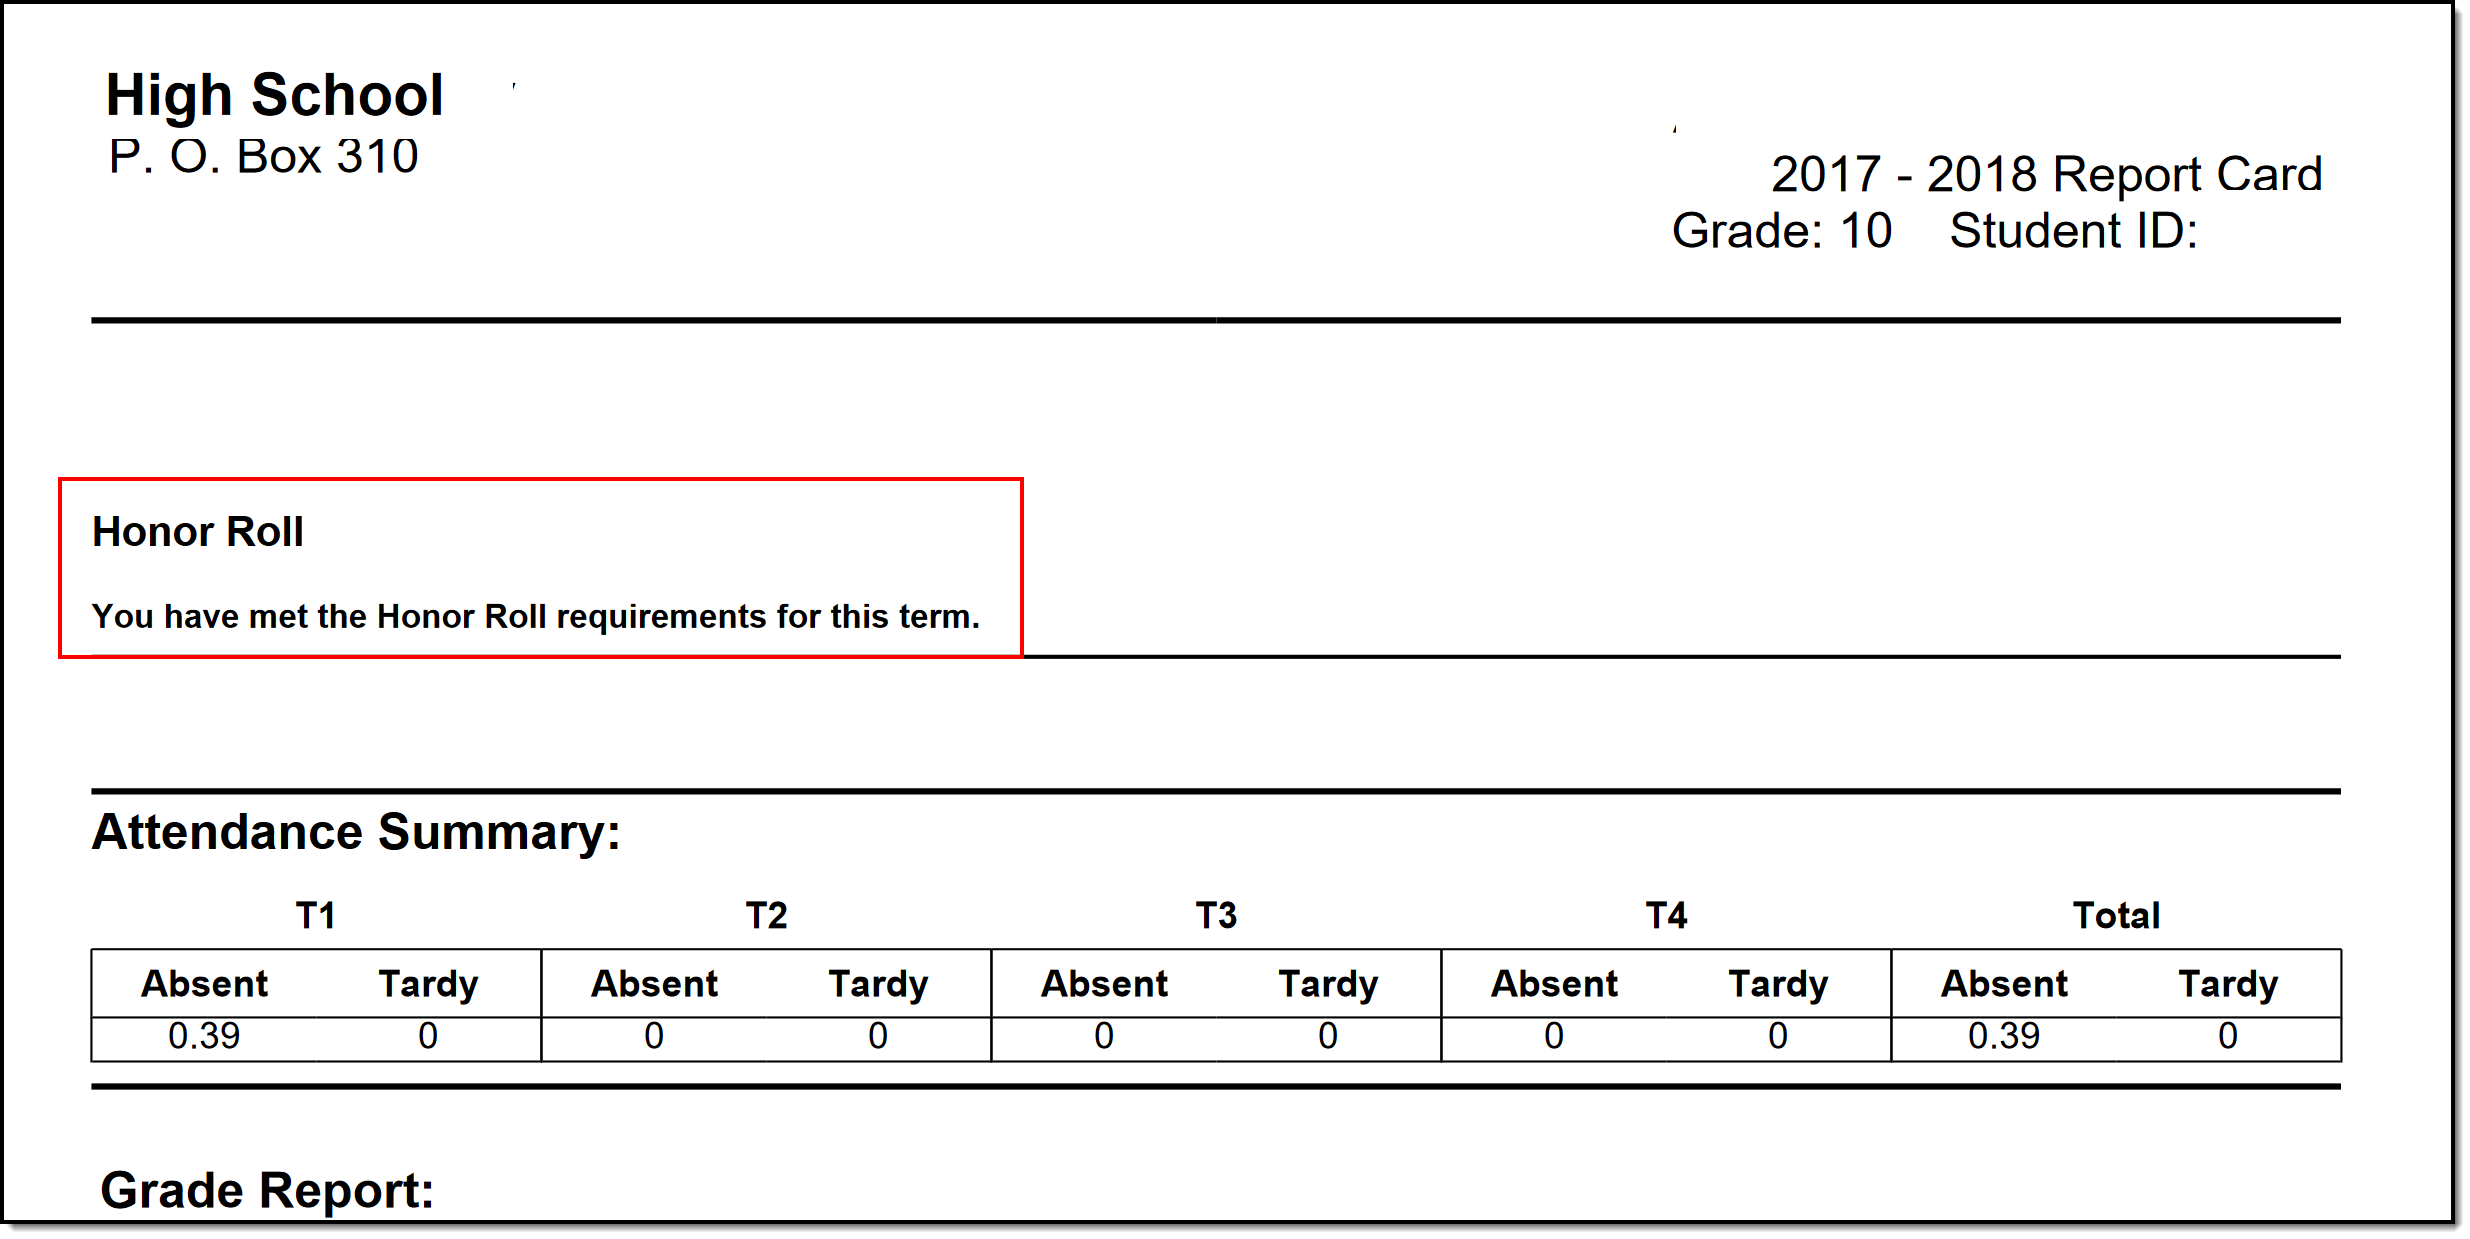
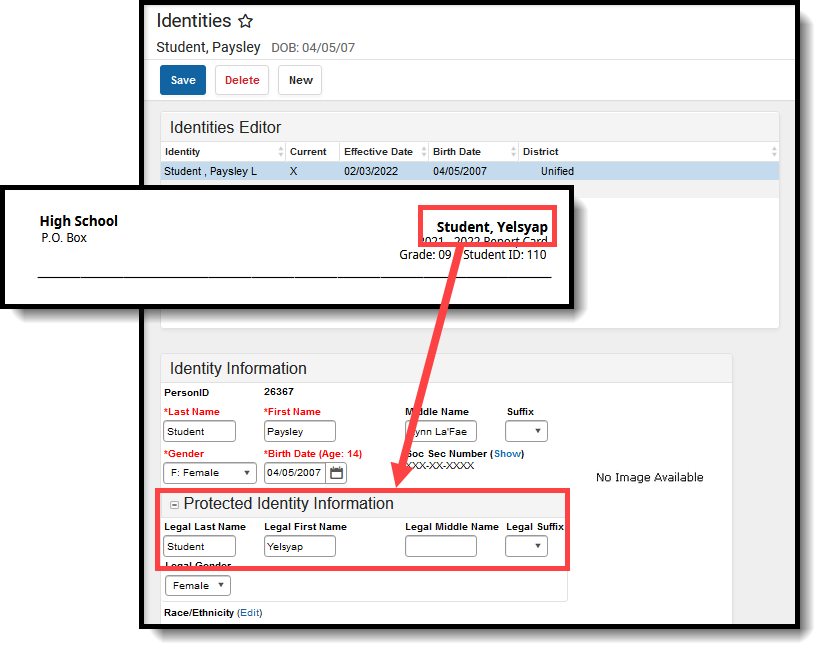
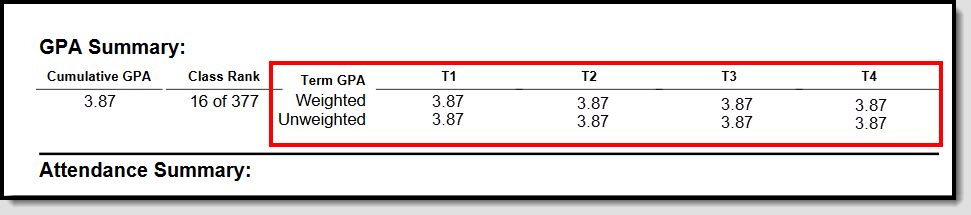
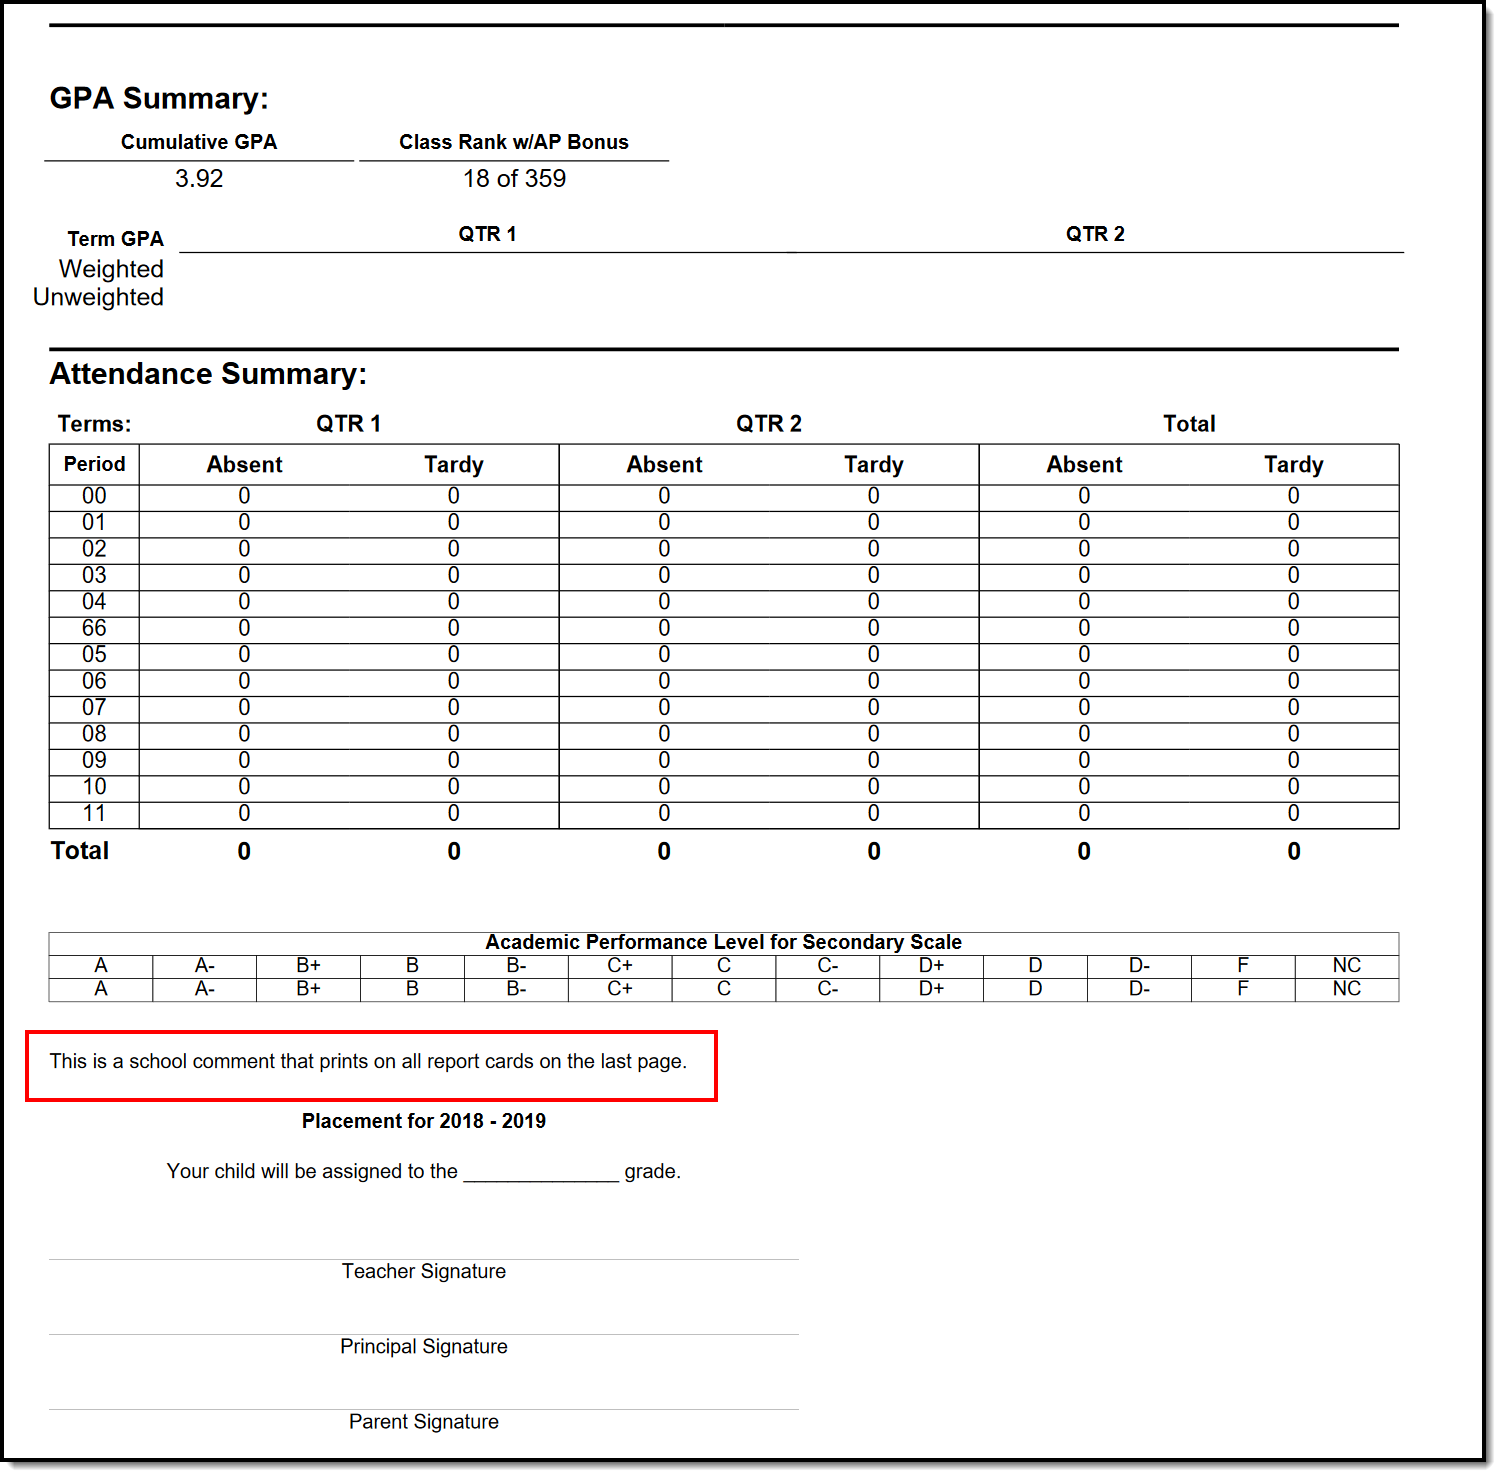
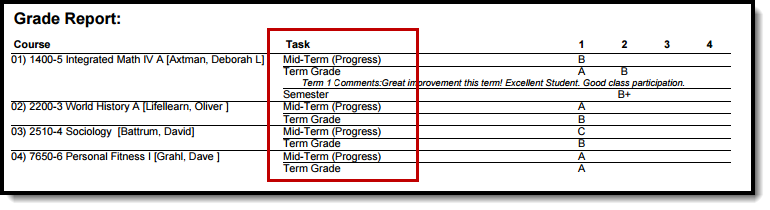
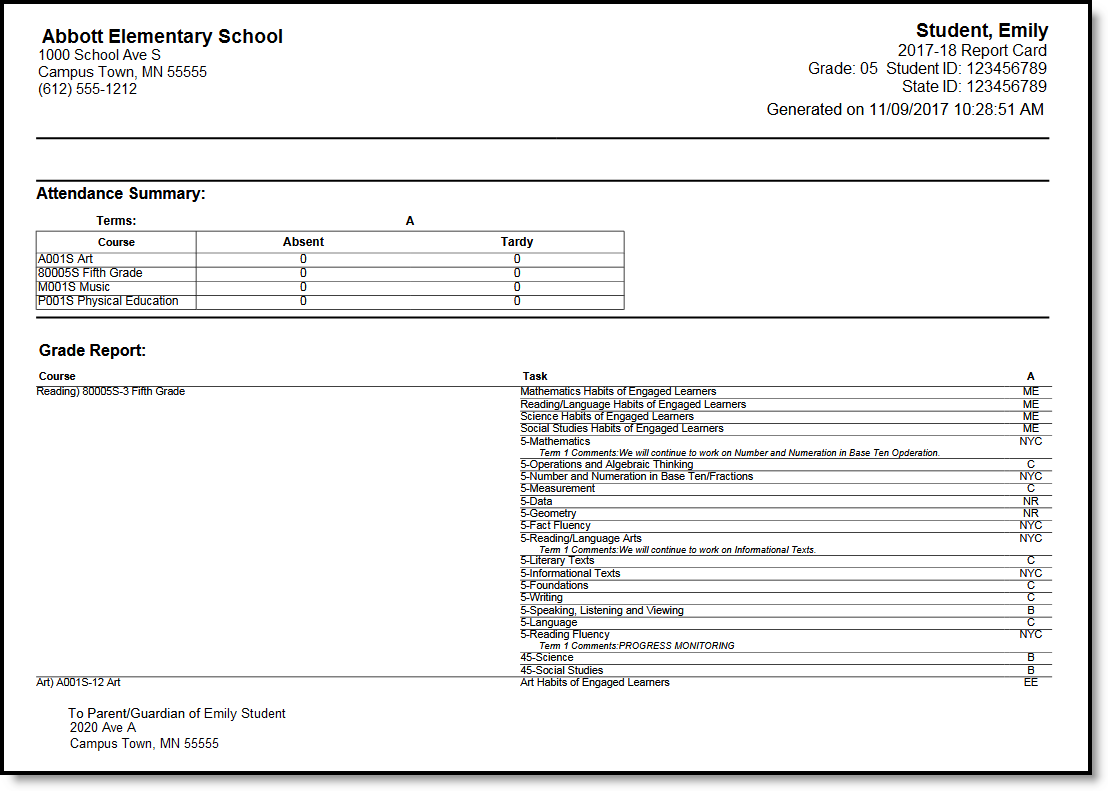
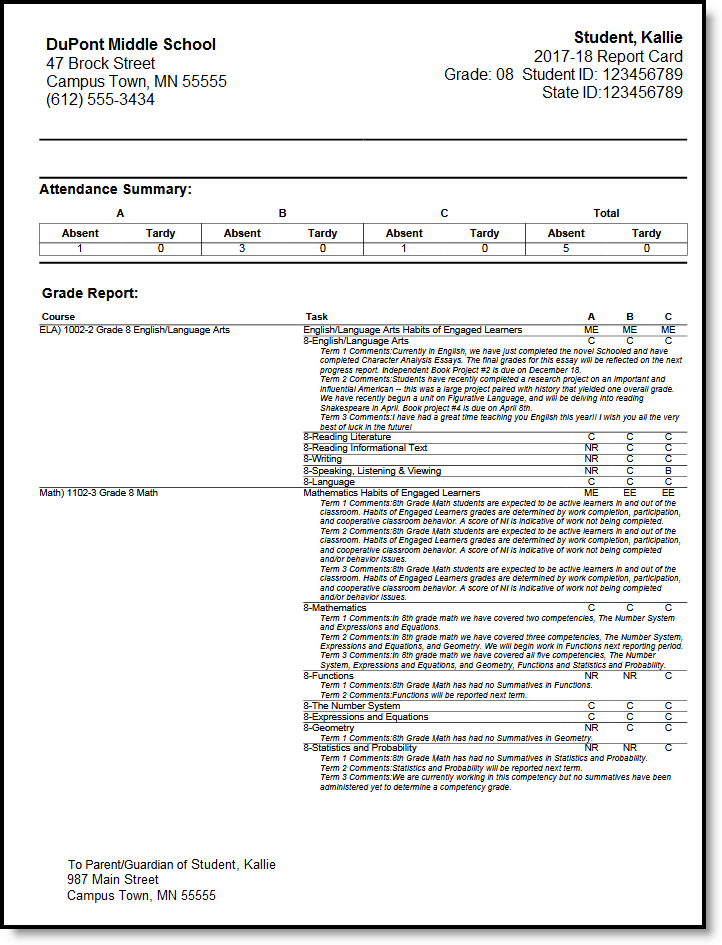
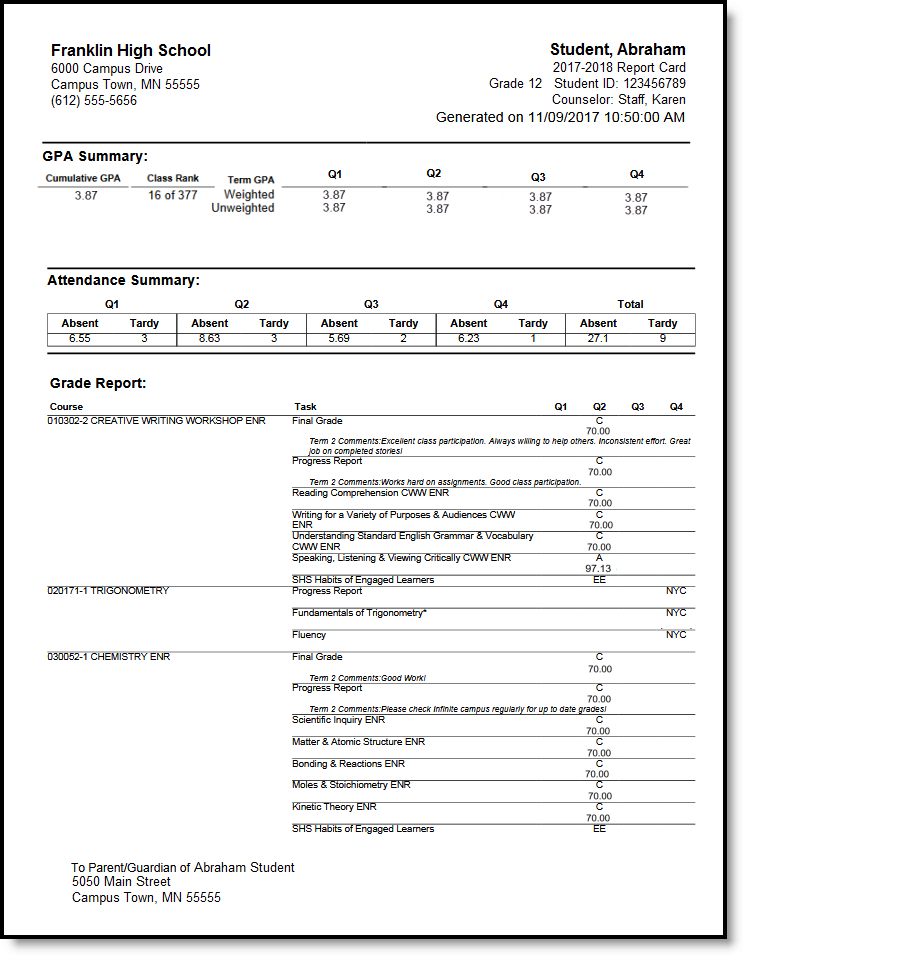
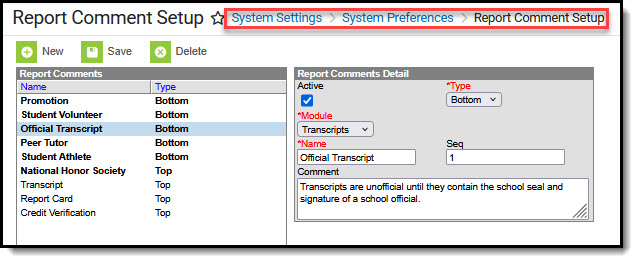
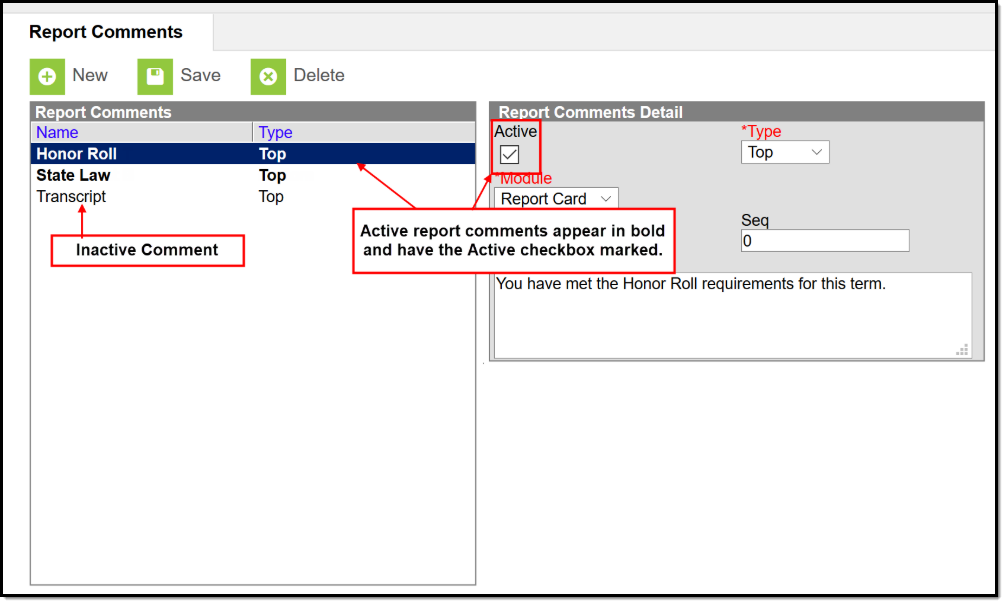
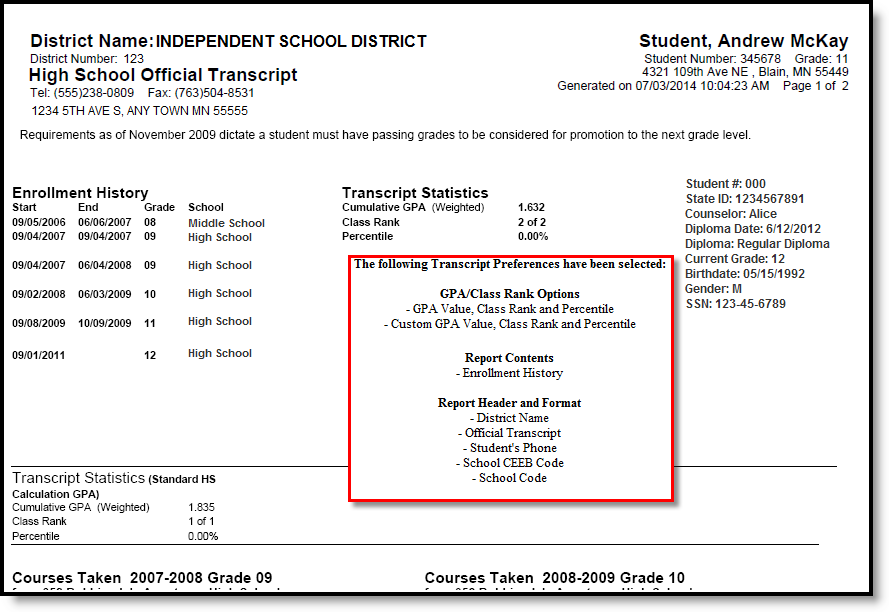
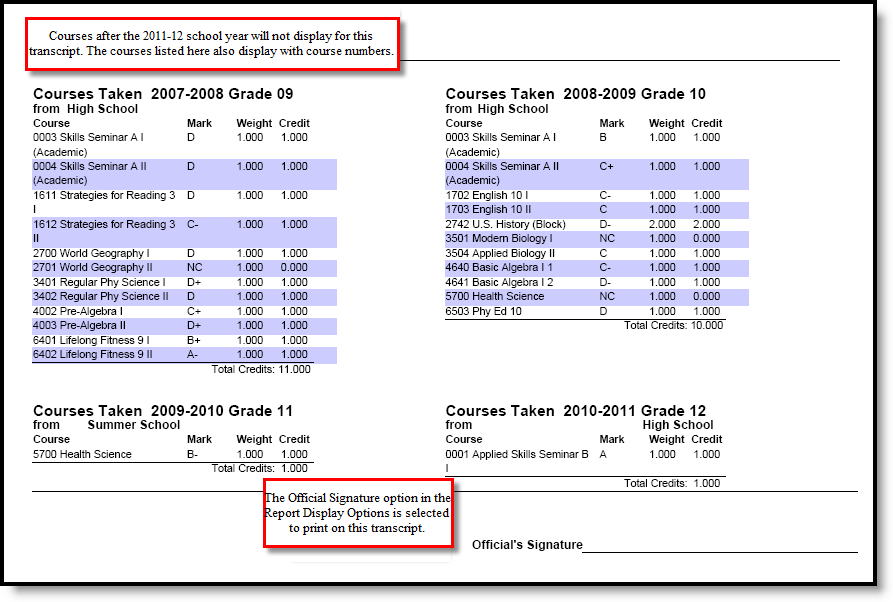
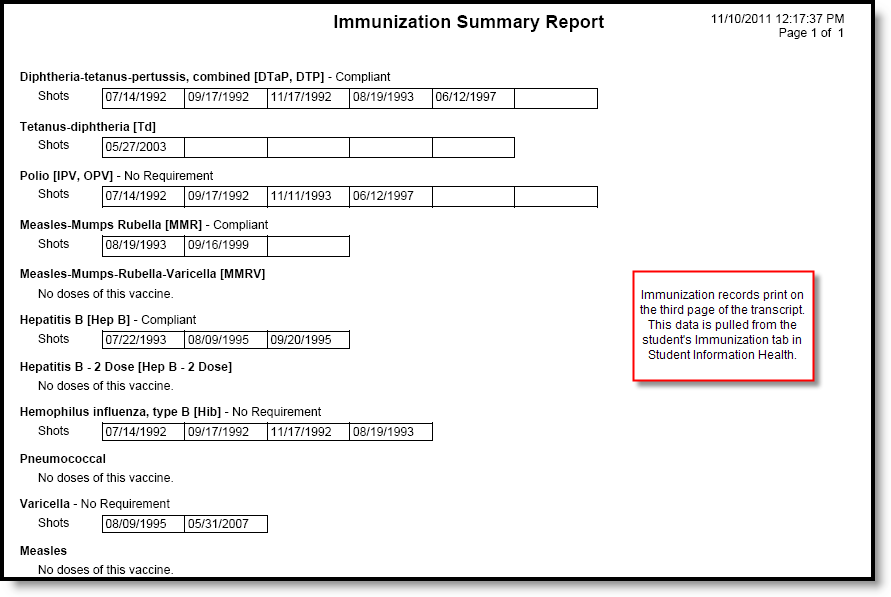
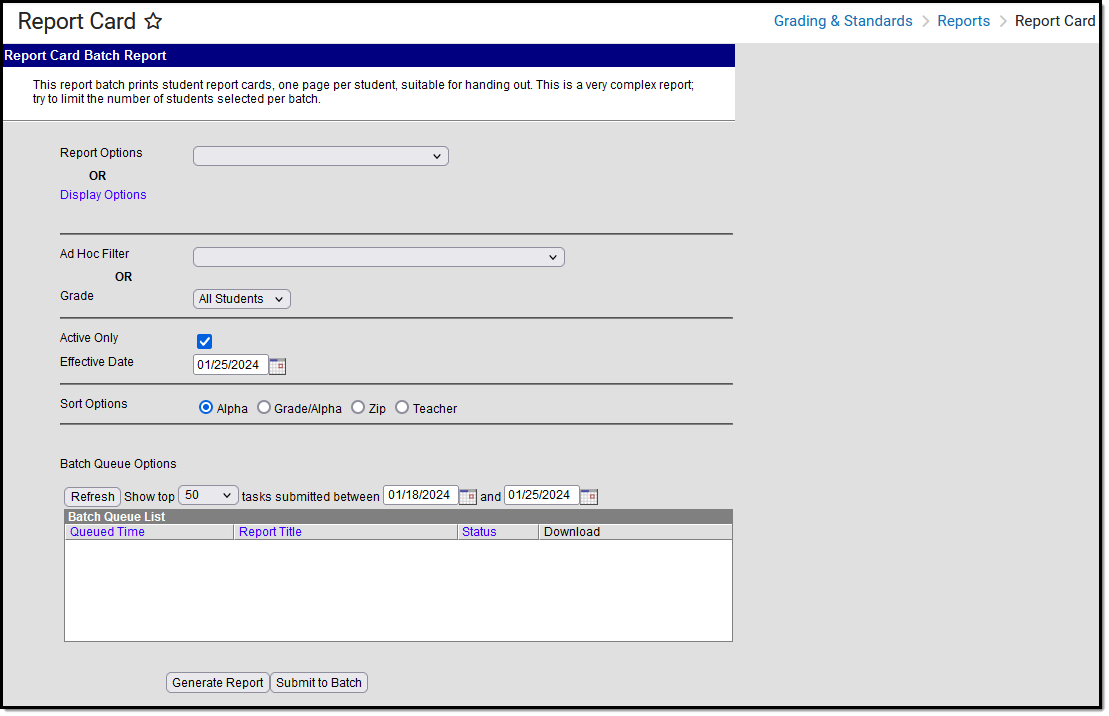
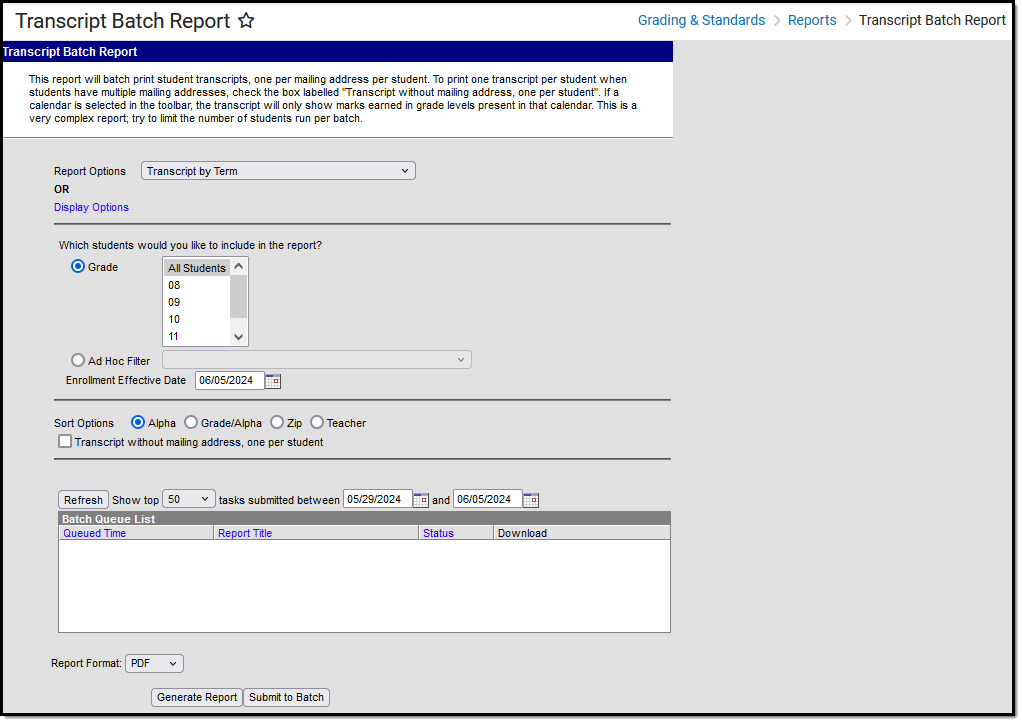
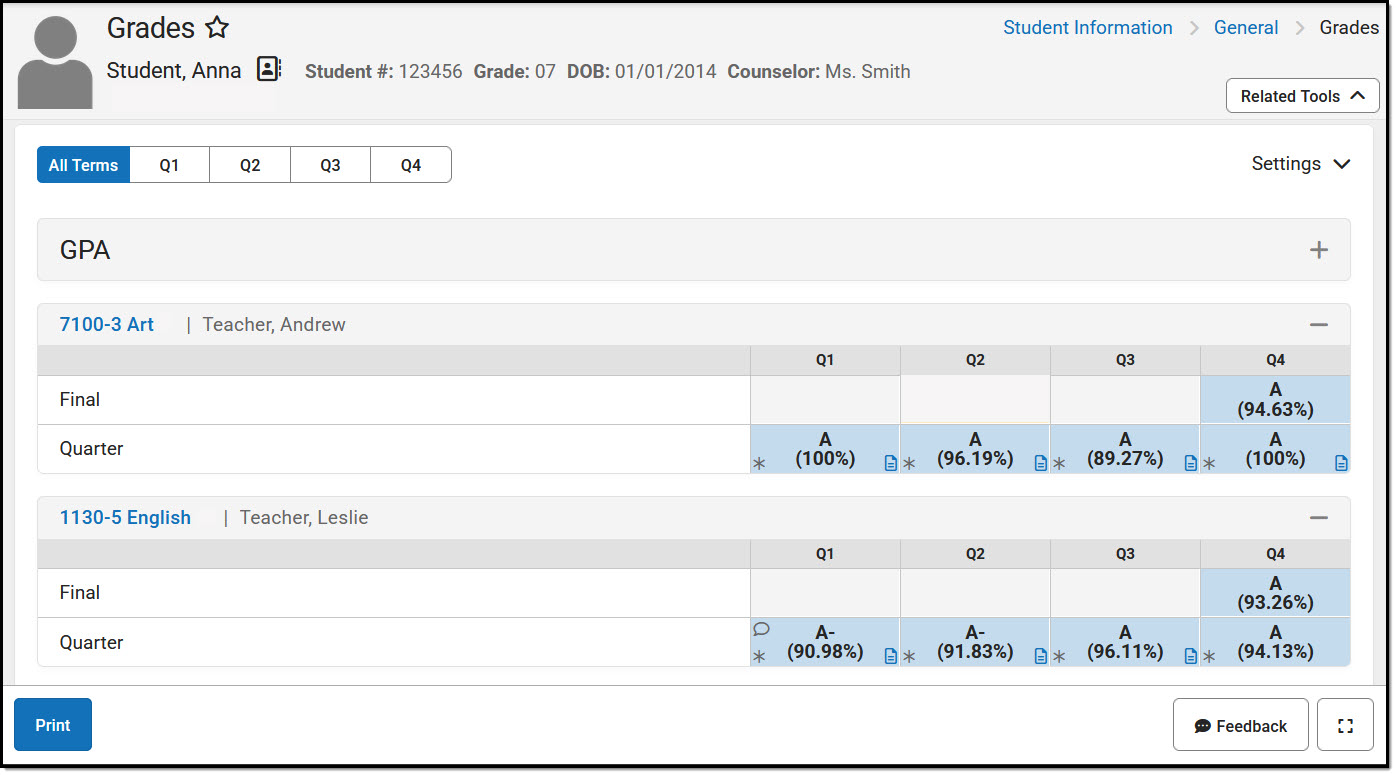
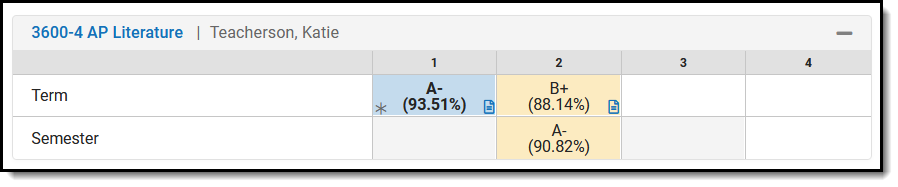
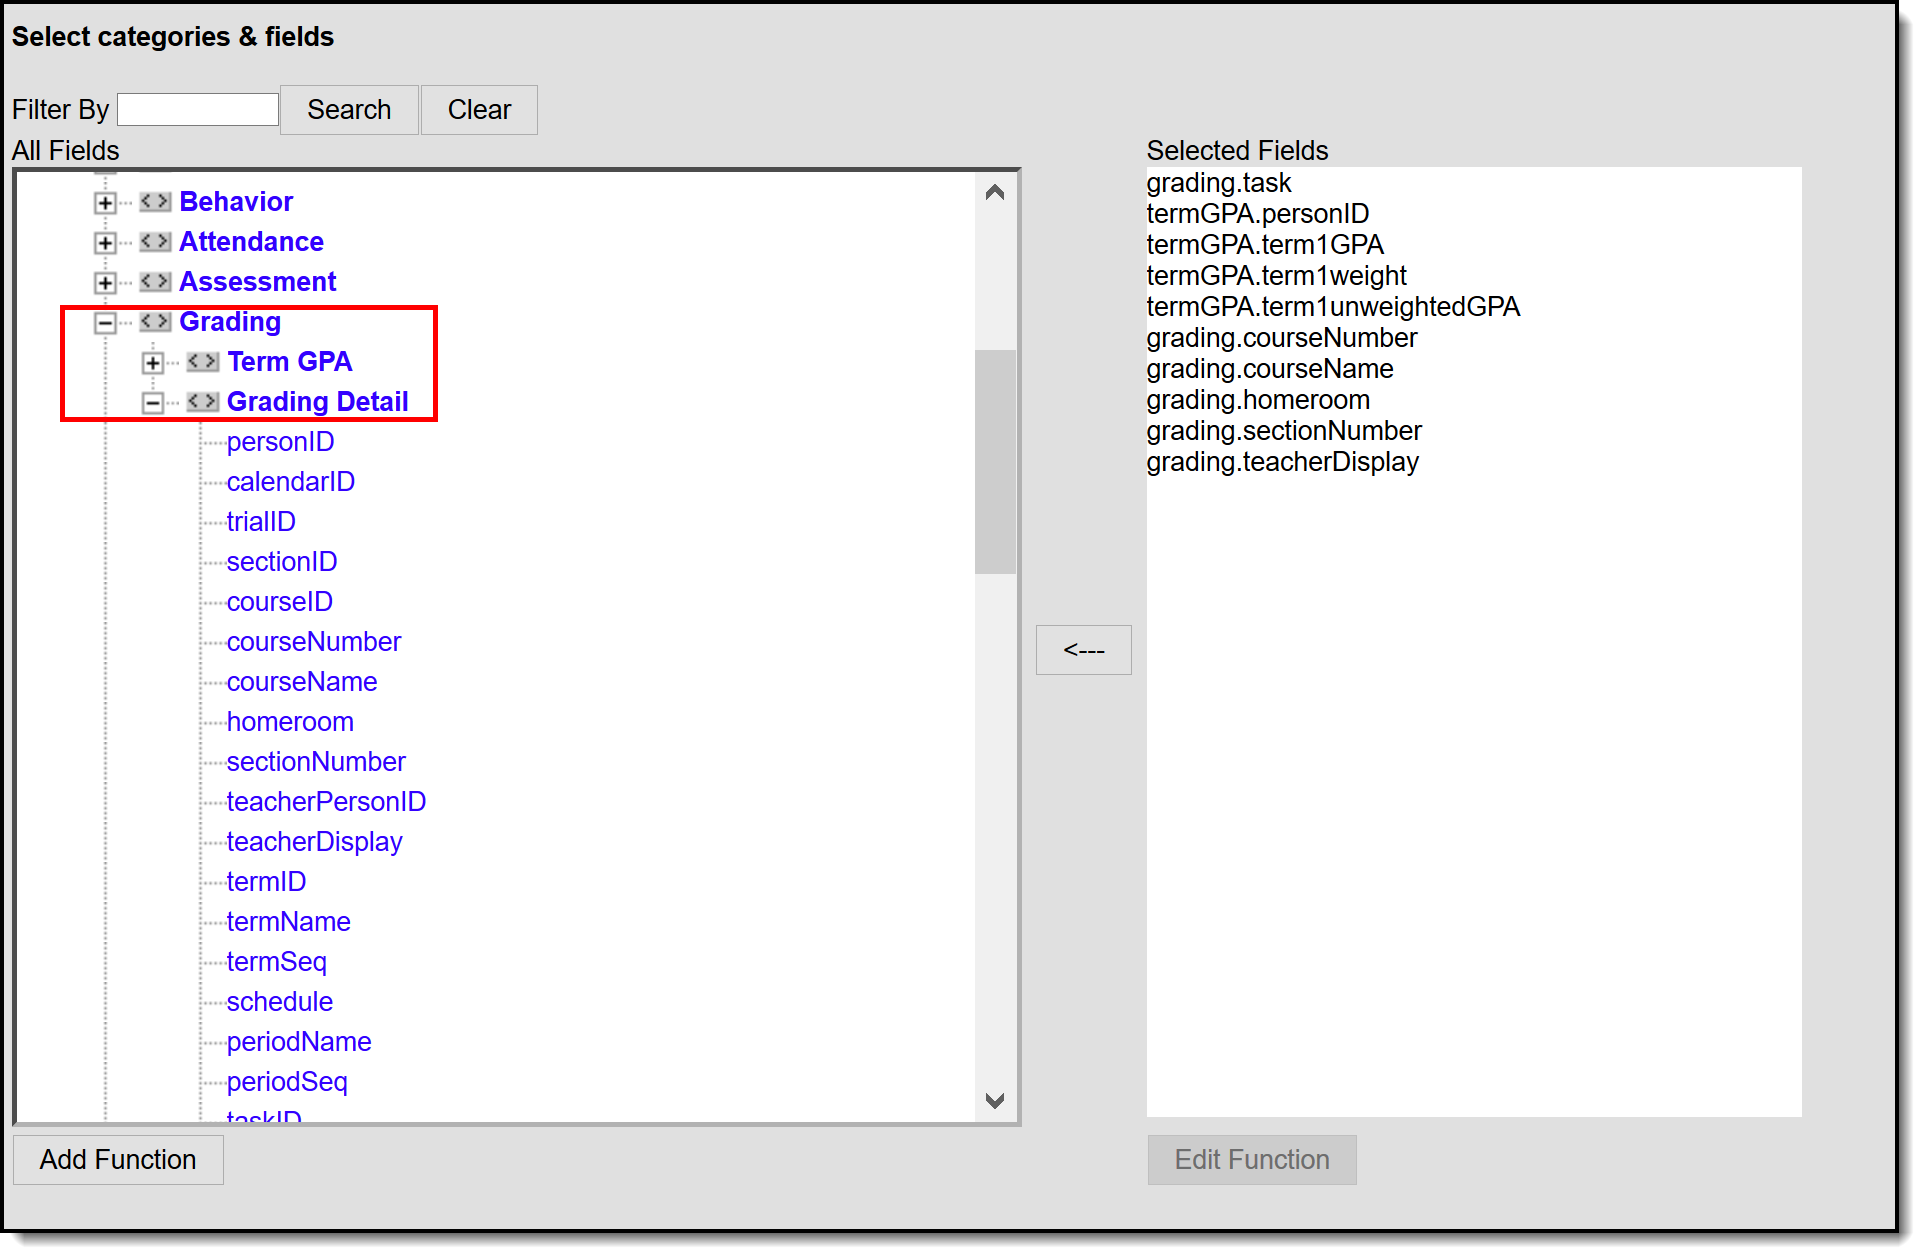
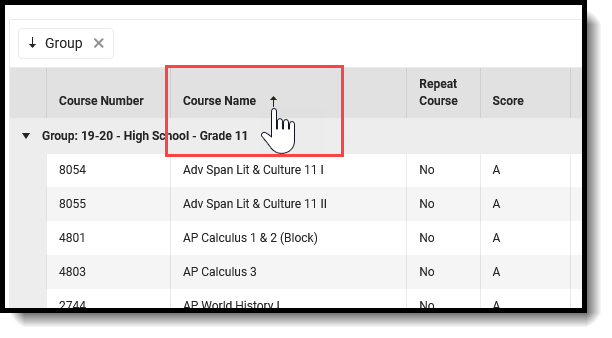
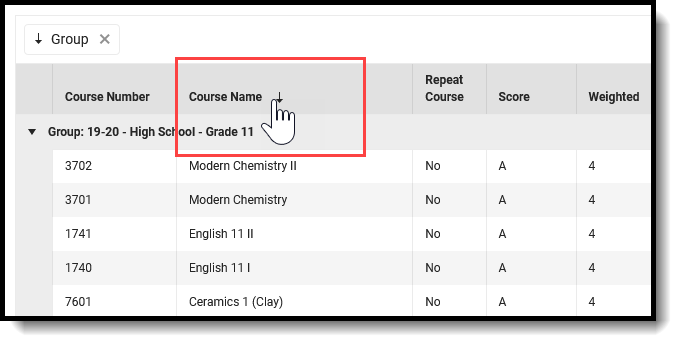
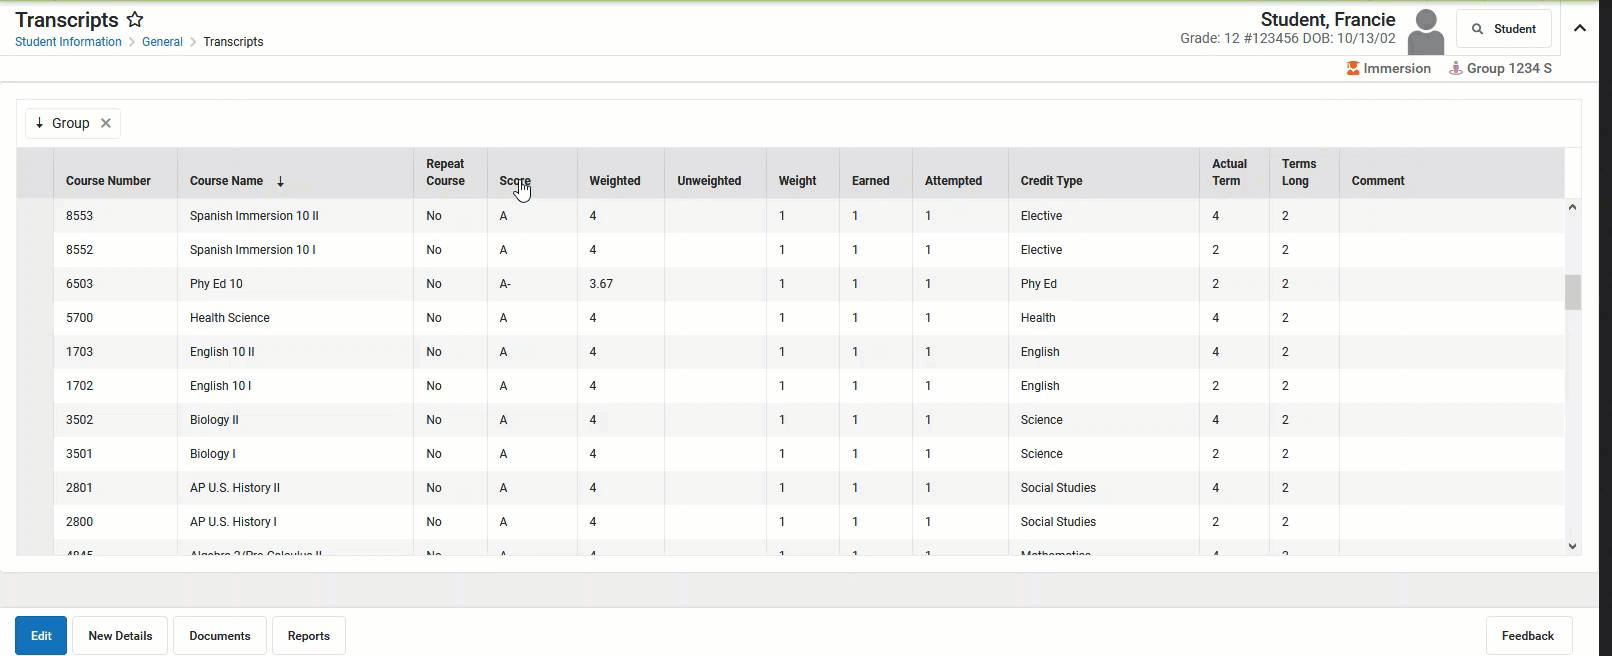
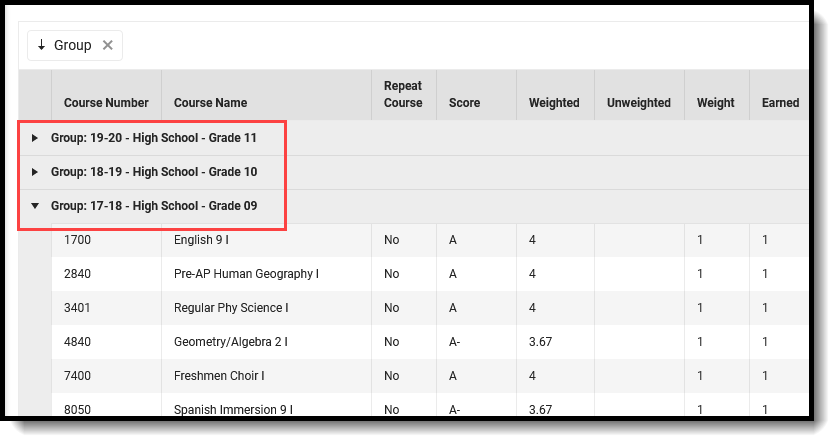
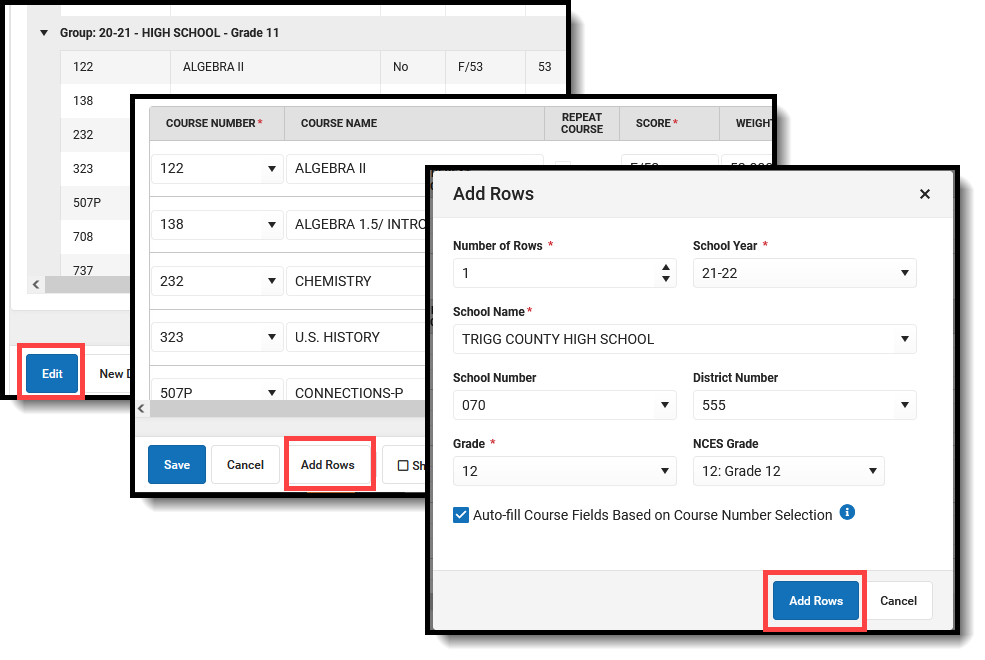
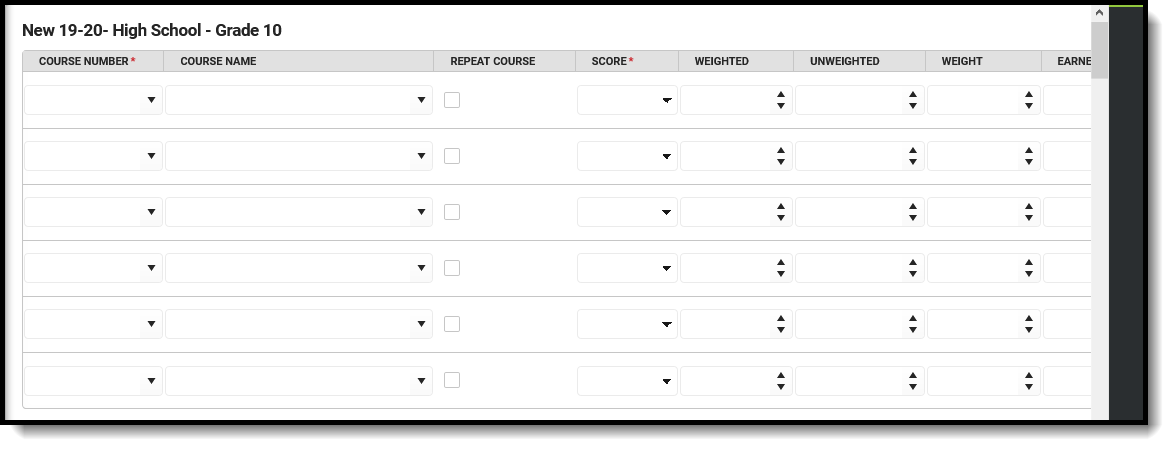
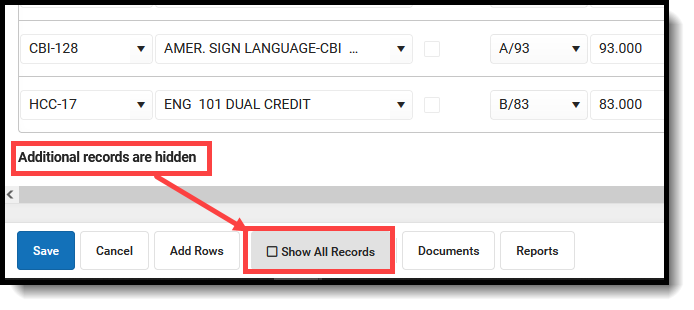
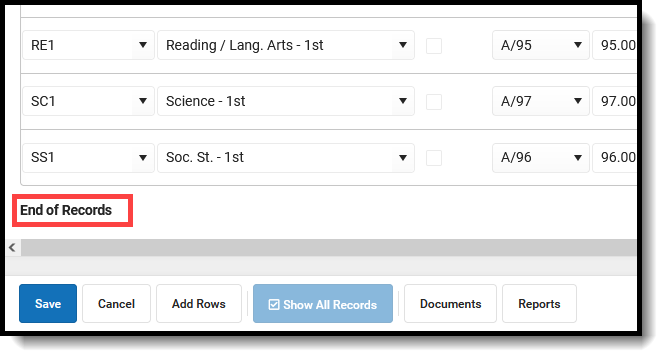
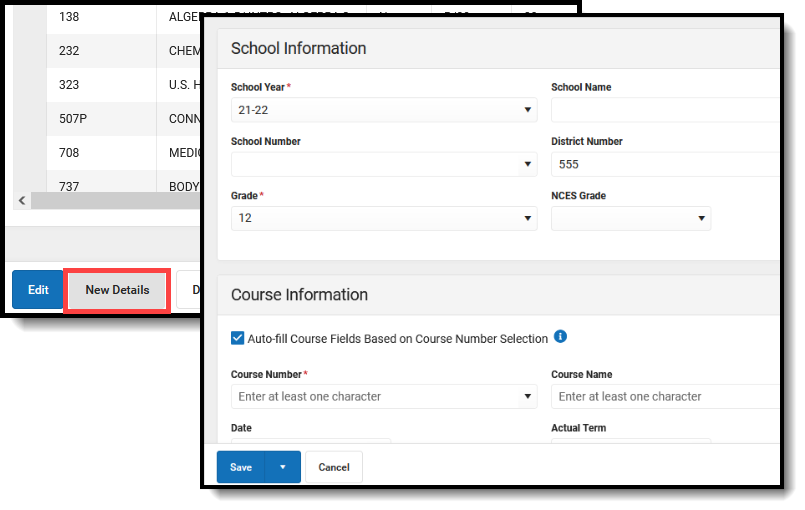
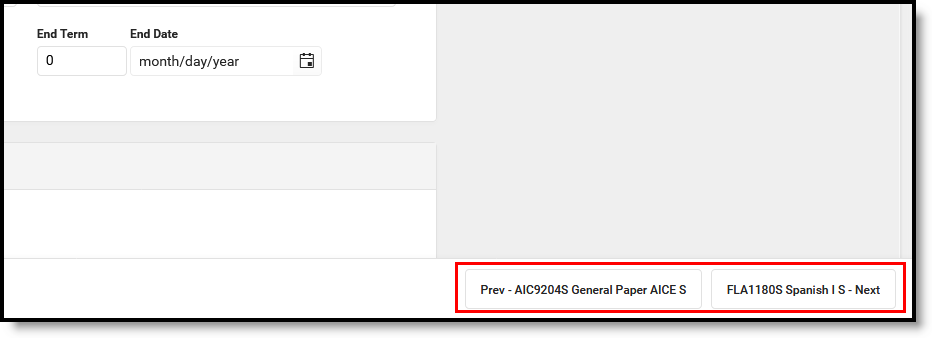
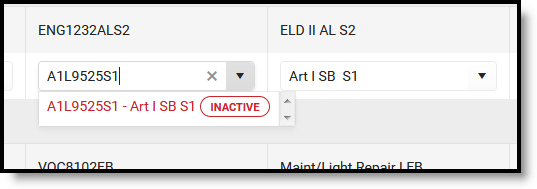
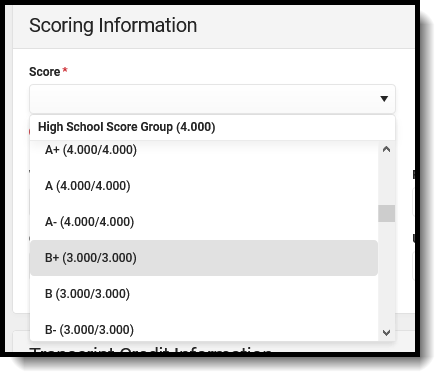
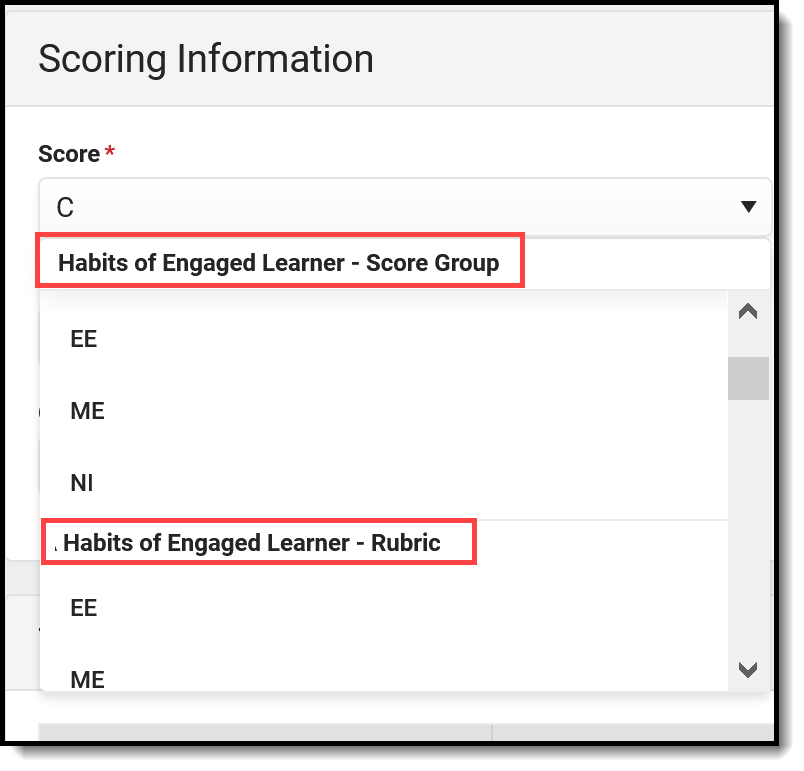
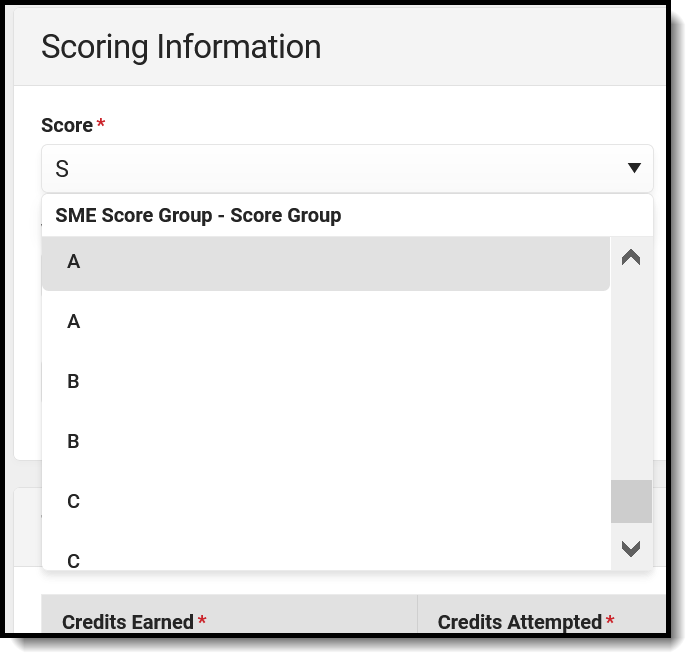
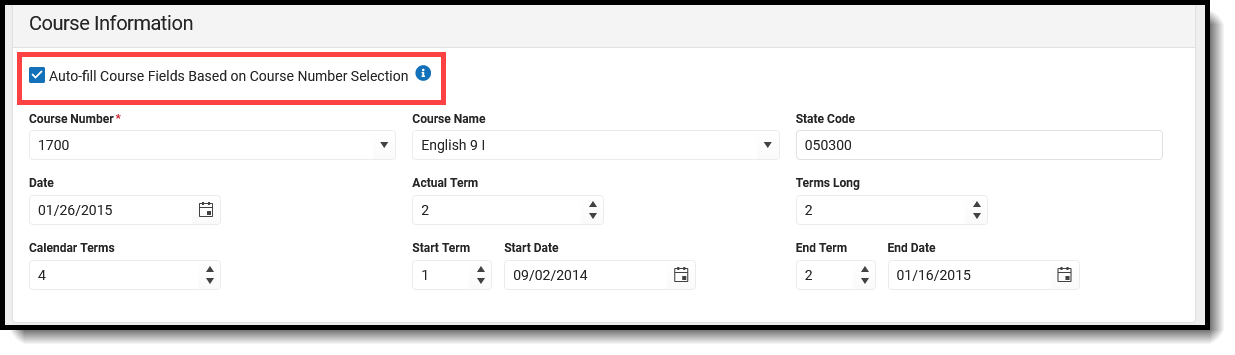
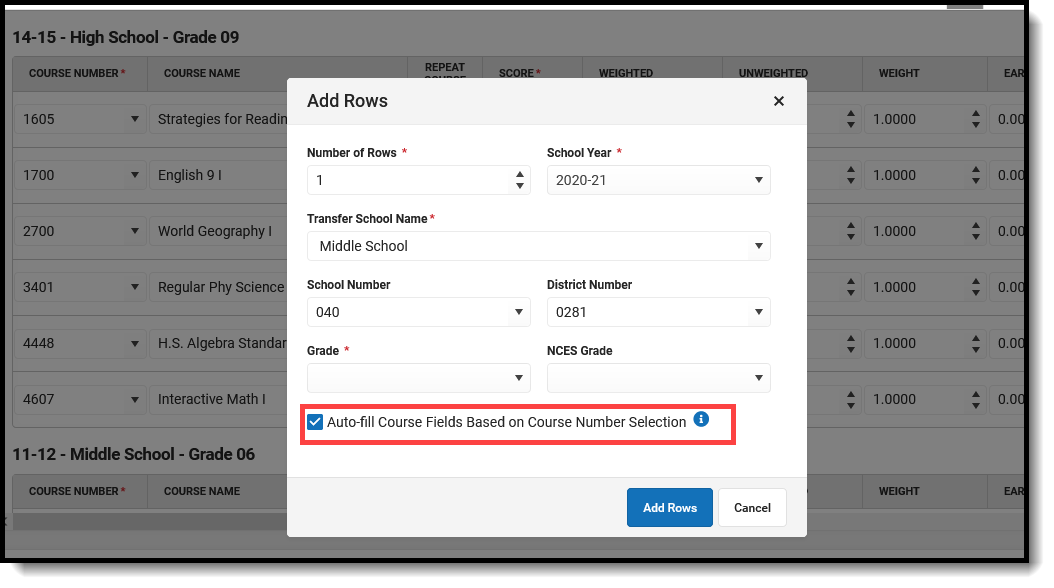
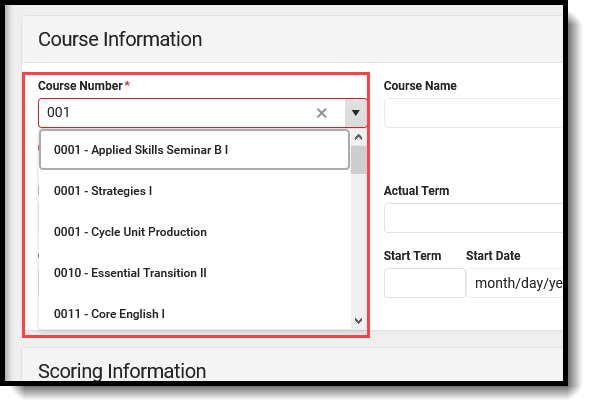
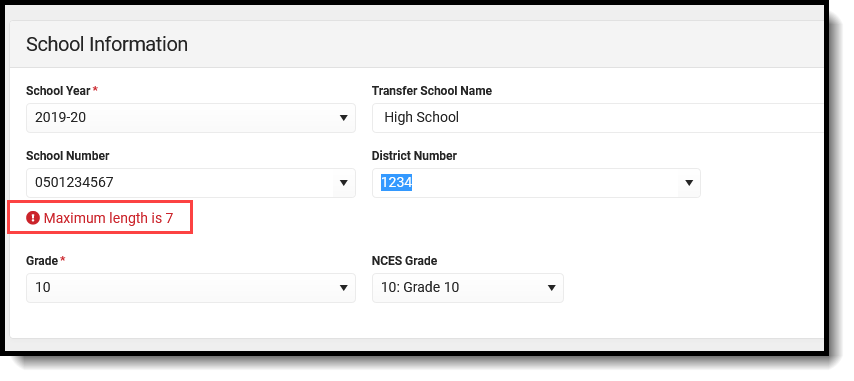
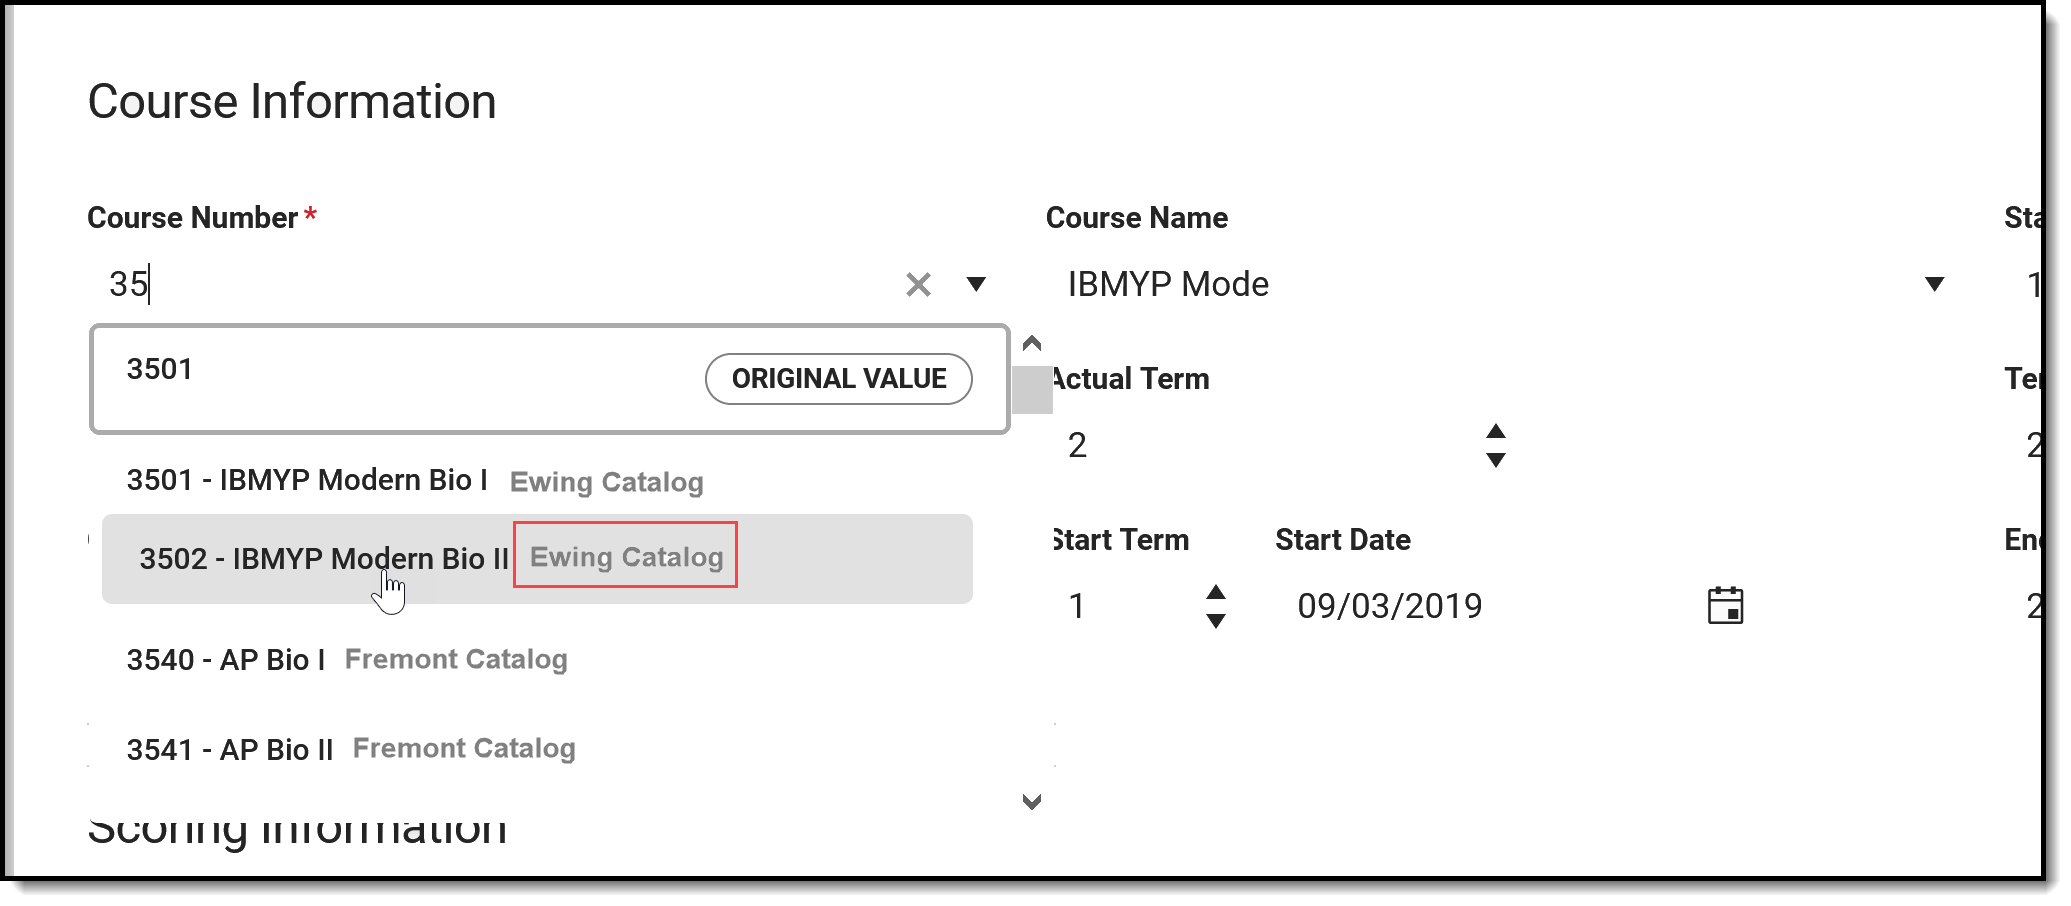
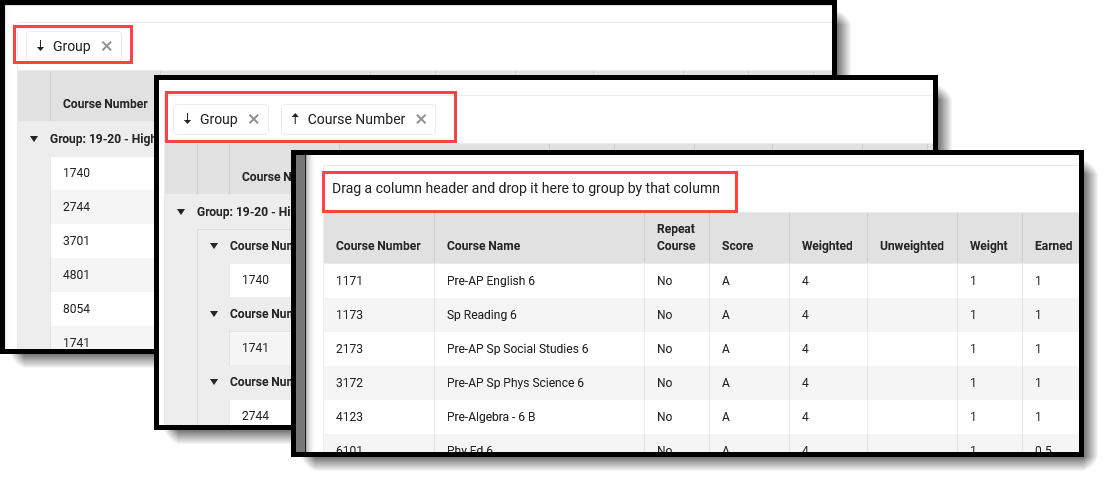
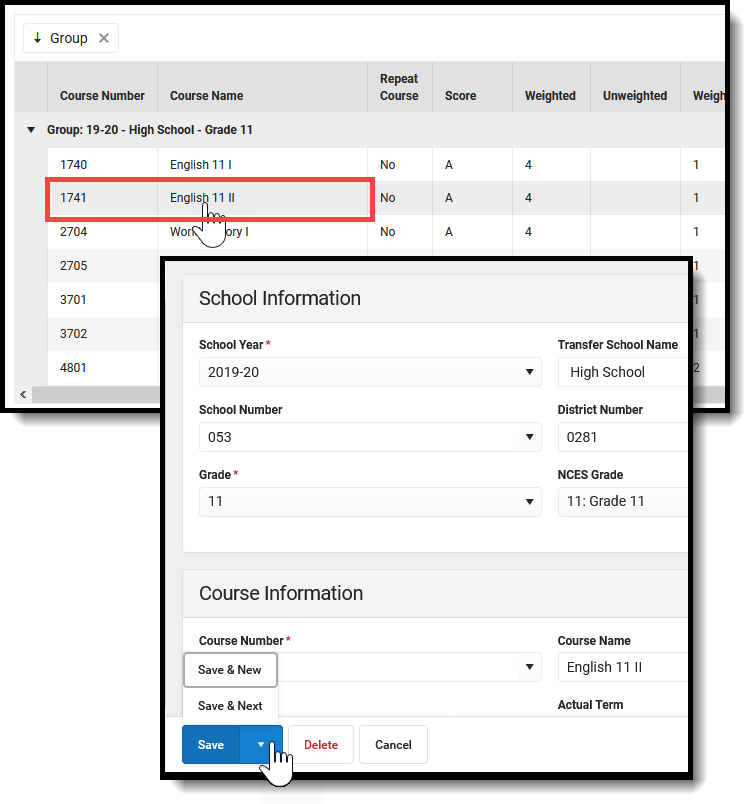
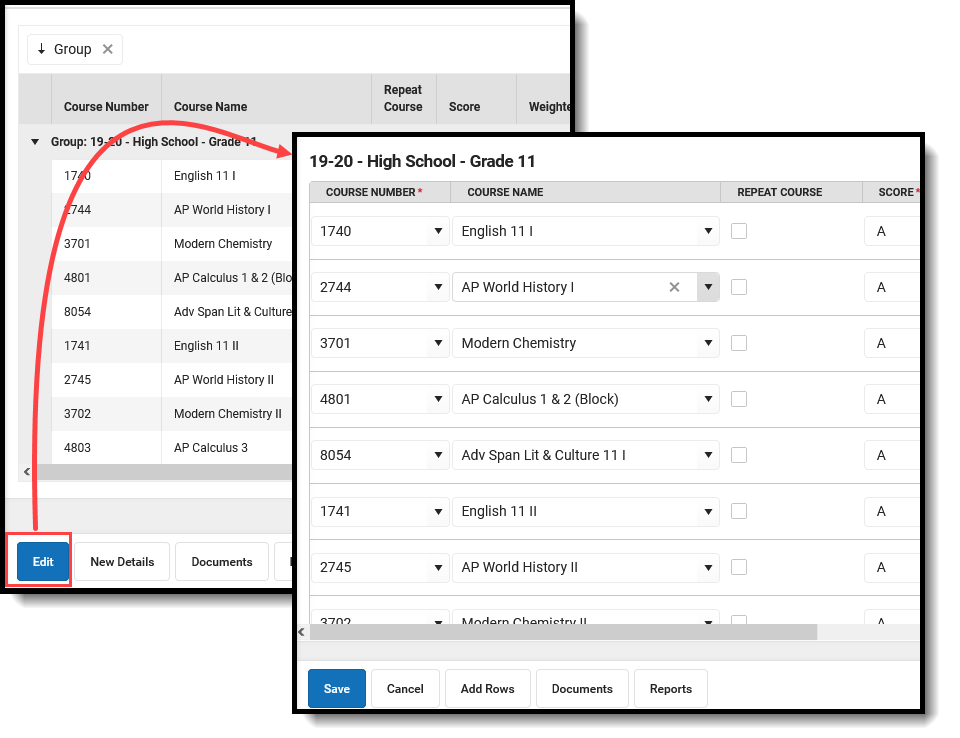
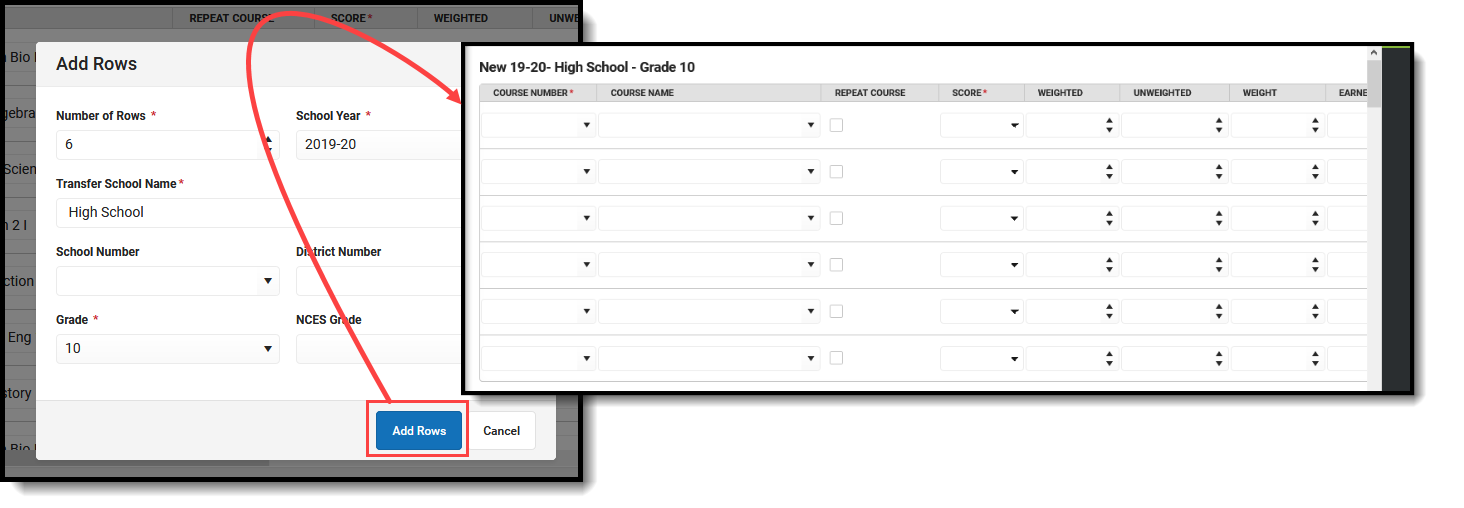
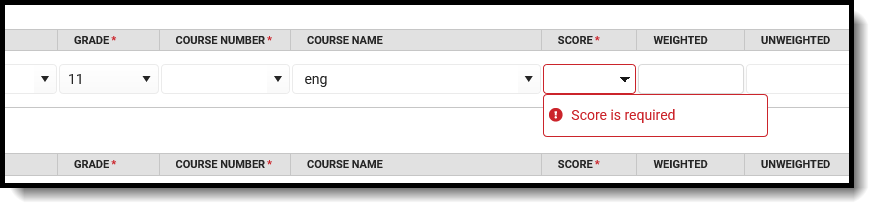
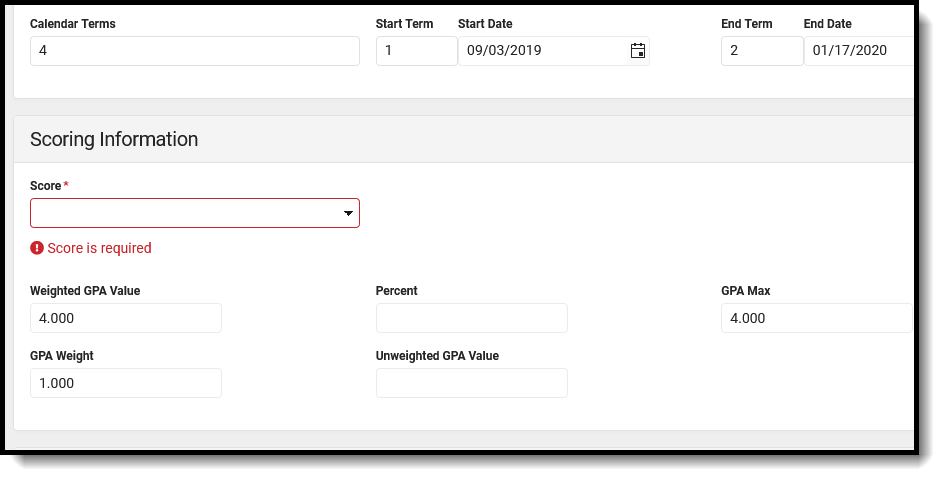
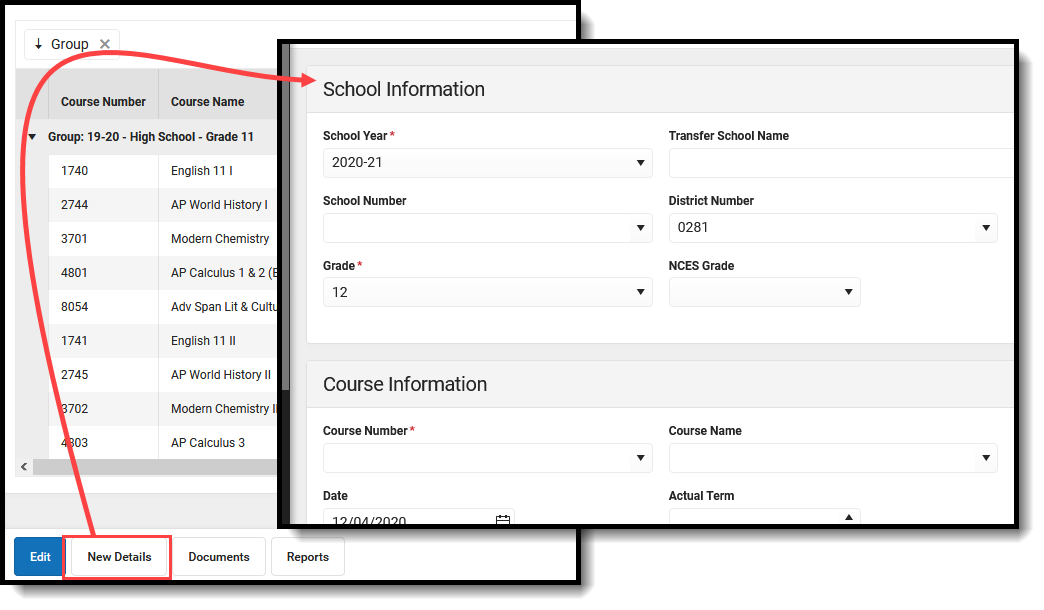
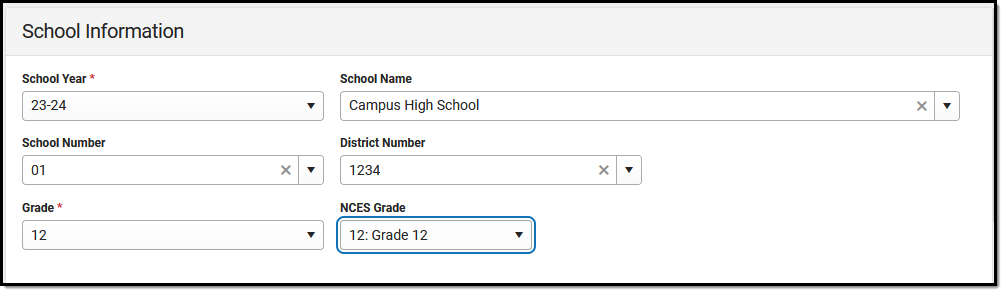
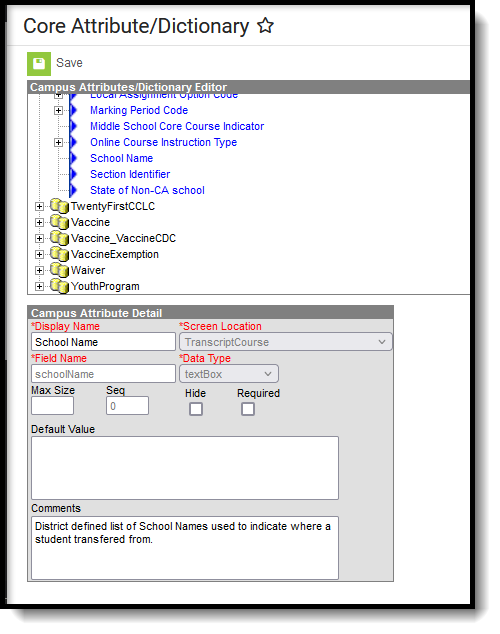
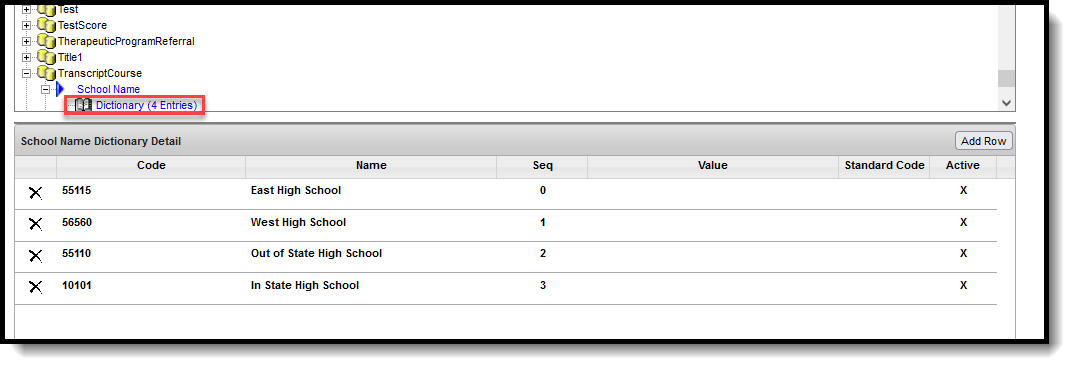
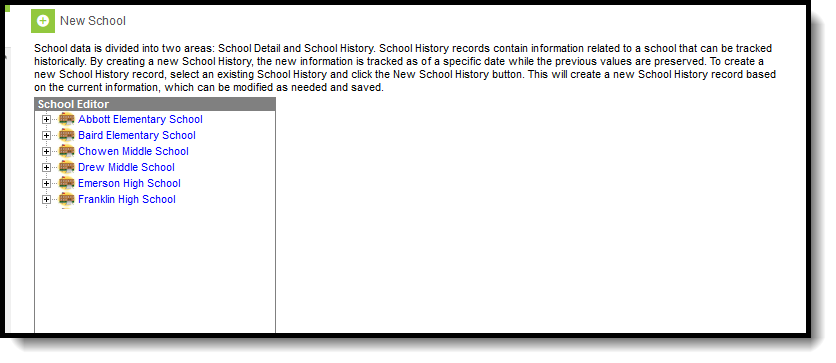
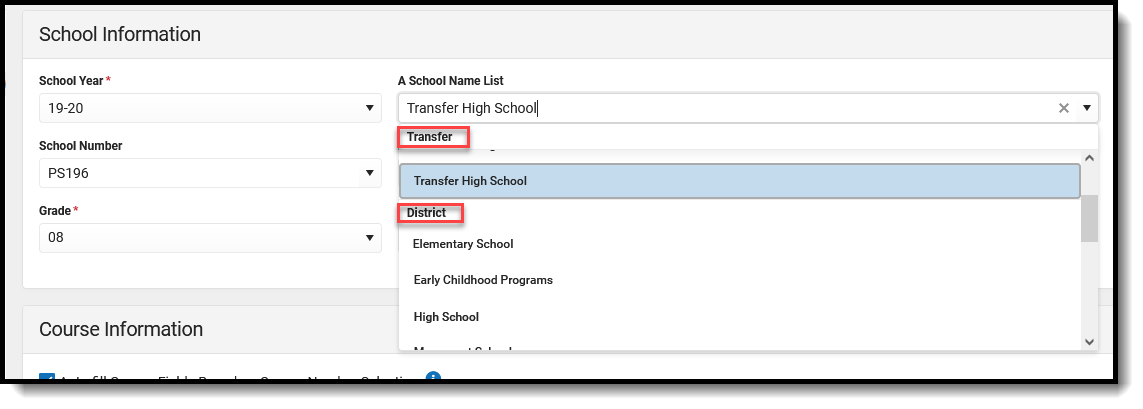
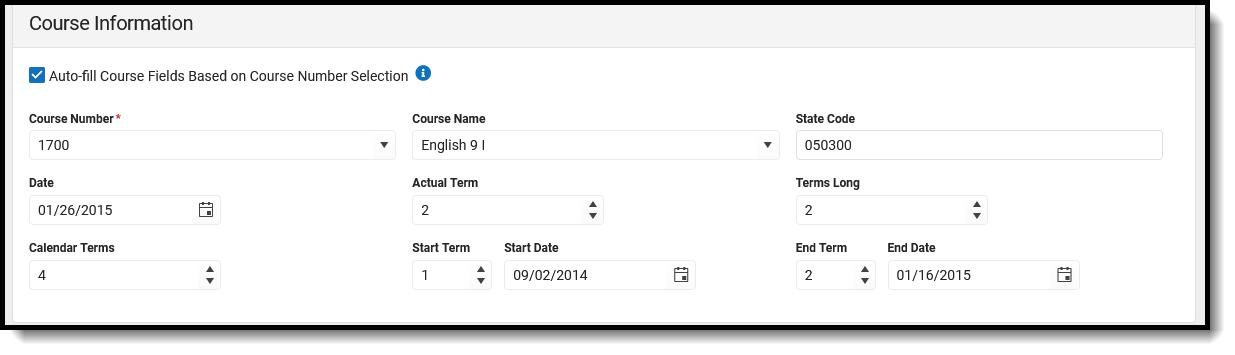
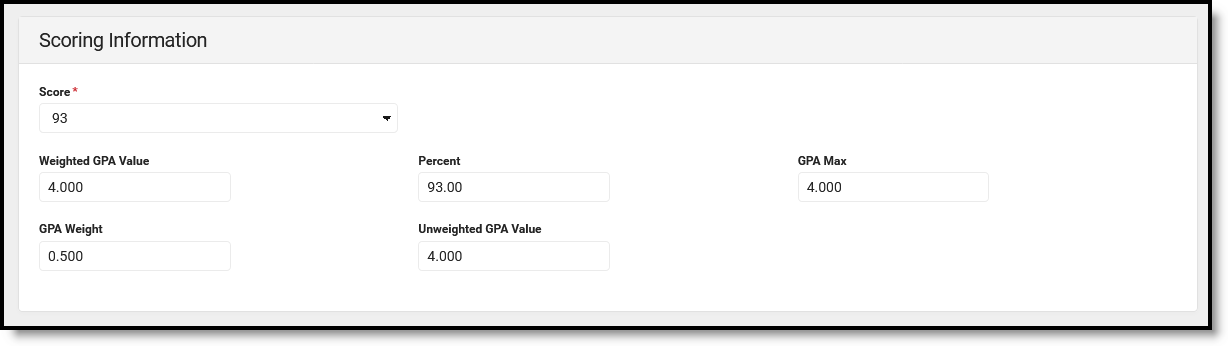
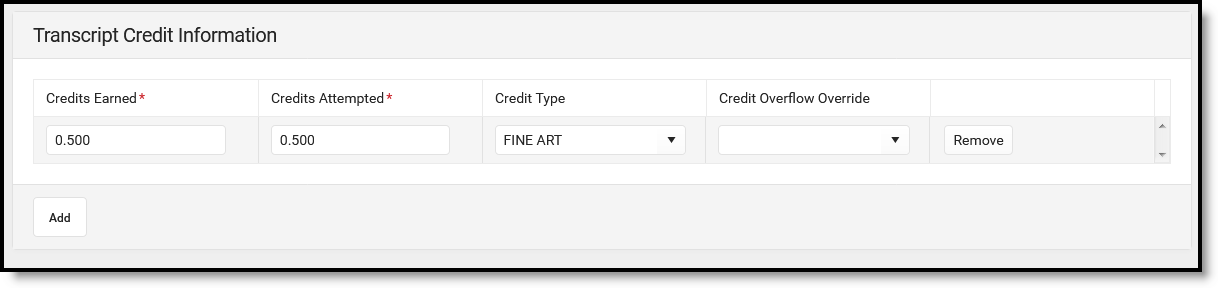
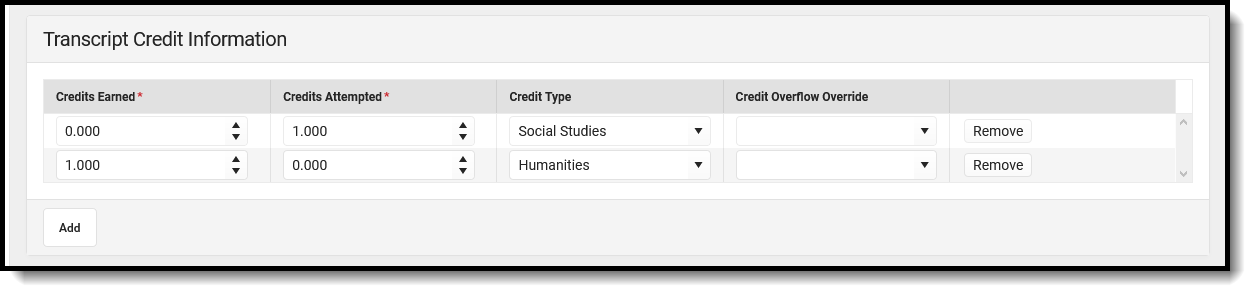
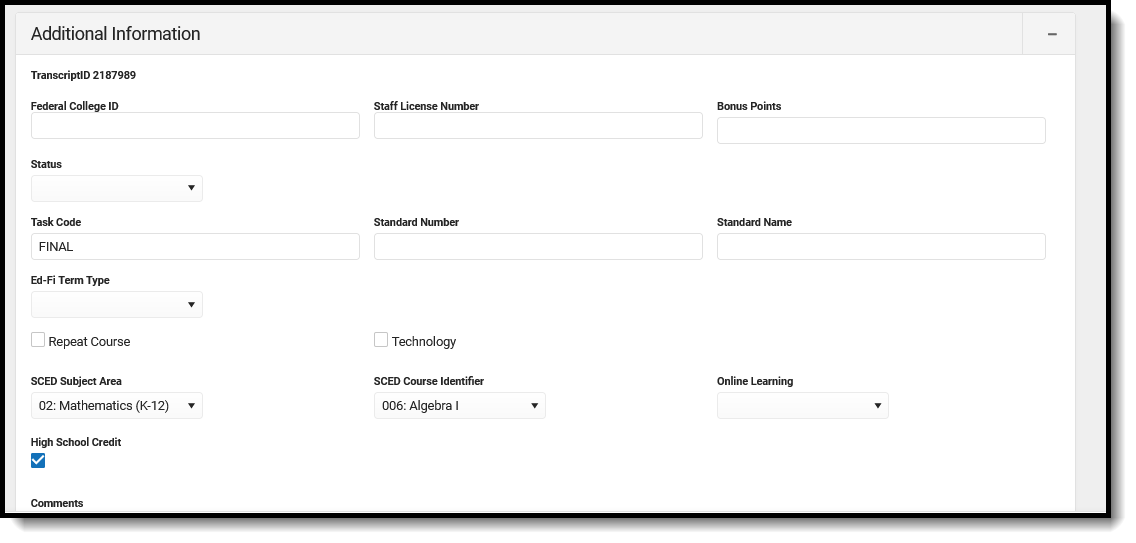
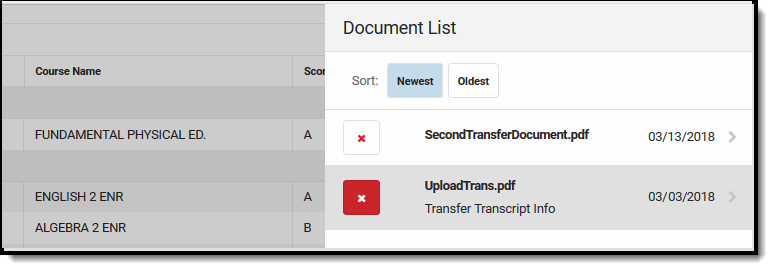
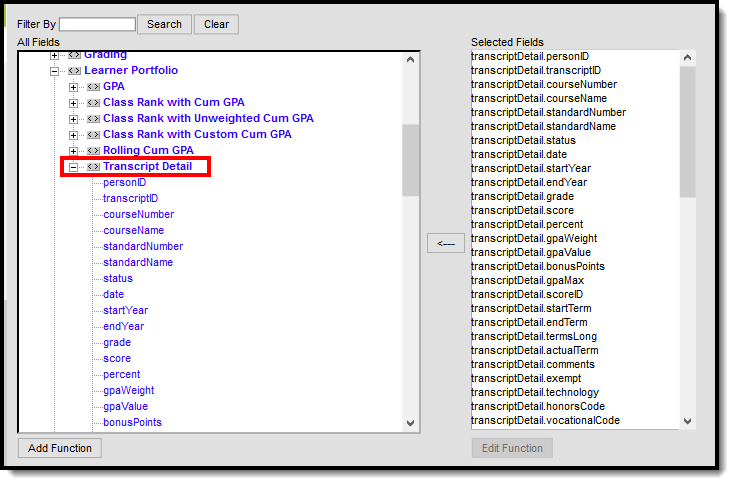