 |
VOOZH | about |
|
VOOZH | about |
This article was published as a part of the Data Science Blogathon
Up to this point in our OpenCV Tutorial, we have gained a notable level of insight into the methods and techniques of the OpenCV package in the Python Programming Language. If you have not read through my previous articles and would like to do so, kindly navigate to the following hyperlinks:
This article will aim to introduce us to, and teach us the technique of an interesting concept known as blurring an image. To facilitate this learning experience we will use an image that may be downloaded at this link. Alternatively, you may save the image found below
Source: Pinterest.
Let us first talk about blurring- As most of us know, when an image is a blur, we can’t, or are unable to, see the image clearly. In image terminology, noise refers to the pixels that give an image brightness and color variation- when we apply the blurring technique to an image, we are attempting to smoothen out or remove the pixels that make the image appear bright sharp/clear, hence making the image appear fuzzy and unclear to the human eye.
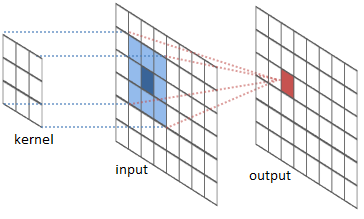
From our previous articles, we learned that OpenCV represents an image in the form of a NumPy array that comprises integer values representing the intensity of a particular pixel. An image in its standard form may have several pixels that reflect the brighter colors of the color spectrum, therefore, making the image appear colorful. Due to these colors, the human eye can easily tell one object or portion of the image, from another. With blurring, we attempt to reduce the brightness/sharpness of an image by reducing the intensity of all pixels.
For example, we can make each pixel be the average of a 2×2 matrix/array/kernel of neighboring pixels or a 5×5 matrix/array/kernel of neighboring pixels.
By reducing the intensity of pixels, we are reducing the number of bright colors that are being emitted from the image, therefore reducing the amount of light being emitted from the image, which ultimately affects the creation of the image in our brain via our eyes, hence providing the blurring effect.
Source: Kaggle.
To blur an image with Python, we are required to make use of the blur() method offered by the OpenCV package. This method takes in a variety of arguments, which you may read about here. There are two important arguments to pass into this
function:
We begin by importing the necessary packages:
import cv2
import numpy as np
Next, we load the image into system memory:
# load the image into system memory
image = cv2.imread('C:/Users/Shivek/Pictures/images.jpg', flags=cv2.IMREAD_COLOR)
We display the original image as follows:
cv2.imshow('AV CV- Winter Wonder', image)
cv2.waitKey()
cv2.destroyAllWindows()
Output to the above code blocks will be seen as follows:
As you may see in the above image, our winter image has not been manipulated in any way whatsoever. Now, we will attempt to perform the technique of blurring the image using the blur() method.
image_blurred = cv2.blur(src=image, ksize=(5, 5))
cv2.imshow('AV CV- Winter Wonder', image_blurred)
cv2.waitKey()
cv2.destroyAllWindows()
We have created a new variable image_blurredand set the variable to hold the contents of the blurred image. We made use of the blur() method offered by OpenCV and have passed in the source image (image to be blurred) and specified a kernel size for which the process of convolution (blurring) must occur. In our case, the intensity of each pixel will be based on the average of the neighboring 5×5 pixel array.
We thereafter proceed to display the image to the screen and set the window to wait an infinite amount of time before being terminated.
Output to the above code block will be seen as follows:
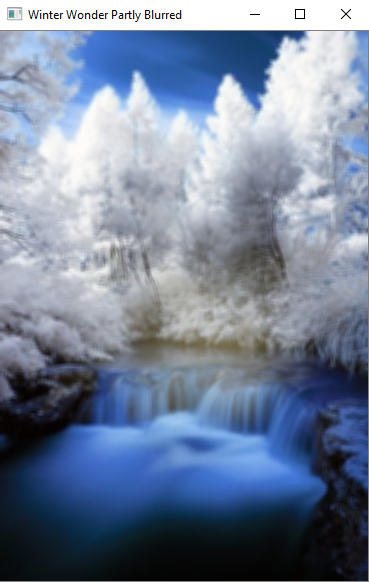
If you look carefully at our image, the quality has been decreased. The image has been blurred a bit and appears fuzzy to the human eye. Now let us increase the degree of blurring- we can make the image such where one will not be able to even guess what is in the image:
image_blurred = cv2.blur(src=image, ksize=(75, 75))
cv2.imshow('Winter Wonder Totally Blurred', image_blurred)
cv2.waitKey()
cv2.destroyAllWindows()
And as can be seen in the above image- If an individual does not see the original image before seeing the blurred variant, the chances of an individual knowing the contents of the image are reduced.
There is no actual limit to the size of the kernel you use- but there is a high chance that you may exceed memory capacity and crash your PC if you choose an extremely large kernel to use. This is due to the quantity of mathematics that your CPU will be performing in the background. Also, Python OpenCV can only handle integers within a certain boundary, therefore you would want to be sure that you avoid
extremely large kernels to avoid OverflowErrors such as:
Also, when I refer to extremely largekernels an example would be:
ksize=(843957487538, 843957487538)
So, we have effectively learned how to blur an image by using the blur() method offered by OpenCV in Python Programming Language.
This concludes my article on Advanced OpenCV: Blurring An Image. I do hope that you enjoyed reading through this article, and have learned a concept about OpenCV Package in the Python Programming Language.
Please feel free to connect with me on LinkedIn.
Thank you for your time.
GPT-4 vs. Llama 3.1 – Which Model is Better?
Llama-3.1-Storm-8B: The 8B LLM Powerhouse Surpa...
A Comprehensive Guide to Building Agentic RAG S...
Top 10 Machine Learning Algorithms in 2026
45 Questions to Test a Data Scientist on Basics...
90+ Python Interview Questions and Answers (202...
8 Easy Ways to Access ChatGPT for Free
Prompt Engineering: Definition, Examples, Tips ...
What is LangChain?
What is Retrieval-Augmented Generation (RAG)?
Edit
Resend OTP
Resend OTP in 45s