 |
VOOZH | about |
|
VOOZH | about |
In this article, we’ll walk through the step-by-step process of creating a Real-Time Polling App using NodeJS, ExpressJS, and socket.io. This project will showcase how to set up a web application where users can perform real-time polling.
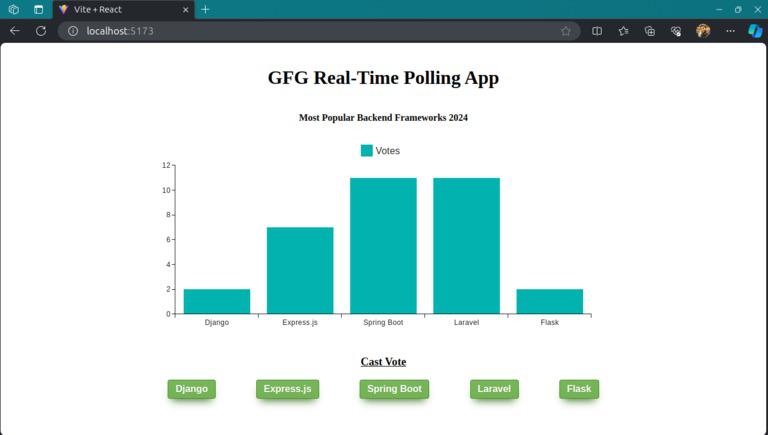
Preview of final output: Let us have a look at how the final application will look like:
BarChart component is a visual representation of poll data for different backend frameworks.socket.io-client library.io('http://localhost:5000') via useMemo.useEffect to handle connection events and attempts to reconnect in case of errors.BarChart component, passing the socket connection as a prop.Step 1: Create a directory for project
mkdir server
cd server
Step 2: Initialized the Express app and installing the required packages
npm init -yStep 3: Install the required dependency in your server using the following command.
npm i express nodemon socket.io 👁 Screenshot-2024-03-01-015849
The updated dependencies in package.json file of backend will look like:
"dependencies": {
 "cors": "^2.8.5",
 "express": "^4.18.2",
 "socket.io": "^4.7.4"
}
Example: Write the following code in server.js file
Start your application using the following command.
node server.jsStep 1: Initialize the React App with Vite and installing the required packages.
npm create vite@latest -yStep 2: Navigate to the root of the project using the following command.
cd clientStep 3: Install the necessary package in your project using the following command.
npm install socket.io-client @mui/x-chartsStep 4: Install the node_modules using the following command.
npm install👁 Screenshot-2024-03-01-015812
The updated dependencies in package.json file of frontend will look like:
"dependencies": {
 "@mui/x-charts": "^6.19.5",
 "react": "^18.2.0",
 "react-dom": "^18.2.0",
 "socket.io-client": "^4.7.4"
},
"devDependencies": {
 "@types/react": "^18.2.56",
 "@types/react-dom": "^18.2.19",
 "@vitejs/plugin-react": "^4.2.1",
 "eslint": "^8.56.0",
 "eslint-plugin-react": "^7.33.2",
 "eslint-plugin-react-hooks": "^4.6.0",
 "eslint-plugin-react-refresh": "^0.4.5",
 "vite": "^5.1.4"
}
Example: Write the following code in frontend files of the project
To start client server:
npm run devOutput: