 |
VOOZH | about |
|
VOOZH | about |
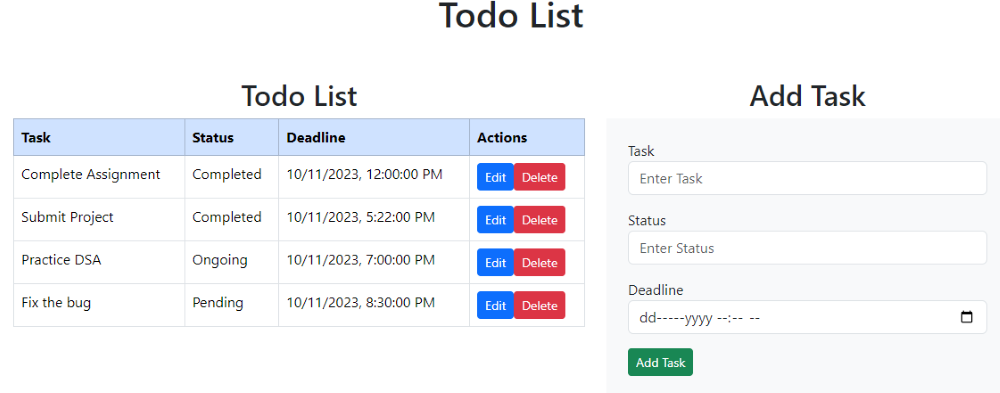
Todo list web application using MERN stack is a project that basically implements basic CRUD operation using MERN stack (MongoDB, Express JS, Node JS, React JS). The users can read, add, update, and delete their to-do list in the table using the web interface. The application gives a feature to the user to add a deadline to their task so that it user can be reminded of the last day to complete the project
Preview of final output: Let us have a look at how the final application will look like.
Technologies used / Pre-requisites:
Requirements:
Building a Todo List app with MERN is a great way to learn full-stack development.
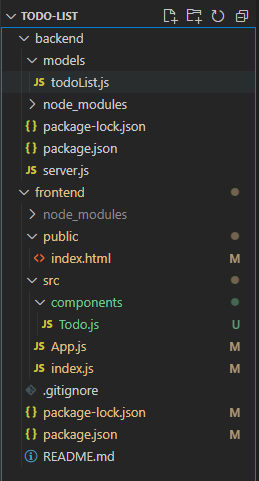
Project Structure:
Steps to create the project:
Step 1: Create directory for project.
mkdir Todo-ListStep 2: Create sub directories for frontend and backend.
Open Todo-List directory using following command.
cd Todo-ListCreate separate directories for frontend and backend.
mkdir frontend
mkdir backend
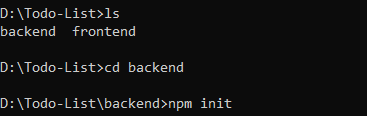
Use "ls" command to list created folders.
lsStep 3: Open backend directory using the following command.
cd backendStep 4: Initialize Node Package Manager using the following command.
npm initStep 5: Install express, mongoose and cors package in backend using the following command.
npm install express mongoose corsStep 6: Come back to Todo-List folder (project main folder).
cd ../Step 7: Open frontend directory using the following command.
cd frontendStep 8: Create react application in the current directory using the following command.
npx create-react-app .Step 9: Install bootstrap, axios and react-router-dom package in backend using the following command.
npm install bootstrap axios react-router-domStep 10: Open Todo-List using your familiar code editor.
Come back to Todo-List folder (project main folder).
cd ../If you are using VS code editor, run the following command open VS code in current folder.
code .Step 11: Navigate to frontend directory in code editor.
Step 12: Delete files inside 'src' folder and 'public' folder (Don't delete folder).
Step 13: Add files in frontend directory as per the project structure with below code.
Step 14: Navigate to backend directory in code editor.
Step 15: Create server.js and model file as per project structure.
Step 16: Add files in backend directory as per the project structure with below code.
Step 17: Replace database connection URL with your own connection URL in server.js file.
Final Project Structure should be like this,
The updated dependencies in package.json for frontend will look like:
"dependencies": {
 "@testing-library/jest-dom": "^5.17.0",
 "@testing-library/react": "^13.4.0",
 "@testing-library/user-event": "^13.5.0",
 "axios": "^1.5.0",
 "bootstrap": "^5.3.2",
 "react": "^18.2.0",
 "react-dom": "^18.2.0",
 "react-router-dom": "^6.16.0",
 "react-scripts": "5.0.1",
 "web-vitals": "^2.1.4"
}
The updated dependencies in package.json for backend will look like:
"dependencies": {
 "cors": "^2.8.5",
 "express": "^4.18.2",
 "mongoose": "^7.5.2"
}
Example : Write the following code in respective files
Frontend code:
Steps to run application:
Step 1: Open Todo-List/backend folder in new terminal / command prompt.
Step 2: Execute the command to start backend API server.
npm startNow, our backend server is running in localhost on port 3001.
http://localhost:3001/dashboardStep 3: Open Todo-List/frontend folder in another new terminal / command prompt.
Step 4: Execute the following command to run react app.
npm startOpen the browser and navigate to the following link to open the application.
http://localhost:3000/Output: