 |
VOOZH | about |
|
VOOZH | about |
Microservices is an architectural approach used to build applications as a collection of small, loosely coupled services, where each service handles a specific business function independently. Spring Boot is widely used for developing microservices due to its simplicity, speed, and production-ready features.
To create a new Spring Boot project, please refer to How to Create a Spring Boot Project in Spring Initializr and Run it in IntelliJ IDEA . For this project choose the following things
Please choose the following dependencies while creating the project.
Generate the project and run it in IntelliJ IDEA by referring to the above article.
Note : We have used the MySQL database in this project.
Go to your MySQL Workbench and create a schema named gfgmicroservicesdemo and inside that create a table called employee and put some sample data as shown in the below image. Here we have created 4 columns and put some sample data.
👁 Spring-Boot-Microservices-1-(2)
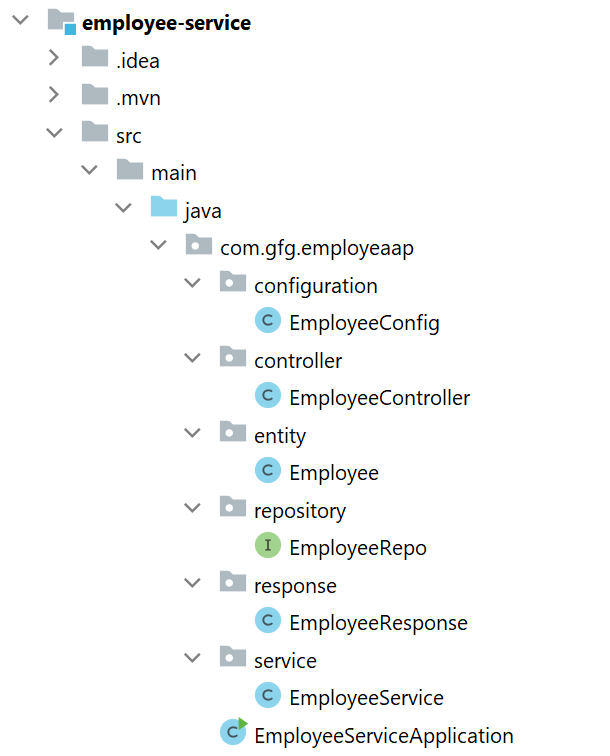
Now we are going to fetch Employee Data from Employee Table in our Spring Boot project. To do it refer to the following steps. Before moving to IntelliJ IDEA let's have a look at the complete project structure for our Microservices.
Now make the following changes in your application.properties file.
spring.datasource.url=jdbc:mysql://localhost:3306/gfgmicroservicesdemo
spring.datasource.username=put your username here
spring.datasource.password=put your password here
You may also refer to the below image:
👁 Spring-Boot-Microservices-21
Go to the src > main > java > entity and create a class Employee and put the below code. This is our model class.
Go to the src > main > java > repository and create an interface EmployeeRepo and put the below code. This is our repository where we write code for all the database-related stuff.
Note : Please refer to this article to know more about JpaRepository .
Go to the src > main > java > response and create a class EmployeeResponse and put the below code.
Go to the src > main > java > service and create a class EmployeeService and put the below code. This is our service class where we write our business logic.
Go to the src > main > java > controller and create a class EmployeeController and put the below code. Here we are going to create an endpoint " /employees/{id} " to find an employee using id.
Go to the src > main > java > configuration and create a class EmployeeConfig and put the below code.
Note : You may refer to these two articles
Before running the Microservice below is the complete pom.xml file. Please cross-verify if you have missed some dependencies
To run your Employee Microservice src > main > java > EmployeeServiceApplication and click on the Run button. If everything goes well then you may see the following screen in your console. Please refer to the below image.
Now open Postman and hit the following URL:
GET: http://localhost:8080/employees/1
And you can see the following response:
{
"id": 1,
"name": "Amiya",
"email": "ar@gmail",
"age": "25"
}
Please refer to the below image:
This is how we have built our Employee Microservice with the help of Java and Spring Boot. And you can also design all your endpoints and write all the business logic, database logic, etc in the corresponding files.
.png)