 |
VOOZH | about |
|
VOOZH | about |
This article is your ultimate guide to becoming a pro at image feature extraction and classification using OpenCV and Python. We'll kick things off with an overview of how OpenCV plays a role in feature extraction, and we'll go through the setup process for the OpenCV environment. You'll get to learn all about different feature extraction techniques and algorithms, with a focus on the ones specific to OpenCV.
Table of Content
Feature extraction is a crucial process in machine learning and data analysis. It focuses on identifying and extracting relevant features from raw data, transforming it into numerical features that machine learning algorithms can work with. This process helps convert raw data into a format suitable for machine learning models and plays a role in dimensionality reduction, simplifying large datasets into manageable groups. The goal is to reduce data complexity while retaining as much relevant information as possible.
Ensure you have OpenCV installed. You can install it using pip if you haven't already:
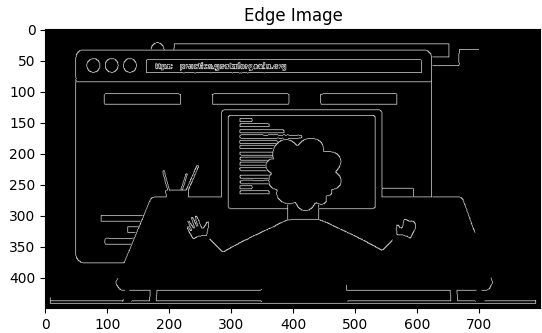
pip install opencv-pythonOne of the common feature extraction techniques is edge detection using the Canny algorithm.
The Canny edge detection algorithm smooths the image to reduce noise, calculates the gradient to find edge strength and direction, applies non-maximum suppression to thin edges, and uses hysteresis for final edge tracking, resulting in a black and white image with edges in white. This makes it highly effective for object detection and image segmentation.
Output:
OpenCV provides several feature detectors. Two commonly used ones are SIFT (Scale-Invariant Feature Transform) and ORB (Oriented FAST and Rotated BRIEF).
First, we are going to implement SIFT, SIFT can find specific points in an image by looking at their size, orientation, and local details.
Output:
Now, we will be implementing ORB and ORB is a faster alternative to SIFT, suitable for real-time applications.
Output:
In a nutshell, OpenCV offers feature extraction methods like SIFT and ORB that are crucial for identifying important features in images. SIFT is super robust, but it can be a bit of a computer hog. On the other hand, ORB is a faster option that performs just as well. By using these methods, you can easily extract features from images and unlock a whole world of possibilities in image processing and computer vision.
pip install PyWavelets
pip install opencv-python
Importing necessary libraries like NumPy for numerical operations, OpenCV for image processing, and Matplotlib for plotting images.
We have used the Indian Cricketer Dataset and the directory structure is discussed below.
Output:
Converting the loaded image to grayscale using cv2.cvtColor and displaying the grayscale image. The shape of the grayscale image is also printed.
Output:
Output:
The code initializes face and eye classifiers using pre-trained Haar cascade models and applies the face classifier to a grayscale image to detect faces. The results are stored in the faces variable, which contains a list of rectangles representing detected faces. This setup enables the identification of facial regions within the image, allowing for further processing or feature extraction.
Output:
array([[172, 55, 268, 268]])The code extracts the coordinates and dimensions of the first detected face from the faces variable. Specifically, x and y represent the top-left corner coordinates of the face, while w and h represent the width and height of the bounding box around the face. This step isolates the region of interest for further processing, such as drawing rectangles around the detected face or performing additional analyses
Output:
(172, 55, 268, 268)Detecting faces in the grayscale image using detectMultiScale. The first detected face's coordinates are used to draw a rectangle around it on the original image. The resulting image is displayed.
Output:
The code detects faces and eyes in an image and visualizes the results. It first closes any open OpenCV windows, then loops through the detected faces to draw red rectangles around them. For each detected face, it defines regions of interest (ROI) in both grayscale and color images. Within each face ROI, it detects eyes and draws green rectangles around them. Finally, it displays the image with the detected faces and eyes, showing the rectangles in grayscale. This provides a clear visual representation of the detected features..
Output:
Output:
Output:
(268, 268, 3)The purpose of this code is to apply a 2D wavelet transform to an input image, which can be useful in various image processing tasks, including denoising, compression, and feature extraction. The specific wavelet used and the level of decomposition can be adjusted according to the requirements of the task.
Output:
Lets write a python function that can take input image and returns cropped image (if face and eyes >=2 are detected)
Output:
Output:
Output:
['./images/bhuvneshwar_kumar',
 './images/dinesh_karthik',
 './images/hardik_pandya',
 './images/jasprit_bumrah',
 './images/k._l._rahul',
 './images/kedar_jadhav',
 './images/kuldeep_yadav',
 './images/mohammed_shami',
 './images/ms_dhoni',
 './images/ravindra_jadeja',
 './images/rohit_sharma',
 './images/shikhar_dhawan',
 './images/vijay_shankar',
 './images/virat_kohli',
 './images/yuzvendra_chahal']
Go through all images in dataset folder and create cropped images for them. There will be cropped folder inside dataset folder after you run this code.
Output:
bhuvneshwar_kumar
Generating cropped images in folder: ./images/cropped/bhuvneshwar_kumar
dinesh_karthik
Generating cropped images in folder: ./images/cropped/dinesh_karthik
hardik_pandya
Generating cropped images in folder: ./images/cropped/hardik_pandya
jasprit_bumrah
Generating cropped images in folder: ./images/cropped/jasprit_bumrah
k._l._rahul
Generating cropped images in folder: ./images/cropped/k._l._rahul
kedar_jadhav
Generating cropped images in folder: ./images/cropped/kedar_jadhav
kuldeep_yadav
Generating cropped images in folder: ./images/cropped/kuldeep_yadav
mohammed_shami
.....
yuzvendra_chahal
Generating cropped images in folder: ./images/cropped/yuzvendra_chahal
Now you should have cropped folder under datasets folder that contains cropped images ,Manually examine cropped folder and delete any unwanted images
Output:
{'bhuvneshwar_kumar': ['./images/cropped/bhuvneshwar_kumar\\bhuvneshwar_kumar1.png',
 './images/cropped/bhuvneshwar_kumar\\bhuvneshwar_kumar10.png',
 './images/cropped/bhuvneshwar_kumar\\bhuvneshwar_kumar11.png',
 './images/cropped/bhuvneshwar_kumar\\bhuvneshwar_kumar12.png',
 './images/cropped/bhuvneshwar_kumar\\bhuvneshwar_kumar13.png',
 './images/cropped/bhuvneshwar_kumar\\bhuvneshwar_kumar14.png',
 './images/cropped/bhuvneshwar_kumar\\bhuvneshwar_kumar2.png',
 './images/cropped/bhuvneshwar_kumar\\bhuvneshwar_kumar3.png',
 './images/cropped/bhuvneshwar_kumar\\bhuvneshwar_kumar4.png',
 './images/cropped/bhuvneshwar_kumar\\bhuvneshwar_kumar5.png',
 './images/cropped/bhuvneshwar_kumar\\bhuvneshwar_kumar6.png',
 './images/cropped/bhuvneshwar_kumar\\bhuvneshwar_kumar7.png',
 './images/cropped/bhuvneshwar_kumar\\bhuvneshwar_kumar8.png',
 './images/cropped/bhuvneshwar_kumar\\bhuvneshwar_kumar9.png'],
Output:
{'bhuvneshwar_kumar': 0,
 'dinesh_karthik': 1,
 'hardik_pandya': 2,
 'jasprit_bumrah': 3,
 'k._l._rahul': 4,
 'kedar_jadhav': 5,
 'kuldeep_yadav': 6,
 'mohammed_shami': 7,
 'ms_dhoni': 8,
 'ravindra_jadeja': 9,
 'rohit_sharma': 10,
 'shikhar_dhawan': 11,
 'vijay_shankar': 12,
 'virat_kohli': 13,
 'yuzvendra_chahal': 14}
Images in cropped folder can be used for model training. We will use these raw images along with wavelet transformed images to train our classifier. Let's prepare X and y now
We're getting everything ready to train an image classifier. First, we go through each celebrity's pictures, making sure they're all the same size. Then, we use the Wavelet Transform to pull out the high-frequency parts from the images.
After that, we stack all these processed images together and add them to our list of features, which we call X. At the same time, we also add the corresponding labels to a separate list called y. This step is important because it ensures our dataset is set up correctly for training the classifier. Each image is represented by its features and has an associated label.
We will use SVM with rbf kernel tuned with heuristic finetuning
Output:
0.5166666666666667Now let's evaluate the model.
Output:
precision recall f1-score support

 0 0.50 0.25 0.33 4
 1 0.00 0.00 0.00 3
 2 0.33 0.50 0.40 2
 3 0.00 0.00 0.00 0
 4 0.40 0.40 0.40 5
 5 0.00 0.00 0.00 3
 6 1.00 0.33 0.50 3
 7 1.00 1.00 1.00 2
 8 0.47 0.78 0.58 9
 9 0.00 0.00 0.00 2
 10 0.56 0.75 0.64 12
 11 0.00 0.00 0.00 3
 12 0.00 0.00 0.00 3
 13 0.73 0.89 0.80 9

 accuracy 0.52 60
 macro avg 0.36 0.35 0.33 60
weighted avg 0.45 0.52 0.46 60
In conclusion, becoming a pro at extracting and classifying image features using OpenCV and Python involves really understanding image processing, being super careful with feature extraction, and using top-notch classifiers. Throughout this journey, we learned the crucial steps of setting up the OpenCV environment, exploring different feature extraction techniques, and creating a powerful image classifier.
.png)
.png)
.png)
.png)
.png)
.png)
.png)
.png)
.png)
.png)
.png)