 |
VOOZH | about |
|
VOOZH | about |
This article was published as a part of the Data Science Blogathon
Research is to see what everybody else has seen and to think what
nobody else has thought – Albert Szent-Gyorgyi
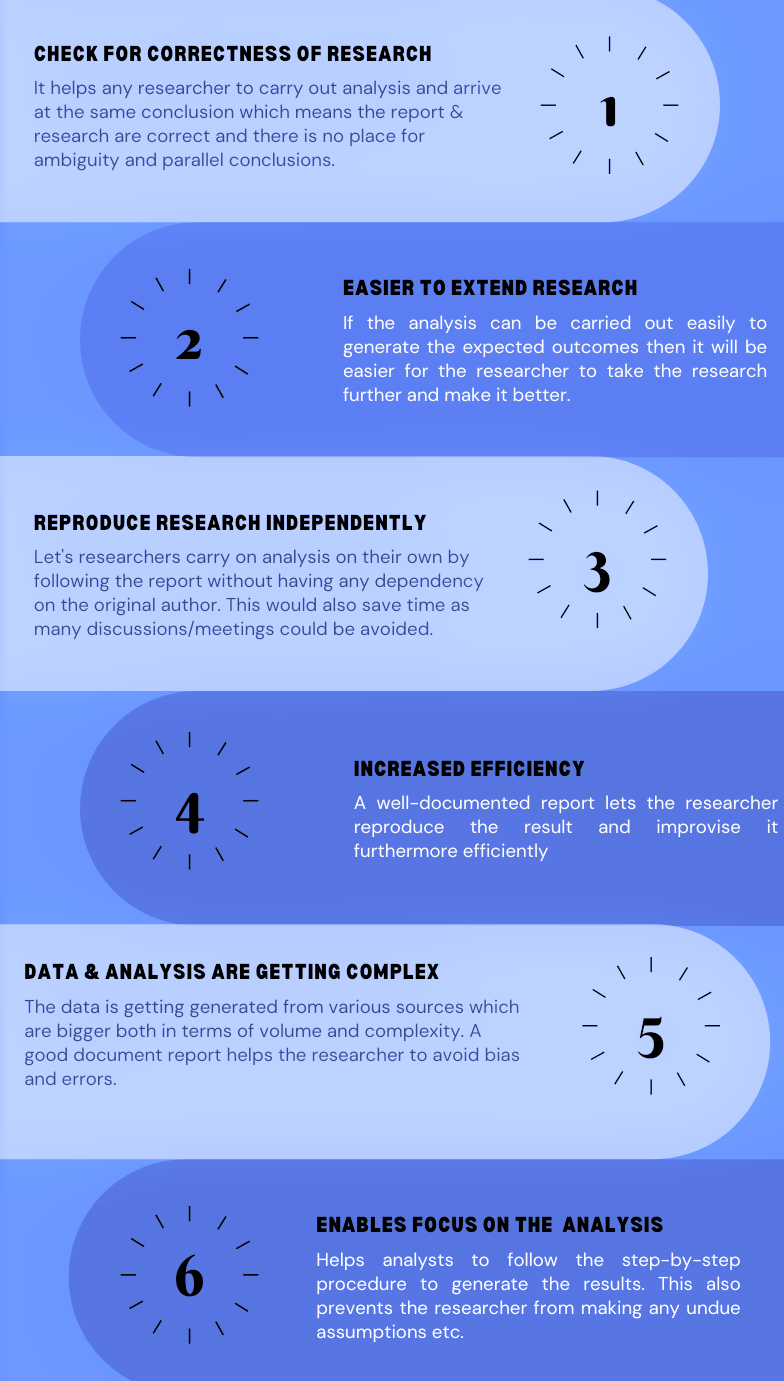
As the business has realized the importance of data and the benefits of its right usage, the size of the data science teams has increased over the years. More teams are carrying out various experiments, revisions, and optimizations. It can become very complex in no time if a process is not brought in the place where every experiment is tracked, measured and results documented for reference. This goes a long way in avoiding redundant research and experiments.
To achieve this, replicability and reproducibility place an important role i.e is the ability to perform data analysis and achieve the same results as someone else.
In this article, we will explore the process of building and managing machine learning reports using configuration files and generate HTML reports. For this simple machine learning project, I will use the Breast Cancer Wisconsin (Diagnostic) Data Set. The objective of this ML project is to predict whether a person has a benign or malignant tumour.
Let’s get started !!
Let’s create a Jupyter notebook by name notebook.ipynb and have the below code in it. I am using VSCode as my editor, it gives a nice and easier way to create a Jupyter notebook.
#mport important packages
import pandas as pd
import numpy as np
from sklearn.model_selection import train_test_split
from sklearn.neighbors import KNeighborsClassifier
import joblib
#path to the dataset
#filename = "../Data/breast-cancer-wisconsin.data"
filename = "./Data/breast-cancer-wisconsin.csv"
#load data
data = pd.read_csv(filename)
#replace "?" with -99999
data = data.replace('?', -99999)
# drop id column
data = data.drop(['id'], axis=1)
# Define X (independent variables) and y (target variable)
X = data.drop(['diagnosis','Unnamed: 32'], axis=1)
y = data['diagnosis']
#split data into train and test set
X_train, X_test, y_train, y_test = train_test_split(X, y, test_size=0.2, random_state=42)
# call our classifer and fit to our data
classifier = KNeighborsClassifier(n_neighbors=5, weights="uniform",
		algorithm = "auto", leaf_size = 25,
		p=1, metric="minkowski", n_jobs=-1)
#training the classifier
classifier.fit(X_train, y_train)
#test our classifier
result = classifier.score(X_test, y_test)
print("Accuracy score is. {:.1f}".format(result))
#save our classifier in the model directory
joblib.dump(classifier, './Model/knn.pkl')
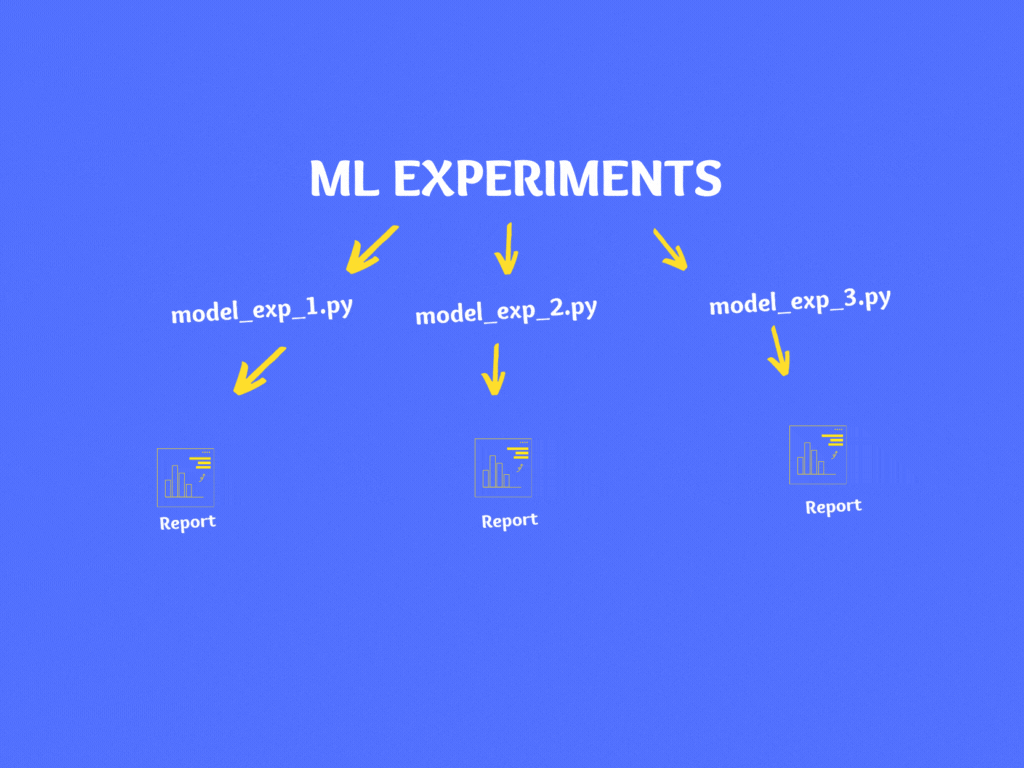
If you notice, in the above code there are various hardcoded numbers, file names, model parameters, train/test split percentage, etc. If you wish to experiment then you can make changes in the code and re-run it.
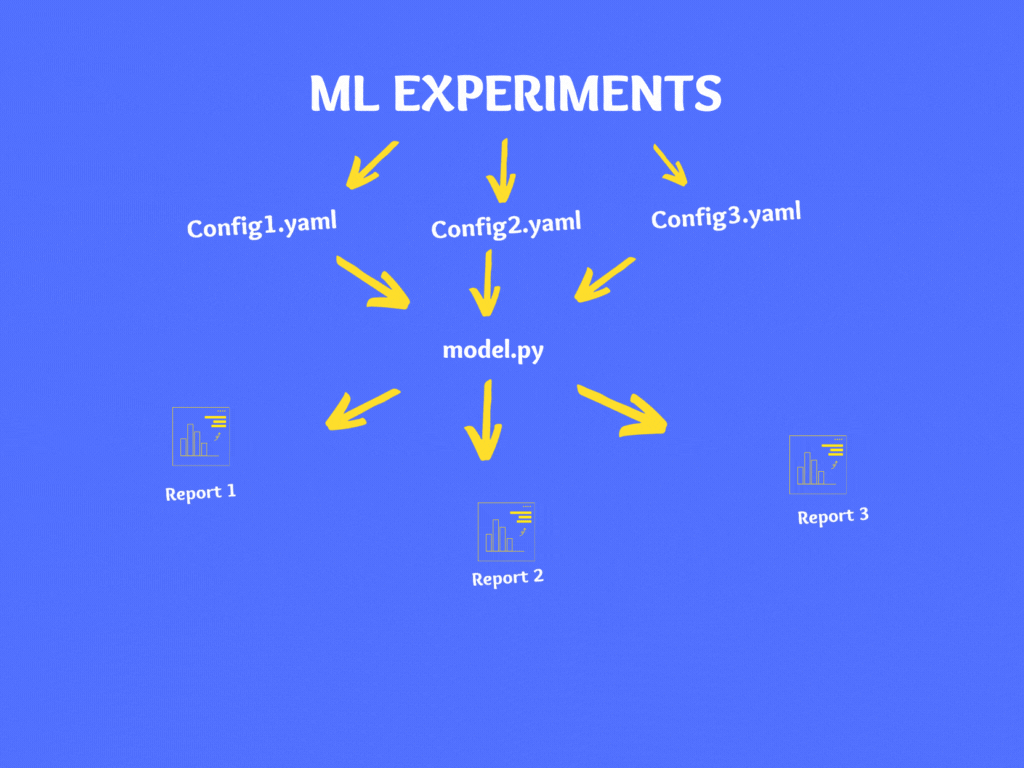
As a best practice, it is not advisable to make changes to code directly instead it is recommended to use configuration files. There are various file types for configuration like YAML, JSON, XML, INI, etc. and in our case, we will use the YAML format.
YAML file formats are popular for their ease of readability. YAML is relatively easy to write and within simple YAML files, there are no data formatting items, such as braces and square brackets; most of the relations between items are defined using indentation.
Let’s create our config file in YAML – Config.YAML
#INITIAL SETTINGS
data_directory: "./Data/"
data_name: "breast-cancer-wisconsin.csv"
drop_columns: ["id","Unnamed: 32"]
target_name: "diagnosis"
test_size: 0.3
random_state: 123
model_directory: "./Model"
model_name: KNN_classifier.pkl
#kNN parameters
n_neighbors: 3
weights: uniform
algorithm: auto
leaf_size: 15
p: 2
metric: minkowski
n_jobs: 1
Now that we have built our model the conventional way, let’s move to the next section where we will do it slightly differently.
There are two major changes compared to the last approach.
Let’s the below chunk of code to notebook.ipynb which will load the Config.yaml.
# folder to load config file
CONFIG_PATH = "./"
# Function to load yaml configuration file
def load_config(config_name):
 with open(os.path.join(CONFIG_PATH, config_name)) as file:
 config = yaml.safe_load(file)
 return config
config = load_config("Config.yaml")
# split data into train and test set
X_train, X_test, y_train, y_test = train_test_split(
 X, y, test_size=config["test_size"], random_state=config["random_state"]
)
Here are the changes we made:
After making similar changes across, the final file would look like this.
# Import important packages
import pandas as pd
import numpy as np
from sklearn.model_selection import train_test_split
from sklearn.neighbors import KNeighborsClassifier
import joblib
import os
import yaml
# folder to load config file
CONFIG_PATH = "./"
# Function to load yaml configuration file
def load_config(config_name):
 with open(os.path.join(CONFIG_PATH, config_name)) as file:
 config = yaml.safe_load(file)
 return config
config = load_config("Config.yaml")
# load data
data = pd.read_csv(os.path.join(config["data_directory"], config["data_name"]))
# replace "?" with -99999
data = data.replace("?", -99999)
# drop id column
data = data.drop(config["drop_columns"], axis=1)
# Define X (independent variables) and y (target variable)
X = np.array(data.drop(config["target_name"], 1))
y = np.array(data[config["target_name"]])
# split data into train and test set
X_train, X_test, y_train, y_test = train_test_split(
 X, y, test_size=config["test_size"], random_state= config["random_state"]
)
# call our classifer and fit to our data
classifier = KNeighborsClassifier(
 n_neighbors=config["n_neighbors"],
 weights=config["weights"],
 algorithm=config["algorithm"],
 leaf_size=config["leaf_size"],
 p=config["p"],
 metric=config["metric"],
 n_jobs=config["n_jobs"],
)
# training the classifier
classifier.fit(X_train, y_train)
# test our classifier
result = classifier.score(X_test, y_test)
print("Accuracy score is. {:.1f}".format(result))
# save our classifier in the model directory
joblib.dump(classifier, os.path.join(config["model_directory"], config["model_name"]))
You can find the entire code on Github.
So far, we have successfully built a classification model, built a YAML config file, loaded the config file on Jupyter notebook, and parameterized our entire code. Now, if you make changes to the config file and run the notebook.ipynb, you will see the model results very similar to the conventional approach.
We will move to the last section where we will generate a report of everything we have done so far.
Here are the steps to be followed to generate the report:
If you wish to experiment on your model then instead of making changes in your code directly, make changes to your Config.yaml and follow the above steps to generate the report.
Now we understand the importance of using a configuration file in a Machine learning project. In this article, we learned what is a configuration file, the importance of the configuration file in your machine learning project, how to create a YAML file and use it in your ML project. Now you can start using the configuration file in your next machine learning project.
Happy learnings !!!!
You can connect with me – Linkedin
You can find the code for reference – Github
https://unsplash.com/
https://yaml.org/
The media shown in this article are not owned by Analytics Vidhya and is used at the Author’s discretion.
I am a Data Science enthusiast with experience in building predictive models, data processing, and data mining algorithms to solve challenging business problems. Involved in open source community and passionate about building data apps.
GPT-4 vs. Llama 3.1 – Which Model is Better?
Llama-3.1-Storm-8B: The 8B LLM Powerhouse Surpa...
A Comprehensive Guide to Building Agentic RAG S...
Top 10 Machine Learning Algorithms in 2026
45 Questions to Test a Data Scientist on Basics...
90+ Python Interview Questions and Answers (202...
8 Easy Ways to Access ChatGPT for Free
Prompt Engineering: Definition, Examples, Tips ...
What is LangChain?
What is Retrieval-Augmented Generation (RAG)?
Edit
Resend OTP
Resend OTP in 45s