 |
VOOZH | about |
|
VOOZH | about |
This article was published as a part of the Data Science Blogathon.
ETL (Extract, Transform, and Load) is a very common technique in data engineering. It involves extracting the operational data from various sources, transforming it into a format suitable for business needs, and loading it into data storage systems.
Traditionally, ETL processes are run on servers, which require ongoing maintenance and manual intervention. However, with the rise of serverless technology, it is now possible to perform ETL without the need for dedicated servers. This is where AWS Glue and PySpark come into play.
AWS Glue is a fully managed ETL offering from AWS that makes it easy to manipulate and move data between various data stores. It can crawl data sources, identify data types and formats, and suggest schemas, making it easy to extract, transform, and load data for analytics.
PySpark is the Python wrapper of Apache Spark (which is a powerful open-source distributed computing framework widely used for big data processing).
Together, Glue and PySpark provide a powerful, serverless ETL solution that is easy to use and scalable. Here’s how it works:
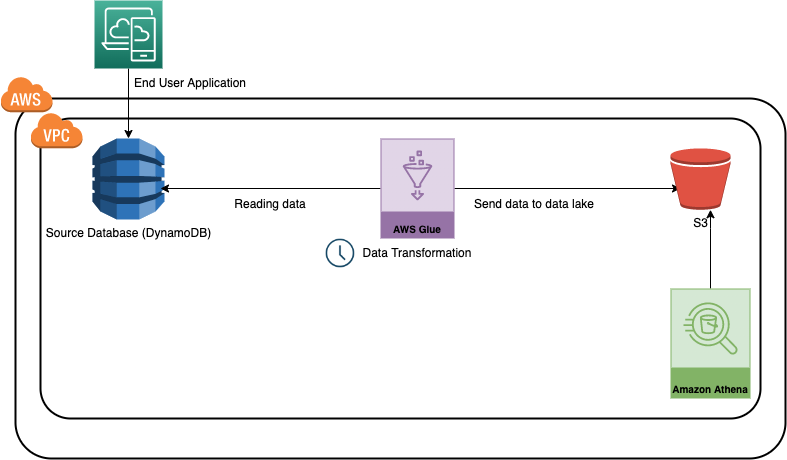
In this use case, we will develop a sample data pipeline (Glue Job) using the AWS typescript SDK, which will read the data from a dynamo DB table, perform some data transformation using PySpark and write it into an S3 bucket in CSV format. DynamoDB is a fully managed NoSQL database service offered by AWS, which is easily scalable and used in multiple applications. On the other hand, S3 is a general-purpose storage offering by AWS.
For simplicity, we can consider this as a use case for moving an application or transactional data to the data lake.
lib/cdk-workshop-stack.ts is where the CDK application’s main stack is defined. We will define the required AWS resources here.bin/cdk-workshop.ts is the entry point or ‘main’ function of any CDK application. It will load the stack defined in lib/cdk-workshop-stack.ts.package.json is the npm module manifest, which contains information like the name of the CDK application, version, dependencies, and different build scriptscdk.json tells the toolkit how to run your CDK application. In our case, it will be "npx ts-node bin/cdk-workshop.ts"stack-configuration.ts is used to maintain configuration-related details like the name of the table, glue job, etc.assets/glue-cdk-asset-etl.py is the python script which runs from the glue jobtsconfig.json your project’s typescript configuration.gitignore and .npmignore tell the package managers to include/exclude specific files from source control when publishing this modulenode_modules is maintained by npm and includes your project’s dependencies.There are multiple ways of creating resources in AWS
In this use case, we will use typescript SDK for developing the resources and python for the glue script. (Glue supports python and scala currently). Let’s take a look at how we are creating key resources in the main stack
const etl_bucket=new Bucket(this,'glue-etl-bucket',{
bucketName:StackConfiguration.bucketName,

removalPolicy:RemovalPolicy.DESTROY,

enforceSSL:true

});
/create glue crawler
 const glue_crawler = new glue.CfnCrawler(this, "glue-crawler-dynamoDB", {
 name: "glue-dynamo-crawler",
 role: glue_service_role.roleName,
 targets: {
 dynamoDbTargets:[
 {
 path:sourcetable.tableName
 }
 ]
 },
 databaseName: StackConfiguration.glueCatlogDBName,
 tablePrefix:'demo-',
 schemaChangePolicy: {
 updateBehavior: "UPDATE_IN_DATABASE",
 deleteBehavior: "DEPRECATE_IN_DATABASE",
 },
 });
Creating a dynamo DB table which will be used as the source for this use case
// creating the source table
const sourcetable=new dynamodb.Table(this,'etl-glue-source',{
 partitionKey :{name:"policy_id",type:dynamodb.AttributeType.STRING},
 sortKey:{name:"age_of_car",type:dynamodb.AttributeType.STRING},
 tableName:"glue-etl-demo-source",
 removalPolicy:RemovalPolicy.DESTROY
 })
//create glue job
 const etl_glue_job=new glue.CfnJob(this,'glue-etl-demo-job',{
 role:glue_service_role.roleArn,
 command:{
 name:'glue-etl',
 scriptLocation:f_pyAssetETL.s3ObjectUrl,
 pythonVersion:'3.9',
 },
 defaultArguments:job_params,
 description:'Sample Glue Processing Job from DynamoDB to S3',
 name:StackConfiguration.glueJobName,
 glueVersion:'3.0',
 workerType:'G.1X',
 numberOfWorkers:2,
 timeout:5,
 maxRetries:0
 })
 }
}
Note: for simplicity, we are not creating any triggers here and will run the job manually from the console. In practice, we can create time-based scheduled triggers which will run automatically like a cron job.
let’s now look at the operations we are performing in the Glue job using the PySpark Script. The data we have used is from a sample of auto insurance claims.
We are performing the below operations here.
1. Reading the data from the source Dynamo DB table – The first operation we are doing here is reading the data from the source Dynamo DB table, which mocks Insurance claims data. Note the database table name and other metadata are passed via environmental variables.
2. Converting the dynamic frame to a PySpark data frame – By default, when we read the data using the AWS Glue API, it creates a dynamic frame. We need to convert it into the PySpark data frame for easy data manipulation.
3. Keeping only the necessary columns for our reporting needs – The next operation we are doing is removing unwanted columns. Let’s assume we need only a few columns to generate the report from the insurance claim table. This step ensures that we are only considering the necessary attributes.
4. Filter the data based on the ‘age of the cars’ column – While working on a specific ETL use-case, we always do not need the entire data. It’s a good practice to select only the necessary information. We have sorted and filtered the data frame in these steps using PySpark’s sorting and filtering functionality. We have assumed a threshold of 0.7 for the ‘age of cars’ column.
5. Writing the data into an S3 bucket – Once we have extracted and transformed the data based on our business needs, we need to write it back into an S3 bucket. To achieve that, there are two operations we need to perform
- Convert to PySpark dataframe back to dynamic frame
- Write the dynamic frame to S3 bucket using the ‘write dynamic frame’ API
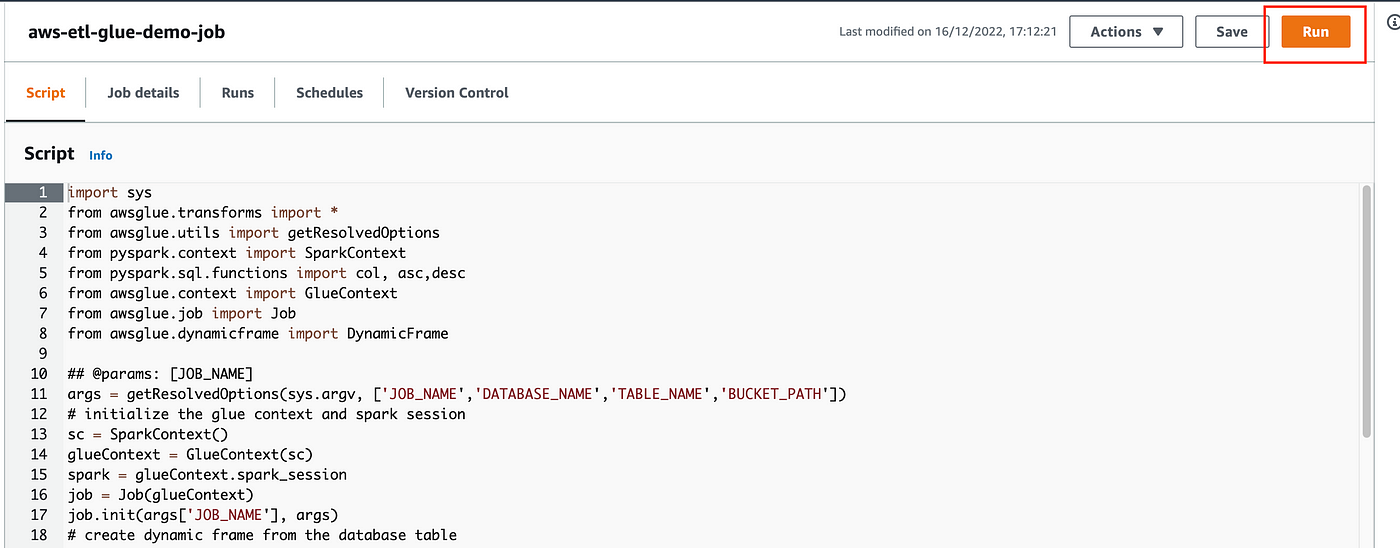
# create dynamic frame from the database table
datasource0 = glueContext.create_dynamic_frame.from_catalog(database = args['DATABASE_NAME'],
table_name = args['TABLE_NAME'], transformation_ctx = "datasource0")
# convert the dynamic frame to pyspark dataframe
data_frame = datasource0.toDF()
# select a subset of columns
data_frame=data_frame[["policy_id","policy_tenure","make","model","age_of_car","is_claim"]]
# sort of dataframe by age of car
data_frame=data_frame.orderBy(col("age_of_car").desc())
# filter the cars - choose only those where age<0.7
data_frame=data_frame.filter(data_frame.age_of_car<0.7)
data_frame = data_frame.repartition(1)
# convert the pyspark dataframe back to dynamic frame
dynamic_frame_write = DynamicFrame.fromDF(data_frame, glueContext, "dynamic_frame_write")
# write the data to s3
s3bucket_node=glueContext.write_dynamic_frame.from_options(
 frame=dynamic_frame_write,
 connection_type="s3",
 format="csv",
 connection_options={"path":args['BUCKET_PATH']},
 transformation_ctx="S3bucket_node"
)
The full code is available at https://github.com/arpan65/aws-serverless-etl
First things First – Please note, before proceeding further, we need to have an AWS account (Free tier is sufficient) and configure AWS CLI (refer to this document https://docs.aws.amazon.com/cli/latest/userguide/cli-chap-configure.html)
Now we will learn about two important CLI commands
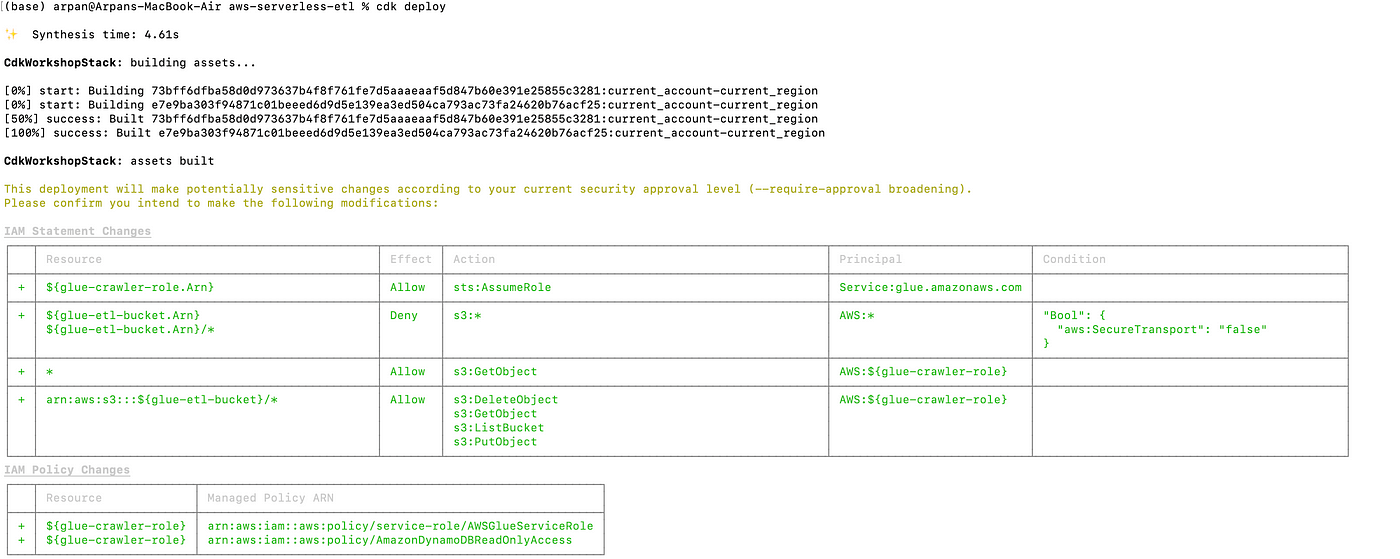
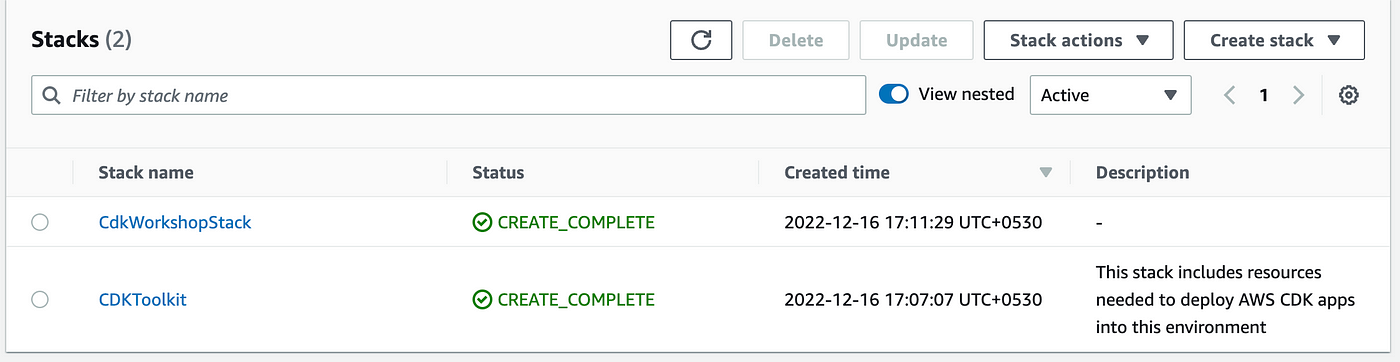
cdk bootstrap When we are deploying a CDK application for the first time, we need to use this command which initiates the necessary resources for the CDK toolkit’s operationcdk synth As mentioned earlier, the code we have written in our stack is just the definition of the AWS resources. When we use this command CDK applications are synthesized. i.e, cloud formation templates are generatedcdk deploy When executed, this command deploys the cloud formation changeset to awsOnce the deployment is completed, navigate to the AWS console; you should see the stack there. Please make sure you are looking into the proper region.
1. Create sample data for dynamo DB using the schema of the lib/sample data/sample.csv file.
2. Navigate to the Glue service from the AWS console and click on the jobs; you should able to see a new job present there.
3. Click on the job and execute it.
4. Once the job completes successfully, navigate to the S3 bucket. The final formatted file will be present there.
Please take a look at the full demo for a better understanding :
AWS Glue has made the game up for serverless ETL solutions and makes it easier to develop and maintain data pipelines easily. let’s summarize our learnings from this article
If you are looking for hands-on experience in AWS, I will encourage you to try it out on your own and configure the job so that it runs on a schedule (well, that sounds like homework 😊 ). Happy learning.
Citation
The media shown in this article is not owned by Analytics Vidhya and is used at the Author’s discretion.
I am a Software Engineer with over 6.5 years of experience developing scalable solutions for the insurance sector, specializing in cloud technologies and insurance tech products. I also have intermediate-level experience in analytics.
As an AWS and Duck Creek certified professional, I possess extensive expertise in a wide range of AWS services, including Lambda, API Gateway, CloudFormation, DynamoDB, Step Functions, EventBridge, SageMaker, Bedrock, Glue, SQS, SNS, and Kinesis. My background enables me to design and implement robust, efficient, and scalable systems tailored to meet the complex needs of the insurance industry.
GPT-4 vs. Llama 3.1 – Which Model is Better?
Llama-3.1-Storm-8B: The 8B LLM Powerhouse Surpa...
A Comprehensive Guide to Building Agentic RAG S...
Top 10 Machine Learning Algorithms in 2026
45 Questions to Test a Data Scientist on Basics...
90+ Python Interview Questions and Answers (202...
8 Easy Ways to Access ChatGPT for Free
Prompt Engineering: Definition, Examples, Tips ...
What is LangChain?
What is Retrieval-Augmented Generation (RAG)?
Edit
Resend OTP
Resend OTP in 45s