 |
VOOZH | about |
|
VOOZH | about |
Version control systems like Git provide powerful tools for managing code changes and collaboration among developers. One common task in Git is merging branches, which allows you to combine the changes made in one branch into another. In this article, we will explore the process of merging branches in Git.
Table of Content
Branches are basically pointers to a specific commit in the repository's history. They allow you to work on different features, bug fixes, or experiments independently without affecting the main codebase. Each branch can have its own set of commits, and they can diverge from each other over time.
In Git, there are primarily two types of branch merging: fast-forward and recursive.
branch A) contains all the commits of the target branch (branch B), Git can perform a fast-forward merge.branch B) to the same commit as the branch being merged (branch A).Merge conflicts occur when Git is unable to automatically resolve differences between the branches being merged. This typically happens when the same part of a file has been modified differently on both branches. When a conflict occurs, Git marks the conflicted sections in the affected files, and it's up to the developer to resolve these conflicts manually.
👁 Screenshot-2024-04-26-181538
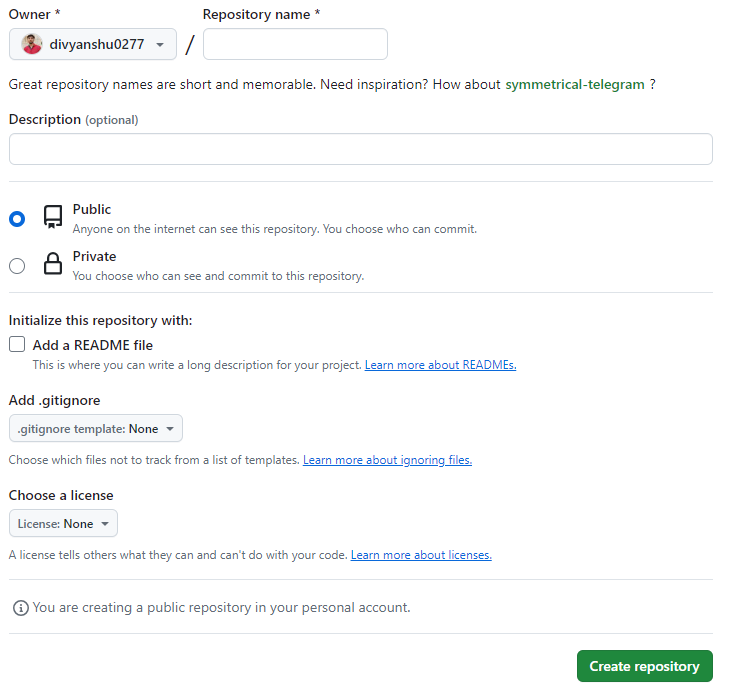
Next, you’ll need to give your repository a name and fill in a few other details. Give it a short description if you want, make it public, and a best practice is to always add a ReadMe file. Once you’re done,
👁 Screenshot-2024-04-26-181758
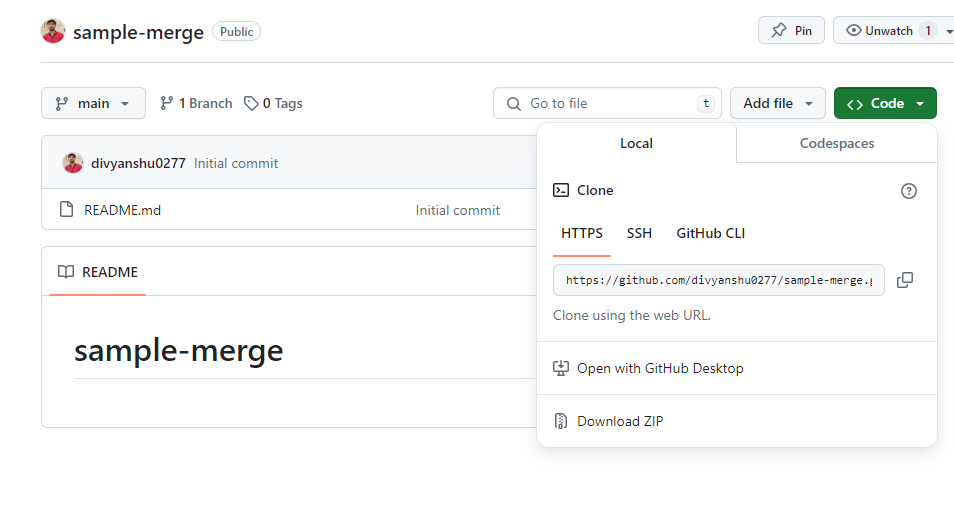
Now, to get working in your code editor, you’ll want to clone your new repository by clicking the Clone button. Select HTTPS, copy the address, and open your terminal.
👁 Screenshot-2024-04-26-181955
cd user/desktop/repo/mkdir <name of your directory>cd <name of your newly created directory> git initNext, use the git clone command with the correct HTTPS address, and hit Enter. By default, this will create a main branch on your local repository.
git clone <paste https address here>Now, open your newly cloned repository with Visual Studio Code. You can now start writing code.
After creating your repository, you will already be on the main branch. As a best practice, you should never, ever, push code directly to the main branch, which needs to be protected.
we are currently on the main branch, you’ve coded something to create some content, and now you want to create a new branch. In your terminal, use the git checkout command to create a new branch and automatically switch to it:
git checkout -b <name of new branch>The command should automatically cut that new branch from your main branch, so the code of the latter should not change.
While you’re on your new branch, go to your terminal and use the git branch command to verify the name of the branch you are on:
git branchYou are now on your new branch, use the git checkout command again to switch to your main branch:
git checkout MainNext, use the git pull command to import any changes that your team may have made and get your local main branch up to date:
git pullNow, use git checkout again to switch to the new branch you want to merge with the main branch:
git checkout <your specified branch>It's now time to use the git merge command. This will take the current version of your main branch and then merge it into your development branch:
git merge MainThe merge result will have the latest version of the code plus the feature you developed.